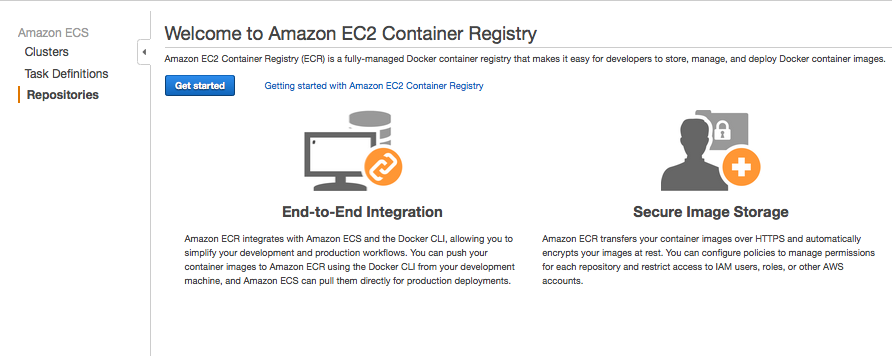
AWS Partner Network (APN) Blog
Using Solano CI with Amazon ECS and Amazon ECR Services to Automatically Build and Deploy Docker Containers
Joseph Fontes is a Partner Solutions Architect at AWS.
Solano Labs, an AWS DevOps Competency Partner and APN Technology Partner, provides a continuous integration and deployment (CI/CD) solution called Solano CI. This solution provides a build, deployment, and test suite focused on performance, with support for multiple programming languages and application frameworks, numerous build and test frameworks, and many database and backend frameworks, in addition to third-party tool integrations. Solano Labs provides a software as a service (SaaS) offering with their Solano Pro CI and Solano Enterprise CI products along with a private installation offering known as Solano Private CI. In this blog post, we’ll demonstrate a CI/CD deployment that uses the Solano CI SaaS offering for build and test capabilities. This implementation integrates with Amazon EC2 Container Service (Amazon ECS) and Amazon EC2 Container Registry (Amazon ECR), creating a build and deployment pipeline from source code to production deployment. Recently, Solano Labs announced the release of a new AWS feature integration, the ability to use the AWS AssumeRole API within a Solano CI build pipeline. This feature, used in this demonstration deployment, supports AWS security best practices by using AWS cross-account roles to replace AWS access keys and secret keys for authentication with AWS services from within Solano CI.
Overview
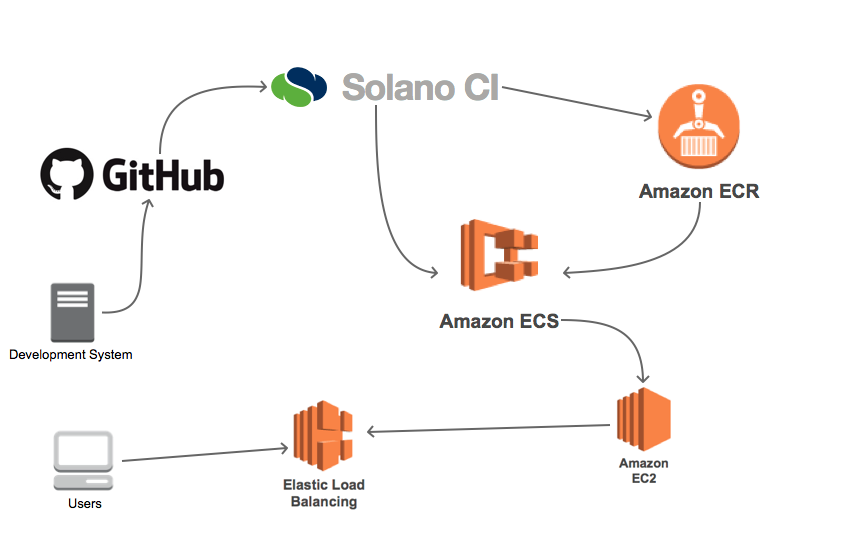
The examples in this blog post demonstrate how you can integrate Amazon ECR with the Solano CI platform in order to automate the deployment of Docker images to Amazon ECS. Once you’ve completed the integration, you’ll be able to automate the deployment of a new codebase to a production environment by simply committing your application changes to a GitHub repository. The following diagram illustrates the workflow.
To deploy this pipeline, we’ll explain how you can perform the following tasks.
- Create a new GitHub repository
- Install and configure Docker
- Create an AWS Identity and Access Management (IAM) role for Solano CI
- Create an Amazon ECR repository
- Set Amazon ECS registry repository policy
- Build a Docker image and push it to Amazon ECR
- Create an Elastic Load Balancing load balancer
- Create an Amazon ECS cluster
- Install Solano CI CLI and set environment variables
- Integrate Solano CI with your GitHub repository
Requirements
These examples will make use of the Solano CI Docker capabilities. For more information about these features, see the Solano CI documentation.
You’ll need a source code versioning system that will allow Solano CI to process your source code, as updates are committed. In our examples, we will be using GitHub. You can also choose any Git or Mercurial compatible service.
Configuring GitHub
We will be using GitHub as our managed source code versioning system. If you do not already have a GitHub account, you can find instructions for creating a new account on the GitHub website.
You’ll want to create a new repository to follow along with the examples. Once your GitHub repository is available, you can import the code for the examples we’re using from the repository:
https://github.com/awslabs/aws-demo-php-simple-app.git
Once you import the code, the contents of your new GitHub repository should mirror the contents of the example repository. You should now be able to clone your repository to your development environment:
git clone your-github-repo-location
In your local GitHub repository, there will be two files named solano.yml and solano-docker.yml. These files contain the build and deployment instructions for use by Solano CI. You’ll need to update the instructions for use with Docker. Within your repository root directory, run the commands:
rm –f solano.yml
cp solano-docker.yml solano.yml
git add solano.yml
Configuring Docker
To build the initial Docker image you’ll use to populate the Amazon ECS service, you’ll need to install the Docker utilities and service. Instructions for installing and starting the service can be found in the AWS documentation.
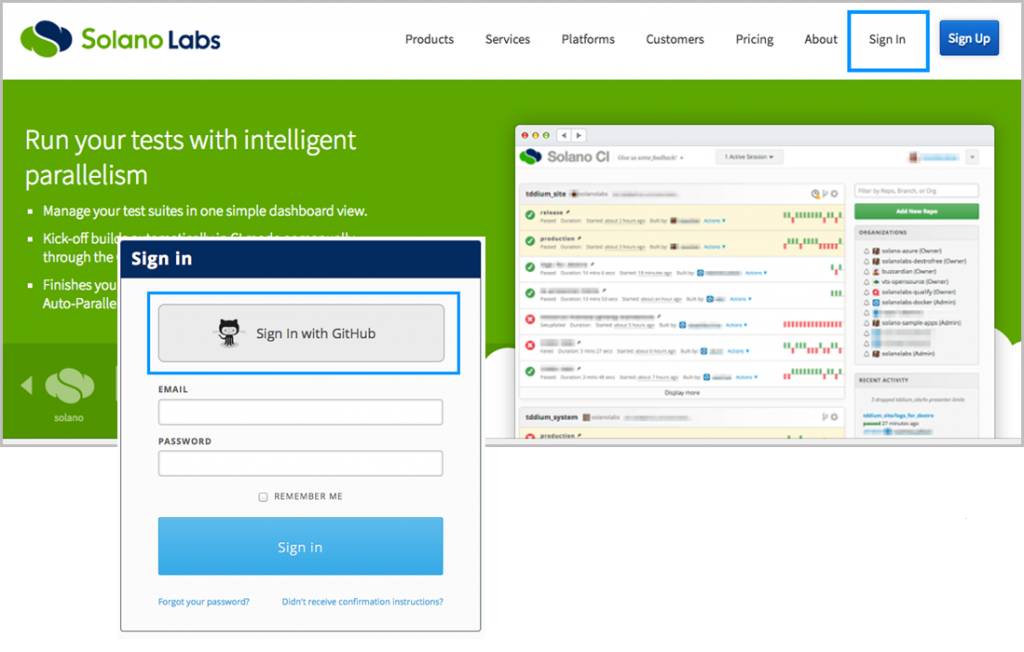
Solano CI Account Creation
To use Solano CI, you’ll either need to have an active account with Solano Labs or use your GitHub credentials to log in. The account creation and the Solano CI platform management console can be found on the Solano Labs website:
Creating the AWS IAM Role
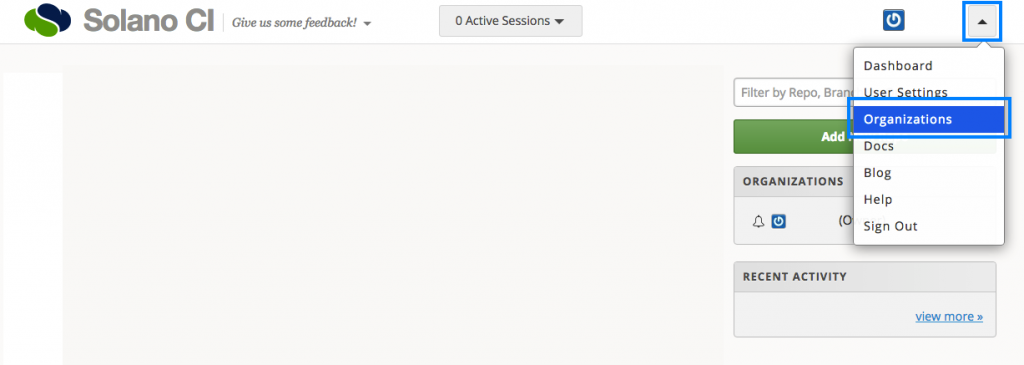
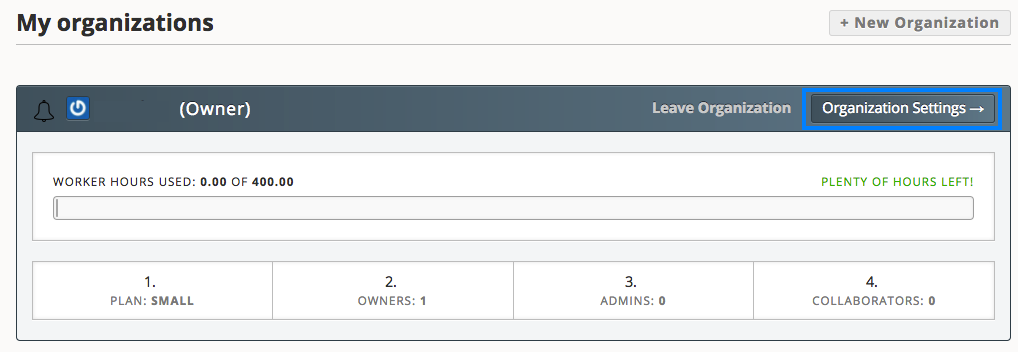
You’ll now need to configure the IAM role used by Solano CI to automate Amazon ECS integration. From your Solano CI console, navigate to the Organization Settings page, and then choose AWS AssumeRole.
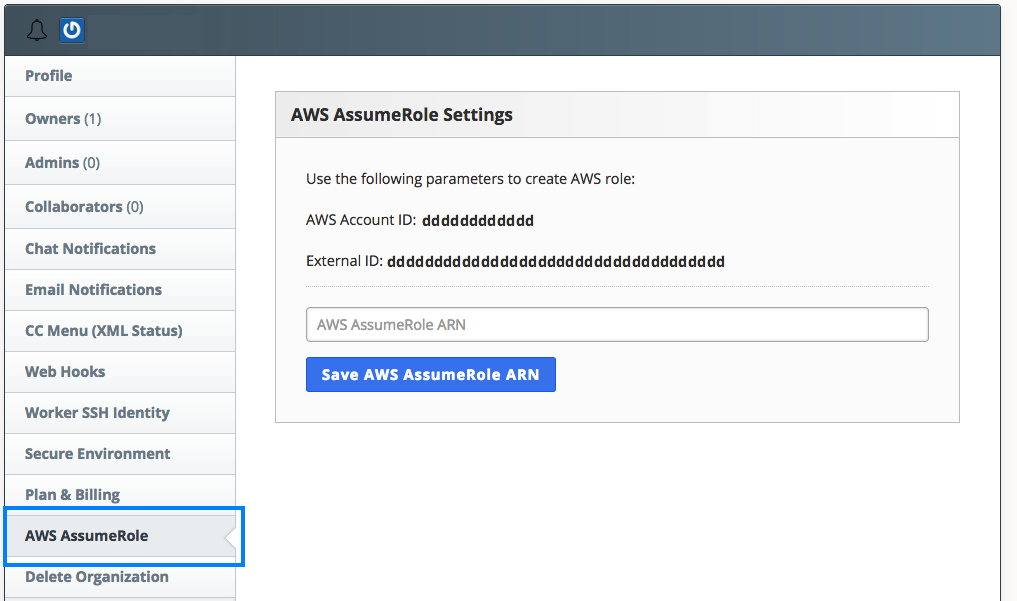
You’ll need to copy the AWS account ID and external ID from the AWS AssumeRole Settings screen—you’ll use these when you create the IAM role. Copy the contents of this Github Gist to the file solano-role-policy-doc.json on your local development environment, replacing AWSACCOUNTIDTMP with the AWS account ID provided from Solano and replacing SOLANOEXTERNALIDTMP with the external ID provided.
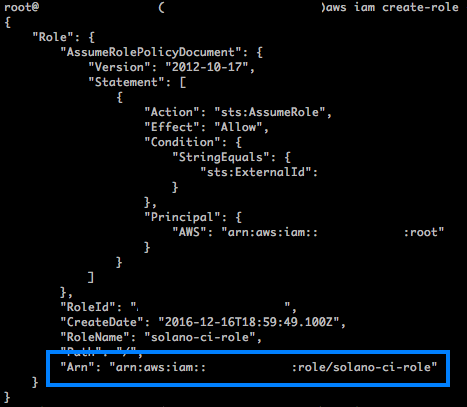
aws iam create-role --role-name solano-ci-role --assume-role-policy-document file://solano-role-policy-doc.json
aws iam attach-role-policy --role-name solano-ci-role --policy-arn arn:aws:iam::aws:policy/AmazonEC2ContainerServiceFullAccess
aws iam attach-role-policy --role-name solano-ci-role --policy-arn arn:aws:iam::aws:policy/AmazonEC2ContainerRegistryPowerUser
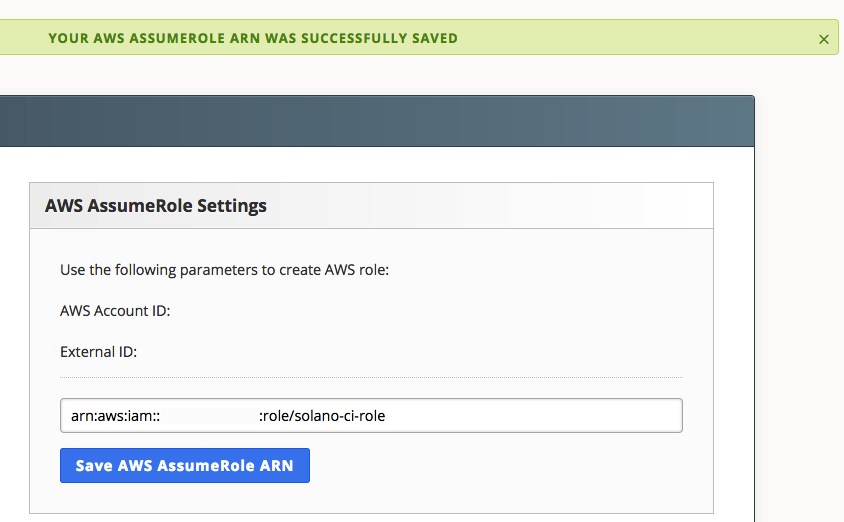
The output of the create-role command includes an IAM role ARN. Copy this value and paste it into the Solano CI AWS AssumeRole Settings box, and then choose Save AWS AssumeRole ARN.
Your Solano CI IAM role will now have the permissions necessary to update the Docker image in your Amazon ECR repository and to update your Amazon ECS cluster with the configuration of the new images.
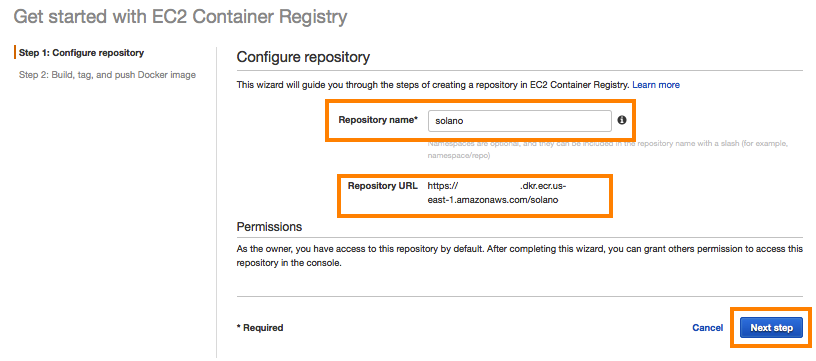
Creating the Amazon ECR Repository
You can use the AWS Management Console, AWS Command Line Interface (AWS CLI), or the AWS SDK to create the Amazon ECR repository. In our example, we’ll be using the command line. Here’s the command used to create a new Amazon ECR repository named solano:
aws ecr create-repository --repository-name solano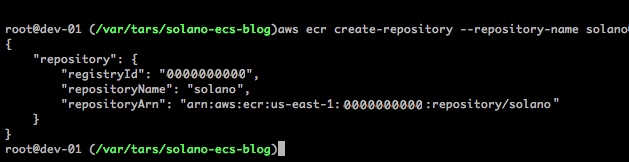
If you prefer to use the AWS Management Console, see the following screen illustrations.
Next, you’ll need a policy that allows an IAM cross-account role access to push and pull images from this repository. Copy the information in this Github Gist to a file named solano-ecs-push-policy.json.
Replace the <ACCOUNT NUMBER> value with your AWS account number and save the file. Now that you have the policy document defined, you need to apply this policy to the repository:
aws ecr set-repository-policy --repository-name solano --policy-text file://solano-ecs-push-policy.jsonThis produces the following output:

Initial Deployment
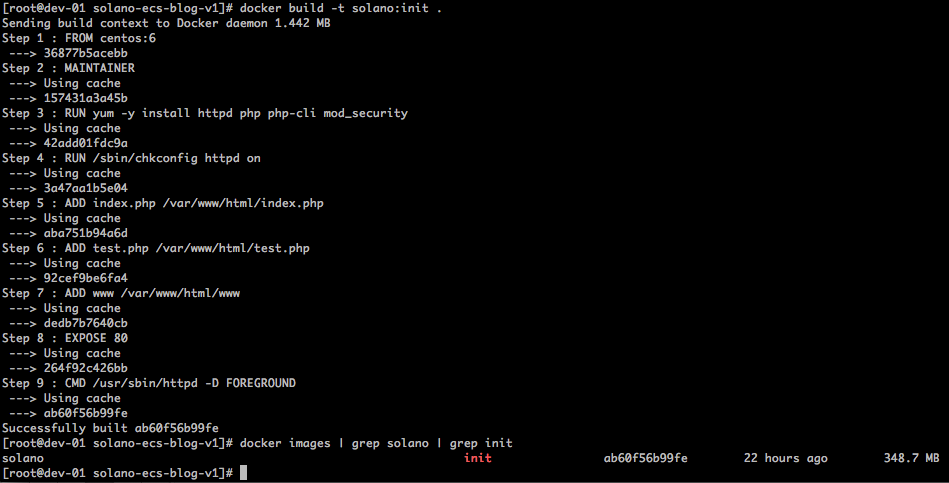
Ensure that your current working directory is your GitHub repository root. You should see a file named Dockerfile. This file is used to instruct the Docker command on how to build the Docker image that contains your entire web application. Using this configuration, you can now test the build of the Docker image.
docker build -t solano:init .
docker images
Using Amazon ECR
Now that you have a local copy of the image, you’ll want to upload this to your private Docker registry. First, retrieve the temporary credentials that will allow you to authenticate to Amazon ECR:
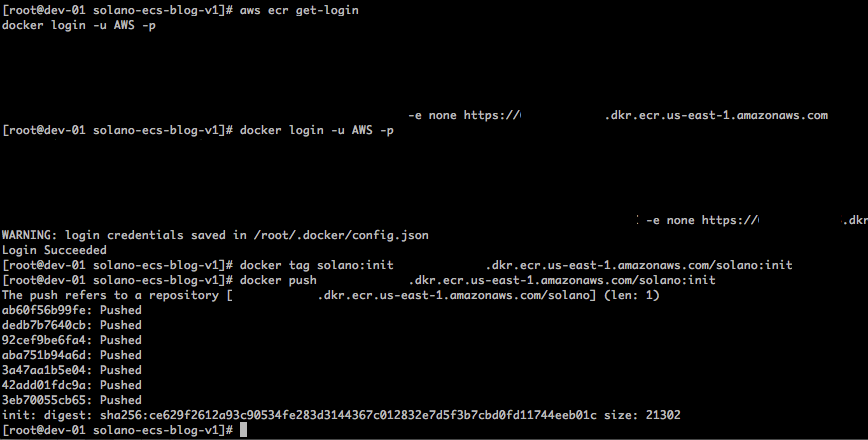
aws ecr get-login
This will return a string containing the full docker login command. Copy and paste this to your command line to initiate the login to your Amazon ECR repository. Alternatively, the Amazon ECR Credentials Helper repository provides an option for users wishing to eliminate the necessity of using the docker login and docker logout commands.
docker login -u AWS –p ……. -e none https://<ACCOUNT_ID>.dkr.ecr.<REGION>.amazonaws.com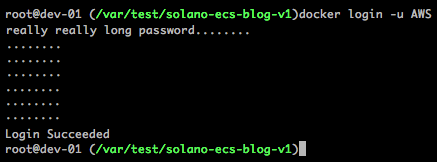
To get this initial image into your registry, you can now tag the instance and push it to the repository with the docker push command. Replace the string ACCOUNT_ID with the AWS account number of your account and REGION with your desired AWS Region in the following commands:
docker tag solano:init ACCOUNT_ID.dkr.ecr.REGION.amazonaws.com/solano:init
docker push ACCOUNT_ID.dkr.ecr.REGION.amazonaws.com/solano:init
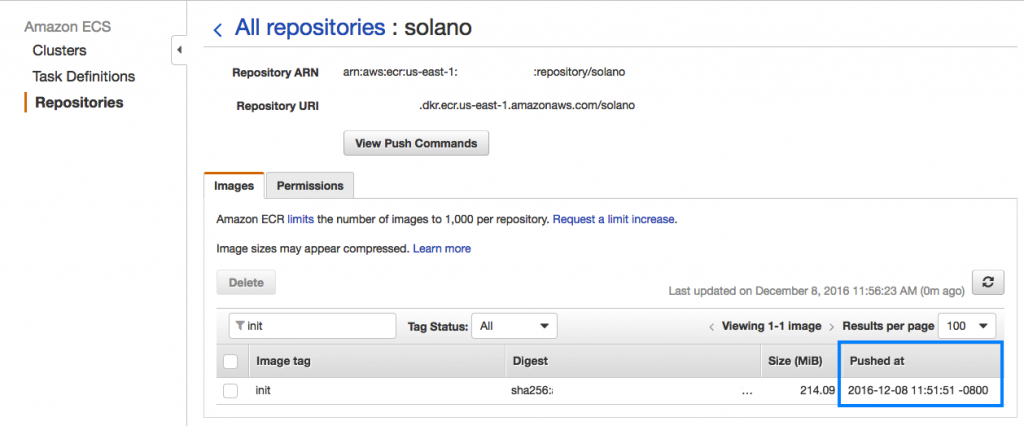
You can confirm the status of the Docker image via the Repositories section of the Amazon EC2 Container Service page in the AWS Management Console.
Configuring Amazon ECS
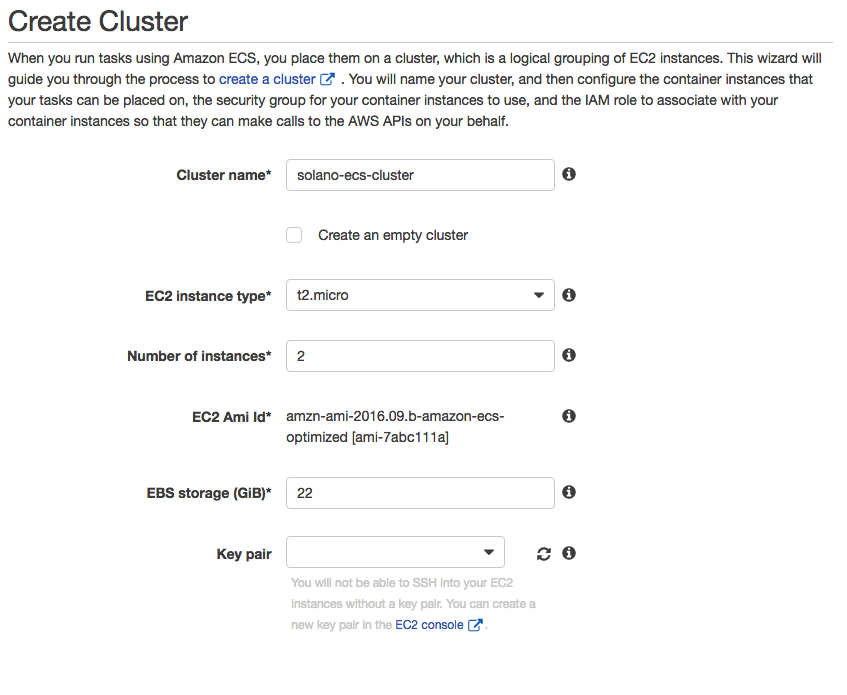
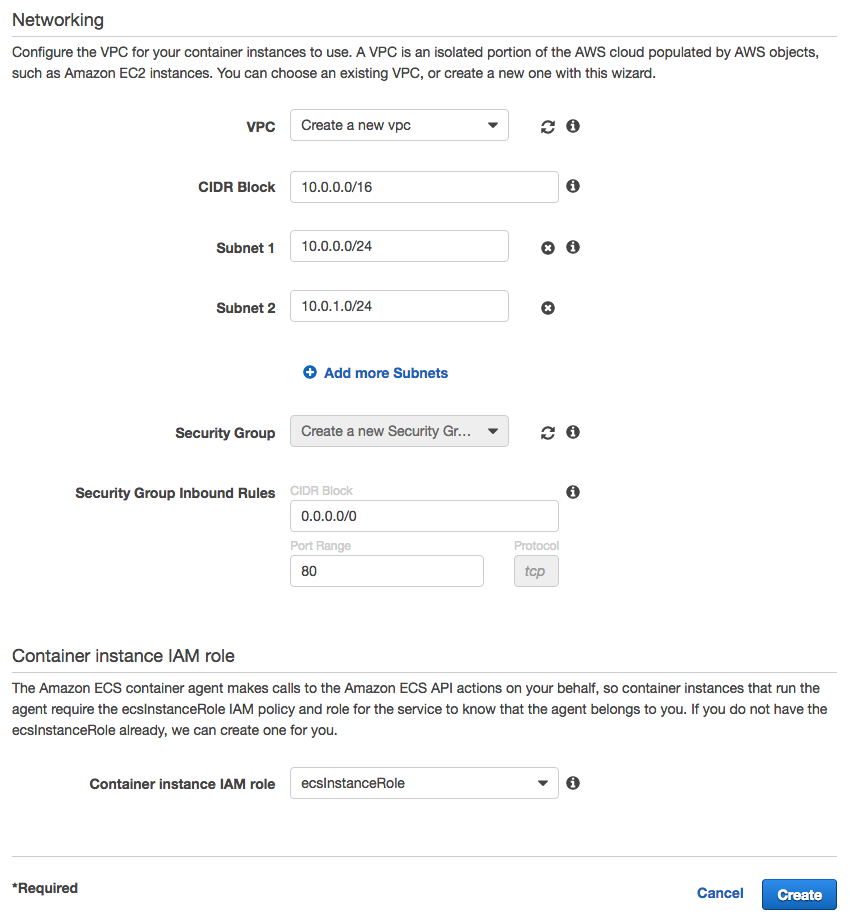
Now that your Amazon ECR repository is configured and populated with your initial Docker image, you can configure Amazon ECS. You can follow the instructions in the AWS documentation to deploy a new Amazon ECS cluster and add the necessary instances to get started. For the examples here, we used solano-ecs-cluster as the Amazon ECS cluster name. You can choose an instance type of t2.micro to minimize costs. To ensure high availability, we chose two instances for the cluster deployment. You’ll want to use the default value for the security group to allow access to TCP port 80 (HTTP) from anywhere. When asked for the virtual private cloud (VPC) to use, select the VPC ID associated with the VPC in which you will deploy the AWS ELB and Amazon EC2 instances. You can choose to use your default VPC. Ensure that your subnet choices are recorded so that they are the same when you create the AWS ELB.
Creating the AWS ELB
This web service will be deployed behind an ELB load balancer, so you need to create an ELB resource. You can use the following command, replacing each <AZ> reference with a space-separated list of each Availability Zone used for Amazon ECS:
Make sure to record the DNSName returned from the command. You will use this to connect to the service later.
Amazon ECS Tasks
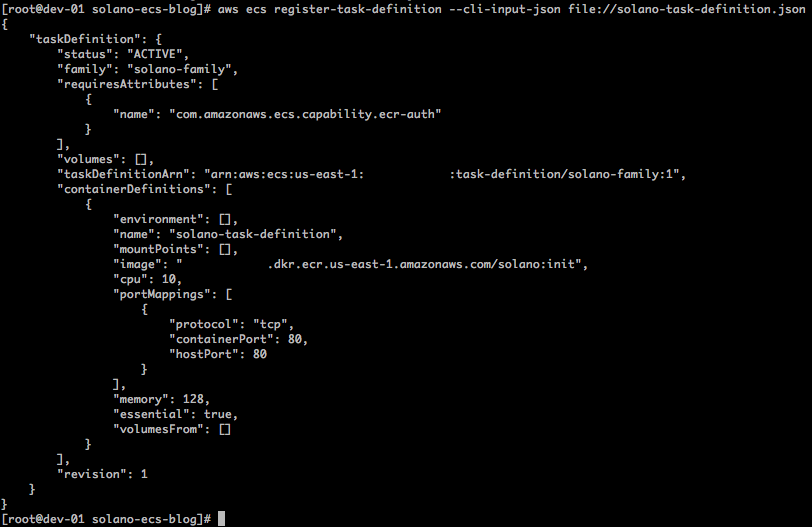
The next step is to create a task definition. Copy the text from this GitHub Gist and paste it into a text editor, substituting <ACCOUNT ID> for your AWS account ID and <REGION> with your AWS region of choice. Save the file with the name solano-task-definition.json. You can now create the task definition using the CLI:
You can now run the task on Amazon ECS. You must use the taskDefinitionArn produced from the previous command in the call below. This value will be the task-definition argument:
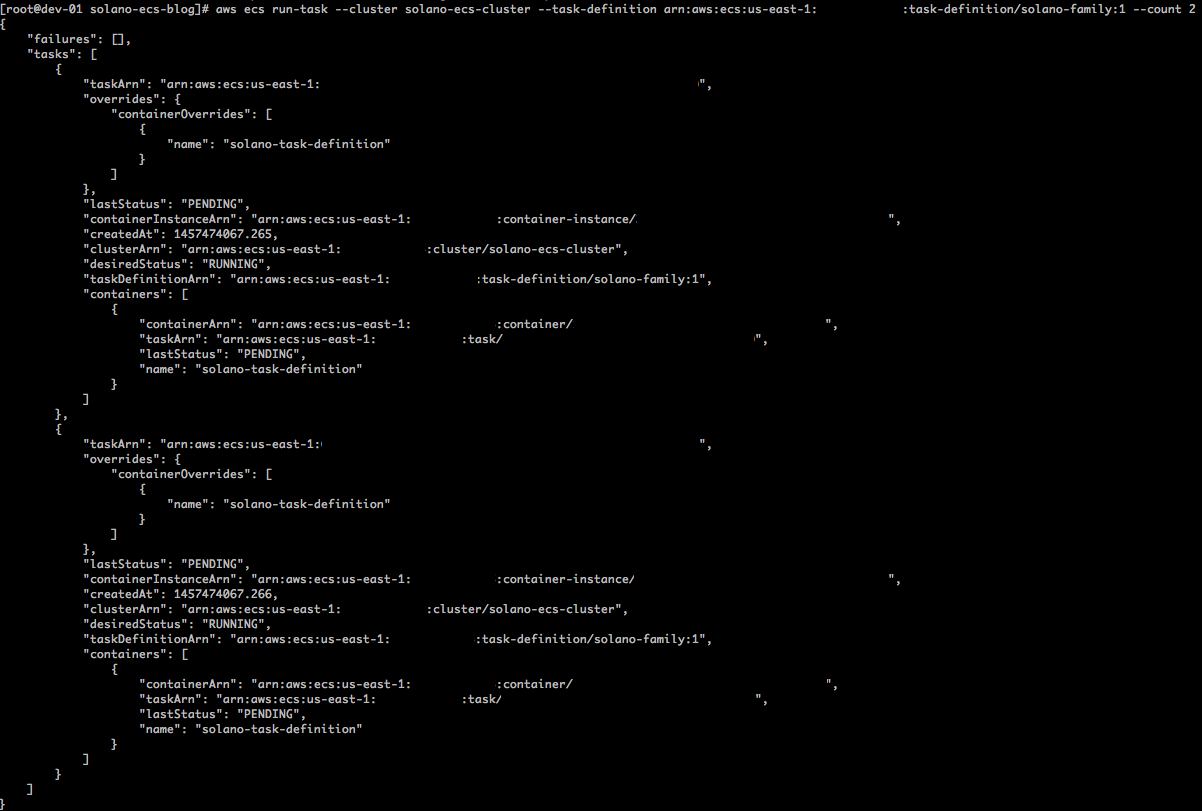
You can always check the status of current running tasks with the following command:
You just started the tasks manually, but the goal is to control the tasks via an Amazon ECS service. With that in mind, let’s shut down the tasks we started. Run the following command for each taskArn from the output of list-tasks:
Creating the Amazon ECS Service
Finally, to get your site running, you need to create the Amazon ECS Service. This process can be done via the Create Service page of the Amazon ECS Management Console. Using the console will provide the ability to configure an AWS ELB along with other ECS options. The example below creates the service using the CLI:
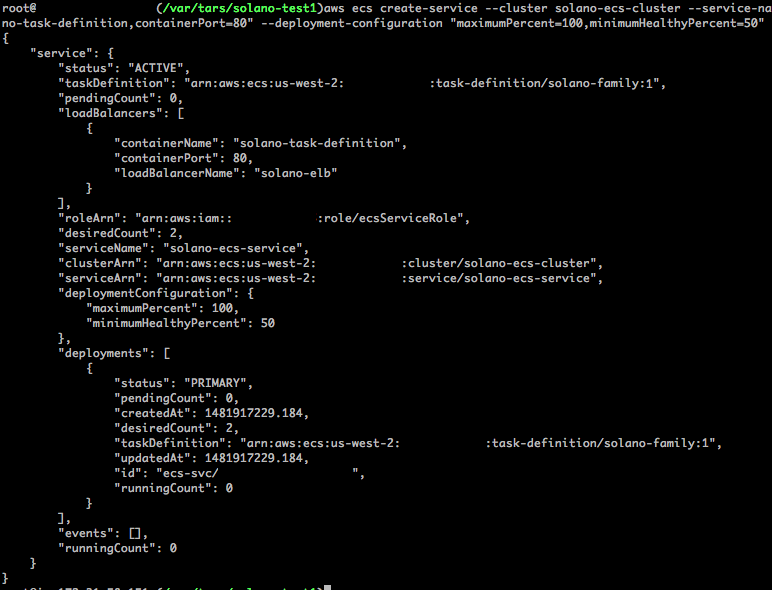
You can view details about the cluster from the command output.
Installing and Configuring the Solano CI CLI
To install the Solano CI CLI, on the same machine you’re using to build the Docker image, you’ll need to install the Solano CI client utility. For login instructions, see the Solano Labs website. For installation instructions, see the Solano CI documentation.
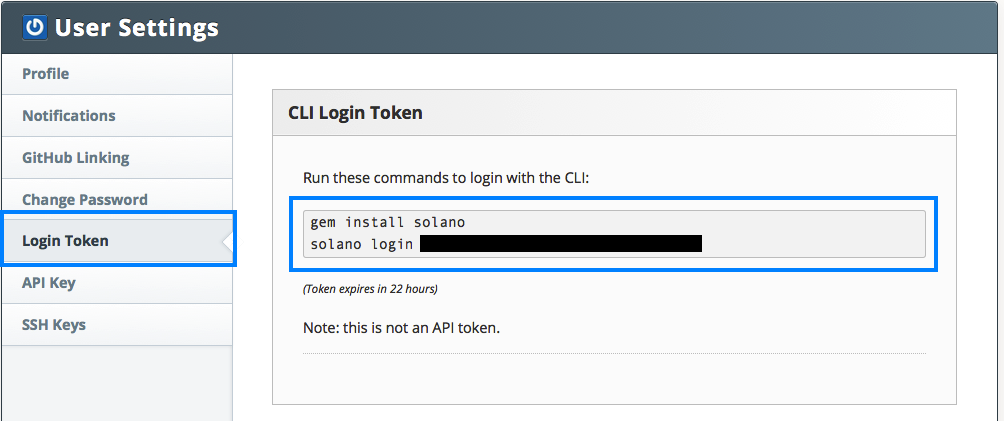
Once you have the command installed, you’ll need to set your AWS account number along with the AWS Region you’ll be using. To use the Solano Labs CLI, find your access token by following the instructions in the Solano CI documentation. From the Solano CI console dropdown menu, choose User Settings, and then choose Login Token. Run the commands shown.
Make sure that you’re in the root directory of your GitHub repository before you start working with the Solano CI CLI.
Use the following commands, and paste the solano login command into your development environment as the first line shows. On the second line, replace the XXXXXXXX with your AWS account ID (without dashes). The next command sets your region to US-EAST-1 (set accordingly). Finally, replace the SOLANO EXTERNAL ID and SOLANO IAM ROLE ARN values with the external ID value from the Solano console configuration and the value of the IAM role you entered into that same page.
solano login …
solano config:add org AWS_ACCOUNT_ID XXXXXXX
solano config:add org AWS_DEFAULT_REGION us-east-1
solano config:add org AWS_EXTERNAL_ID <SOLANO EXTERNAL ID>
solano config:add org AWS_ASSUME_ROLE <SOLANO IAM ROLE ARN>
solano config:add org AWS_ECR_REPO solano
These values are now available for your use within the Solano CI build and deployment process and will be referenced on the backend through various scripts.
You can view a list of the variables set with the command:
solano config orgFrom your GitHub repository root, you’ll want to make sure that all your changes are in place before the initial build:
git add *
git commit –m “initial CI-CD commit”
git push –u origin master
Creating the Solano CI Repository
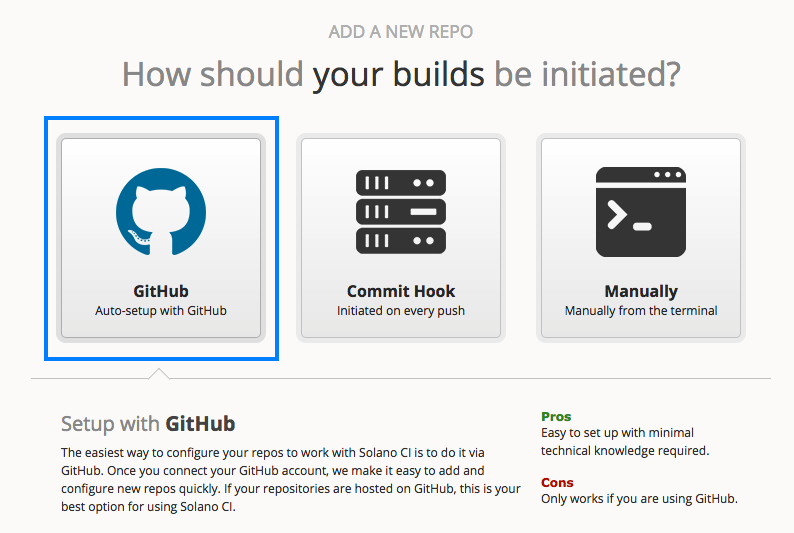
You can now create your Solano CI repository. In the Solano CI console, choose Add New Repo. Follow the on-screen instructions for creating the repository or review the Solano Labs GitHub integration documentation.
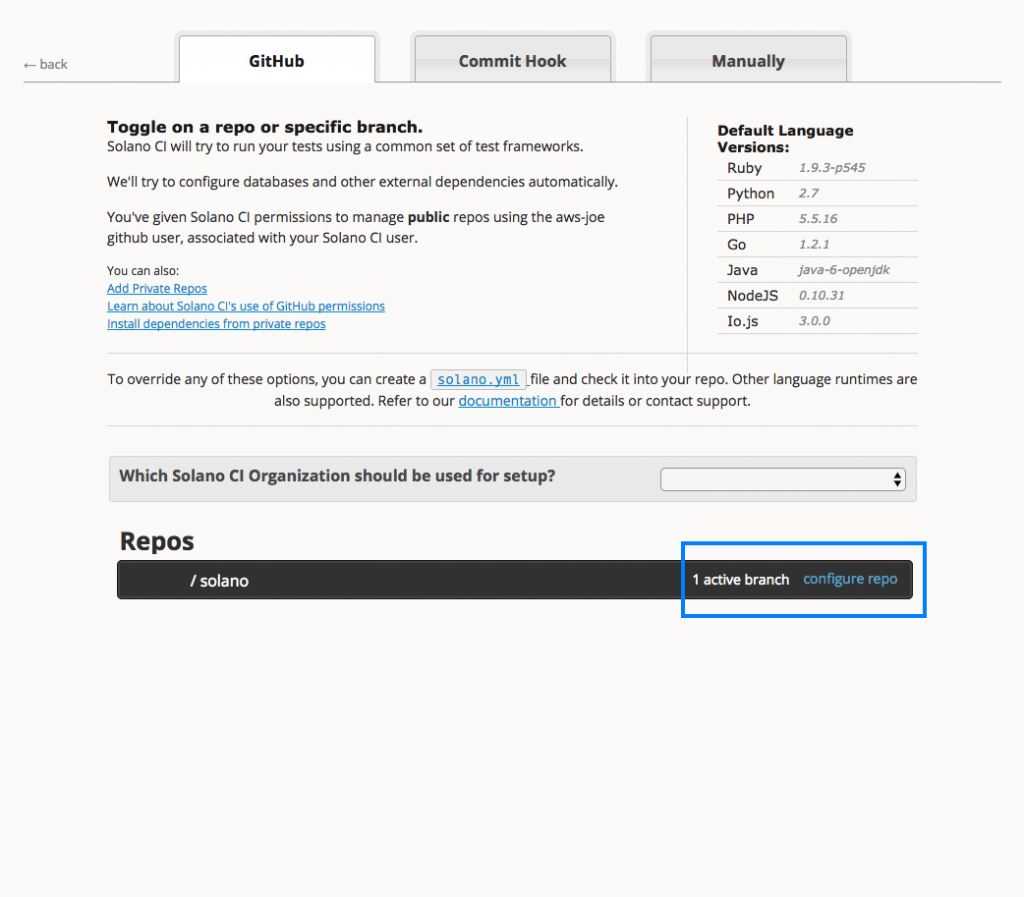
Once the repository has been created, you will be able to view the repository build status from the Solano CI dashboard.

Conclusion and Next Steps
You now have the default application deployed and available for viewing via the hostname of the ELB load balancer you saved earlier. You can view the site by entering the URL into your web browser. To test the continuous integration components, simply change the files in your GitHub repository and then push the changes to your Github repository. This will start the process of Solano rebuilding the Docker image and instructing Amazon ECS to deploy a new application version. This automates the entire process of building new Docker images and deploying the new codebase to services without any down time, by taking advantage of Amazon ECS automated deployments and scheduling.
In this blog post, we explained how to automate building and deploying Docker containers by using a single Docker image with a single application. This process can be expanded from simple deployments of a single application to complex designs requiring vast fleets of resources to build and serve. Automating these components allows for a faster development and deployment model focusing resources on product testing and application improvements. Moving forward, readers can expand upon these examples and apply this process to applications currently using Amazon ECS or applications being migrated to containers.
This blog is intended for educational purposes and is not an endorsement of the third-party product. Please contact the vendor for details regarding performance and functionality.
How to Integrate REST APIs with Single-Page Apps and Secure Them Using Auth0: Part 2
In my previous post on securing REST APIs with Auth0, you learnt the basics of token-based authentication using JWT tokens, configured the Auth0 portal by registering a client, a resource (API) server and created a Auth0 rule to add scopes to the JWT token.
In this post, you will create 2 RESTful APIs using Amazon API Gateway and secure them using a custom authorizer configured with API Gateway and integrate these APIs with a SPA (please note that AWS service charges may apply while using AWS services to walk through this post). The two REST APIs you will create are the Movies and the Devices APIs. Access to the Movies API is only allowed to users authenticated using Amazon credentials, while access to the Devices API is only allowed to users authenticated using Google credentials. You will use a CloudFormation template to automate the creation of REST APIs, Lambda functions and S3 buckets required to run this solution. I will walk you through the AWS resources created by the CloudFormation template and also explain how JWT Verification can be implemented in a custom authorizer lambda function.
Solution implementation and deployment
- Download the solution source code from our GitHub repository.
- Clone the library into a local folder:
git clone https://github.com/awslabs/apn-blog.git
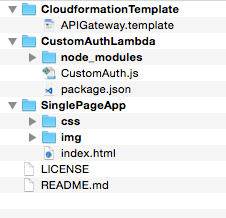
The contents of the apn-blog/APIAuthorization folder should look like this:
- Log in to your AWS account and create an Amazon S3 bucket. This bucket will be used to store the packaged zip file for the Custom Authorizer Lambda function. For instructions, see the Amazon S3 documentation.
- Navigate to the ‘CustomAuthLambda’ folder from step 2 and edit the ‘js’ file. Modify the values assigned to the following variables/parameters (search for //TODO in the source file):
- signingSecret – Replace the value assigned to a value configured in Auth0 API settings portal.
- audience – Replace the audience value to the ‘Identifier’ attribute value configured in Auth0 API settings portal.
- Zip the contents of the ‘CustomAuthLambda’ folder and upload it to the S3 bucket you created in step 3.
- Download this CloudFormation template and run it in your AWS account in the desired region. For detailed steps about how to create a CloudFormation stack based on a template, see this walkthrough.
- You must provide four parameters:
- CustomAuthLambdaS3Bucket – Set this to the name of the S3 bucket you created in step 3.
- CustomAuthLambdaS3KeyName – Set this to the name of the AWS Lambda packaged zip file you created in step 5.
- StageName – Specify the name of the stage you want the REST API to be deployed in the API Gateway (e.g., beta, prod).
- WebsiteS3BucketName – Specify the name of the S3 bucket that will host the SPA as a static website. This bucket will be created by CloudFormation. (See the rules for naming S3 buckets in the Amazon S3 documentation.)
The following schematic shows the association of REST APIs to the Lambda functions after the cloudformation stack is created.
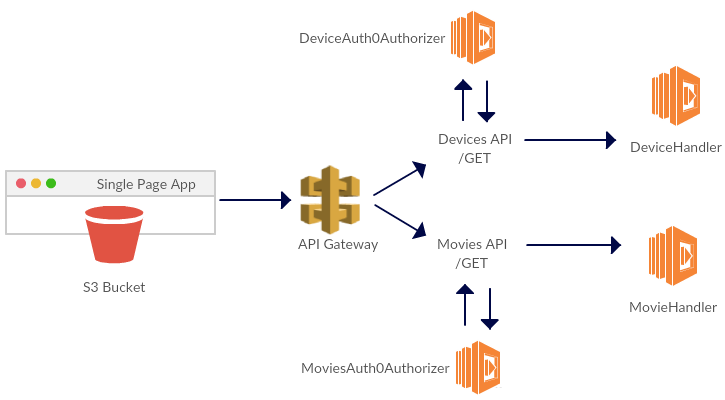
Each REST APIs GET method is backed by a Lambda function. A distinct custom authorizer backed by a shared Lambda function is created for each of the GET method. If need be, different lambda functions can be built and associated with each custom authorizer.
You will find a list of all AWS resources created by this CloudFormation template at our GitHub location.
- Copy the value of the output key ‘S3BucketSecureURL’ from the Outputs tab of the AWS CloudFormation stack, and update this URL in the Auth0 portal under client settings for the Allowed Callback URLs
- In order to integrate the SPA with these REST APIs, you’ll need to make some modifications to the html file in the SPA source code (it’s in the folder ‘SinglePageApp’ from step 2). Open index.html in a text editor or IDE and make the following changes.
- Replace the values of query parameter values sent to Auth0’s Authorize API:
- Set the Authorize API URL domain name to the domain name of your client registered in the Auth0 portal under client settings.
- Set the audience value to the ‘Identifier’ attribute value configured under API settings in the Auth0 portal.
- Set client_id to the client ID of your application registered in the Auth0 portal.
- Set the redirect_uri value to the CloudFormation stack’s output value for the key named ‘S3BucketSecureURL’.
You will make these changes in the following code fragment:
- Replace the values of parameter values being sent to UserProfile API:
- Set the domain to the domain name of your client registered in the Auth0 portal under client settings.
- Set the clientID to the ‘client ID’ of your client registered in the Auth0 portal under client settings.
- Set the callbackURL value to the CloudFormation stack’s output value for the key named ‘S3BucketSecureURL’
You will make these changes in the following code fragment:
- Finally, replace the REST API endpoint URLs depending on the Stage endpoint URLs in API Gateway:
- Save the html file.
- Copy the contents of the ‘SinglePageApp’ folder (from step 2) to the S3 bucket created by CloudFormation, represented by the cloudformation template parameter WebsiteS3BucketName.
- Copy the S3BucketSecureURL output value from the CloudFormation stack and browse to this URL. You will be presented with a login link.
- Choose the login link. Auth0 will redirect you to a custom login screen that lists the two identity providers, Amazon and Google.
- Log in using Amazon credentials and choose Invoke Movie API. This should display the message “Movie Info retrieved from Movie API.” Choose Invoke Device API to display an “UnAuthorized” message.
- Log in using Google credentials and choose Invoke Device API. This should display the message “Device Info retrieved from Device API.” Choose Invoke Movie API to display an “UnAuthorized” message.
JWT Verification using custom authorizer Lambda function
Custom authorizers can be configured by using the API Gateway console or APIs. For this post, you configured the Auth0CustomAuthorizer Lambda function to be the custom authorizer for both the Movies and the Devices API. API Gateway provides flexibility to configure multiple custom authorizers for each API and each method in the API can use a different authorizer. To configure a custom authorizer, you must specify a unique name and select a Lambda function to act as the authorizer. You also need to indicate which field of the incoming request contains the JWT token. API Gateway will pass the value of the field to your Lambda authorizer. This field can be selected using the method.request.header.Authorization mapping expression.
I’ll walk you through the implementation of a custom authorizer Lambda function named Auth0CustomAuthorizer. The Lambda function needs to performs 3 tasks:
- Token extraction – Extract the JSON Web Token (JWT) access_token from the Authorization HTTP request header (using the event parameter of the lambda handler function).
- JWT Verification – Verify if the access_token is valid (it hasn’t been modified in transit, hasn’t expired, etc).
- Building IAM Policy – If the JWT access_token is found to be valid, the function then evaluates if the token contains the required scope based on the resource being accessed. Based on this evaluation, the Lambda function generates an AWS Identity and Access Management (IAM) Allow or Deny policy and returns the policy back to the API Gateway.
As per the API configuration settings in Auth0, the JWT tokens generated by Auth0 will be signed by using the HS256 algorithm with a secret key. The Secret key should be securely stored needs to be known only to the Custom Authorizer and Auth0. The custom authorizer can then verify (see ‘jwt.verify’ function call in the code below) that the signature obtained from its own hashing operation matches the signature on the JWT itself (i.e. it matches the JWT signature created by the authentication server) and that the JWT token hasn’t expired. If the signatures match, it means the JWT is valid. If the signatures don’t match, it means that the received JWT is invalid, which may be an indicator of a potential attack on the REST API. The Lambda function then generates a IAM policy which either allows or denies access to the REST API depending on the validity of the JWT token.
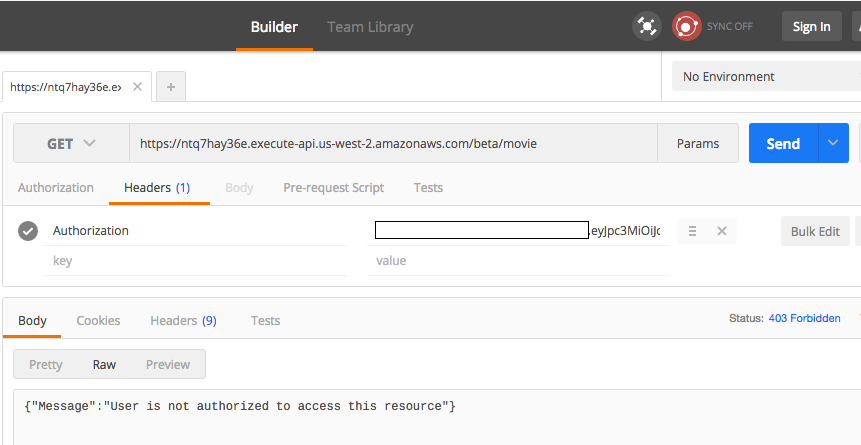
Use Postman to Test APIs
The Postman Chrome extension is a convenient tool to test an API in API Gateway. See the Amazon API Gateway documentation for details on using the Postman Chrome App to test API calls. Copy the API stage URL from the API Gateway console and add the Authorization HTTP header to the GET request. When an invalid JWT token is passed, the API Gateway returns a 403/Forbidden response due to the custom authorizer.
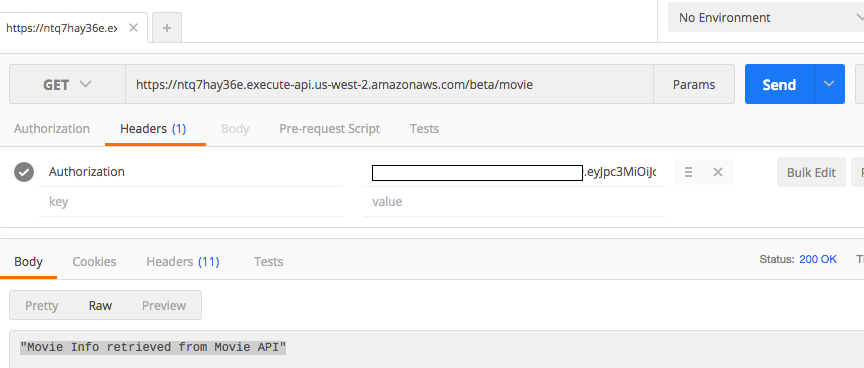
When a valid JWT token is passed, the API Gateway returns a 200/OK response.
In this two-part post, I’ve demonstrated how you can use an Amazon API Gateway custom authorizer to secure REST APIs by integrating with APN Technology Partner and identity platform provider, Auth0. I first configured a client, registered a resource server (API), created rules within the Auth0 portal and then created REST APIs by using API Gateway, created a custom authorizer using AWS Lambda, registered the custom authorizer with API Gateway, and implemented JWT verification.
What’s next?
There are many ways you can customize or extend this solution; for example, you can:
- Accelerate delivery of this SPA via Amazon CloudFront.
- Set up your own custom DNS domain name. Use services like AWS Route 53 and AWS Certificate Manager to set up your own Amazon CloudFront custom domain name and SSL certificate.
- Handle JWT token expiration and generate refresh tokens.
- Improve error handling in API Gateway and AWS Lambda – Refer to this blog for more details.
- Improve error handling in SPA.
The code for this post is available on GitHub at https://github.com/awslabs/apn-blog/tree/master/APIAuthorization.
If you have comments about this post, please submit them in the “Comments” section below. If you have questions about this solution or its implementation, please start a new thread on the API Gateway forum.
How to Integrate REST APIs with Single-Page Apps and Secure Them Using Auth0: Part 1
Aravind Kodandaramaiah is an AWS Partner Solutions Architect (SA) who works closely with Global Systems Integrators (GSIs).
It’s fairly common for customers to host backend REST APIs for their mobile, web, and enterprise applications on Amazon Web Services (AWS). In order to host such REST APIs, you need to think about infrastructure, authorization, monitoring, traffic management, and similar considerations. Amazon API Gateway is a pay as-you-go service that allows you to quickly and easily build and run such REST APIs in a robust and scalable way. Instead of focusing on infrastructure, you focus on your services.
As you run these REST APIs, it is important to secure them by implementing authorization strategies such as JSON Web Token (JWT) verification or OAuth provider callout. In this two-part blog post, I’ll show you how to integrate such REST APIs and secure them by using Auth0. I’ll use a single-page application (SPA) hosted on Amazon Simple Storage Service (Amazon S3) for reference.
Auth0, an APN Technology Partner and AWS Mobile Competency Partner, is an authentication broker that allows you to authenticate and authorize applications and APIs with any identity provider running on any stack, on any device. Auth0 implements proven, common, and popular identity protocols used in consumer-oriented web products (e.g., OAuth, OpenID Connect) and in enterprise deployments (e.g., SAML, WS-Federation, LDAP).
Identity Protocols and Access Tokens
OAuth 2.0 is an authentication protocol that allows users to approve applications to act on their behalf without sharing their password. In order to enable federated access, OAuth 2.0 defines the concept of an access_token. Access tokens are credentials used to access protected resources. An access_token is a string representing an authorization issued to the client. Access tokens can have different formats and structures. JSON Web Token (JWT) is one such access token format.
JSON Web Token (JWT) is an open standard (RFC 7519) that defines a compact and self-contained method for securely transmitting information between parties encoded as a JSON object. For example, with JWT, an application could generate a token that has the claim “logged in using Amazon” and provide that to a client. The client could then use that token to prove that the user did log in using Amazon credentials.
Why use JSON Web Tokens?
JSON web Tokens provide a number of benefits compared to traditional cookie based methods.
- Scalability – Unlike server-based authentication, token-based authentication doesn’t require you to store session state on the server side. This increases the scalability of applications.
- Reusability – Multiple services or applications could leverage the same token for authorizing.
- Security – Protection against CSRF, token expiry, and revocation capabilities.
Anatomy of a JSON Web Token
A JSON Web Token consists of three parts: Header, Claims and Signature. The header and payload are Base64 encoded, then concatenated by a period, finally the result is algorithmically signed producing a token in the form of header.claims.signature. The header consists of metadata including the type of token and the hashing algorithm used to sign the token. The payload contains the claims data that the token is encoding. The final result looks like:
eyJ0eXAiOiJKV1QiLCJhbGciOiJIUzI1NiJ9.eyJtZXNzYWdlIjoiSldUIFJ1bGVzISIsImlhdCI6MTQ1OTQ0ODExOSwiZXhwIjoxNDU5NDU0NTE5fQ.-yIVBD5b73C75osbmwwshQNRC7frWUYrqaTjTpza2y4
Claims
Tokens issued by Auth0 contain claims, which are statements about a subject (user). For example, the claim can be about a name, identity, key, group, or privilege.
Scopes
Auth0 uses scope values to specify what access privileges are being requested for Access Tokens. Auth0 provides the concept of Rules which allow you to customize the JWT token by adding custom scopes.
Solution Overview
The solution I will illustrate, involves an SPA that lets users log in using Amazon or Google credentials, and access REST APIs over Amazon API Gateway. The solution involves building of two REST APIs that provide access to information about devices and movies. Users who log in with Amazon credentials are allowed to access only the Movies REST API, while users who use Google credentials are allowed to access only the Devices REST API. The SPA will be hosted in Amazon S3. The REST APIs need to authorize these users based on the JWT bearer access token provided by Auth0. In this post, I will show how you can use custom authorizers in Amazon API Gateway to validate bearer access tokens and to implement custom authorization logic. This post uses the concept of implicit grant to secure the REST APIs.
Before proceeding with the solution architecture, let’s understand how implicit grant works. Here’s a representation of the flow.
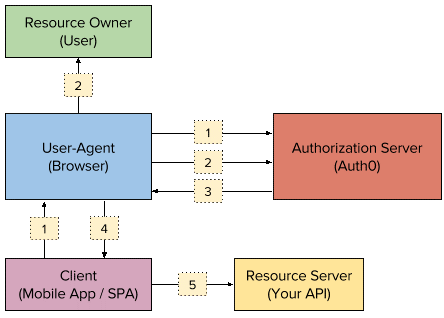
- The client initiates the flow via the user agent and redirects the user to the authorization server (Auth0). Auth0 exposes an authorization API for this purpose. See AuthO documentation for details about redirecting a user using this API.
- Auth0 re-directs the user to a Login screen. The user authenticates (in this example, using either Amazon or Google credentials) with the identity provider.
- The authorization server redirects the user to the client with an
id_tokenandaccess_tokenin the hash fragment. - The client extracts the tokens from the hash fragment. Refer to the ‘getParameterByName’ function defined in html for details on how tokens are extracted from the hash fragment.
- The client uses the access tokens to call the resource server on behalf of the user.
The following architecture diagram shows the implementation of implicit grant flow.
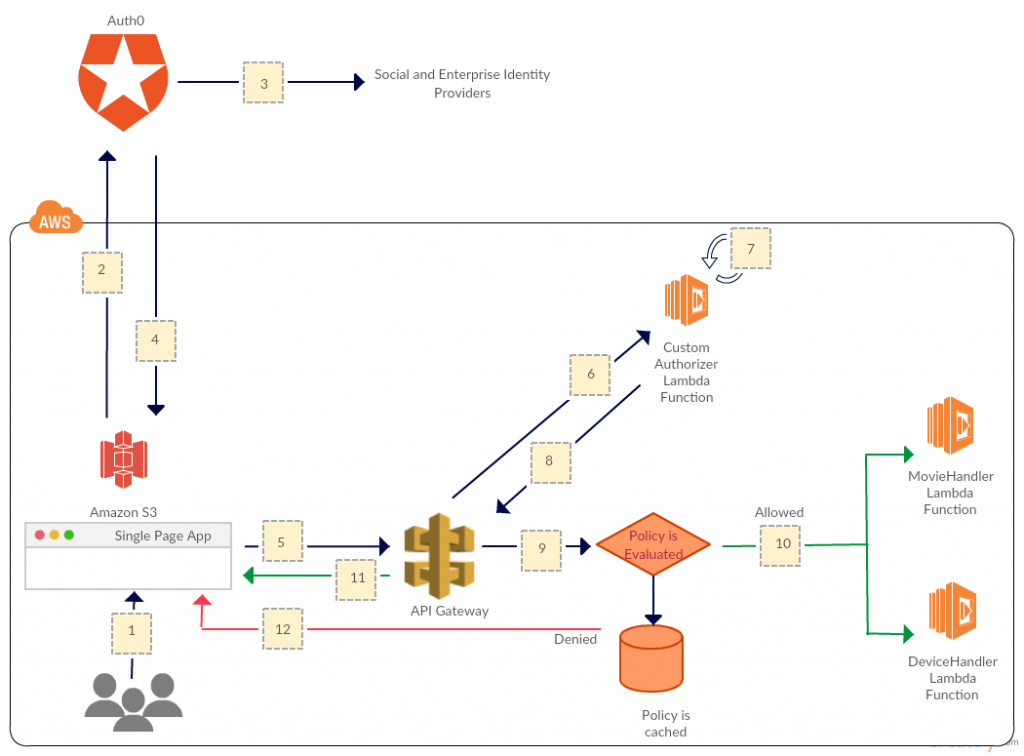
How does this solution work?
- An SPA is deployed as a static website in Amazon S3. See the Amazon S3 documentation for details on hosting static websites on Amazon S3. Users click the login link.
- The SPA redirects to Auth0’s authorization API, which presents users with a customized login screen that provides options for Amazon or Google credentials.
- After users log in, Auth0 brokers these requests to the appropriate identity providers (Amazon or Google) using the OAuth2 protocol.
- Upon successful authentication, Auth0 builds and returns an
id_tokenand anaccess_tokenback to the SPA. Before building anaccess_token, Auth0 executes any rules configured as part of the authentication pipeline and adds scopes to theaccess_token. Theid_tokenis used to retrieve user profile information to customize the SPA (like displaying the user name or profile picture etc), while theaccess_tokenis used to authorize API calls. The process of validating theid_tokenand customization of SPA is beyond the scope of this post. - The SPA calls the REST APIs exposed over Amazon API Gateway by including the
access_tokenwithin the Authorization HTTP header. - The API Gateway verifies whether a custom authorizer is registered, and, if so, calls the AWS Lambda function with the
access_token. - The custom authorizer Lambda function verifies if the
access_tokenpassed is valid and executes custom authorization rules, if any. The actual process of verification will be discussed later in the post. - If the
access_tokenis valid and the request is to be authorized, the custom authorizer Lambda function generates an AWS Identity and Access Management (IAM)Allowpolicy and caches it (configurable). If the authorization token is invalid or has expired, an IAMDenypolicy is generated and cached (configurable) to deny access to the API. The IAM policy is returned back to Amazon API Gateway. - The API Gateway evaluates the policy.
- The API Gateway allows access to the API if an IAM Allow policy was returned by the custom authorizer Lambda function.
- AP Gateway returns status 200/OK to the SPA along with the response payload.
- The API Gateway denies access to the API if an IAM Deny policy was returned by the custom authorizer Lambda function and returns 403 Forbidden responses to the SPA.
Solution steps
Configuring Auth0
Before getting into the details of creating and configuring APIs, I’d like to walk you through registering an application, APIs, and rules within Auth0, which you must do first. Here are the steps involved.
- Registering the client
- Sign up with a user name on the Auth0 website. Auth0 provides a free plan which should be sufficient to implement the solution outlined in this blog post.
- In the Auth0 dashboard, choose +New Client
- Enter the application name as AWSDemo and choose Single Page Web Applications.
- Configuring the client settings
- Navigate to the application Settings screen and configure the following attributes:
- Domain represents the domain name and should be in the format domain.auth0.com.
- Client ID is an auto-generated ID associated with this application. A client application typically specifies the domain name and the client ID when calling an Auth0 API endpoint. This enables Auth0 to know which account and application configuration settings should apply to the call.
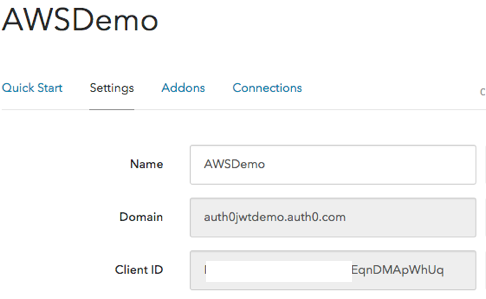
- Allowed Callback URLs should be set to the SPA’s Amazon S3 static website endpoint URL. This is an important security feature, as it allows Auth0 to allow a callback only to the specified URLs after a user authenticates. If the URL is not known at the time of registration, you can update it later.

Note: The URL you specify might differ from the illustration. Configure it appropriately.
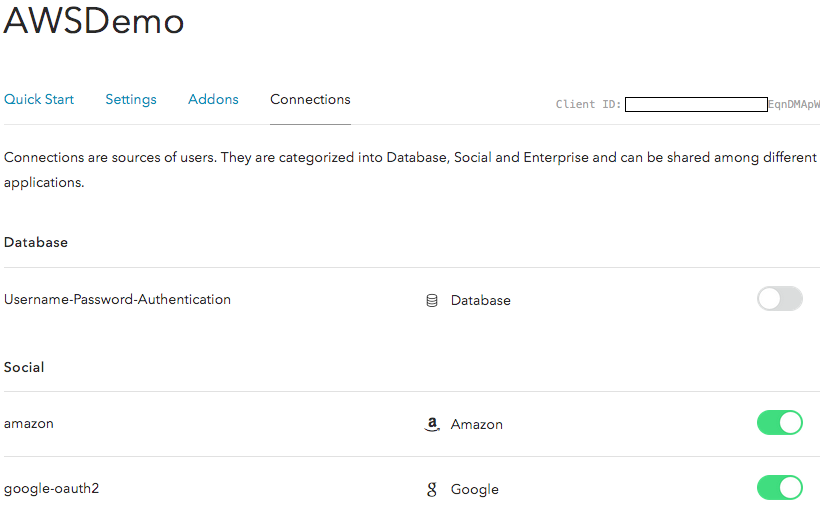
- Navigate to the Connections screen in Auth0 and configure the identity providers supported for user logins. For this post, you will enable Amazon and Google.
- Configuring Auth0 Account settings
- Navigate to Account settings. On the Advanced tab, select Enable APIs Section and OAuth2 as a Service. These features enable us to build the implicit grant flow to secure APIs by generating
access_tokensfor the API (resource server) configured within Auth0.
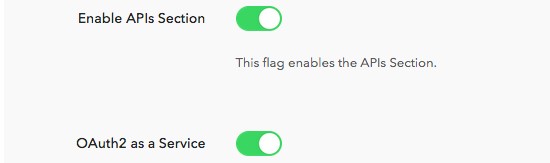
When you choose the Enable APIs Section option, you’ll see a new APIs option in the navigation pane.
- Navigate to Account settings. On the Advanced tab, select Enable APIs Section and OAuth2 as a Service. These features enable us to build the implicit grant flow to secure APIs by generating
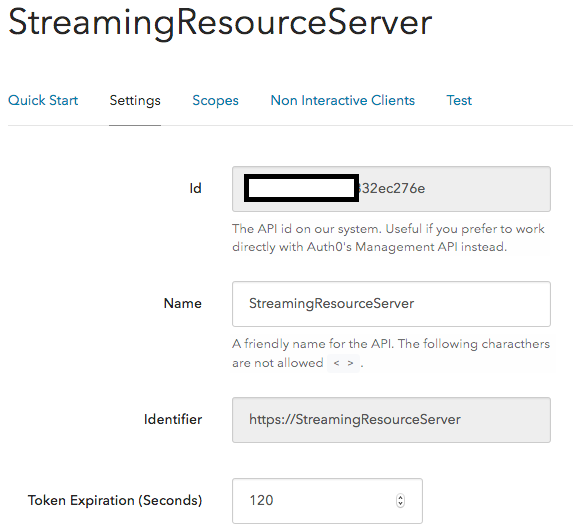
- Configuring APIs – This section is used to configure the APIs that will be consumed from authorized clients. For this post, define a single API setting which would be applicable to both the Movies and Devices APIs.
- Navigate to the APIs section and choose +Create API.
- Provide the API name as StreamingResourceServer and specify a unique identifier (Can be alphanumeric string or a URL). For this post, choose the identifier to be a URL https://StreamingResourceServer. This URL need not be public facing nor be present and Auth0 does not invoke this URL in anyway.
- Choose the signing algorithm HS256 (RS256 is also supported, but for this post I choose HS256).
About Signing Algorithm & Signing Secret
-
JWT tokens consists of three parts separated by periods (.):
- Header
- Payload
- Signature
In order to validate JWT tokens against modifications, JWT tokens have an embedded signature. This signature is created by using one of the signing algorithms along with the signing secret. For example, if you’re using the HMAC SHA256 algorithm, the signature will be created in the following way:
HMACSHA256(base64UrlEncode(header) + “.” + base64UrlEncode(payload), secret)
It is important to safeguard the signing secret and not expose it. Only the REST APIs (or API Gateway custom authorizer) and Auth0 need to know about the signing secret.
- Set the token expiration. This specifies the amount of time before the Auth0 access_token
- Save these settings. The API settings should resemble the following illustration.
- Configuring Rules
Now you’ll create a rule in Auth0. Rules within Auth0 are functions written in javascript that are executed everytime a user authenticated into your application. They let you customize the JWT tokens by adding additional claims such as scopes for authorization, adding profile enrichment data (for example, user information queried from a database/api), enabling multi-factor authentication, etc.
Scopes are used for authorization purposes. For this blog post, you will create a rule that checks whether the user logged in using Amazon credentials. If yes, the rule will add a scope called read:Movies. If a user logged in using Google credentials, a scope called read:Devices is added. This rule gets executed after a user logs into the SPA using either Amazon or Google identity providers and before the access_token gets returned to the SPA from Auth0. Auth0 executes the rule by adding scopes to the access_token and returns it back to the SPA.To create the rule:
- Choose Rules in the Auth0 navigation pane, and then choose +Create Rule.
- Provide a name for the rule.
- Use JavaScript to implement the rule. You will implement the rule as shown below. The code checks to see if the JWT token being requested is for a specific API and then depending on the Identity provider used for authentication, adds a Scope to the access token.
function (user, context, callback) {
  if (context.request.query.audience === 'https://StreamingResourceServer') {
    if (context.connection === 'google-oauth2') {
      context.accessToken.scope = ['read:Devices'];
    }
    if (context.connection === 'amazon') {
      context.accessToken.scope = ['read:Movies'];
    }
}
  callback (null, user, context);
}
Summary and Next Steps
In this post, I’ve demonstrated how you can configure a new client, register a resource server (API), and create rules within the Auth0 portal. In an upcoming post, I’ll walk you through the steps for building REST APIs using API Gateway and securing them by integrating these APIs with Auth0 using a custom authorizer.
AWS MSP Partner Program – Raising the Bar
By Barbara Kessler and Thomas Robinson
In our last post about the evolution of managed services, we wrote about how the landscape is evolving for managed service providers (MSPs) who are working with customers in hyperscale cloud environments. In our opinion, established MSPs can no longer focus exclusively on running and operating their customers’ environments and must expand their reach further up the stack and into what has traditionally been the purview of consulting companies to include professional services and greater involvement in customers’ requirements such as compliance and development practices. This evolution also opens the door for established Consulting Partners to expand their reach into what has traditionally been the purview of MSPs, but now includes next gen capabilities. This evolution is driving a convergence that allows both types of APN Partners to fulfill customers’ full lifecycle needs: plan/design >> build/migrate >> run/operate >> optimize. Let’s now expand that discussion to review the AWS Managed Service Provider Program for APN Partners and how this program recognizes and validates the capabilities of the next generation of bar-raising MSPs.
This program has grown out of customers asking AWS to help them identify not what they have traditionally viewed as MSPs, but consulting and professional services APN Partners who can help them with this full lifecycle. We have in turn built this program to connect this request from customers to the best qualified APN Partners to deliver the kind of experience that is being sought. The program introduces a rigorous set of validation requirements in the AWS MSP Partner Validation Checklist that are assessed in a 3rd party audit process. These requirements address each of the areas discussed in our previous post:
Design, architect, automate
Next gen MSPs must be AWS experts. They must possess a depth and breadth of knowledge around AWS services and features, so they are asked to demonstrate this knowledge and provide examples of customer use cases as a critical part of their MSP audit. APN Partners must then expand this to show evidence of detailed designs and implemented customer solutions. These APN Partners must also demonstrate the ability to identify when solutions such as Amazon DynamoDB, AWS Lambda, or Amazon Redshift would provide a more efficient and less costly solution in their customers’ environments. We are looking to see that these leading edge APN Partners are leveraging their knowledge and using documented AWS best practices, as well as their own extensive experience, to create intelligent and highly automated architectures that allow customers to take advantage of the agility that the AWS Cloud enables.
Software/Cloud-based solutions
The move to cloud-based solutions has also driven changes in how MSPs handle billing and cost management for their customers. AWS MSPs are often also AWS Resellers and as such they become experts in AWS tools and services that allow depth of visibility and understanding around customers’ usage of various services. These MSPs typically leverage 3rd party or homegrown software solutions that enable robust rebilling capabilities and insights including proactive recommendations and proposed buying strategies, including proactive recommendations on instance sizing, reserved instance purchases, and use of managed solutions such as Amazon RDS. All AWS Resellers are asked to demonstrate this knowledge and their tools during their MSP validation audit.
Distributed operations and resources
We also dive deep into our partners’ support capabilities to validate the maturity of their operations and ability to consistently deliver an excellent customer experience. In addition to meeting industry standards for IT service management (ITSM), AWS MSPs demonstrate how these capabilities apply specifically to their AWS practices in areas such as service intelligence monitoring, customer dashboards, event/incident/problem management, change management, as well as release and deployment management. We believe that this foundation is critical to delivering a highly valuable experience for customers. APN Partners who are looking to expand into cloud operations capabilities can also consider incorporating the new AWS Managed Services for automating AWS infrastructure operations such as patch management, security, backup, and provisioning to add to their applications management capabilities.
Solution/Application-based SLAs
MSPs have traditionally provided Service Level Agreements (SLAs) to customers to address foundational concerns, such as response and restoration times, as well as infrastructure uptime, but this further evolves for next gen MSPs. Infrastructure SLAs for cloud-centric customers focus not on the uptime of hardware, but on uptime based on high availability architecture provided and maintained by the MSP. These SLAs should then expand into the customers’ workloads and application performance to focus on the outcome of experience of the customer. Review of these SLAs, documentation, processes, metrics and continual improvements are a valuable aspect of the MSP Program audit.
DevOps – CI/CD
AWS MSPs enable additional agility and efficiency for their customers through integration of DevOps practices and principles. ITSM standards for infrastructure and application release and deployment management are already broadly adopted by next gen MSPs and are baseline requirements for AWS MSP Program Partners. APN Partners demonstrate how they enable and/or manage continual integration and continual deployment (CI/CD) pipelines, as well as deployment and release management with repeatable and reusable mechanisms. APN Partners are asked to evidence this capability with a demonstration and customer examples during their 3rd party audit. We also encourage APN Partners to further build and enhance their DevOps practices through attainment of the DevOps Competency for Consulting Partners, which garners additional credit in the audit process.
Dynamic monitoring with anomaly detection
By designing and implementing advanced and intelligent environments, leveraging auto scaling, infrastructure as code and self-healing elements, next gen MSPs enable a significant shift in the focus of their ongoing monitoring and management efforts. AWS MSPs embrace a new approach utilizing next generation monitoring capabilities. Rather than setting a pre-defined static monitoring thresholds, these APN Partners often incorporate machine learning to determine normal state for their customers’ dynamic environments and they are able identify anomalies outside of normal patterns of behavior. These APN Partners then use this knowledge to deliver valuable management services and insights to their customers, the technology for which they demonstrate during the AWS MSP audit.
Security by design
Significant focus on security is another bar-raising element of the AWS MSP Partner Program. Next gen MSPs are engaging with customers earlier in the plan/design phase and they are able to address security needs from the onset of a project. During the AWS MSP audit, partners are asked to provide evidence and demonstrate their capabilities to protect their customers’ environments, as well as their own, using industry standards and AWS best practices. They are also asked to review access management strategy, security event logging and retention, disaster recovery practices, and use of appropriate AWS tools. APN Partners are then given an opportunity to demonstrate how they use these tools and practices to deliver continuous compliance solutions to help customers achieve various regulatory compliance and reduce potential exposure in this capacity.
Trusted advisor and partner
In addition to reviewing APN partners’ specific technical capabilities in each of these categories, AWS works with APN Partners and our 3rd party auditors to provide an objective validation of broader business practices and capabilities. During their audit, APN Partners provide an overview of their business, including financial assessments, risk mitigation, succession planning, employee satisfaction, resource planning, and supplier management, amongst other controls. They also provide evidence of their process to solicit and collect objective customer feedback, respond to that feedback, and conduct regular reviews with their customers. We also look to AWS MSPs to be vocal thought leaders who evangelize the next gen MSP point of view and work to educate customers on the evolution of cloud managed services and specifically the value of DevOps enabled automation. Due to the invaluable role of the AWS MSP, APN Partners must demonstrate in the third-party audit the viability of their business, their obsessive focus on customers, and their thought leadership to enable them to earn and maintain a trusted advisor role with their customers.
Raising the Bar
The AWS MSP Partner Program recognizes APN Partners who embrace this new approach to providing cloud managed services and who are experts that can unlock agility and innovation for their customers. The rigorous process of the program validation audit is designed to be consultative in nature to continually share best practices and deliver significant value for the APN Partners participating, while also giving customers a means to confidently identify those APN Partners whose have raised the bar in managed services. Please see the MSP Program webpage to learn more and to find the current list of validated APN Partners.
What are your thoughts on the evolution of next gen MSPs? Talk to us in the comments section!
Partner SA Roundup – January 2017
Last year, we hosted a wealth of content from our Partner SAs (read all about our Partner SA guest posts), including a couple of posts recapping innovative ISV solutions on AWS. This year our SAs are back at it, and we’re going to kick off 2017 with Ian Scofield and Mike Kalberer, two Partner SAs who work closely with a number of APN Partners, who discuss solutions from CloudHealth Technologies, Saviynt, and Turbot.
CloudHealth Technologies
By Ian Scofield
 Optimizing your cloud infrastructure for cost is a core component of the AWS Well-Architected Framework. To save money, AWS customers can purchase Reserved Instances (RIs) at deeply discounted rates compared to On-Demand pricing. AWS recently released Convertible and Regional Benefits for RIs, which provide improved purchasing flexibility. To provide additional insight into these features from their perspective, APN Partner CloudHealth Technologies recently wrote a two-part blog series explaining the benefits of Convertible RIs and when to choose them over Standard RIs, as well as when to consider leveraging the Regional scope option.
CloudHealth not only helps you identify areas where leveraging RIs can save you money, but also allows you to automatically modify RIs whenever there is an opportunity for cost savings. Beyond RI management, CloudHealth provides visibility into your cloud infrastructure and analyzes current usage to identify optimizations focusing on cost, usage, performance, and security. CloudHeath users can also define governance policies to help automate basic operational tasks, such as identifying untagged resources and terminating them after giving owners a specified time to comply. CloudHealth can also provide security benefits like identifying overly permissive security groups and recommend steps to remediate.
For more information on the benefits of using CloudHealth or to sign up for a free trial, head on over to their website.
Saviynt
By Mike Kalberer
![]() It’s important to be able to provision access to AWS resources across a single or multiple accounts seamlessly. The workflow needs to be able to identify and manage the risks of granting that access, while also providing ease of use to users.
It’s important to be able to provision access to AWS resources across a single or multiple accounts seamlessly. The workflow needs to be able to identify and manage the risks of granting that access, while also providing ease of use to users.
APN Partner Saviynt recently added privileged access management (PAM) to its existing AWS security offering. Granting least privileges via roles in order to complete a required task is considered best practice. This new feature gives customers visibility into which users have access to these privileged roles, and helps limit privilege creep or egregious permissions. PAM also provides an audit trail of the actions performed by users in these roles to give a complete picture of who had access and which actions they performed with that access.
Common tasks are usually associated with permissions that are typical and essential for performing those individual tasks; for example, a user does not need access to Amazon RDS if they’re only working with Amazon EC2. The PAM module includes self-service functionality against pre-defined, high privileged roles. This allows users to request access to these high privileged roles with multi-stage approvals. Auto provisioning can be configured for single or multiple AWS accounts, with additional controls like time-bound expiration.
Once the access has expired, PAM can automatically de-provision access from the AWS account(s) and pull audit trail information from AWS CloudTrail for automated review or certification. Since the user sessions are created using temporary credentials, PAM is able to associate these credentials with users to ensure that the audit trails are correctly correlated.
Saviynt’s security management solution integrates with various AWS services, including IAM, AWS CloudTrail, Amazon EC2, Amazon S3, and Amazon RDS. Saviynt’s Security Manager is available with a 30-day free trial on AWS Marketplace. For more information regarding the new PAM feature, see the Saviynt blog.
Turbot
By Ian Scofield
![]() Managing policies and access across multiple, even hundreds of, AWS accounts can require additional work to integrate with your existing workflow. Ensuring that policies are applied identically across all accounts and detecting when configuration drift has occurred is very important. This is where APN Partners like Turbot, who is also an AWS Life Sciences Competency Partner, can help by providing you with the tooling to automate these tasks, and additional confidence that your AWS infrastructure will remain exactly how you’ve configured it.
Managing policies and access across multiple, even hundreds of, AWS accounts can require additional work to integrate with your existing workflow. Ensuring that policies are applied identically across all accounts and detecting when configuration drift has occurred is very important. This is where APN Partners like Turbot, who is also an AWS Life Sciences Competency Partner, can help by providing you with the tooling to automate these tasks, and additional confidence that your AWS infrastructure will remain exactly how you’ve configured it.
Turbot provides users with centralized access to all of their AWS accounts and resources. By leveraging single sign-in, it allows users to use the AWS console they’re familiar with for their application, with a benefit of additional control guardrails in place. Turbot provides other features like LDAP integration with predefined policies, predefined security group rules across accounts, automatic encryption and backup rotation, etc.
Turbot is also quick to react to various AWS feature and Region releases; for instance, they already support the recently launched London and Canada Regions, as well as the AWS Server Migration Service, AWS Shield, AWS Step Functions, and AWS X-Ray. For more information regarding this product and its features, check out the Turbot website. To schedule a demo, reach out to Turbot directly at sales@turbothq.com.
Have You Registered for the Upcoming AWS Partner Summit – Canada?
We are just over a week away from our very first AWS Partner Summit – Canada. We’re excited to connect with APN Partners from across Canada to discuss AWS, the APN, and the Canadian Cloud market!
This free event is open exclusively to APN members and is geared at business, sales and pre-sales leaders building software solutions or client practices on AWS.
If you haven’t yet registered, it’s not too late. Space is limited, so register now.

Location and Time
Westin Harbour Castle
1 Harbour Square, Toronto, ON M5J 1A6
January 24th, 8:00 AM – 5:50 PM
Keynote
The keynote will be hosted by Terry Wise, VP, Global Alliances, Ecosystem and Channels, Amazon Web Services.
IDC Overview
Hear from IDC’s Steve White and David Senf on what is happening specifically in the Canadian Cloud market, and opportunities both near- and longer-term for APN Partners.
Join us for Eight Breakout Sessions
Choose from eight different sessions in the business and technical tracks to increase your AWS Cloud knowledge.
Technical Track:
- AWS re:Invent 2016 Overview and New Solutions
- Advanced Networking on AWS
- Microsoft Workloads on AWS: Best Practices, Architecture, Patterns, Migrations, and Licensing
- Benefits of AWS Cloud Security
Business Track:
- A Path To Success: Your APN Journey Starts Now
- Realising the Benefits of Strategic AWS Services for Canadian Businesses
- Expanding your Cloud Business with ISV Partners
- Panel Discussion: Selling with AWS — Understanding the Canadian Go-To-Market and Partner Best Practices
Networking
At the end of the event, we’ll be hosting a networking reception for all attendees. Take advantage of this time to connect with AWS team members and other APN Partners.
Whether you are a Consulting or Technology Partner, join us to gain a clear understanding of how to leverage the APN program and take advantage of the market momentum. Register now!
Driving Customer Success – A Splunk and AWS Blog
This is a guest blog from Tony Bolander, Manager, Global Strategic Alliances, Splunk
AWS and Splunk have developed a powerful relationship through the AWS Partner Network (APN) over the past couple years, buoyed by shared customer focus and strategic alignment across executive leadership, engineering, and marketing teams. As I reflect on our work together, it becomes increasingly clear how we have been able to collaborate so well: We’ve found that the principles that form the foundation of what each company does, the Amazon Leadership Principles and Splunk Values, are closely aligned. They gave us a solid foundation to start from, and build upon. Today, I want to discuss how we’ve driven customer success as an APN Advanced Technology Partner by focusing on our customers, building a dedicated AWS-focused team within Splunk, driving innovation and experimentation through a think big mentality, and successfully educating customers and going to market with AWS.
It All Comes Down to the Customer
AWS and Splunk customers innovate at a rapid pace – they introduce new, diverse, and sizable workloads onto AWS and need to ensure security, visibility and operational intelligence are consistent with or better than their previous on-premises experiences. This customer consideration has been the cornerstone of Splunk solution development on AWS, as demonstrated in customer case studies like Autodesk and EnerNOC. Strong collaboration between the product teams has also been essential for us. Splunk often participates in AWS’s early release and Beta programs to help ensure our customers’ needs are getting visibility as new services from AWS are introduced. Splunk’s own value of “Passionate” has a beautiful synergy with the customer obsession we see at AWS, as we embrace customer requirements and challenges to deliver a best in class solution. Most recently, our collaboration manifested in Splunk being the launch APN partner for AWS Personal Health Dashboard. Splunk was the sole APN Partner fully integrated with the AWS Personal Health Dashboard at launch!
Deep Ownership and Transparency
To be an effective APN Partner, Splunk moves beyond a traditional business development rhythm. There is a global Splunk team dedicated to the AWS relationship. This team owns the overall relationship and coordinates activity with the rest of Splunk. This allows us to better align AWS & Splunk colleagues responsible for demand generation, marketing, social media, public relations, sales, technical services, professional services, product management, development, operations and support. By applying Splunk’s own value of “Open”, we work closely through honest interactions that positively impact our collective goals and objectives.
Drive Simplicity and Innovation
Splunk’s own journey to the AWS Cloud is the epitome of invention and simplification, and combined with our own company value of “Innovative”, we were able to quickly launch Splunk Cloud, a global SaaS offering for machine-data analytics powered by AWS. Splunk has since become an “all-in” AWS customer and is supported by the AWS Partner Network, Sales, Solution Architects, Professional Services, and Executives. AWS also promotes APN Partner invention through a full range of AWS acceleration programs via the AWS Partner Network (APN). These programs help Splunk to quickly and cost-effectively develop new AWS-focused solutions for our customers on AWS. Customers benefit from a simplified process of gaining global insights from their AWS-generated data.
Go Big or Go Home
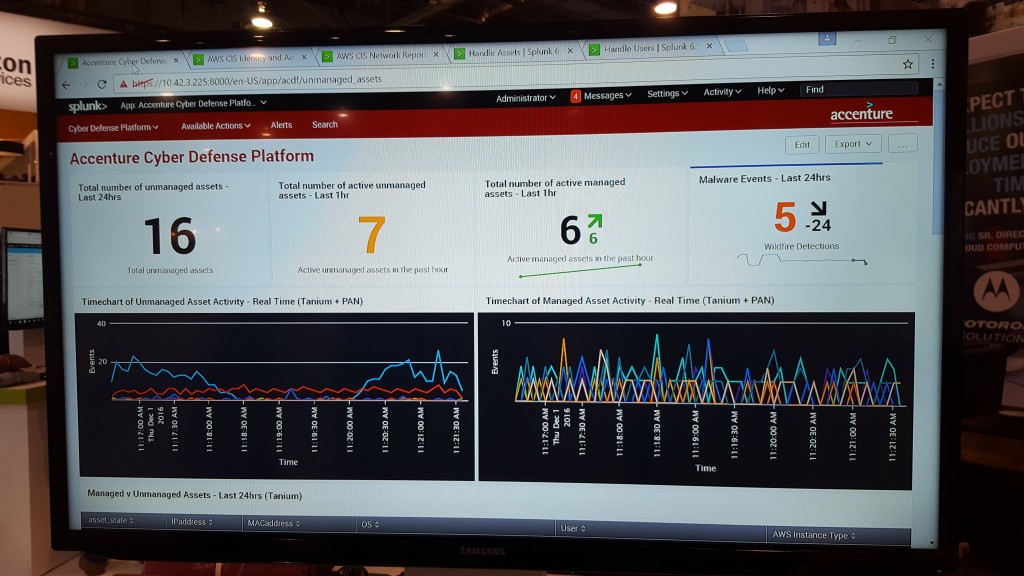
For Splunk, we think big with Big Data and apply our own value of “Disruptive” when identifying new ways for customers to quickly gain business insights at scale. Most importantly, we ask our customers to Think Big when asking questions of their data through Splunk – this has resulted in a growing set of joint AWS & Splunk success stories including FamilySearch and Adobe. Other AWS partners are also thinking big – this was most notable at AWS re:Invent where Atlassian & Puppet demonstrated their Splunk Apps and Accenture showcased Splunk as part of their Cyber Defense Platform as shown here:
Educate and Drive Customer Success
Before taking our solutions to market, Splunk and AWS collaborate early and often to identify ways to serve our customers. Ultimately, it comes down to the following equation for us: leveraging AWS Agility + Splunk Visibility = Cloud Success. With security being the top priority for AWS, we want to ensure our customers hear a clear message from both AWS and Splunk, resulting in a co-authored AWS & Splunk Security Whitepaper. We also deliver an AWS-centric solution that both an advanced AWS user and a new Splunk user can gain value from within a few hours – this manifests itself in the Splunk App for AWS, a fantastic testimony of collaboration, innovation and advanced integration.
Bringing it all together at AWS re:Invent 2016
“Fun” is the final Splunk value, and while it’s not written down – we know our friends at AWS embrace this attitude as well.
In fact, they provided plenty of fun at AWS re:Invent 2016! This was a fantastic opportunity for AWS customers to get hands-on with AWS & Splunk at the Security Jam or track their water, food, and meds with the Splunk and AWS IoT-based First Responder Service! We also worked with AWS Marketplace to promote a new version of Splunk Light, bundled with the App for AWS for 6 months for free – we invite you to try it out! *(AWS service charges still apply)

This alignment has definitely paid off. Our CEOs recently got together to discuss the importance of collaboration and the results it drives for customers.
Happy Splunking,
Tony Bolander, Manager, Global Strategic Alliances (@tonybolander)
The content and opinions in this blog are those of the third party author and AWS is not responsible for the content or accuracy of this post.
Trends in IoT on AWS, and a Look Back at IoT re:Invent 2016 Announcements
This is a guest post from Tim Mattison. Tim is a Partner SA at AWS who focuses on the IoT segment.
In a broad sense, IoT is the convergence of embedded systems, communications technology, and cloud. As processing, communication technology and storage costs continue to drop, we find the industry is realizing the value of data previously locked away inside closed, on-premises systems or from legacy systems previously unconnected. The IoT ecosystem can be thought of as the combination of all components enabling customers to remotely manage connected devices, acquire and analyze the data, act intelligently on the data, and adjust the system as required to provide ongoing process improvements. As we jump into 2017, I want to take a moment to recap some of the key trends we saw emerge in IoT on AWS in 2016, and discuss some of the recent announcements we made pertaining to IoT on AWS.
IoT on AWS and Trends in the AWS IoT Partner Ecosytem
At re:Invent we announced the AWS IoT Competency. The AWS IoT Competency consists of five elements that we see as the building blocks of IoT. Edge technology partners build the base layer that defines where and how IoT data is collected. Gateway technology partners aggregate and process edge device data to be delivered to the cloud. Connectivity partners provide mobile data coverage, and device and subscription management to simplify the deployment and management of fleets of edge devices and gateways. Platform technology partners acquire data, analyze and act on it, and adjust the behavior of the system over time. Consulting partners weave all of these elements into systems with specific business value for their customers. The APN Partners that have achieved the AWS IoT Competency have helped us identify several trends in IoT on AWS:
Platform Technology Partners continue to see a steady increase in the types of data, sources of data, and volumes of data ingested every month. Some of this data is stored in data lakes where information can be shared across an organization. This gives teams the freedom to innovate and find new ways to turn vast amounts of data into value for their customers. Some of this data is fed into systems that utilize machine learning that provides focused, actionable data (e.g. predictive maintenance). The industry has only begun to understand what can be done with the vast amount of data ingested and stored in the cloud.
Edge Technology Partners have seen a shift from a large number of proprietary data formats to more open formats such as JavaScript Object Notation (JSON), Amazon Ion, and protocol buffers. Also, companies are moving from long product cycles where functionality is locked in at manufacture time to shorter product cycles where devices are continually updated over-the-air (OTA), increasing the device’s capabilities and value over time. Look no further than Tesla as an example of this, where pushing a software update to the vehicle enables new features for the owner. This highlights how embedded product development is evolving in similar style to the application space, incorporating devops practices to enable rapid innovation and iteration. However, this continual delivery path to the device requires high quality out-of-the-box connectivity.
Gateway Technology Partners have shown us that we are in the midst of a new era of communications technology. There is an increasing number of mature and nascent connectivity choices embedded engineers and application developers can evaluate when developing products and systems for IoT use cases. In the cellular band we see a rapid evolution of low cost options for device connectivity such as Narrow Band Long Term Evolution (NB-LTE) and LTE-M. The Low Power Wide-Area Network (LP-WAN) technologies such as Sigfox and LoRa are maturing at a rapid pace. We are seeing these technologies applied in new classes of devices that can operate on battery power for several years.
Connectivity Technology Partners are innovating in the device and subscription management space in direct response to the increasing number of devices leveraging these next generation connectivity solutions. These systems are designed for fleets of devices at a global scale, providing private networks enabling a secure and direct connectivity channel to the cloud. These platforms often provide tight integration with the connectivity infrastructure to offer secure device provisioning and world-wide connectivity. In addition, there is also a trend toward using new Low-Power Wide-Area Network (LPWAN) technology to create devices that can run on battery power for years and be deployed in locations that were not possible just a few years ago. This is pushing the power of the cloud out even further and propelling the IoT flywheel.
Finally, our Consulting Partners carry the expertise in fusing these solutions together, staying on top of and ahead of the curve, and building solutions that provide greater value than simply the sum of their parts. They have shown us that there is a clear benefit to IoT partners interoperating to facilitate building the systems their customers need.
AWS has continued to innovate within the IoT space as well. Over the course of the year, our core IoT service, AWS IoT, released several new features driven by customer requirements. Bring-Your-Own-Certificate (BYOC) provides customers greater flexibility in maintaining and managing the chain of trust for the device certificates. Just-In-Time-Registration (JITR) enables customers to customize how new devices are authenticated in the cloud. Websockets and Android SDK support allow developers to build mobile experiences that tie directly into their IoT systems. AWS Elasticsearch integration simplifies visualizing data, creating dashboards, and gaining actionable intelligence with Kibana. Authorization policy updates further enhance the customer’s ability to create fine grained security policies for a single device or a global device fleet.
Greengrass – re:Invent 2016
At re:Invent, AWS announced Greengrass. Greengrass, now in preview, is software that allows customers to accelerate their development of cloud connected sensors, edge devices, and gateways by integrating directly with AWS. Greengrass provides a foundation for on-premises functionality required for many kinds of IoT workloads. With AWS Greengrass, connected devices can run AWS Lambda functions, keep device data in sync, and communicate with other devices securely – even when not connected to the Internet. The AWS Greengrass Core provides support for AWS Lambda and AWS IoT Device Shadows, local messaging, and secure communication.
For our gateway partners, Greengrass allows them to focus on their mission of providing data aggregation, device management, security, and other value added services instead of undifferentiated edge device connectivity. As more devices become Greengrass aware, gateway partners will grow their base of supported edge devices as well as the customer base that their solutions can address. As additional Greengrass features are developed again the value of these systems increase.
For our edge partners, making their devices Greengrass-aware allows them to focus on their mission of providing sensors and edge devices that enable business transformation. Connecting to a Greengrass-enabled gateway means that the same product can be used in on-premises, hybrid, or cloud solutions alleviating the need to develop up to three distinct products. Leveraging the AWS IoT Device SDK with Greengrass functionality means all of the higher level services like AWS IoT Device Shadows are available from the gateway whether the gateway is online or offline.
Whether the workload is latency or bandwidth sensitive, or if availability of connectivity is not guaranteed, Greengrass provides a way to develop using services customers are familiar with and shift intelligence to the edge when it is needed.
Learn More About IoT on AWS
Interested in learning more? Go to AWS IoT, read the documentation and white papers in our developer resources.
Want to dive in immediately? Head over to Getting Started with AWS IoT where you can get up and running in a few minutes, buy an AWS IoT button, or purchase a developer kit.
Do you want to keep on top of what’s new? Go to The Internet of Things on AWS blog, check out our webinars.
Do you have an IoT project that you want to build and are looking for a consulting or technology partner? Use the AWS Partner Solutions Finder to find our full list of AWS IoT partners.
Hear from two of our AWS IoT Competency Partners, C3 IoT and MachineShop, as they discuss why their customers are moving to AWS, and how customers take advantage of their software on AWS:
C3 IoT
MachineShop
How to Best Architect Your AWS Marketplace SaaS Subscription Across Multiple AWS Accounts
This is a guest post from David Aiken. David is a Partner SA who focuses on AWS Marketplace.
In my first post following the launch of AWS Marketplace SaaS Subscriptions, I provided a quick overview to describe the concepts, integration points, and how to get started with the AWS Marketplace SaaS Subscription feature. In this post, I walk through best practices for architecting your AWS Marketplace SaaS Subscription across multiple AWS accounts. Let’s begin!
Overview
Calls to the SaaS Subscriptions APIs, ResolveCustomer and BatchMeterUsage, must be signed by credentials from your AWS Marketplace Seller account. This does not mean that your SaaS code needs to run in the AWS MP Seller account. The best practice is to host your production code in a separate AWS account, and use cross-account roles and sts:AssumeRole to obtain temporary credentials which can then be used to call the AWS MP Metering APIs. This post walks you through how this can be implemented.
Accounts
In our example, there are two AWS accounts:
- AWS Marketplace Seller Account – this is the account your organization has registered as a seller in AWS Marketplace. API calls must be authenticated from credentials in this account.
- AWS Accounts for Production Code – this is the AWS account where your SaaS service is hosted.
Why Use Separate Accounts?
Sellers should only use a single AWS Account as the AWS Marketplace account. This simplifies management and avoids any confusion for customers viewing an ISV’s products and services.
Separating the Seller account from the product accounts means each SaaS service can have its own AWS account, which provides a good security and management boundary. When a seller has multiple products, multiple AWS accounts can be used to further separate environments across teams.
Using different AWS Marketplace seller and production accounts
In this scenario, there are 2 AWS accounts in play. The AWS account registered as an AWS Marketplace Seller (222222222222) and the AWS account where the production code resides (111111111111).
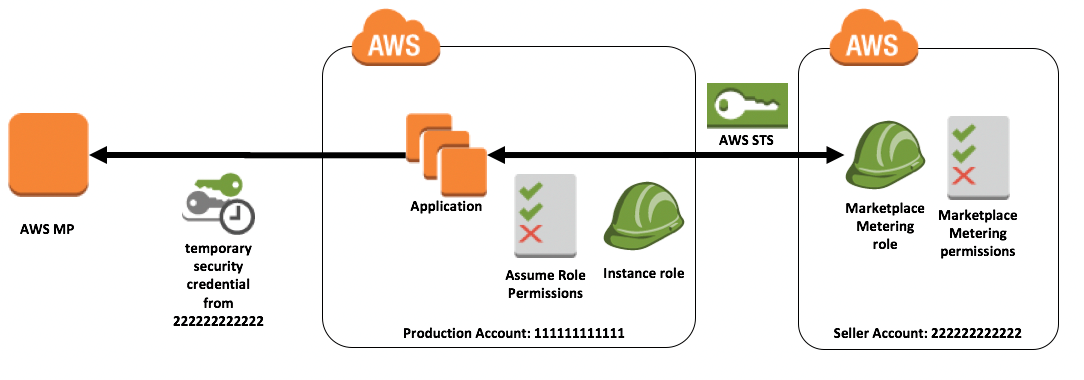
The Seller Account is registered with AWS Marketplace and does have permissions to call the Metering APIs. The seller account contains an IAM Role, with the appropriate IAM Policy to allow access to the Metering API as well as the permission for the role to be assumed from the Production Account.
The IAM Role in the Seller Account in our example is called productx-saas-role. This has the AWSMarketplaceMeteringFullAccess managed policy attached. The IAM Role has a trust relationship as shown below:
{
  "Version": "2012-10-17",
  "Statement": [
    {
      "Effect": "Allow",
      "Principal": {
        "AWS": "arn:aws:iam::111111111111:root"
      },
      "Action": "sts:AssumeRole",
      "Condition": {
        "StringEquals": {
          "sts:ExternalId": "someid"
        }
      }
    }
  ]
}
The SaaS application is hosted in the Production Account. This account is not authorized to call the Metering APIs. This account contains an IAM Role and Policy which is attached to the EC2 instances running the hosting application via an EC2 Instance Profile. This provides the instance with temporary credentials which can be used to sign requests to AWS API calls. These temporary credentials are used to call the sts:AssumeRole method, which returns temporary credentials from the seller account. These are used to call the Metering API.
The permissions required to perform the sts:AssumeRole command are:
{
    "Version": "2012-10-17",
    "Statement": {
        "Effect": "Allow",
        "Action": "sts:AssumeRole",
        "Resource": "arn:aws:iam::222222222222:role/productx-saas-role"
    }
}
In order for the application to make a call to the Metering API, it must first assume the role in the seller account. This is done by calling the sts:AssumeRole method. If successful, this call returns temporary credentials (secret/access keys). These credentials can then be used to call the Metering API.
The following code snippet shows how you can call the assume_role function in python to obtain the temporary credentials from the seller account.
import boto3

sts_client = boto3.client('sts')

assumedRoleObject = sts_client.assume_role(
    RoleArn="arn:aws:iam::222222222222:role/productx-saas-role",
    RoleSessionName="AssumeRoleSession1",
    ExternalId="someid")

credentials = assumedRoleObject['Credentials']

client = boto3.client('marketplace-metering','us-east-1',
    aws_access_key_id = credentials['AccessKeyId'],
    aws_secret_access_key=credentials['SecretAccessKey'],
    aws_session_token = credentials['SessionToken'])
Summary
Using a single AWS Account for AWS Marketplace avoids confusion and mistakes. Using cross-account roles allows you to avoid hosting production code in the AWS Account registered as a seller. For more information on SaaS Subscriptions, please visit the AWS Marketplace SaaS Subscriptions page.
Delivering Real-Time Insights to Enterprise Customers – New Relic, an AWS Migration Competency Partner
We launched the AWS Migration Competency in June 2016 with one simple goal in mind: to help customers connect with AWS Partners who’ve proven their expertise helping customers of all sizes successfully migrate to AWS. The principle of simplicity has driven the launch of all of our Competencies. Our mission is to make it as easy as possible for customers to find AWS Partners who’ve demonstrated deep expertise in particular solution areas, and we plan to continue to launch Competencies in different areas to reach more use cases on AWS.
New Relic is an Advanced APN Technology Partner who holds the AWS DevOps, AWS Mobile, and AWS Migration Competencies, with particular focus on application testing and monitoring. New Relic offers solutions that provide real-time end-to-end intelligence across customer experiences, application performance, and dynamic infrastructure. As an Advanced APN Partner, the company has built a mature AWS-based business, and has helped a wide range of Enterprise customers successfully take advantage of the benefits of AWS, including Airbnb, GE, Healthcare.gov, Fairfax Media, FlightStats, MLBAM, and News Corp. NewRelic continues to innovate on AWS, and has recently expanded its solutions portfolio to include New Relic Infrastructure, an infrastructure monitoring solution on AWS. Learn more at www.newrelic.com/infrastructure
We recently caught up with the New Relic team to learn a little more about what makes them unique as an ISV, how they work with AWS, the migration trends the team is seeing within its customer base, and what’s next for the company on AWS.
Who is New Relic?
New Relic is a leading digital intelligence company that delivers full-stack visibility and analytics to more than 14,000 customers, including more than 40 percent of the Fortune 100. “Our customers include digital-first companies like AirBnB, as well as large enterprises looking to transform for digital era, including GE and MLB Advanced Media,” says John Gray, SVP of Business Development at New Relic. “New Relic helps organizations understand if their apps are up and running, how to improve their digital customer experience, and realize the promise of their digital investments.”
As an Advanced Technology Partner, New Relic works closely with AWS to ensure the performance and success of customers’ applications and infrastructure utilizing AWS services.
Why AWS?
With a deep focus on end customers and their wide range of use cases, New Relic saw the potential to build solutions for customers on AWS. “With a large customer base building cloud-native applications, New Relic recognized the market opportunity to align with companies shifting to cloud usage. AWS provides a flexible and highly scalable solution that allows us to build high availability, highly scalable services in a very timely manner. As a result, it made sense to offer an application and infrastructure performance monitoring solution on AWS,” explains Lee Atchison, Principal Cloud Architect at New Relic. “We use AWS to develop our applications, and deploy highly scalable production services.”
Innovating on AWS
A pure, multi-tenant SaaS platform, the New Relic Digital Intelligence Platform provides visibility into how customers make use of cloud-based services, such as AWS, from within the application and infrastructure running on AWS services. New Relic also provides active monitoring of Amazon Elastic Compute Cloud (Amazon EC2) servers to provide infrastructure-level monitoring and configuration management. “We offer companies the ability to increase their understanding of the behaviors of the AWS services they use, code running on AWS services, trends in digital experiences, and the business outcomes of those experiences,” says Atchison. With the recent addition of New Relic Infrastructure, it includes out of the box integrations to provide expanded native monitoring with popular AWS Services such as Amazon CloudFront, Amazon RDS, AWS Elastic Load Balancing, and more.
As the company continued to build and grow on AWS, New Relic chose to become an APN Partner to demonstrate its strong relationship with AWS to both current and prospective customers.
Customer Migrations to AWS
By helping customers identify, benchmark, and troubleshoot application performance through New Relic Application Performance Monitoring (New Relic APM), New Relic has helped a number of customers successfully migrate to AWS. Fairfax Media, a leading media company in Australia and New Zealand, used New Relic on their on-premises systems while migrating to AWS, and were able to identify potential application issues and fix them before the migration. Dedalus, a Premier AWS Consulting Partner and Systems Integrator, has used New Relic to extend monitoring beyond infrastructure to the application layer, and monitor application queries and health for over 100 of its customers. “Through New Relic APM and New Relic Infrastructure, we’re able to provide customers a seamless diagnostics experience with full stack visibility for their applications running on Amazon EC2,” says Atchison.
For customers about to undergo a large-scale cloud migration, the New Relic team recommends investing in both infrastructure and application-layer performance monitoring. “Monitoring your cloud infrastructure is important, so you don’t find yourself over-provisioned, or under-provisioned in a critical area,” explains Atchison. “However, monitoring infrastructure shouldn’t be the only avenue to monitor your performance. A single query from an application can be the true cause of why your infrastructure isn’t performing as you’d expect. Monitoring performance at the application level to catch these irregularities is also critical.”
New Relic was a launch partner for the AWS Migration Competency, and believes the Competency helps customers understand the company’s level of expertise within the space. “We believe the AWS Migration Competency assures customers and prospects that New Relic has a deep understanding of the migration process to AWS,” says John Gray, SVP of Business Development.
What’s Next?
With the recent launch of New Relic Infrastructure, which is now offered on AWS Marketplace through AWS Marketplace SaaS Subscriptions, the company is looking beyond its expertise in the application performance monitoring space to provide customers the ability to have an end-to-end view of their environment on AWS. “New Relic Infrastructure provides customer with easy dynamic instance monitoring, and the ability to efficiently understand their EC2 usage and optimize usage and cost,” explains Gray.
As an APN Partner, New Relic is working with AWS to explore new marketing opportunities such as videos, shared customer speaking experiences at AWS and New Relic events, workshops, and more. As previously mentioned, New Relic recently listed New Relic Infrastructure on AWS Marketplace and is looking to expand products available on AWS Marketplace.
Lee Atchison, Principal Cloud Architect at New Relic, held two speaking sessions at AWS re:Invent 2016. Check them out:
To learn more about New Relic, visit the company’s listing in the AWS Partner Finder.