FDA Industry Systems
Prior Notice Systems Interface (PNSI)
Prior Notice for Food Articles
Additional Capabilities
for PNSI Version 1.9
New Features in the Prior Notice System Interface (PNSI)
This document may be printed directly from your browser.
To aid in reading a printed copy it is recommended that it be printed in "landscape" mode. (Help)
Screens, descriptions, and examples are subject to change as
enhancements are made to the system.
They are not intended to take the place of the written regulations found
at:
http://www.cfsan.fda.gov/~pn/pnfr.html
Table of Contents
- Web Entries
- Prior Notices
Finding Existing Web Entries
- Choose Home at the top right of any page to return to the Welcome to the Prior Notice System Interface page (Figure 3).
- Choose the Find Existing Web Entry button.
-
The Find Web Entries page displays (Figure 37). From this page you can find an existing Web Entry, open an existing Web Entry to view or edit, or create a new Web Entry.
You can find all Web Entries you have created, regardless of status, minus those the system has deleted since the anticipated arrival date is more than 30 days past. This page lists all Web Entries for a transmitter that match the search criteria shown. Web Entries are displayed in ascending order by Entry Identifier.
Figure 37:
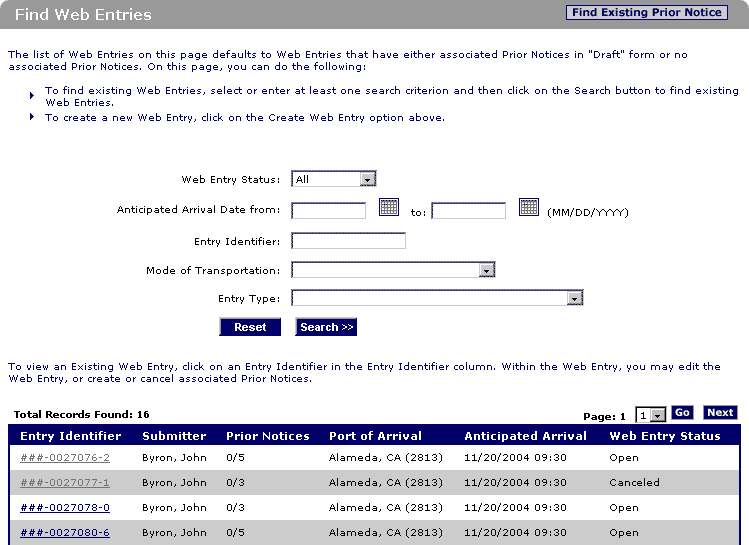
- In order to find a Web Entry, scroll through the list or use the search function.
- Select a Web Entry by choosing the Entry Identifier.
The search criteria textboxes allow a search using multiple strings. For example, if you enter "XYZ ABC", the system will search for all items that contain "XYZ" and "ABC" in any order. The search function has the ability to search based on the following criteria:
- Groups of Web Entries (e.g., those with Prior Notices still in Draft form)
- Anticipated Arrival Date range
- Some Web Entry criteria (Entry Identifier, Mode of Transportation, Entry Type)
Canceling a Web Entry
To cancel from a Web Entry (View) page (Figure 15b):
- Find the Existing Web Entry on the Find Web Entries page (Figure 37).
- Choose the Entry Identifier of the Web Entry that
you want to cancel to display the Web Entry (View) page.
- Choose the Cancel button. You will be reminded
that canceling a Web Entry also cancels any associated prior notices and
asked
to confirm
that you want to cancel the Web Entry.
- The Web Entry (View) page will be updated with the status of the Web Entry and associated prior notices as "Canceled".
Copying a Web Entry
Copying allows you to avoid repetitive data entry for similar Web Entries and associated Prior Notices. You may also cancel a Web Entry and then copy it, to correct errors in a Web Entry you have already completed.
- Navigate to the Web Entry you wish to copy. For example, use the Find Web Entries page to access the Web Entry (View) page (Figure 15b) of the Web Entry you wish to copy.
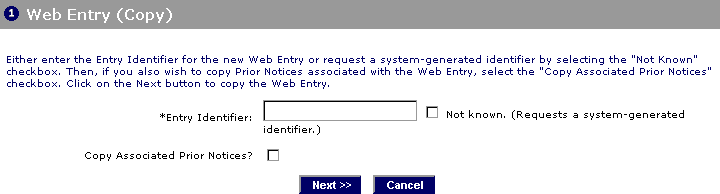
- Choose the Copy button. It displays on the upper right side of the Web Entry (View) page. The Web Entry (Copy) page displays (Figure 38).
- Except if the Entry Type is Mail (Commercial), Mail (Non-Commercial Sender), or Baggage, enter the Entry Identifier for the new Web Entry or enable the Not Known checkbox. For all other Entry Types other than FTZ, IT, and T&E, only one "Open" Web Entry (i.e., not Completed or Canceled) may have a given Entry Identifier at a time for each Company.
Note: For Mail (Commercial), Mail (Non-commercial Sender), and Baggage Entry Types, the system automatically generates a new Entry Number.
- If you also wish to copy all associated Prior Notices, enable the Copy Associated Prior Notices checkbox. Doing this will create new Prior Notices in Draft status when the system copies the Web Entry.
- Choose the Next button.
Figure 38:
- The Web Entry (View) page displays the new Web Entry and, if you requested it, copies of the associated Prior Notices in Draft Status.
- Continue with the normal flow of Creating a Web Entry and Creating and Submitting a Prior Notice by editing the information that should be different.
Finding Existing Prior Notices
- Choose Home at
the top right of any page to return to the Welcome to the Prior
Notice System Interface page (Figure 3).
- Choose the Find Existing Prior Notice button.
- The Find Prior Notices page displays (Figure 39). From this page you can find an existing Prior Notice, open an existing Prior Notice to view or complete it for submission, or create a new Prior Notice.
You can find all Prior Notices you have created, regardless of status, minus those the system has deleted since the anticipated arrival date is more than 30 days past. This page lists the Prior Notice Articles for a transmitter that match the search criteria shown. The Prior Notices are displayed in ascending order by Entry Identifier and Article Number.
Figure 39:
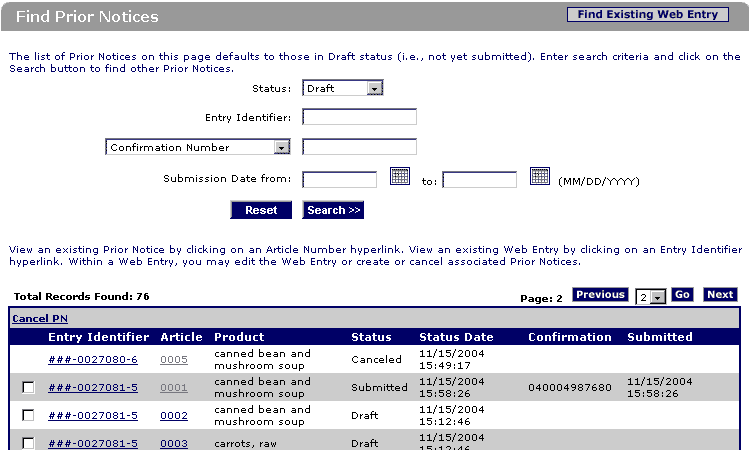
- In order to find an article, scroll through the list or use the search function.
- Select the Web Entry by choosing the Entry Identifier
or select the Article by choosing the Article .
The search criteria textboxes allow a search using multiple strings. For example, if you enter "XYZ ABC", the system will search for all items that contain "XYZ" and "ABC" in any order. The search function has the ability to search based on the following criteria:
- Status (e.g., Canceled, Draft, Submitted)
- Entry Identifier
- Some Prior Notice criteria (e.g., Confirmation Number, Manufacturer, Product)
Canceling a Prior Notice
You may cancel Prior Notices that are inaccurate or that are for articles
that you will not import. Canceling a prior notice changes the status
of the Prior Notice from "Draft" or "Submitted" to "Canceled".
You may cancel Prior Notices in the Find Prior Notices page,
the Web Entry (View) page, or the Prior
Notice: Article (View) and Prior Notice Confirmation: Submitted pages.
To cancel from the Find Prior Notices page (Figure 39):
- Find the Existing Prior Notice, on the Find Prior Notices page (Figure 39).
- Enable the checkbox to the left of the Entry Identifier of each Prior Notice you want to cancel. You can mark
more than one checkbox to select multiple prior notices to cancel.
- Choose Cancel PN. You will be asked to confirm that you wish to cancel this Prior Notice.
- The Find Prior Notices page updates the current display to reflect the changes. If canceled prior notices are displayed, the status will be changed to "Canceled" and the current date/time will be the Status Date.
To cancel from a Web Entry (View) page (Figure
15b):
- Find the Existing Web Entry, on the Find Web Entries page (Figure 37).
- Choose the Entry Identifier of the Web Entry that contains the Prior Notices you want to cancel.
- Enable the checkbox to the left of the Entry Identifier of each Prior Notice you want to cancel. You can mark more than one checkbox to select multiple Prior Notices to cancel.
- Choose the Cancel PN button. You will be asked to confirm that you wish to cancel this Prior Notice.
- The Web Entry (View) page updates to display "Canceled" as the Status and the current date/time in the Status Date.
To cancel from the Prior Notice: Article (View) and Prior Notice: Submitted pages (Figure 34):
- Choose the Cancel PN button. You will be asked to confirm that you wish to cancel this Prior Notice.
- The Prior Notice: Canceled page displays. The page displays "Canceled" as the Status and the current date/time in the Status Date.
Copying a Prior Notice
Use the Copy feature to copy a Prior Notice within a Web Entry. Copying allows you to avoid repetitive data entry for similar Prior Notices. You may also cancel a Prior Notice and then copy it, to correct errors in a Prior Notice you have already submitted.
- Navigate to the Prior Notice you wish to copy. For example, if you wish to access a Prior Notice from the Web Entry (View) page (Figure 15b), choose the corresponding Article Number in the Article column.
- If the Prior Notice is in Submitted or Canceled status, the Prior Notice: Submitted or Prior Notice: Canceled page displays. If the Prior Notice is in Draft status, the Prior Notice: Article (View) page displays.
- Choose the Copy button. It displays in the same place on the right side of the title bar on all three pages (e.g. the Prior Notice: Submitted page (Figure 34)) . The Prior Notice: Article (Edit) page displays the new Prior Notice with the same information as in the Prior Notice you copied, except that it has the next available Article Number for the Prior Notice within the Web entry. For example, copying a Prior Notice for Article 0001 creates a Prior Notice for Article 0002, if 0002 has not been previously created within the Web Entry.
- Continue with the normal flow of Creating and Submitting a Prior Notice by editing the information that should be different.
New in version 1.5: Submit Holding Facility Information After Any Prior Notice Submission
If United States Customs and Border Protection (CBP) has directed this article to a Holding Facility after the Prior Notice was transmitted you will need to provide the Holding Facility information. PNSI has a new function, View/Submit Holding Facility, that allows you to submit Holding Facility information for a Prior Notice that has already been submitted, even if the Prior Notice has been transmitted through the U.S. Customs and Border Protection's (CBP) Automated Commercial System (ACS) or by another PNSI user.
You will need the Prior Notice Confirmation Number that can be found on the Prior Notice: Submitted page (Figure 34) or the Web Entry Summary Confirmation PDF plus information about the Holding Facility. Holding Facility information may be required for any Entry Type except for Mail (Commercial) and Mail (Non-Commercial Sender).
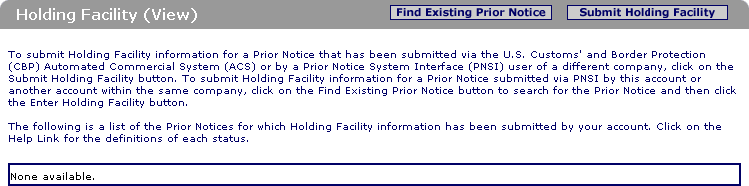
- Access the View Holding Facility page from the Welcome to the
Prior Notice System Interface page (Figure
3) by clicking on the View/Submit Holding Facility button. The Holding
Facility (View) page displays any Holding Facility information that
was submitted through PNSI using your account. (Figure 40)
Figure 40:
- 2. If the Prior Notice was transmitted through PNSI using your account:
- Select the Find Existing Prior Notice button to display all submitted Prior Notices on the Find Prior Notices page (Figure 39).
- Choose the article number to display the Prior Notice: Submitted page for that Prior Notice (Figure 34).
- Choose the Submit Holding Facility button.
- 2a. If the Prior Notice was transmitted through ACS or through PNSI using someone else's account:
- Choose the Submit Holding Facility button.
- Enter the Prior Notice Confirmation Number on the Holding Facility - Enter Prior Notice Information page (Figure 41)
- Choose the Next button to proceed.
Figure 41:

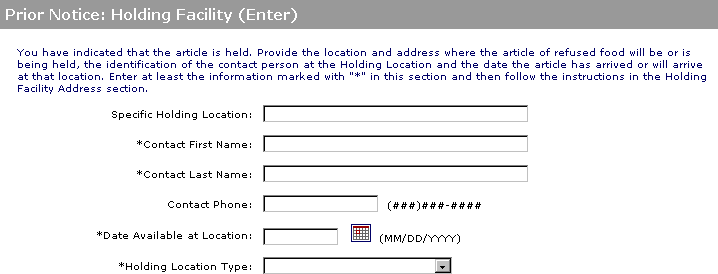
- The Prior Notice: Holding Facility (Enter) page will display. (Figure 42) Enter the Specific Holding Location (within the Holding Facility), Contact Name, Phone, and Date Available at Location.
- Select an appropriate Holding Location Type (Port/Import Lot, Secure Facility at Port, or Secure Facility outside of Port) from the Holding Location Type drop-down list.
- Under Holding Facility Address, enter the Holding Facility's Food Facility Registration Number, Business Name, and City, or all required address information denoted by asterisks.
- Choose the Save button.
Figure 42:

- The the Prior Notice: Submitted page or the Holding Facility (View) page (Figure 43) displays the Holding Facility information in static text.
- You may navigate to the Holding Facility (View) page at any time from the Welcome page. Use the Holding Facility (View) page to check the status of your Holding Facility Information submission. If the status of the Holding Facility is set to Pending, you should come back to this page shortly to check the status of the Holding Facility.
Figure 43:
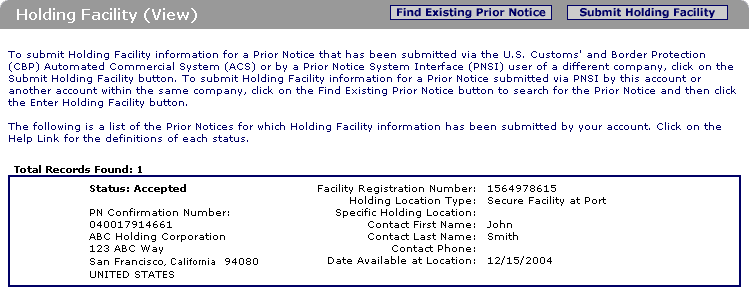
Holding Facility Statuses:
- Pending - the Holding Facility information has been submitted to FDA but the system is still searching for the matching submitted Prior Notice.
Come back and check the updated status shortly.
- Accepted - the Holding Facility information has been successfully submitted to FDA and the Confirmation Number successfully matched to a submitted Prior Notice.
- Duplicate - the Prior Notice Confirmation Number has been matched to an existing Prior Notice but Holding Facility information has already been submitted for this Prior Notice.
- Rejected - the Prior Notice Confirmation Number has not been matched to a Prior Notice.
For more information see:
See also: Create New Account Quick Start Guide