Video School / Lessons
Do More With Your DSLR I: Working with Available Light

Recently, I found myself in a bit of a quandary. My fellow Vimeo Staff members and I were getting ready to shoot a new Vimeo original video, when it fell upon me to handle the camera and make sure it was set up for the lighting conditions we were shooting in. Oh no, what would I do? I was going to try the old press-some-buttons-and-hope-for-the-best technique, but luckily Lan and Vu, the Bui brothers, appeared and passed on some of their extensive DSLR knowledge. Here's how it all went down:
Now, I'm going to let you all in on a little secret: I was merely acting like a DSLR novice. As hard as it may be to believe, I actually do have a decent grasp on the topic of available light. However, for the sake of entertainment — and your education — I was willing to pretend otherwise. Let's dig into what the Bui brothers taught me:
Exposure
Exposure, or the amount of light that the camera sensor receives, is dictated by a few factors, but one of the most critical is your f-stop. Your f-stop is a measure of aperture, or the diameter of opening that allows light to pass from the lens onto the camera's light sensor. Aperture is expressed as f-stop, and will be indicated on your camera in abbreviations that look like this: F2.8 or f/2.8. Here's a diagram that shows varying f-stops and the corresponding opening each represents:
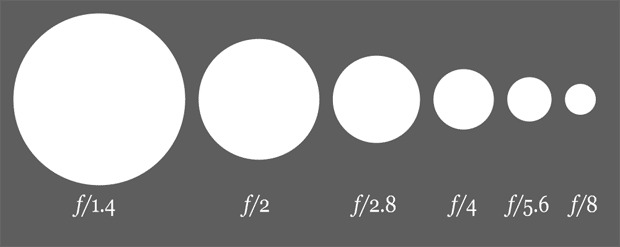
The "F" stands for the focal length of your lens, and the number indicates the diameter of the iris opening. A smaller number like 1.8 or 2.4 means the diameter is greater and more light is reaching the sensor. You want to change your aperture to let in more or less light depending on the conditions you're shooting in.
Another important factor to keep in mind when considering aperture is depth of field. Depth of field refers to the part of the image that is in focus. A deep DOF allows both the foreground and background to appear in focus, while a shallow DOF will allow you to focus on a single area or subject. The amount of depth in your shot should be based on your subject matter. If you're shooting an establishing or landscape shot, you probably want to show most things in focus with a a deep depth of field. Conversely, if you're focusing on a person, you might want to blur your background to draw your audience's eye to what's important.
White Balance
White balance is a calibration that enables your camera to show colors accurately under varying light conditions. Think of it as making sure the color white is always white so that your image doesn’t have unwanted tints. Many cameras come with automatic white balance, which works pretty well most of the time, but sometimes you'll want to adjust it yourself. You can do this a few different ways, the easiest of which is with presets. The most common presets are sunny, cloudy, fluorescent, and tungsten. These balance the image color based on those general lighting conditions. Some cameras will have more presets than others, so play around and test what happens when you change the presets.
Certain cameras will allow you to manually adjust the white balance. On a DSLR, this is usually done by adjusting the Kelvin color temperature. As the Bui brothers explain, every type of light has a different temperature. Warmer temperatures are orange, cooler temperatures are blue, and each temperature corresponds to a number value. Daylight is usually somewhere around 5500K. Number values above that correspond to cooler light, and numbers below that correspond to warmer light. If you know the temperature of the light you're in, adjust according to that. However, this can also be done by eye. Using the live view on your LCD screen, adjust the temperature until the whites are white, or until you get the temperature and look you desire.
On some cameras, you can set your white balance by taking a picture of a white object and calibrating the appropriate temperature that way. Once you do this, the camera will know this is the color of pure white in your lighting situation and adjust the image colors accordingly.
Key Lighting
When shooting only with available light, as is common with documentaries and other types of on-the-fly shooting, you have to think about where your key light is. If you're shooting outside during the day, your key light will be the sun. It's generally good practice to try to shoot your subject so the key light is not directly behind them. Rather, you should move your camera so the light source shines on your subject's front-right or front-left side. A quick and easy way to enhance natural lighting is to use a bounce, which will give you lighting that is more flattering, with fewer harsh shadows.
ISO
The next element to consider is ISO. Paired with aperture, this is how you achieve the proper exposure when shooting on a DSLR (since your shutter speed should usually be set to twice your frame rate). On a film camera, ISO is a measure of film speed, or the film's sensitivity to light. On a digital camera, ISO measures the sensitivity of your camera's light sensor. On a DSLR, ISO usually ranges from around 100 to perhaps 6400. The higher the number, the more sensitive it is to light. In general, the darker your shooting conditions, the higher your ISO should be, and the brighter your shooting conditions, the lower your ISO needs to be.
You can also use ISO to compensate for stylistic aperture choices. For example, in this tutorial, the Bui brothers suggested I open up my aperture to blur the background behind my subject. To maintain the proper exposure, we needed to turn down the ISO. Alternately, if you need to shoot at a small aperture, you might need to turn up the ISO. Keep in mind, however, that the higher the ISO, the more noise, or graininess, your image will have.
Shooting in Low Light
When shooting in low light, you'll need to pull out all the stops. To let the maximum amount of light into the camera's sensor, open your aperture all the way and bump up your ISO. In the shot of Vimeo man dancing with the girl in the street, we chose a wide aperture of 2.8 and a high ISO of 5000.
That about sums up all the knowledge the Bui Brothers imparted upon me. Whether you know a little bit about DSLRs, or you're a complete novice like the Dan in the video, I hope this lesson will set you on the path to mastering your camera.
Check out the other episodes in this series:


Lesson Summary
DSLRs are powerful tools for video-making, but how do you make sure your settings are right for your lighting situation? Learn how with the Bui brothers!
New to Video School? Read our Frequently Asked Questions.
Browse by Category
Submit Your Tutorial
Most of the video tutorials in our Video School lessons come from Vimeo members. If you have a tutorial you'd like to share, please submit it here.
60 Comments
Wykeyta HairDocotor Nikkole
I just got a Nikon D3100 and I am going to try this out
Ken
Iv'e had the D3100 for maybe 2 years now. It's an awesome camera, you will love it. Just use this camera a lot and get used to the basics and functions. Good luck!
Dennis Varghese
yeah,one realises how good it is once you get to know the D3100,when you really start feeling the camera.
Shiply PRO
The D3100 is still one of the best entry level cameras IMO.
Dhruv Agarwal
ikr..!!!
mohammedharuna
hello,weicome
Penina Mezei
I have the same camera. You won't be disappointed.
Dento Budi Jaya Putra
Wow, it's good, i wanna try with my Nikon D3200
mohammedharuna
goodmorning
mohammedharuna
hello,can you able to help?
Harold Seifert
I'm excited! whew!
A.C. Sheridan Plus
Cute video. A few other things to consider: 1) try to stay under 1600 ISO in low light. Over that, and there's just too much noise even with good cameras. 2) remember you shutter speed should be about 2x your frames per second. So if you're shooting 24fps, set your shutter speed to 1/50. If your shooting 30fps, set shutter speed to 1/60. 3) Never use auto white balance. When you start and restart the camera it will readjust for WB and your shots will have different temperatures. 5) Use an ND filter to cut light when you want a shallow dept of field on a bright day.
Rules to live by.... ;)
Czr
Im Excited to learn more thanks for sharing.
Batool Naqvi
"Ok so there's a f-stop, but I don't really know how to start with that."
Haha. I see what you did there. =D
Maxx Jatt
How i can shoot a video with Nikon D5100 in low light. I hate noise and grains in video. Any technique to remove the grains and noise ?
Daniel Di Tullio
Try to use Neat Video (neatvideo.com). Is a good tool for noise reduction in video
Maxx Jatt
Thanks Daniel Di Tullio
Super P.
Also, try adjusting the ISO. It's usually the cause of noise in DSLRs.
BTW that D5100 can go places if you treat it right :D
Frank Matowitz
get a lens with a lower f-stop.
Pascale van der Burg
This helped me lots!! Thank you!!
ART BMX MAGAZINE Plus
here is a another way : Buy a 1Dc =
vimeo.com/58056838
James Albrecht
Thank you so much for posting this!
Long time fan of photography but I'd only ever had access to point-n-shoot cameras, so most photographic terminology tended to go in one ear and out the other. Now I own a nice Nikon D3200 and am eager to break free of "auto" anything. This video certainly helped! :)
Sami Aygin
Beyaz Dengesi
Beyaz dengesi doğru değişken ışık koşullarında altında renkleri göstermek için kamera sağlayan bir kalibrasyon olduğunu. Renk beyaz her zaman görüntünün istenmeyen tonları yok böylece beyaz emin olarak düşünün. Çoğu kamera oldukça iyi çoğu zaman çalışıyor otomatik beyaz dengesi, gelir, ancak bazen bunu kendiniz ayarlamak isteyeceksiniz. Bu birkaç farklı şekilde, hafızalı olduğu kolay yapabilirsiniz. En yaygın istasyon hafızalı, aksesuarim.com güneşli bulutlu, floresan ve tungsten vardır. Bu denge o genel aydınlatma koşullarına göre görüntü renk. Bazı kameralar diğerlerine göre daha hazır olacak, böylece etrafında oynamak ve önayarları değiştirmek ne olur sınayın.
SuulsaK
It's nice to show people what they can do with DSLRs and that DSLRs can shoot video but Nikon is not exactly what you are looking for when you want to shoot video because Nikon cameras don't have practicaly any manual control over video. Changing ISO and shutten speed on Nikons does have influence on photos but not on video shooting. These are basic things you need to control. Canon DSLRs can do any of these things...
Cortez
I'm new to Vimeo and shooting video, this was very helpful. I will shot something based on what I have learned from your lesson, I will post it.
guillermo castellanos
Awesome!
Michael Dreyfus
SulsaK's comment is incorrect, but it seems to be a pervasive rumor. I have a Nikon d5100, probably the most entry-level of Nikon DSLRs, and all my manual adjustments apply to video. The only caveat is that they have to be done before switching the camera to Live View, and can't be adjusted during the shot.
Marcus Wong
I LIKE this video so much!!! 100 Likes for VIMEO ~!!! :)
Felipe Rivera
I have a NIkon 3200 and help me a lot your tips.
Owen Dai
such a great educational video
cwjstone Plus
Awesome Video! Huge thanks to the Vimeo team!
moncif ait ahmed
o m g thats coool, peoples in morocco they pay money to learn that in schools and in video it s free, and cool way to teach and learn , good job
Maurii Guerra Jr.
Thanks guys!
Daniel JHEELAN
Hi,
Learn with fun
Thanks for the refresh: Merci.
Daniel
Issac Aboagye
hi
WDK
"you ready to shoot?", "yeah, give me one second" =P paradoxical.
Jeff Haring
Great information guys! Thanks!
roddy dextre
7D vimeo.com/75645918
Rodgers Raysis Chimfwembe
I own a D7000 and I want to use it more for video. I had too strong a contrast and maybe the settings discussed will help in a way or two.
JL Johnson
Wow I haven't shot any video in years. Here goes!
ORGNZD.
Check out some of my videos and let me know what you think!!! #ORGNZD.
fRED
wow!
joyful
有中文就好了。
Mark Slovak
How does the f/ control depth of field? For large f/, like f/20, only the central portion of the
lens system is used, so almost all the light that is focused on the detector is close to the
principal axis of the lens system (few aberrations). For small f/, like f/1.5, a larger portion of
the lens system is used, and light far from the principle axis does not focus at the same place
as light near the axis. Hence the background appears blurry (out of focus).
Cheryll Hammond
Ok, Please don't laugh but I'm using a Nikon D50, I know I need to upgrade. This camera has been good to me and have gotten great action shots "during the day". Can someone please tell me what settings my camera should be on for sports under stadium lighting at night? My subjects have a blur following them.
FMVideo
show de bola
Stefania Pizzica
Grandi informazioni, grazie davvero!
Giustino Bruno
Grazie per questa condivisione, bravi :-)
ApsWindowCompany
Thanks for giving these information
Christian Exiga
thanks a lot.
Kitchengirl Plus
Ok, so do you shoot in raw or JPG when you film ?
I prefer to shoot in raw when I take pictures, but how about filming? I use my Nikon D600
Nikki
As a true novice, this video helps a great deal. Thank you!
Hits Outdoors PRO
This is a GREAT video ... You really simplify the settings .. Thanks for sharing...
fotsoemmanuel
Nikki Il y a 1 mois
As a true novice, this video helps a great deal. Thank you!
As a true novice, this video helps a great deal. Thank you!
Nikki Il y a 1 mois
As a true novice, this video helps a great deal. Thank you!
jailson ferreira santos
ola td bem galera
bilal
Feeding the brain of intellectual wealth online support to all people all over the world a home based business and profitable real intellectual wealth I hope everyone success
VSauce4
I have had my Cyber-Shot Optical Steady Shot 2 months ago and I've been recording since I was 6.
Marri Goodie
Ich werde es ausprobieren und sehen ob es mir gefällt, wenn ja werde ich es weiter empfehlen.
TheSnapDude1
I will try this on my Canon 60D and Nokia Lumia 1020!
Janmarie Santiago
I will apply this to everything I see too bright