Translate
Oil and Gas Well Drilling and Servicing eTool
Home | Site Preparation | Drilling | Well Completion | Servicing | Plug and Abandon Well | General Safety and Health
Site Map | Glossary of Terms | Illustrated Glossary
Drilling Rigging Up

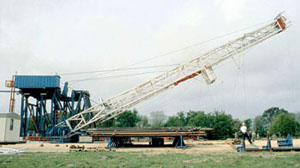
Figure 1. Hoisting the mast
Rigging up is placing and assembling the various parts of equipment that make up the rig, and preparing the rig for drilling. There are many rig designs, and this eTool does not cover each type individually. This eTool focuses on the common hazards and solutions that many rig designs share.
During assembly of the rig, some equipment may be handled and set with crane, rig up trucks, or forklift, depending on the size of the rig. It should be noted that overhead hazards such as high voltage power lines may be present.
There may be two or more crews (teams) working together in the rigging up process. The rigging up process includes the following steps, some of which are done simultaneously: (See Transporting Rig and Rigging Up).
- Setting Up the Substructure
- Setting Up the Rig Floor and Mast or Derrick
- Installing Handrails, Guardrails, Stairs, Walkways, and Ladders
- Installing the Power System
- Rigging Up the Circulating System
- Installing the Auxiliary Equipment
- Inspecting the Rig
- Rigging Down
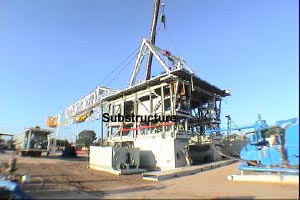
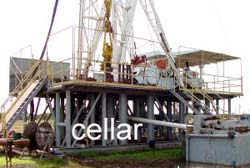
Figure 2. Setting up the substructure
Equipment is unloaded and positioned at or near the exact location that it will occupy during operations.
The substructure is assembled, pinned together, leveled, and made ready for other rig components on the floor.
Equipping the cellar begins but can be done throughout the rigging up process. This includes welding on a drilling nipple to the conductor pipe and attaching a flow line.
Potential Hazards:
- Being struck by the crane, load, truck, or forklift tipping.
- Pinched fingers when assembling equipment.
- Burns from cutting and welding on the drilling nipple.
- Temporary eye irritation from welding light flash.
- Falling from heights.
Possible Solutions:
- Instruct all workers in safety procedures and ensure that they are knowledgeable about job hazards. This can be done during pre-job safety meetings or JSA briefings.
- Instruct workers to stand clear and keep hands and other body parts away from pinch points.
- Wear proper long sleeve clothing to protect from burns.
- Wear proper welding eye/face protection.
- Avoid looking directly at the flame or arc when welding.
- Wear fall protection when working from heights. [29 CFR 1926 Subpart M]
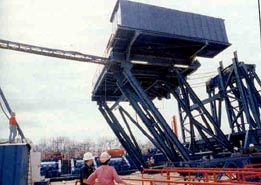
Figure 3. Raising the doghouse and rig floor

Figure 4. Setting mast on rig floor

Figure 5. Setting crown on derrick stand

Figure 6. Rigging up the mast
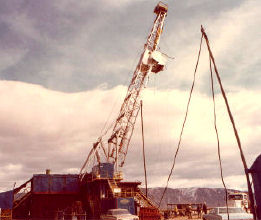
Figure 7. Raising the mast
Once the substructure is set in place, the process of setting up the rig floor begins. Begin by installing stairways and guardrails to allow access to the rig floor. Then, the drawworks is set in place and secured to the substructure. On mechanical rigs, the engines are set in place and the compound and associated equipment connected to the drawworks. On electric rigs, the electric cables (lines) are strung to the drawworks.
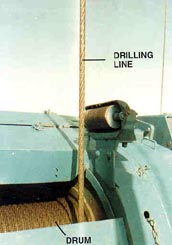
The bottom of the mast is raised to the rig floor and pinned in place. The crown section is then raised into place on the derrick stand. The "A-legs" are raised and pinned into place. The monkeyboard is pinned in place on the mast and all lines and cables are laid out to prevent tangling when the mast is raised. A thorough inspection of the mast should be made before raising the mast/derrick. The mast is now ready to be raised. The engines are started (see Installing the Power System), and the drilling line is spooled onto the drawworks drum. Once the mast has been raised and pinned, the remaining floor equipment can be set into place. If the rig has safety guylines, they must be attached to the anchors and properly tensioned prior to continuing the rigging up process. A derrick emergency escape device is installed on the mast.
Potential Hazards:
- Falling or tripping during rigging up.
- Falling from rig floor.
- Being struck by swinging equipment.
- Being struck by falling tools.
- Being crushed or struck by equipment due to failure or overloading of hoisting equipment.
- Getting entangled in lines during raising of the derrick or mast.
- Failure to properly install derrick emergency escape device.
Possible Solutions:
- Install, inspect, and secure stairs and handrails. [29 CFR 1926.1052]
- Do not use guardrails for anchor points or for lifting or supporting loads.
- Use fall protection when installing or removing guardrails.
- Use a tag line to guide equipment, rather than positioning yourself under suspended loads.
- Check the derrick for unsecured tools before raising it.
- Allow only the operator raising the mast to be on the rig floor.
- Uncoil all lines so that they are clear of all workers when the mast or derrick is raised.
- Attach safety lines to all tools hanging from the rig.
- Keep a safe distance from moving equipment.
- Install derrick emergency escape device properly in accordance with manufacturers recommendations.

Figure 8. Stairways, guardrails, and ladders

Figure 9. Stairways
Handrails, guardrails, stairways, walkways, and ladders are installed where they are needed for safety and access.
Potential Hazards:
- Falls from ladders.
- Falls or slips from ladders and stairs due to damaged or missing rungs or steps.
- Slips or falls on walkways due to debris or uneven surfaces.
- Falls from heights.
- Falling into the mud pit or mixing tank.
Possible Solutions:
- Follow established procedures and best work practices.
- Instruct workers on proper procedures for using and installing ladders.
- Use only ladders in good repair that do not have missing rungs.
- Do not install stairs with missing or damaged steps. Repair them before installing them.
- Keep walkways clean and free of debris and tripping hazards. [29 CFR 1910.22]
- Use proper fall protection.
- Place guardrails in place prior to working in elevated areas. [29 CFR 1910.28]

Figure 10. Engines and generators

Figure 11. Power house
Installing the power system is usually done simultaneously with setting up the rig floor, because power is needed to operate the equipment. Today there are generally two types of rigs being used on land. A mechanical rig is powered by engines and compound. An electric rig is powered by engines and generators. This type supplies power to electric motors, which drive the machinery.
All power cords, belts, and chains need to be connected to the machinery from their associated power source. Simultaneously, the fuel lines and tanks need to be hooked up. Then, start the engines.
Potential Hazards:
- Tripping on power cords and hoses.
- Slips and falls on slick walking services.
- Getting caught in pinch points.
- Exposure to chemical hazards.
- Being shocked or electrocuted.
Possible Solutions:
- Keep all cords and hoses orderly and clear of walking spaces.
- Clear and clean all walkways and walking surfaces of slipping hazards.
- Use caution around all chain and belt pinch point areas. Install all guards.
- Use proper personal protective equipment when working with chemicals. [29 CFR 1910.132]. Section 8 of an SDS will indicate Exposure controls/personal protection. [29 CFR 1910.1200(g)(2)(viii)]
- Use proper lockout/tagout/ procedures. [29 CFR 1910.147]

Figure 12. Mud pumps
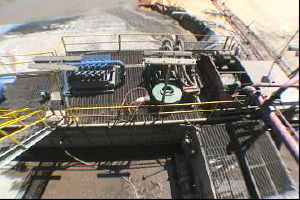
Figure 13. Mud system
While one crew finishes preparing the rig floor, another crew might be rigging up the circulating system.
The mud tanks and mud pumps are set into the predetermined location. The mud lines are then connected and electric cords are strung.
Potential Hazards:
- Being struck by or crushed by equipment being set into place.
- Getting caught in pinch points.
- Being struck by crane, load, truck or forklift tipping.
- Being struck by hammer when connecting mud line unions.
Possible Solutions:
- Keep a safe distance from equipment that is coming together or moving.
- Maintain a safe distance from all pinch points.
- Stand clear of workers that may be swinging hammers.

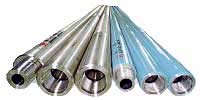
Figure 14. Tubulars on pipe racks

Figure 15. V-door, pipe ramp, pipe rack and cat walk
All remaining drilling and auxiliary equipment must be set into place and installed where needed. The catwalk and pipe racks are positioned and the pipe and drill collars are set on the racks.
Potential Hazards:
- Getting struck or pinched by, or caught in between, tubulars being loaded onto racks.
- Having feet pinched or crushed when setting up the pipe racks and catwalk.
Possible Solutions:
- Keep a safe distance from equipment that is coming together.
- Use a tag line to guide the pipe racks and catwalks into position.

Figure 16. Inspecting the rig
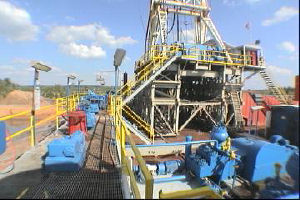
Figure 17. Inspecting rig equipment
Perform a complete inspection of the rig before operating. The driller and/or rig superintendent/toolpusher/manager should walk around the entire rig and inspect for missing or loose pins and bolts, equipment guards, adequate guard railings, proper line and cable placement, and unclear walkways.
Potential Hazards:
- Falling from the rig.
- Tripping on power cords and hoses.
- Slipping and falling on slick walking services.
Possible Solutions:
- Use proper fall protection. [29 CFR 1926 Subpart M]
- Keep all cords and hoses orderly and clear of walking spaces.
- Clear and clean all walkways and walking surfaces of slipping hazards.

Figure 18. Loading doghouse onto trailer
After production casing is run and cemented, the rig is taken down and moved to another site. The rigging down process is basically the reverse of rigging up.
The hazards and solutions are similar to those for rigging up.
#31. Cellar
A pit in the ground to provide additional height between the rig floor and the well head to accommodate the installation of blowout preventers, ratholes, mouseholes, and so forth. It also collects drainage water and other fluids for disposal.†
#54. Stairways
Stairs leading from one level to another. Protected with handrails.†
#36. Drawworks
The hoisting mechanism on a drilling rig. It is essentially a large winch that spools off or takes in the drilling line and thus raises or lowers the drill stem and bit.†

#13. Engine Generator Sets
A diesel, Liquefied Petroleum Gas (LPG), natural gas, or gasoline engine, along with a mechanical transmission and generator for producing power for the drilling rig. Newer rigs use electric generators to power electric motors on the other parts of the rig.†
#4. Monkeyboard
The derrickman's working platform. Double board, tribble board, fourable board; a monkey board located at a height in the derrick or mast equal to two, three, or four lengths of pipe respectively.†

#7. Mast
A portable derrick capable of being erected as a unit, as distinguished from a standard derrick, which cannot be raised to a working position as a unit.†

3. Drilling Line
A wire rope hoisting line, reeved on sheaves of the crown block and traveling block (in effect a block and tackle). Its primary purpose is to hoist or lower drill pipe or casing from or into a well. Also, a wire rope used to support the drilling tools.†
#18. Mud Pits
A series of open tanks, usually made of steel plates, through which the drilling mud is cycled to allow sand and sediments to settle out. Additives are mixed with the mud in the pit, and the fluid is temporarily stored there before being pumped back into the well. Mud pit compartments are also called shaker pits, settling pits, and suction pits, depending on their main purpose.†

#60. Walkways
An area cleared for moving through by personnel and protected with a handrail.†
#14. Fuel Tanks
Fuel storage tanks for the power generating system.†

#16. Mud Pump
A large reciprocating pump used to circulate the mud (drilling fluid) on a drilling rig.†
#30. Catwalk
The ramp at the side of the drilling rig where pipe is laid to be lifted to the derrick floor by the catline or by an air hoist.†

#24. Pipe Racks
A horizontal support for tubular goods.†
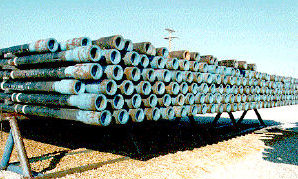
#8. Drill Pipe
The heavy seamless tubing used to rotate the bit and circulate the drilling fluid. Joints of pipe 30 feet long are coupled together with tool joints.†
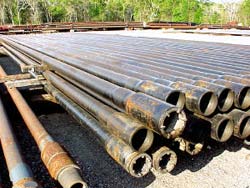
#38. Drill Collar
A heavy, thick-walled tube, usually steel, used between the drill pipe and the bit in the drill stem. It is used to put weight on the bit so that the bit can drill.†