Air Sealing Light Tubes
Scope

Air Sealing
Light tubes adjacent to unconditioned space include lens separating unconditioned and conditioned space and are fully gasketed.
- Seal all gaps and holes to unconditioned space with caulk or foam.
- Install a proper lens kit with a gasket.
- If the light tube does not have a lens kit with a gasket, install a light tube with at least R-6 insulation around the length of the tube.
ENERGY STAR Certified Homes Notes:
[Note: Guidance for ENERGY STAR Certified Homes Version 3.0, Revision 08 is coming soon.]
ENERGY STAR Certified Homes (Version 3.0, Revision 07) requires light tubes that do not include a gasketed lens to be sealed and insulated >= R-6 for the length of the tube.
Description
A light tube (also known as a solar tube or tubular skylight) is a tube that brings light from the roof to a room inside the house. One end of the tube has a clear dome that is mounted on the roof to allow in sunlight from any angle. The sunlight is directed down the tube, which is lined with highly reflective material that carries the sunlight to a diffuser mounted at the ceiling. The diffuser distributes the light inside the room. Light tubes can save energy by replacing electric lights for daytime light in rooms that do not have windows. Energy savings can be lost however if the tube is not air sealed and insulated.
How to Air Seal a Light Tube
- Locate a spot centered between ceiling joists. Cut the ceiling hole no larger than necessary and use a saw that will provide a clean smooth cut, which will be easier to seal.
- Following the manufacturer’s instructions, cut a hole in the roofing to the appropriate size. Apply a bead of caulk to the underside of the flashing collar that will be installed on the roof. Use a shingle ripper or reciprocating saw to loosen the roof shingles above the hole where the tube will be installed. Slip the flashing base under the loosened shingles above the hole. Screw the flashing into place. Cover the screw heads with caulk.
- Assemble the tube and use metal tape or mastic to seal any seams in the tube. Install the light tube according to the manufacturer’s instructions, installing any gaskets or seals supplied by the manufacturer. Ensure that a manufacturer-supplied gasket or caulk is applied around the base of the tube in the bottom tube assembly between the flange and the drywall.
- From the attic side, caulk or spray foam where the tube meets the drywall.
- Cover the tube with R-8 or greater duct insulation that includes a vapor barrier. Use mastic, metal tape (not duct tape), or fasteners to seal the insulation to the light tube.
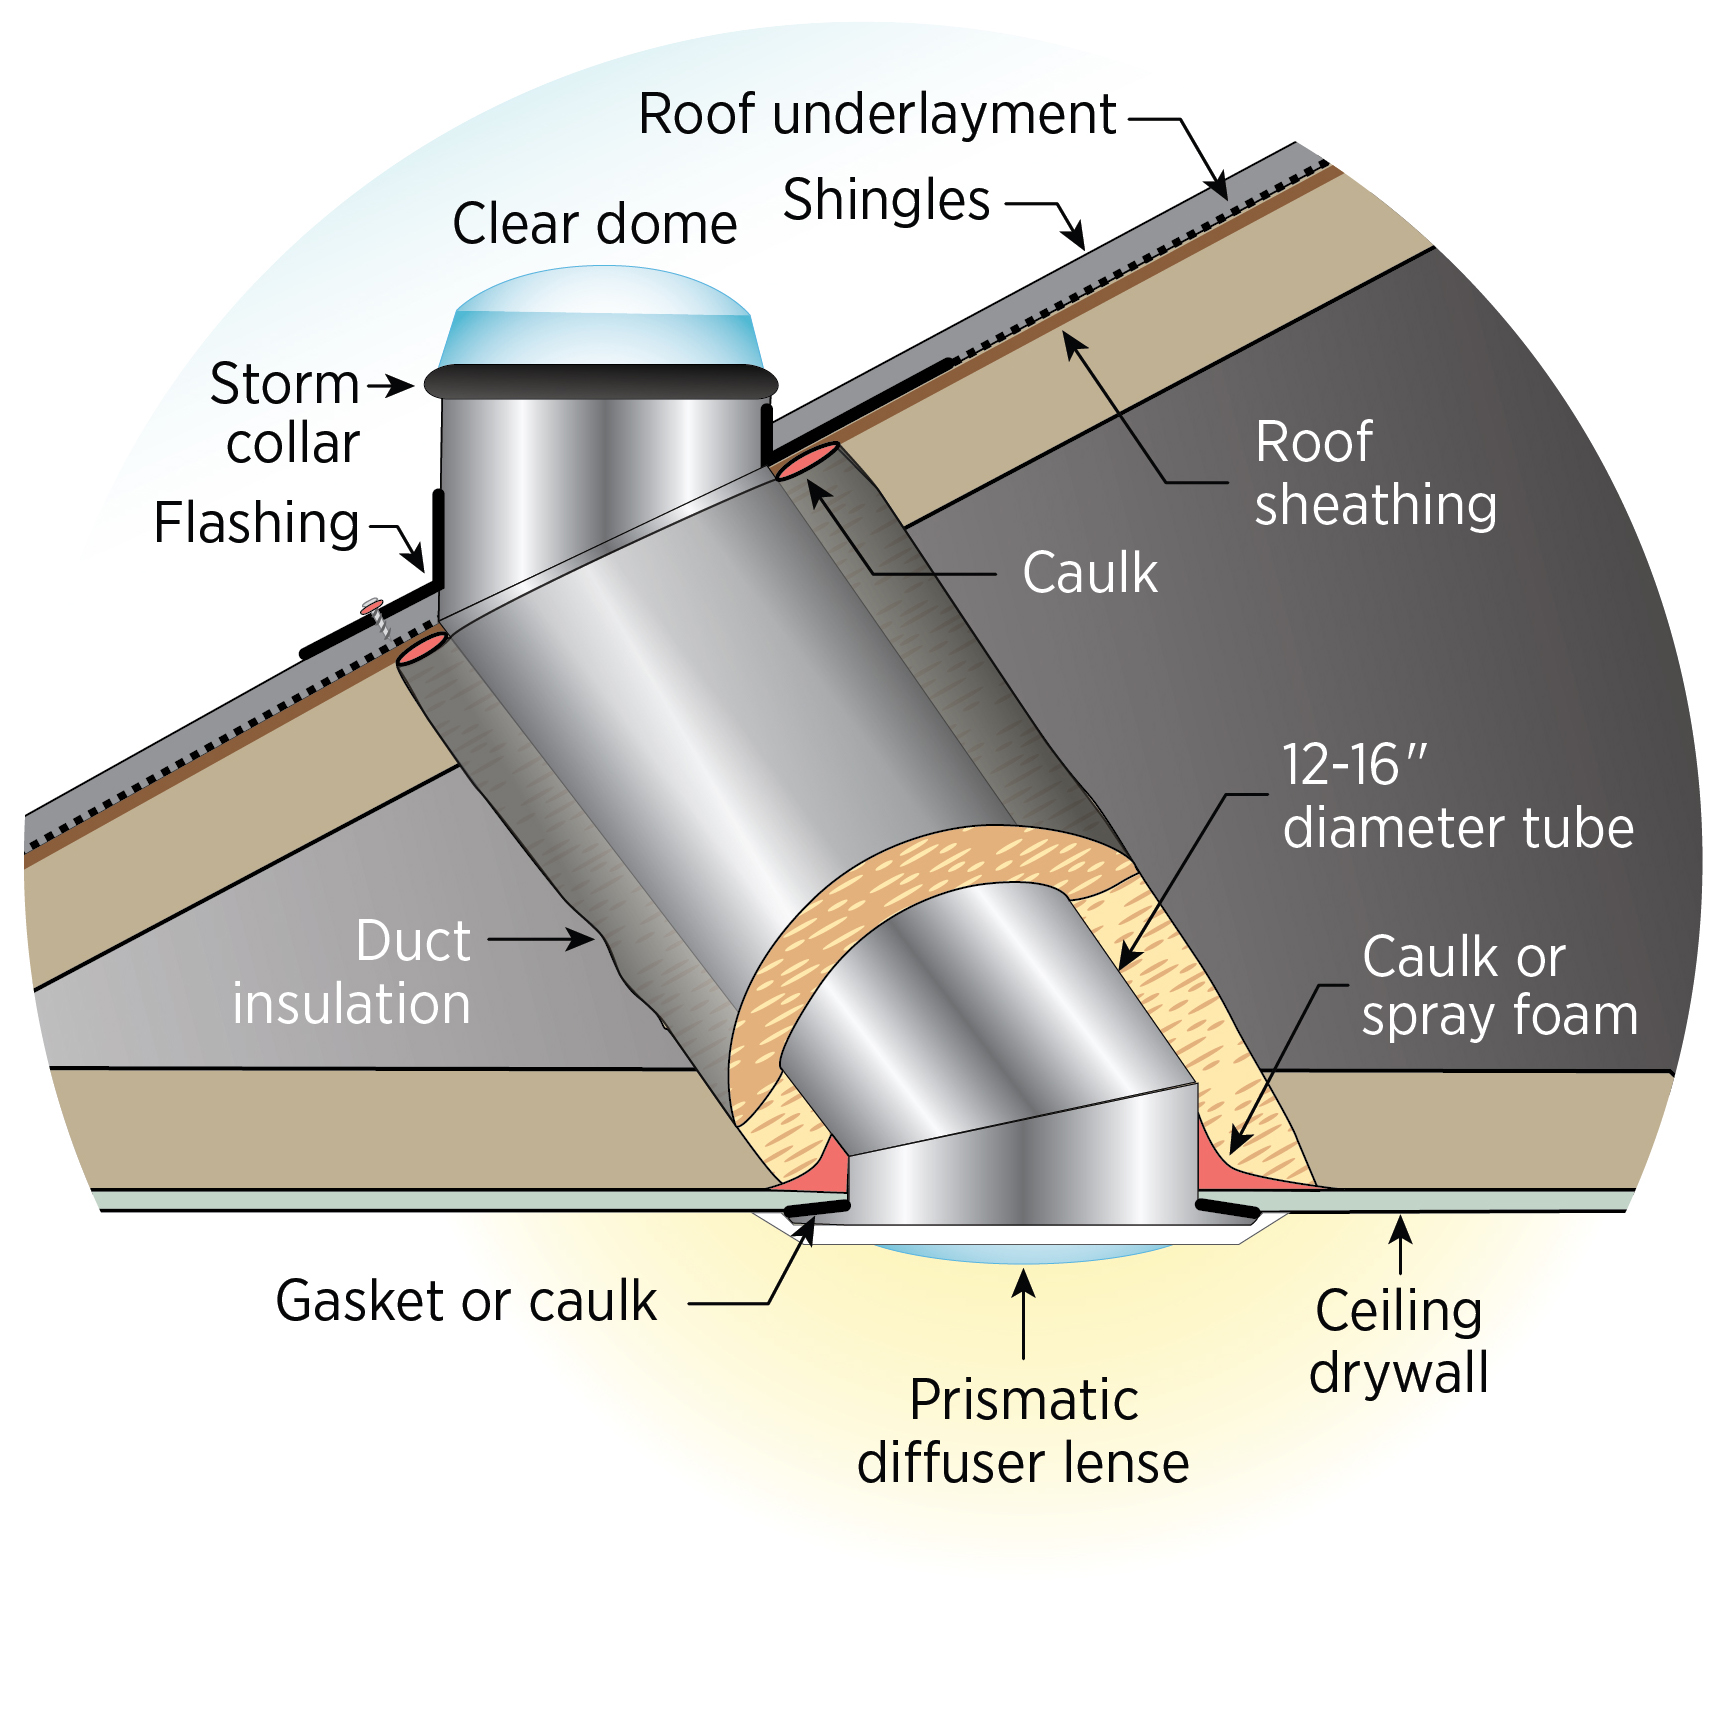
Figure 1 - Light tubes can represent a significant amount of surface area that is exposed to unconditioned attics. The metal tube needs to be air sealed at both ends and along all seams and it should be insulated. ![]()
Ensuring Success
Visually inspect and verify that the light tube is sealed at the ceiling deck and roof deck and is covered with insulation and an air barrier. Blower door testing and use of an infrared camera may help indicate whether a light tube is sufficiently air tight.
Climate
No climate specific information applies.
Training
Videos

CAD Images
None Available
Compliance
[Note: Guidance for ENERGY STAR Certified Homes Version 3.0, Revision 08 is coming soon.]
ENERGY STAR Certified Homes (Version 3.0, Revision 07), Thermal Enclosure Checklist, Air Sealing. Penetrations to unconditioned space fully sealed with solid blocking or flashing as needed and gaps sealed with caulk or foam. Light tubes adjacent to unconditioned space include lens separating unconditioned and conditioned space and are fully gasketed. Light tubes that do not include a gasketed lens are required to be sealed and insulated > R-6 for the length of the tube.
Exhibit 1: Mandatory Requirements. Certified under ENERGY STAR Qualified Homes Version 3.
AAMA/WDMA/CSA 101/I.S.2/A440-08 NAFS
North American Fenestration Standard/Specification for Windows, Doors, and Skylights. Available from AAMA. This is a voluntary standard/specification that covers requirements for the following components for new construction and retrofits: single and dual windows, single and dual side-hinged door systems, sliding doors, tubular daylighting devices, and unit skylights.
Table R402.4.1.1 Air Barrier and Insulation Installation, Shafts/penetrations: Duct shafts, utility penetrations, and flue shafts opening to exterior or unconditioned space are air sealed.*
Section N1102.4.1 Building thermal envelope. Joints (including rim joist junctions), attic access openings, penetrations, and all other such openings in the building envelope that are sources of air leakage are sealed with caulk, gasketed, weatherstripped or otherwise sealed with an air barrier material, suitable film or solid material.*
Table R402.4.1.1 Air Barrier and Insulation Installation, Shafts/penetrations: Duct shafts, utility penetrations, and flue shafts opening to exterior or unconditioned space are air sealed.*
Table N1102.4.1.1 Air Barrier and Insulation Installation, Shafts/penetrations: Duct shafts, utility penetrations, and flue shafts opening to exterior or unconditioned space are air sealed.* Table N1102.4.1.1, Air barrier and thermal barrier: A continuous air barrier is installed in the building envelope including rim joists and exposed edges of insulation. Breaks or joints in the air barrier are sealed. Air permeable insulation is not used as a sealing material.*
*Due to copyright restrictions, exact code text is not provided. For specific code text, refer to the applicable code.
More Info.
Tight Air Sealed Home = Comprehensive Draft Protection

Poorly air-sealed homes are less comfortable and cost more to maintain because they introduce drafts, cold spots, moisture, and insects into the home. Builders can provide a home with comprehensive draft protection by installing a continuous air barrier around the whole house and by taking extra care to caulk and seal in all those places where holes and cracks may be lurking - around wiring, plumbing, ducts, and flues; where wall framing meets flooring; around windows; where drywall meets top plates and sill plates; where rim joists meet foundation walls and subfloors; etc. Some builders use spray foam insulation in the walls, rim joists, and/or attic to insulate and air seal at the same time.
Alternate Terms
Sales Message
