Customize Your Email to Make Signing/Encrypting Messages Easier
By DON CIO Privacy Team - Published, August 3, 2015
The most commonly reported PII breach in the Department of the Navy is also one of the easiest breaches to prevent: failure to encrypt an email message containing personally identifiable information (PII). In August 2014, failure to encrypt email resulted in almost half of all PII breaches reported, impacting a significant number of DON personnel. More...
DON policy requires that all email containing sensitive information, including PII, must be digitally signed and encrypted. Guidelines for email encryption were issued in a Naval message from the DON CIO: "DON Policy Updates for Personal Electronic Devices Security and Application of Email Signature and Encryption."
On the Navy Marine Corps Intranet (NMCI), all email defaults to a “digital” signature. Encrypting a message must be manually selected in the “Options” tab, and users often forget to select the encrypt option when sending PII. This “Privacy Tip” provides a step-by-step tutorial to customize the encrypt option so the “Sign” and “Encrypt” functions are clearly visible in the “Message” tab (the tab normally used when drafting an email). However, you must still manually select/highlight the “Encrypt” tab.
Two important reminders when emailing sensitive information containing PII:
- You must mark all email containing PII with the Privacy warning: "For Official Use Only, Privacy Sensitive, any misuse may result in civil and or criminal penalty.”
- All recipients of the email must have an official need to know.
The following tutorial was developed by a Bureau of Personnel (BUPERS) staff member.
Do you ever forget, or just get tired of having to go through the “Options” tab to hit the right buttons to make sure your email is digitally signed and encrypted?
It would be much easier if you had “Sign” and “Encrypt” buttons on the default “Message” tab right next to the Send button (see below). Thanks to the miracle of ribbon customization, you can make that happen.

Here’s how…
1) Click the “New E-mail” button.
2) Note that you’re in the default “Message” tab, then right click your mouse in the blank area of the ribbon on the right and select “Customize the Ribbon.”
3) Select “New Group.”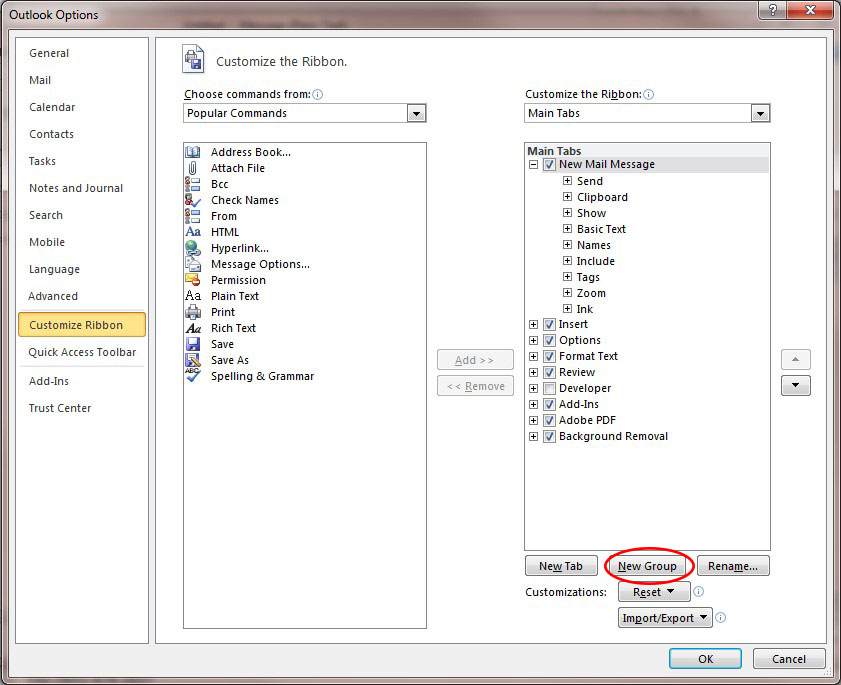
4) Select “Rename.”
5) Type whatever name you choose to call your new group in the Display name dialogue box and then click “OK.”
6) Click the “up” pointer on the far right until your new group is directly below the “send” group.
7) Select “All Commands” from the drop-down menu.
8) Scroll down to “Encrypt” and select “Add.”
9) Scroll down to “Sign” then select “Add” and then click “OK.”
10) The “Sign” & “Encrypt” buttons are now available in the email “Message” tab. 
This will make it much easier to encrypt email messages that contain sensitive and/or PII information.