Google+ History API
Welcome to the early developer preview of Google+ history.
We think the difference between saving and sharing is really important for communicating online. After all, not every thought that crosses your mind comes out of your mouth. Google+ features, like Instant Upload, give you control over how you save and share your photos. With Google+ history, we’re starting to bring this save/share capability to other online activities.
When you sign up for the developer preview, your site or app will be able to privately save moments, such as a listened song, or a visited restaurant, to your users’ Google+ history. From there, your users can, if they want, share those moments with others, directly to the stream and/or on their profile. In all cases, moments in history include attribution of your site or app.
Your use of the Google+ history API is subject to the Google+ Platform Button Policies and Google+ Platform Terms of Service.
Getting started
Google+ history is a collection of moments that describe activities the user has engaged across the web and applications. You can use the Google+ history API to write to a user's Google+ history and they can share the important moments in their life with their circles.
You can write many kinds of moments to the Google+ history based on the activities of the user within your application or site. Your application can classify the activities based on schema.org markup to accurately describe the moment.
To get started writing to Google+ history, you will set up your application in the APIs Console, authorize the user, implement a client-side or server-side flow, and write moments by using the REST API:

Setting up your application
Before you can start writing moments or testing the sample code, you must configure your project to use the Google+ history API.
- Sign up for the developer preview and test.
- Create an API project for your application with the Google APIs Console.
- Enable the APIs in the Services pane
of the APIs Console. Toggle the
switches to 'on' for the Google+ API and the Google+ history API as
pictured here:

- Create an OAuth 2.0 client ID by clicking "Create an OAuth 2.0 Client ID" on
the API Access pane. See our
general OAuth 2.0 documentation for more information.

Testing your preview account
Sign up for the developer preview with your Google Account. Verify that you are registered by reloading this page; you should see a sign-in button within the black outline below:
If you do not see the sign-in button, you are not yet in the developer preview. Try signing up again and check your email for the occasionally necessary verification step. Also, ensure that you are signed into the Google Account that is associated with the provided email. Reload this page and check again for the button.
Authorizing the user
The Google+ sign-in button initiates a standard OAuth 2.0 flow. This flow signs your user in and provides you with an ID token, access token, and a refresh token. You can use these tokens to write moments to Google+ with the history API.
You have two options for signing in the user and writing moments:
- A lightweight client-side flow, which allows you to use use HTML and JavaScript to sign in your user.
- A more robust server-side flow, which provides offline access to the APIs. Offline access allows your back-end code to use the API directly even when the user is not viewing pages on your site.
Choose the flow that best matches the requirements of your application.
Client-side flow
The client-side flow is the more simple approach. Signing in and writing moments to Google+ both take place entirely within the user's web browser with JavaScript. Because everything is happening in the user's web browser, you can write moments only while your user is actively viewing your application.
This flow chart describes the interactions between your application and Google+.
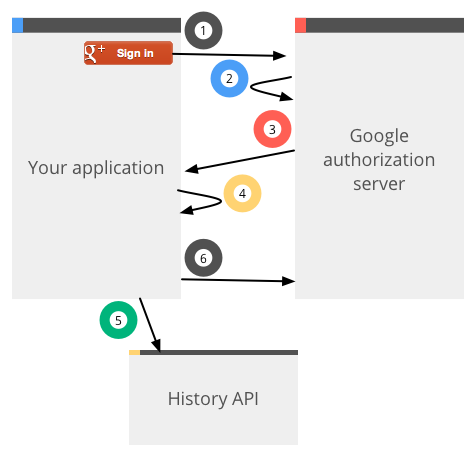
- The user clicks the sign-in button.
- The OAuth confirmation dialog is displayed. The user grants access.
- The access token is set within the JavaScript client library.
- The callback function is triggered. It must remove the sign-in button.
- The webpage writes moments by POSTing to the REST API over AJAX.
- The webpage reloads to fetch updated access tokens as needed.
Include the button
The minimal invocation of the Google+ sign-in button for the client-side flow
only requires that you specify two attributes: clientid and callback.
<!-- Place this tag where you want the sign-in button to render -->
<g:plus action="connect" clientid="{CLIENT_ID}" callback="{CALLBACK_FUNCTION}"></g:plus>

<!-- Place this asynchronous JavaScript just before your </body> tag -->
<script type="text/javascript">
 (function() {
   var po = document.createElement('script'); po.type = 'text/javascript'; po.async = true;
   po.src = 'https://apis.google.com/js/plusone.js';
   var s = document.getElementsByTagName('script')[0]; s.parentNode.insertBefore(po, s);
 })();
</script>
Next steps
If you determined that the client-side flow is appropriate for your application, follow the instructions in the client-side flow example.
Server-side flow
Server-side processing gives you more options for integrating Google+ into your application. You can write moments outside of the user's web browser; for example, you could batch tasks to run overnight when your server is under less load. By storing the OAuth refresh token, you can write moments when the user is offline.
This flow chart describes the interactions between your application and Google+.

- The user clicks the sign-in button.
- The OAuth confirmation dialog is displayed. The user grants access.
- The user is redirected to your OAuth 2.0 callback handler.
- A
stateand an OAuthcodeare passed to your callback handler as HTTP GET parameters. Your callback validates that thestateparameter matches the value that was supplied to thestateattribute of the sign-in button which initiated this flow. - Your back-end code exchanges the OAuth code for access and refresh tokens.
- Your OAuth callback handler renders a page that calls the
completeJavaScript function. Calling thecompletefunction indicates to Google that you have completed the code exchange. - The callback function is triggered. It must remove the sign-in button.
- Your back end makes API calls and write moments by using the access token.
- Your back end requests new access tokens as needed by using the refresh token. Google API client libraries handle this automatically.
Include the button
For the server-side flow, the sign-in button markup adds the state and redirecturi fields:
<!-- Place this tag where you want the sign-in button to render -->
<g:plus action="connect"
  clientid="{CLIENT_ID}" state="{STATE}" redirecturi="{REDIRECT_URI}"
  callback="{CALLBACK_FUNCTION}"></g:plus>

<!-- Place this asynchronous JavaScript just before your </body> tag -->
<script type="text/javascript">
 (function() {
   var po = document.createElement('script'); po.type = 'text/javascript'; po.async = true;
   po.src = 'https://apis.google.com/js/plusone.js';
   var s = document.getElementsByTagName('script')[0]; s.parentNode.insertBefore(po, s);
 })();
</script>
Next steps
If you determine that the server-side flow is appropriate for your application, follow the instructions in the server-side flow example.
After your user is signed in
After the user completes the sign-in process, your app has an access token for the user. You can now use this access token to call the APIs that you enabled for this project, and to access the user's identity on Google+.
Button attributes
| Key | Value | Default | Required | Description |
|---|---|---|---|---|
| action | connect | — | Required | This attribute must be set to connect for the sign-in
button to render. |
| width | int | — | — |
The desired width of the button in pixels. If the width is not set, the button automatically selects a size based on the language and client web browser. If the supplied value is too small, the button does not render and an error message is displayed on the console. |
| height | int | — | — |
The desired height of the button in pixels. If the height is not set, the button automatically selects a size based on the language and client web browser. If the supplied value is too small, the button does not render and an error message is displayed on the console. |
| clientid | string | — | Required | Your OAuth 2.0 client ID that you obtained from the Google APIs Console. |
| redirecturi | uri | — | Required for server-side flow |
The URI to which Google redirects your users after they complete the OAuth consent dialog. This location is where you must exchange the `code` to complete the OAuth flow. If You must add this value to the 'Redirect URIs' list in the Google APIs Console. If |
| scope | A space delimited list of scope URIs | — | — |
The OAuth 2.0 scopes for the APIs that you would like to use. The You must specify
|
| state | string | — | Required for server-side flow |
A secret identifier used to maintain state between the page containing
the sign-in button and the completion of the OAuth flow in the
Learn more about using this parameter on the server-side flow page. |
| approvalprompt | auto, force | auto | — | Allows control over when the user is re-prompted for consent.
When set to auto, the user only sees the OAuth consent
dialog if they have not authorized your application. When set to
force, the user is shown the OAuth consent dialog each
time they click on the sign-in button.
|
| callback | function(authResult) | — | — |
A function, in the global namespace, to be called after a successful sign-in occurs. This function must hide the sign-in button. This function is passed a single parameter: a JSON object with the following structure:
{
  "id_token": the user ID,
  "access_token": the access token,
  "expires_in": the validity of the tokens, in seconds,
  "state": the state value received from the server,
  "error": an error message if problems occurred
}
|
Writing moments
Moments are written to Google+ by using the history REST API. You should consider using one of the client libraries to send API requests. The library abstracts the complexities of authorization and transport.
Write moments by making an HTTP POST request to
https://www.googleapis.com/plus/v1moments/people/me/moments/vault.
You must specify an access token that has been granted with the
https://www.googleapis.com/auth/plus.moments.write scope. You can specify this
access token either in the HTTP Authorization header, or as a query parameter.
The request body is a simplified version of the HTML5 microdata specification JSON representation for the type of moment that you are communicating.
The API responds with a 204 HTTP status code upon a successful POST request.
Debug mode
If you specify the GET parameter debug=true when you write moments, the API
response body contains an expanded payload that includes all of the data
that Google was able to extract from your target URLs.
Request body structure
The following fields are common to all types of moments:
| Key | Value | Required | Description |
|---|---|---|---|
| type | String | Required | The target type. Available types are listed below. |
| target | Object | Required |
The URL of the item that was acted upon. In the case of a comment on an article, this would be the URL of the article. Attributes of the target must be included in the page found at the `target.url` as schema.org markup. |
| result | Object | Required for some moment types | If a user action results in the creation of new data, you can specify a result object that describes this data. For example, if a user creates a comment, this object describes that comment. See the moment type reference for a list of values that are available for the result object of each type. |
Example request body for a view activity.
{
  "type": "http://schemas.google.com/ViewActivity",
  "target": {
    "url": "http://www.youtube.com/watch?v=6y_xKVSRAy8"
  }
}
Moments and results
Some user actions inherently create data, such as commenting on an article. Other actions do not create data, such as watching a video. To accommodate these differences moments are grouped into a two different categories depending on whether or not they create data.
- For user actions that do not result in the creation of data, you must
communicate two top level values:
typeandtarget. - For user actions that do result in the creation of data you must also include
a
resultobject which represents that newly created data.
Types of moments
Many different kinds of moments are available to represent different user
actions within your app. It is very important that you use the correct type.
For example, do not use a CheckInActivity when your user comments on a blog
entry. Use a CommentActivity instead.
| Type | Result |
|---|---|
| AddActivity | — |
| BuyActivity | — |
| CheckInActivity | — |
| CommentActivity | Required |
| CreateActivity | — |
| ListenActivity | — |
| ReserveActivity | Optional |
| ReviewActivity | Required |
| ViewActivity | — |
Request a new type
If none of the types of moments described in this document are appropriate for your application please request an addition.
- Check to see if it has already been requested: Visit our
issue tracker
to see if someone else has already made a request that will satisfy your
needs. If the issue already exists, you can click on the
 icon to cast your vote and subscribe
to updates.
icon to cast your vote and subscribe
to updates. - Request a new type: If no filed request is appropriate for your needs, you should request its addition. Please complete this form.
In the mean time, you can use AddActivity for any type of moment.
Subtypes
Schema.org types are organized into a tree. Many types have subtypes. Wherever a specific item type is listed, you can also use any of the known subtypes.
Google+ history
Your user can see and manage the submitted moments on their Google+ history page. They can choose which moments to share with their circles or which to keep private.
Frequently asked questions
- Why would I want to specify the callback?
-
The
callbackfunction executes code immediately after a successful sign-in. At the very least, you must use this callback to hide the sign-in button to clearly indicate to your user that they successfully signed in.You might also use the callback to support a flow such as prompting a user to sign into their Google+ account after they submit a comment. After they are signed in, you can submit the moment for that comment to Google.
- Do I need to use the refresh token?
-
Access tokens expire about one hour after they are issued. The refresh token is used in the server-side flow to acquire new access tokens. The Google API client libraries complete the refresh process automatically.
- What do I do if the token refresh process fails?
-
This can happen if the refresh token is corrupt or the user has revoked access. Delete the token and send the user through the OAuth flow again.
- What web browsers are supported?
-
All Google+ plugins support the same web browsers as the Google+ web
interface:
- Windows: Chrome, Firefox 3.6 and up, Internet Explorer 8 and up
- Linux : Chrome, Firefox 3.6 and up
- Mac: Chrome, Firefox 3.6 and up, Safari 4 and up
- What happens if I do not specify schema.org markup on my target URL?
-
Schema.org markup is required on all target URLs during the developer preview. If you write moments with target URLs that do not contain schema.org markup, the operation might succeed, but you should not depend on this working consistently or reliably.
- How do I delete a moment that has been submitted to Google+?
-
During the developer preview, moments can be deleted from the user's history page. Work is currently in progress to develop an API that will allow you to delete moments that your application has already written.
- I found a bug! What are the known issues?
-
During the developer preview you're likely to encounter bugs. Visit our issue tracker to see a list of known issues. If the issue that you're observing is not listed, please let us know by completing the new issue form.