Read the full article at: Introduction to dcl
Hosted by Media Temple, domain from Name.com.
]]>I’m incredibly honored to have Eugene Lazutkin author for David Walsh Blog. Eugene has written much of the vector graphic code for the Dojo Toolkit’s dojox/gfx (and subsequent charting and drawing resources) library, a library I consider to be mind-blowingly awesome. Eugene chose to write about dcl
, an ultra-flexible, tiny OOP JS library.
dcl
is a minimalistic yet complete JavaScript package for
node.js and modern browsers. It implements OOP
with mixins + AOP at both “class” and object level, and works in strict
and non-strict modes.
The simplest way to learn something is to dive right in. Let’s implement a simple widget based on reactive templating: when we change parameters of a widget, they are immeditely reflected in a web page.
Assuming that we run our code using AMD format in browser, our “code shell” will look like that:
require( ["dcl", "dcl/bases/Mixer", "dcl/mixins/Cleanup", "dcl/advices/memoize"], function(dcl, Mixer, Cleanup, memoize){ // our code goes here } );
As the first step let’s code our data model:
var Data = dcl(Mixer, { declaredClass: "Data", updateData: function(data){ dcl.mix(this, data); } });
We derived our class using single inheritance from
Mixer, which comes with dcl
.
Mixer
is a very simple base. All it does is it copies properties of
the first constructor argument to an instance.
Obviously in this simple example we could just call updateData()
from our
constructor, but let’s assume that a constructor and an updater can do
(slightly) different things and we want to keep them separately.
declaredClass
is completely optional, yet recommended to be specified
(any unique human-readable name is fine), because it is used by debugging
helpers included with `dcl`.
Now let’s code our nano-sized template engine, which substitutes strings
like this: ${abc}
with properties taken directly from an instance
(this.abc
in this case). Something like that:
var Template = dcl(null, { declaredClass: "Template", render: function(templateName){ var self = this; return this[templateName].replace(/\$\{([^\}]+)\}/g, function(_, prop){ return self[prop]; }); } });
We specify what template to use by name, which is a property name on an object instance, and it fills out a template string using properties specified on an object.
This is another demonstration of single inheritance: our Template
is based
on a plain vanilla Object
, like any JavaScript’s object, which is indicated
by using null
as a base.
What else do we need? We need a way to manage our DOM node:
var Node = dcl([Mixer, Cleanup], { show: function(text){ if(this.node){ this.node.innerHTML = text; } }, destroy: function(){ if(this.node){ this.node.innerHTML = ""; } } });
The code above provides a way to show some HTML, and clears out its presentation
when we destroy()
a widget.
It uses two bases: already mentioned Mixer
is used to get a property in
during initialization (node
in this case), and
Cleanup, which again comes with dcl
.
The latter chains all destroy()
methods together and provides a simple
foundation for clean up management, so all resources can be properly disposed of.
What we did up to this point is we came up with very small manageable orthogonal components, which reflect different sides of our widget, and can be combined together in different configurations. Let’s put them all together now:
var NameWidget0 = dcl([Data, Template, Node], { declaredClass: "NameWidget0", template: "Hello, ${firstName} ${lastName}!" }); var x = new NameWidget0({ node: document.getElementById("name"), firstName: "Bob", lastName: "Smith" }); x.show(x.render("template")); // Hello, Bob Smith! x.updateData({firstName: "Jill"}); x.show(x.render("template")); // Hello, Jill Smith!
It works, but it is not very coherent, and way too verbose. Don’t worry, we will fix it soon.
Some readers probably noticed that we have three bases now: Data
, Template
,
and Node
, and two of them (Data
, and Node
) are based on Mixer
.
How does it work? It works fine, because underneath dcl
uses
C3 superclass linearization algorithm
(the same one used by Python), which removes duplicates, and sorts bases
to ensure that their requested order is correct. In this case a single
copy of Mixin
should go before both Data
and Node
. Read more on
that topic in dcl() documentation.
Now let’s address deficiencies of our implementation #0:
Both requirements are simple and seem to call for good old-fashioned supercalls:
var NameWidget1 = dcl([Data, Template, Node], { declaredClass: "NameWidget1", template: "Hello, ${firstName} ${lastName}!", constructor: function(){ this.showData(); }, updateData: dcl.superCall(function(sup){ return function(){ sup.apply(this, arguments); this.showData(); }; }), showData: function(){ var text = this.render("template"); this.show(text); } }); var x = new NameWidget1({ node: document.getElementById("name"), firstName: "Bob", lastName: "Smith" }); // Hello, Bob Smith! x.updateData({firstName: "Jill"}); // Hello, Jill Smith!
Much better!
Let’s take a look at two new things: constructor and a supercall. Both
are supposed to be supercalls, yet look differently. For example,
constructor doesn’t call its super method. Why? Because dcl
chains
constructors automatically.
updateData()
is straightforward: it calls a super first, then a method
to update a visual. But it is declared using a double function pattern.
Why? For two reasons: run-time efficience, and ease of debugging. Read all
about it in dcl.superCall() documentation,
and Supercalls in JS.
While this implementation looks fine, it is far from “fine”. Let’s be smart and look forward: in real life our implementation will be modified and augmented by generations of developers. Some will try to build on top of it.
showData()
in construct is not going to be the last code
executed, as we expected. Constructors of derived classes will be called
after it.updateData()
will be overwritten, and some programmers may forget
to call a super. Again, they may update data in their code after
our code called showData()
resulting in stale data shown.Obviously we can write lengthy comments documenting our “implementation decisions”, and suggesting future programmers ways to do it right, but who reads docs and comments especially when writing “industrial” code in a crunch time?
It would be nice to solve those problems in a clean elegant way. Is it even possible? Of course. That’s why we have AOP.
Let’s rewrite our attempt #1:
var NameWidget2 = dcl([Data, Template, Node], { declaredClass: "NameWidget2", template: "Hello, ${firstName} ${lastName}!", constructor: dcl.after(function(){ this.showData(); }), updateData: dcl.after(function(){ this.showData(); }), showData: function(){ var text = this.render("template"); this.show(text); } }); var x = new NameWidget2({ node: document.getElementById("name"), firstName: "Bob", lastName: "Smith" }); // Hello, Bob Smith! x.updateData({firstName: "Jill"}); // Hello, Jill Smith!
Not only we got a (slightly) smaller code, now we are guaranteed, that
showData()
is called after all possible constructors, and after every
invokation of updateData()
, which can be completely replaced with code
that may use supercalls. We don’t really care — we just specified
code, which will be executed *after* whatever was put there by other
programmers.
Now imagine that our user wants to click on a name, and get a pop-up with
more detailed information, e.g., an HR record of that person. It would make
sense to keep the information in one place, yet render it differently.
And we already have a provision for that: we can add another template
property, and call render()
with its name:
var PersonWidget1 = dcl(NameWidget2, { declaredClass: "PersonWidget1", detailedTemplate: "..." }); var x = new PersonWidget1({ node: document.getElementById("name"), firstName: "Bob", lastName: "Smith", position: "Programmer", hired: new Date(2012, 0, 1) // 1/1/2012 }); // Hello, Bob Smith! var detailed = x.render("detailedTemplate");
In the example above I skipped the definition of a detailed template for brevity. But you can see that we can add more information about person, and we can define different templates when a need arises.
Imagine that we profiled our new implementation and it turned out
that we call render()
method directly and indirectly very frequently,
and it introduces some measurable delays. We can pre-render a template
eagerly on every data update, yet it sounds like a lot of work for several
complex templates, and some of them are not even going to be used. Better
solution is to implement some kind of lazy caching: we will invalidate cache
on every update, yet we will build a string only when requested.
Obviously such changes involve both Data
and Template
. Or it can be done
downstream in NameWidget
or PersonWidget
. Now look above and please
refrain from doing those changes: so far we tried to keep our “classes”
orthogonal, and caching is clearly an orthogonal business.
dcl
already provides a simple solution:
memoize advice.
Let’s use it in our example:
var PersonWidget2 = dcl(NameWidget2, { declaredClass: "PersonWidget2", detailedTemplate: "...", // memoization section: render: dcl.advise(memoize.advice("render")), updateData: dcl.advise(memoize.guard ("render")) });
With these two lines added our render()
result is cached for every
first parameter value (“template” or “detailedTemplate” in our case),
and the cache will be invalidated every time we call updateData()
.
In this article we presented dcl
package. If you plan to use it
in your Node.js project install it like this:
npm install dcl
For your browser-based projects I suggest to use volo.js:
volo install uhop/dcl
The code is an open source on github.com/uhop/dcl under New BSD and AFL v2 licenses.
This article didn’t cover a lot of other things provided by dcl
:
inherited()
supercalls.dcl
.dcl
.If you want to learn more about it, or just curious, you can find a lot of information in the documentation.
Happy DRY coding!
Read the full article at: Introduction to dcl
Hosted by Media Temple, domain from Name.com.
]]>Read the full article at: CSS calc
Hosted by Media Temple, domain from Name.com.
]]>The calc routine is especially useful when calculating relative widths. Calculations can be additions, subtractions, multiplications, and divisions. Have a look:
/* basic calc */ .simpleBlock { width: calc(100% - 100px); } /* calc in calc */ .complexBlock { width: calc(100% - 50% / 3); padding: 5px calc(3% - 2px); margin-left: calc(10% + 10px); }
WebKit and Opera currently require a browser prefix for calc()
. Be sure to use whitespace around operators so that they aren’t construed as positive and negative notations.
CSS calc is another example of CSS taking over the role of JavaScript in layout, and I think it’s a great thing. As we move more toward responsive design, calc allows us to use percentages for overall block widths, with just a touch of pixel help for some of its components. Have you used calc for your apps? Share how you used calc!
Read the full article at: CSS calc
Hosted by Media Temple, domain from Name.com.
]]>Read the full article at: Placeholders and Overflow
Hosted by Media Temple, domain from Name.com.
]]>text-overflow: ellipsis
!
input[placeholder] { text-overflow: ellipsis; } ::-moz-placeholder { text-overflow: ellipsis; } /* firefox 19+ */ input:-moz-placeholder { text-overflow: ellipsis; }
Most developers are unaware of each of the properties and even fewer are aware that they are so perfectly complimentary!
Read the full article at: Placeholders and Overflow
Hosted by Media Temple, domain from Name.com.
]]>Read the full article at: pointer Media Query
Hosted by Media Temple, domain from Name.com.
]]>This media query has not yet been implemented and is currently only a proposed spec. I’ve written this post to raise awareness of it and get general thoughts about it.
As more devices emerge and differences in device interaction are implemented, the more important good CSS code will become. In order to write good CSS, we need some indicator about device capabilities. We’ve used CSS media queries thus far, with checks for max-width and pixel ratios. One new proposed CSS media query is the pointer media query; the pointer media query provides information about how accurate the device pointer is (if present).
The pointer media query has three values:
none
– device has no pointercoarse
– pointer has limited accuracyfine
– pointer has high level of accuracyA fine pointer would be a mouse or a stylus-based touch screen, while a coarse pointer would be a finger-based touch screen, like an iPad, iPhone, or other tablet. The example provided within the spec shows enlarging checkboxes and radio buttons on coarse-pointered devices:
/* Make radio buttons and check boxes larger if we have an inaccurate pointing device */ @media (pointer:coarse) { input[type="checkbox"], input[type="radio"] { min-width:30px; min-height:40px; background:transparent; } }
I envision this API being used to enlarge navigation items and other prominent links when the pointer is coarse. What would you do with the pointer media query?
Read the full article at: pointer Media Query
Hosted by Media Temple, domain from Name.com.
]]>Read the full article at: How to Create a Twitter Card
Hosted by Media Temple, domain from Name.com.
]]>One of my favorite social APIs was the Open Graph API adopted by Facebook. Adding just a few META tags to each page allowed links to my article to be styled and presented the way I wanted them to, giving me a bit of control over how my content is presented on Facebook. Twitter’s new Twitter Cards API allows for the same idea: add META tags to your pages to allow links to your site to be more informational when tweeted. Implementing Twitter Card META tags on your site takes five minutes, applying for approval from Twitter takes another five minutes, and from that point forward, your content is presented much more professionally. Let’s get started!
There are three types of Twitter Cards: summary, photo, and video. The summary Twitter Card is for articles and text-based content, while photo and video cards are self-explanatory (YouTube uses the video card type, for example). There are a few META tags used for all card types, then a few more that are card-type-specific. All META tag name attributes are prefixed with twitter:
.
META tags you would use in all card cases include:
twitter:card
– The type of card to be created: summary, photo, or video.twitter:url
– The URL that should be used for the card. This will likely be the same URL as the page’s canonical link.twitter:title
– The title as it should display in the Twitter Card.twitter:description
– A 200 character summary of the content at the given URL.twitter:image
– A representative image URL for the content. In many cases, simply providing your logo’s URL will be just fine.Each of these items get their own META tag, so the Twitter Card META tags for this page would look like:
<meta name="twitter:card" content="summary"> <meta name="twitter:url" content="http://davidwalsh.name/twitter-cards"> <meta name="twitter:title" content="How to Create a Twitter Card"> <meta name="twitter:description" content="Twitter's new Twitter Cards API allows developers to add META tags to their website, and Twitter will build card content from links to a given site."> <meta name="twitter:image" content="http://davidwalsh.name/demo/openGraphLogo.png">
Twitter also provides attribution META tags for content, providing an opportunity for authors to get credit within the TwitterCard:
twitter:site
- The Twitter username used by the given site including the ‘@’twitter:creator
– The Twitter username of the individual author of the contentI use the same handle for the site and author, though I could use my @davidwalsh account for the creator if I wanted:
<meta name="twitter:site" content="@davidwalshblog"> <meta name="twitter:creator" content="@davidwalshblog">
These are the basic META tags you’ll want to use whenever creating Twitter Cards. Let’s have a look at the tags specific to image and video cards!
Media-specific cards require a bit more information about the media itself, so for image and video cards, these additional tags are useful:
twitter:image:width
– The width of the imagetwitter:image:height
– The height of the imagetwitter:player
– URL to the IFRAME’d player, must be HTTPStwitter:player:width
– The width of the player IFRAMEtwitter:player:height
– The height of the player IFRAMEtwitter:player:stream
– The URL to stream as videotwitter:player:stream:content_type
– The content type of the streamTwitter video cards are much more involved than the other card types, but well worth configuring so that users can watch their videos within their Twitter app. Sample tags could look like:
<meta name="twitter:image:width" content="600"> <meta name="twitter:image:height" content="600"> <meta name="twitter:player" content="https://davidwalsh.name/video-embed/12345"> <meta name="twitter:player:width" content="435"> <meta name="twitter:player:height" content="251"> <meta name="twitter:player:stream" content="https://davidwalsh.name/raw-stream/12345.mp4"> <meta name="twitter:player:stream:content_type" content="video/mp4; codecs="avc1.42E01E1, mpa.40.2"">
Twitter provides a Card Preview utility so that you can ensure your META tags are used in a valid fashion. I recommend using this utility for all card types, but especially for video card types, as they require the most information.
Now that the Twitter Card META tags are in place, the next step is applying for approval from Twitter.
Twitter requires that your domain be approved before they will allow Twitter Cards for your site; this is likely to combat abuses like pornography and sites promoting illegal activity. When you apply for Twitter Card approval, you provide simple information about your site, like the Twitter username associated with the domain, which cards you intend on using, and so on:
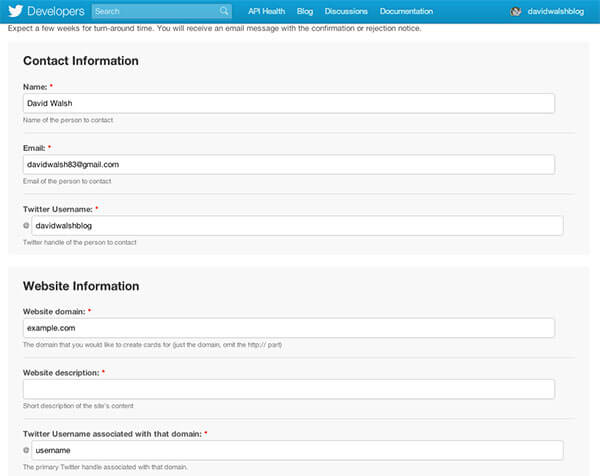
Twitter mentions the approval process can tween five and ten days, but my site was approved in two days. Once your site is approved, links to your site containing the appropriate META tags will provide Twitter clients enough information to build Twitter Cards!
If you’re running into issues with your card content not being pull correctly, ensure that your robots.txt file isn’t blocking Twitter. Twitter’s bot is aptly named Twitterbot
so check your robots.txt file for incorrectly Disallow
rules!
The following image shows a Twitter card for this site:
At first I was upset about Twitter’s idea of a Twitter Card because I assumed it would close down the platform, and to this point, no one knows if that will be the case. What I do know is that implementing Twitter Card META tags is incredibly easy and provides another way for business / site owners to effectively market their site. Twitter Cards are also nice for the user, allowing them to play videos within their Twitter client, or simply provide a visual associated with a given tweet.
Want to see Twitter Cards in action? Tweet a link to this or any other post on the site, then click/tap the tweet for the detailed view!
Read the full article at: How to Create a Twitter Card
Hosted by Media Temple, domain from Name.com.
]]>Read the full article at: Vibration API
Hosted by Media Temple, domain from Name.com.
]]>It’s always good to check for the presence of API support before using it; here’s how you can detect the Vibration API’s presence:
// Standards ftw! var supportsVibrate = "vibrate" in navigator;
The Vibration API consists of only one method provided to the window.navigator
object: vibrate
.
The navigator.vibrate
function accepts either a single number or an array of numbers for a series of vibrations. When using the array method, the even indices represent vibration duration, the odd indices represent a delay before the next vibration.
// Vibrate once for one second navigator.vibrate(1000); // Vibrate multiple times for multiple durations // Vibrate for three seconds, wait two seconds, then vibrate for one second navigator.vibrate([3000, 2000, 1000]);
To stop vibration when active, simply pass a 0 or an empty array to the navigator.vibrate
method:
// Either of these stop vibration navigator.vibrate(0); navigator.vibrate([]);
Realize that vibrations do not loop until stopped with 0 or an empty array; the single number vibration occurs once and then becomes silent, the array of vibration durations run and becomes silent again.
Some basic setInterval
and clearInterval
action will allow us you to create persistent vibration:
var vibrateInterval; // Starts vibration at passed in level function startVibrate(duration) { navigator.vibrate(duration); } // Stops vibration function stopVibrate() { // Clear interval and stop persistent vibrating if(vibrateInterval) clearInterval(vibrateInterval); navigator.vibrate(0); } // Start persistent vibration at given duration and interval // Assumes a number value is given function startPeristentVibrate(duration, interval) { vibrateInterval = setInterval(function() { startVibrate(duration); }, interval); }
Of course the snippet above doesn’t take into account the array method of vibration; persistent array-based vibration will require calculating the sum of the array items and creating an interval based on that number (with an additional delay, probably).
This API is clearly targeted toward mobile devices. The Vibration API would be good for alerts within mobile web applications, and would be especially awesome when used in games or media-heavy applications. Imagine watching a video on your mobile device, and during an explosion scene, your phone got a bit of a shake. Or playing Bomberman and feeling a gentle kick when a block explodes!
What do you think of the Vibration API: immediately useful or not quite yet?
At the time of writing, Firefox BETA for Android is the only browser which supports the Vibration API. WebKit landed the Vibration API a while back, but in my testing of iOS Chrome and Safari, as well as Android Chrome and standard browser, I could not find a working vibration property. Opera doesn’t appear to support vibration yet either.
Read the full article at: Vibration API
Hosted by Media Temple, domain from Name.com.
]]>Read the full article at: Disable Autocomplete, Autocapitalize, and Autocorrect
Hosted by Media Temple, domain from Name.com.
]]>Disabling these three native mobile features is as easy as a few simple HTML attributes:
<input autocomplete="off" autocorrect="off" autocapitalize="off" spellcheck="false" /> <textarea autocomplete="off" autocorrect="off" autocapitalize="off" spellcheck="false"></textarea>
Any or all of the autocorrect, autocomplete, and autocapitalize attributes can be used on a given element to prevent the given corrective feature.
While I love these features, they aren’t always applicable and when they aren’t, users get frustrated. Keep these attributes in mind when using forms on your desktop or mobile site!
Read the full article at: Disable Autocomplete, Autocapitalize, and Autocorrect
Hosted by Media Temple, domain from Name.com.
]]>Read the full article at: spellcheck Attribute
Hosted by Media Temple, domain from Name.com.
]]>
The spellcheck
attribute uses values of true or false (you cannot simply add the spellcheck attribute to a given element):
<!-- spellcheck everything! --> <input type="text" spellcheck="true" /><br /> <textarea spellcheck="true"></textarea> <div contenteditable="true" spellcheck="true">I am some content</div> <!-- spellcheck nothing! --> <input type="text" spellcheck="false" /><br /> <textarea spellcheck="false"></textarea> <div contenteditable="true" spellcheck="false">I am some content</div>
You can use spellcheck on INPUT
, TEXTAREA
, and contenteditable
elements. The spellcheck
attribute works well paired with the autocomplete, autocapitalize, and autocorrect attributes too!
We’ve all filled out form fields on our mobile and desktop devices which check spelling or grammer and probably shouldn’t. The spellcheck attribute can save us from that embarrassment when used properly!
Read the full article at: spellcheck Attribute
Hosted by Media Temple, domain from Name.com.
]]>Read the full article at: Telephone Link Protocol
Hosted by Media Temple, domain from Name.com.
]]>The tel
protocol is used for phone numbers:
<a href="tel:18008675309">Call Jenny!</a>
If you’d like to create a link for SMS text messaging, that’s easy enough too:
<a href="sms:18008675309">Text Jenny!</a>
The sms
protocol is used for text.
Many mobile browsers automatically linkify phone numbers on webpages but with the snippet above you can forcibly create phone links! Since said links don’t work on desktop browsers, it’s probably wise to create a JS snippet to replace spans with a given CSS class with phone links.
Read the full article at: Telephone Link Protocol
Hosted by Media Temple, domain from Name.com.
]]>Read the full article at: Mighty Deals 5x Giveaway!
Hosted by Media Temple, domain from Name.com.
]]>Here’s how it works:
Remember to use your real name and email address. Five winners will be chose and announced next week! Good luck!
Read the full article at: Mighty Deals 5x Giveaway!
Hosted by Media Temple, domain from Name.com.
]]>Read the full article at: Generating Dojo GFX Drawings from SVG Files ||
Hosted by Media Temple, domain from Name.com.
]]>Eric Brown was my first boss at SitePen and was one of my go-to vector graphic creation men. Eric created an awesome tool for converting SVG images to JSON, useful for creating vector graphics of all rendering engines (Canvas, SVG, VML, etc.) that Dojo’s GFX library supports. The original script had a few issues, so Eric’s here to clear those up.
This article builds on the earlier article Generate Dojo GFX Drawings from SVG Files. If you’ve not yet read that article, go and do it now. I’m not going to repeat what’s already in it, and this article won’t make a lick of sense without reading that one first. Really, go ahead, don’t worry, go read it now. I’m a patient sort of guy and will still be here when you get back.
So you’ve read it now? Good. You understand that the technique being discussed here is a way of making images that’ll handle resizing gracefully without quality loss, regardless of whether they’re being shown on giant desktop monitors or minuscule phone displays. With this technique you get full retina quality without the full retina download. Now you’ve got got the basics down and are ready to learn a handful of new tricks.
The first is a work-around for a gotcha that may have bitten you on
some of the SVG images you tried to convert. Oftentimes when you do a
conversion there will be errors in the resulting JSON file that will cause
IE grief. Don’t fret! This is a known limitation that has always been in
svg2gfx.xsl
, but it’s trivially corrected post-conversion. All
that one needs to do is remove occurrences of ,]
and
,}
from the JSON and the problem is solved. This can be pretty
easily done with your favorite text editor, but it’s also easily done with
a one-liner that works on all Linux systems, Macs, and other UNIX-like
machines. Starting with the file you converted per the earlier article,
type the following at the command line:
sed -e 's/,}/}/g' -e 's/,]/]/g' output.json > correctedoutput.json
This will make your JSON play nice with IE. (Yeah experts, I know this can be done more succinctly with more complicated regular expressions, but this version works with pretty much any SED.)
This second trick is really easy but will get you better results. Say for instance you’re making a logo for your new company, "FTW", and you want a few letters incorporated into the logo. Use whatever graphics tool you’re using to generate outlines for the letters prior to conversion, and your logo will display properly on every machine regardless of what fonts they’ve got installed. See? I told you this one was simple.
This third trick is nearly as simple as the second one. If you put
id
values on objects within your source SVG, they’ll get
carried through as name
values within the resulting JSON. This
can make debugging much easier should something go wrong. It also enables
easier manual tweaking after the conversion should it be desirable. Setting
id
values can sometimes be done directly within your drawing
application, but can also be done directly to the resulting SVG with a
text editor.
If you’re using your image in just one page, there’s a performance advantage to embedding it within the JavaScript for your page. This is easily done, and best shown by example. I’ll walk through the entire process of using the FTW image above into an embedded resizable logo on a page.
<?xml version="1.0" encoding="utf-8"?> <svg version="1.2" baseProfile="tiny" id="FTW" xmlns="http://www.w3.org/2000/svg " xmlns:xlink="http://www.w3.org/1999/xlink " x="0px" y="0px" width="400px" height="400px" viewBox="0 0 400 400" xml:space="preserve"> <g id="FTWLogo"> <polygon id="Pentagon" fill="#1B1464" stroke="#000000" stroke-width="5" points="105.232,340.097 41.442,151.479 201.116,32.524 363.591,147.625 304.331,337.715" /> <polygon id="Star1" fill="#FFFF00" stroke="#FBB03B" stroke-width="2" points="212.992,48.754 200.967,42.751 189.205,49.255 191.198,35.963 181.377,26.787 194.635,24.574 200.328,12.399 206.528,24.324 219.867,25.976 210.441,35.558" /> <polygon id="Star2" fill="#FFFF00" stroke="#FBB03B" stroke-width="2" points="53.874,168.643 41.849,162.64 30.087,169.144 32.08,155.853 22.259,146.676 35.517,144.463 41.209,132.289 47.41,144.213 60.749,145.865 51.323,155.447" /> <polygon id="Star3" fill="#FFFF00" stroke="#FBB03B" stroke-width="2" points="377.663,163.829 365.638,157.826 353.876,164.33 355.869,151.039 346.049,141.862 359.306,139.649 364.998,127.475 371.199,139.399 384.538,141.051 375.112,150.633" /> <polygon id="Star4" fill="#FFFF00" stroke="#FBB03B" stroke-width="2" points="117.066,356.964 105.041,350.961 93.279,357.465 95.272,344.174 85.452,334.997 98.709,332.784 104.402,320.609 110.603,332.533 123.941,334.186 114.516,343.768" /> <polygon id="Star5" fill="#FFFF00" stroke="#FBB03B" stroke-width="2" points="317.365,353.679 305.34,347.676 293.578,354.18 295.57,340.889 285.75,331.712 299.008,329.499 304.701,317.324 310.901,329.248 324.24,330.9 314.814,340.482" /> <g id="FTW"> <path id="F" fill="#FFFFFF" d="M137.14,198.674h-28.076v27.392h-20.41v-67.675h48.486v13. 574h-28.076v13.086h28.076V198. 674z" /> <path id="T" fill="#FFFFFF" d="M215.754,174.846h-24. 805v51.22h-20.361v-51.22h-24. 805v-16.455h69.971V174.846z" /> <path id="W" fill="#FFFFFF" d="M337.287,158.391l-29.297, 68.554h-11.816l-17.578-39. 892l-18.018,39.892h-11.914l- 28.711-68.554h21.143 l14.062,37.5l16.113-37.5h14. 6l15.82,37.5l14.697-37.5H337. 287z" /> </g> </g> </svg>
Notice that per Tip #2 this SVG has had its FTW replaced with outlines.
In lieu of three letters, it has three paths. This effectively embeds the
font so it’ll render the same everywhere. Also, per Tip #3 portions of
the drawing have been given id
attributes.
Now we do the full conversion in just one command line by first converting it as covered in the earlier article, and then piping it directly into the postprocessing step we discussed above in Tip #1:
xsltproc svg2gfx.xslt ftw.svg | sed -e 's/,}/}/g' -e 's/,]/]/g' > ftw.json
This will give us the GFX JSON we need. It’ll all be in one line. We can now copy and paste this line into a page. We’ll show it copied into a page as part of the next trick.
With just a little bit of clever hackery it’s easy to work vector graphics magic into a site that features unobtrusive JavaScript. While virtually every modern environment both mobile and stationary will use the vector graphic version, folks without JavaScript will still see at least an appropriate bitmap image. The code below makes it happen; it’s pretty heavily commented and thus speaks for itself. You can use it as a template for your own pages. Normally one would use a bitmap image that approximates the vector image, but here we’re using two distinctly different images to make the workings of the trick more obvious.
<!DOCTYPE html> <html> <head> <title>FTW</title> <!-- We're embedding this CSS in here to make this demo easier. Normally you'd put this in its own file. --> <style> h1 { margin:1em; padding:1em; } #Logo { width:5em; height:5em; float:left; } </style> </head> <body> <!-- This bitmap image will only get displayed if the viewer has JavaScript turned off. For this example we've made it distinct for illustration purposes; when you're doing it for real, use a low-res bitmap version of your vector image for good graceful degradation. --> <img id="Logo" alt="FTW Logo" src="ftl.png"> <h1>This Company Is FTW!</h1> <p>Blah blah blah, blah blah.</p> <script data-dojo-config="async:true" src="//ajax.googleapis.com/ajax/libs/dojo/1.8.0/dojo/dojo.js"></script> <!-- We're embedding the following JavaScript in here to make this demo easier. Normally you'd put this in its own file. --> <script> require(["dojo/dom", "dojo/dom-construct", "dojo/dom-style", "dojo/behavior", "dojox/gfx", "dojox/gfx/utils", "dojo/domReady!"], // This code works on desktop browsers including recent versions of // Chrome, Safari, Firefox, Opera, and IE. It works on iOS. It works // on Android. It even works on some more exotic systems like the // OLPC XO. function(dom, domConstruct, domStyle, behavior, gfx, utils) { behavior.add({ '#Logo':function(node) { var logoNode=dom.byId('Logo'); var surfacePos=dojo.position(logoNode); var surfaceWidth=surfacePos.w; var surfaceHeight=surfacePos.h; // The following 400 comes from the size of our original SVG image. var scale=surfaceWidth/400; // We're going to make the bitmap placeholder image hidden. domStyle.style(node,{'visibility':'hidden'}); // Now we make a new div to take its place on the screen. var extraDiv=document.createElement('div'); domStyle.style(extraDiv,{'position':'absolute','display':'block', 'width':surfaceWidth+'px','height':surfaceHeight+'px', 'top':surfacePos.y+'px','left':surfacePos.x+'px'}); domConstruct.place(extraDiv,node.parentNode,'first'); // We put a GFX surface into this new div. var surface=gfx.createSurface(extraDiv,surfaceWidth,surfaceHeight); var logo=surface.createGroup(); // This next line has your JSON copied into it between the two ' var logoShape='[{name:"FTWLogo",children:[{name:"Pentagon",shape:{type:"polyline",points:[{x:105.232,y:340.097},{x:41.442,y:151.479},{x:201.116,y:32.524},{x:363.591,y:147.625},{x:304.331,y:337.715},{x:105.232,y:340.097}]},fill:"#1B1464",stroke:{color:"#000000",width:"5",style:"Solid"}},{name:"Star1",shape:{type:"polyline",points:[{x:212.992,y:48.754},{x:200.967,y:42.751},{x:189.205,y:49.255},{x:191.198,y:35.963},{x:181.377,y:26.787},{x:194.635,y:24.574},{x:200.328,y:12.399},{x:206.528,y:24.324},{x:219.867,y:25.976},{x:210.441,y:35.558},{x:212.992,y:48.754}]},fill:"#FFFF00",stroke:{color:"#FBB03B",width:"2",style:"Solid"}},{name:"Star2",shape:{type:"polyline",points:[{x:53.874,y:168.643},{x:41.849,y:162.64},{x:30.087,y:169.144},{x:32.08,y:155.853},{x:22.259,y:146.676},{x:35.517,y:144.463},{x:41.209,y:132.289},{x:47.41,y:144.213},{x:60.749,y:145.865},{x:51.323,y:155.447},{x:53.874,y:168.643}]},fill:"#FFFF00",stroke:{color:"#FBB03B",width:"2",style:"Solid"}},{name:"Star3",shape:{type:"polyline",points:[{x:377.663,y:163.829},{x:365.638,y:157.826},{x:353.876,y:164.33},{x:355.869,y:151.039},{x:346.049,y:141.862},{x:359.306,y:139.649},{x:364.998,y:127.475},{x:371.199,y:139.399},{x:384.538,y:141.051},{x:375.112,y:150.633},{x:377.663,y:163.829}]},fill:"#FFFF00",stroke:{color:"#FBB03B",width:"2",style:"Solid"}},{name:"Star4",shape:{type:"polyline",points:[{x:117.066,y:356.964},{x:105.041,y:350.961},{x:93.279,y:357.465},{x:95.272,y:344.174},{x:85.452,y:334.997},{x:98.709,y:332.784},{x:104.402,y:320.609},{x:110.603,y:332.533},{x:123.941,y:334.186},{x:114.516,y:343.768},{x:117.066,y:356.964}]},fill:"#FFFF00",stroke:{color:"#FBB03B",width:"2",style:"Solid"}},{name:"Star5",shape:{type:"polyline",points:[{x:317.365,y:353.679},{x:305.34,y:347.676},{x:293.578,y:354.18},{x:295.57,y:340.889},{x:285.75,y:331.712},{x:299.008,y:329.499},{x:304.701,y:317.324},{x:310.901,y:329.248},{x:324.24,y:330.9},{x:314.814,y:340.482},{x:317.365,y:353.679}]},fill:"#FFFF00",stroke:{color:"#FBB03B",width:"2",style:"Solid"}},{name:"FTW",children:[{name:"F",shape:{type:"path",path:"M137.14,198.674h-28.076v27.392h-20.41v-67.675h48.486v13.574h-28.076v13.086h28.076V198.674z"},fill:"#FFFFFF"},{name:"T",shape:{type:"path",path:"M215.754,174.846h-24.805v51.22h-20.361v-51.22h-24.805v-16.455h69.971V174.846z"},fill:"#FFFFFF"},{name:"W",shape:{type:"path",path:"M337.287,158.391l-29.297,68.554h-11.816l-17.578-39.892l-18.018,39.892h-11.914l-28.711-68.554h21.143 l14.062,37.5l16.113-37.5h14.6l15.82,37.5l14.697-37.5H337.287z"},fill:"#FFFFFF"}]}]}]'; // Now we can load the shape onto the surface. utils.fromJson(logo,logoShape); // This transform converts from our original SVG image size to // the size we need for our display. It's a vector transformation, // so there's no loss of quality. logo.setTransform(gfx.matrix.scale(scale)); } }); } ); </script> </body> </html>
Now you’re ready to go out and incorporate vector graphics for all your sites. You no longer have to just dream of having logos that render on any size display in crystal clear quality. You now have the power to make it happen.
Read the full article at: Generating Dojo GFX Drawings from SVG Files ||
Hosted by Media Temple, domain from Name.com.
]]>Read the full article at: Dojo DeferredList
Hosted by Media Temple, domain from Name.com.
]]>Dojo returns Deferred objects from many operations, including animation and XHR requests. With the Deferred object, you can use the then
property to react to the response once the async interaction is completed:
// A very basic usage of dojo/request request("service.php?id=someid").then(function(response) { console.log("request result is:", response); });
The example above shows a basic AJAX request and handling of the resulting Deferred. Easy, right? But what if you want an action to execute only after multiple Deferreds have resolved?
The DeferredList is a manager for multiple Deferreds, making handling multiple Deferreds a breeze:
// Require the Dojo dependencies require(["dojo/request", "dojo/DeferredList"], function(request, DeferredList) { console.log("Request loaded!", request); // Request 1 var promise1 = request("/endpoint/1").then(function(response) { console.log("request 1 result", response); }); // Request 2 var promise2 = request("/endpoint/2").then(function(response) { console.log("request 2 result", response); }); // Create a DeferredList to manage both of them var list = new DeferredList([promise1, promise2]); // When they're both resolved... list.then(function(result) { // result is: [Array[2], Array[2]] // result item[0] is the result of each request // Do something! }); });
The example above represents all roses: all successful Deferreds. What if a Deferred fails; a 404 error, request timeout, or a Deferred rejection? A little validation cures all that:
// Require the Dojo dependencies require(["dojo/request", "dojo/DeferredList"], function(request, DeferredList) { console.log("Request loaded!", request); // Request 1 var promise1 = request("/endpoint/1").then(function(response) { console.log("request 1 result", response); }); // Request 2 var promise2 = request("/endpoint/2").then(function(response) { console.log("request 2 result", response); }); // Request 3: A request that will fail... var promise3 = request("/endpoint/noexist").then(function(response) { console.log("request 3 result (fail)", response); }); // Create a DeferredList to manage both of them var list = new DeferredList([promise1, promise2, promise3]); // When they're both resolved... list.then(function(result) { if(request[0][0] && request[1][0] && request[2][0]) { // request[2][0] is false // Success! } else { // React to a failure } }); });
If the promise for a given Deferreds returns false, you know the request (or async action) failed. The second argument returned by the Deferred provides information about the request and why it failed:
{ "message": "Unable to load noexist.php status: 404", "response": { "url": "/endpoint/noexist", "options": { "headers":{} }, "xhr": { "statusText": "Not Found", "status": 404, "response": "{404 page html}"} } }
The example here is oversimplified. One realistic example is the one I used to create the dojox/mobile TweetView example, sending multiple JSONP requests (Twitter profile and Twitter timeline list) for a client-side Twitter widget. The dojo/DeferredList resource makes handling multiple asynchronous actions easy and enjoyable. Just another reasons to use the Dojo Toolkit in your next web application!
Read the full article at: Dojo DeferredList
Hosted by Media Temple, domain from Name.com.
]]>Read the full article at: HTML5 Datalist
Hosted by Media Temple, domain from Name.com.
]]>DATALIST
element.
A DATALIST
element gets an ID
attribute and contains numerous OPTION
elements, just as a SELECT
element would:
<datalist id="frameworks"> <option value="MooTools"> <option value="Moobile"> <option value="Dojo Toolkit"> <option value="jQuery"> <option value="YUI"> </datalist>
Once the DATALIST
element is in place, a list attribute gets added to an INPUT
element which refers to the list ID
:
<input name="frameworks" list="frameworks" />
What’s provided is a very rudimentary but useful autocomplete list of existing items that match given text. Of course the lack of styling that comes with OPTION
elements isn’t optimal, and there’s no method to hook DATALIST
‘s up to a service endpoint for more dynamic suggestions, but this new element is a step in the right direction!
Read the full article at: HTML5 Datalist
Hosted by Media Temple, domain from Name.com.
]]>Read the full article at: CSS :target
Hosted by Media Temple, domain from Name.com.
]]>:target
. The target pseudo selector provides styling capabilities for an element whose ID matches the window location’s hash. Let’s have a quick look at how the CSS target pseudo selector works!
Assume there are any number of HTML elements with a given ID:
<h2 id="section1">Section 1</h2> <h2 id="section2">Section 2</h2>
Take note of the ID values of the elements above — to trigger the :target
pseudo selector, the window.location.hash
will need to match.
The :target
pseudo selector may be applied to classes, tags, or any other selector:
/* would apply to all targetted elements */ :target { color: #000; } /* applies to H2's */ h2:target { color: #f00; }
When the window.location.hash
is “section2″, the element color will become red and underlined. Simple! Much like you can animate elements upon hover or even between media queries, you could even animate the element when targeted; Chris Coyier provides an excellent example of target animating.
:target
is neat but I haven’t seen it abused to do anything groundbreaking. For a site that doesn’t strive for ultimate dynamism, however, the :target
pseudo selector could add a bit of native class when using window hashes.
Read the full article at: CSS :target
Hosted by Media Temple, domain from Name.com.
]]>Read the full article at: Animated 3D Flipping Menu with CSS
Hosted by Media Temple, domain from Name.com.
]]>CSS animations aren’t just for basic fades or sliding elements anymore — CSS animations are capable of much more. I’ve showed you how you can create an exploding logo (applied with JavaScript, but all animation is CSS), an animated Photo Stack, a sweet 3D CSS flip card, and much more. Today’s we’ll create a simple but awesome 3D flipping menu as featured here!
The HTML structure consists of a list with links, as you would expect from a navigation menu, however there are a few extra SPAN
elements to aid the 3D effect:
<ul class="block-menu"> <li><a href="/" class="three-d"> Home <span aria-hidden="true" class="three-d-box"> <span class="front">Home</span> <span class="back">Home</span> </span> </a></li> <li><a href="/demos" class="three-d"> Demos <span aria-hidden="true" class="three-d-box"> <span class="front">Demos</span> <span class="back">Demos</span> </span> </a></li> <!-- more items here --> </ul>
Beside the basic A
element, a series of SPANs
are used to represent the “front” and “back” faces of the 3D box during animation. Each should be given the same text as the A element.
The animation centers around transitions and transforms. The actual A
element wont move — the parent SPAN
element will. Each inner SPAN
is initialized to its position and doesn’t change. Each element animates upward and backward, using CSS transforms and CSS transitions, though one is on the rotation back while the other animates up into view.
/* basic menu styles */ .block-menu { display: block; background: #000; } .block-menu li { display: inline-block; } .block-menu li a { color: #fff; display: block; text-decoration: none; font-family: 'Passion One', Arial, sans-serif; font-smoothing: antialiased; text-transform: uppercase; overflow: visible; line-height: 20px; font-size: 24px; padding: 15px 10px; } /* animation domination */ .three-d { perspective: 200px; transition: all .07s linear; position: relative; cursor: pointer; } /* complete the animation! */ .three-d:hover .three-d-box, .three-d:focus .three-d-box { transform: translateZ(-25px) rotateX(90deg); } .three-d-box { transition: all .3s ease-out; transform: translatez(-25px); transform-style: preserve-3d; pointer-events: none; position: absolute; top: 0; left: 0; display: block; width: 100%; height: 100%; } /* put the "front" and "back" elements into place with CSS transforms, specifically translation and translatez */ .front { transform: rotatex(0deg) translatez(25px); } .back { transform: rotatex(-90deg) translatez(25px); color: #ffe7c4; } .front, .back { display: block; width: 100%; height: 100%; position: absolute; top: 0; left: 0; background: black; padding: 15px 10px; color: white; pointer-events: none; box-sizing: border-box; }
If you want to a glimpse into which ways the front and back elements move (which I highly recommend you do), set one of them to display: none
and hover over the element; you’ll see what role each plays in the animation.
The only downfall of this technique is the repeated menu label; it’s easy to duplicate from a technical perspective, but screen readers may read said text three times, even with the aria-hidden="true"
directive. The visual effect, however, is flawless in its style and silky smooth animation. No JavaScript, Flash, or canvas needed to create this effect — just a few simple CSS directives. CSS animations…something to be very thankful for.
Read the full article at: Animated 3D Flipping Menu with CSS
Hosted by Media Temple, domain from Name.com.
]]>Read the full article at: CSS Transitions
Hosted by Media Temple, domain from Name.com.
]]>:hover
or :focus
.
Let’s create a basic CSS transition of opacity (a fade in and out):
/* from */ .myElement { opacity: 0.5; transition-property: opacity; } /* to */ .myElement:hover { opacity: 1; }
In the example above, when the element is hovered over, its opacity animates from 50% opacity to 100% opacity. When the mouse leaves the element, its opacity animates back down to 50%.
Outside of simply providing a CSS property to transition, there are a number of other helpful transition properties:
transition-property
: one or more properties, or “all”, to transitiontransition-duration
: amount of time the transition should take to complete (ex: 2s or 0.5s)transition-delay
: delay before starting the transitiontransition-timing-function
: traditional timing curve function for the transitionThese transition properties allow complete control over the simple animation. Here’s a CSS transition example using all of the properties available:
/* from */ .myElement { color: #333; transition-property: color; transition-duration: 1s; transition-delay: .2s; transition-timing-function: linear; } /* to */ .myElement:focus { color: #999; } /* shorthand: property duration timingFunc delay */ .myElement { transition: all 2s linear 0.3s; }
In most cases, the default duration, delay,and timing function wont need to be changed.
Multiple transition properties should be separated by commas:
.myElement { /* padding-left, opacity, height, and color here */ transition-property: padding-left, opacity, height, color; transition-duration: 1s, 2s, 3s, 4s; }
The “all” keyword can also be used to signify all properties should be transformed. Separate transitions may also be strung together in a shorthand syntax:
.myElement { transition: padding-left 1s, opacity 2s, height 3s, color: 4s; }
The property value can get quite long, but the flexibility is quite nice!
If you’re looking to detect transition end with JavaScript, that’s quite easy:
myElement.addEventListener("transitionend", function() { // Do something now that the transition has ended }, true);
The transitionend event on the node will fire once the transition has completed.
My blog has featured a number of CSS transition examples:
Read the full article at: CSS Transitions
Hosted by Media Temple, domain from Name.com.
]]>Read the full article at: Xbox Live Gamer API
Hosted by Media Temple, domain from Name.com.
]]>My sharpshooter status aside, I’ve always been surprised upset that Microsoft has never provided an API for the vast amount of information about users, the games they play, and statistics within the games. Namely, I’d like to publicly shame every n00b I’ve baptized with my sniper rifle. I recently found a great gamer API effort by XboxLeaders.com. While their API can’t tell me the titles and emblems I’ve earned in Black Ops II, I can get some relevant information about my user, my status, and the games I’ve recently dominated.
XboxLeaders currently offers data in three formats (XML, JSON, and serialized PHP) at four API endpoints to retrieve information from:
GET profile/:gamertag
– Returns data pertaining to the requested gamers’ profile on Xbox LIVE.GET games/:gamertag
– Returns data pertaining to the requested gamers’ played games. All game data is returned except for achievements.GET achievements/:gamertag/:gameid
– Returns all achievement data for the requested gamer and game.GET friends/:gamertag
– Returns all friend data for the requested gamer. Will error out if friends list is private.These endpoints allow developers to access all of the important gamer-specific data available. XboxLeaders is also working on a POST implementation for sendings messages. Authorization may become required for this API, but the API is currently open to anyone that wants to use it.
Calls to the profile API will return the following information:
{ "Data": { "Tier": "gold", "IsValid": 1, "IsCheater": 0, "IsOnline": 1, "OnlineStatus": "Online playing COD: Black Ops II - Search & Destroy\r\non Overflow", "XBLLaunchTeam": 0, "NXELaunchTeam": 0, "KinectLaunchTeam": 0, "AvatarTile": "https://avatar-ssl.xboxlive.com/global/t.fffe07d1/tile/0/2000b", "AvatarSmall": "http://avatar.xboxlive.com/avatar/dwalsh83/avatarpic-s.png", "AvatarLarge": "http://avatar.xboxlive.com/avatar/dwalsh83/avatarpic-l.png", "AvatarBody": "http://avatar.xboxlive.com/avatar/dwalsh83/avatar-body.png", "Gamertag": "dwalsh83", "GamerScore": 310, "Reputation": 20, "Name": "David Walsh", "Motto": "Watch your head.", "Location": "Madison, WI, US", "Bio": "There is, and only can be, Call of Duty." }, "Stat": "ok", "In": 2.504, "Authed": "false", "AuthedAs": null }
That’s a nice amount of data to work with. The other API calls will return likewise relevant information.
So what can be created with this Xbox Gamer API? That’s up to your imagination! Let me use this awesome API to create a gamer card!
<?php // Vars $gamertag = 'dwalsh83'; /* Would be better to use cURL, but for briefness of code, using file_get_contents */ // Get profile information $profile = json_decode(file_get_contents('http://www.xboxleaders.com/api/profile.json?gamertag='.$gamertag)); $profile = $profile->Data; // Get game information $games = json_decode(file_get_contents('http://www.xboxleaders.com/api/games.json?gamertag='.$gamertag)); $games = $games->Data; ?> <!DOCTYPE html> <html> <head> <style> .gamercard { border: 1px solid #bdbec1; padding: 10px; width: 600px; font-family: arial, sans-serif; font-size: 12px; color: #bdbec1; background-image: -webkit-linear-gradient(#ddd, #fff, #e9fdce); background-image: -moz-linear-gradient(top, #ddd, #fff, #e9fdce); background-image: -ms-linear-gradient(#ddd, #fff, #e9fdce); background-image: -o-linear-gradient(#ddd, #fff, #e9fdce); background-image: linear-gradient(#ddd, #fff, #e9fdce); } .gamercard img { display: block; } .gamercard .avatar { float: right; width: 150px; height: 300px; margin: -60px 0 0 50px; } .gamercard h1 { font-weight: normal; color: #78BB58; } .gamercard h1 img { display: inline-block; padding-right: 10px; width: 24px; height: 24px; } .gamercard h2 { color: #111; font-size: 16px; font-weight: normal; margin-top: 15px; } .gamercard ul { list-style-type: none; } .gamercard ul li { padding-top: 8px; } .gamercard ul li strong { color: #666; } .gamercard ul.games li { display: inline-block; margin-right: 20px; text-align: center; font-weight: bold; width: 85px; vertical-align: top; } .gamercard ul.games li img { margin: 0 auto; width: 85px; } .gamercard a { color: #78bb58; } .gamercard .clear { clear: both; } </style> </head> <body> <!-- gamercard --> <div class="gamercard"> <!-- profile image --> <img src="<?php echo $profile->AvatarBody; ?>" alt="<?php echo $profile->Gamertag; ?>" class="avatar" /> <!-- gamer name --> <h1><img src="<?php echo $profile->AvatarTile; ?>" alt="<?php echo $profile->Gamertag; ?>" /><?php echo $profile->Gamertag; ?></h1> <!-- personal info --> <h2>The Legend</h2> <ul> <li><strong>Name:</strong> <?php echo $profile->Name; ?></li> <li><strong>Bio:</strong> <?php echo $profile->Bio; ?></li> <li><strong>Location:</strong> <?php echo $profile->Location; ?></li> <li><strong>Motto:</strong> <?php echo $profile->Motto; ?></li> <li><strong>Online:</strong> <?php echo $profile->IsOnline ? 'Online' : 'Offline'; ?></li> <li><strong>Status:</strong> <?php echo $profile->IsOnline ? $profile->OnlineStatus : '(none)'; ?></li> </ul> <?php if(count($games->PlayedGames)): ?> <!-- recent games --> <h2>Recent Games</h2> <ul class="games"> <?php foreach($games->PlayedGames as $game): ?> <li><a href="<?php echo $game->Url; ?>"><img src="<?php echo $game->BoxArt; ?>" alt="<?php echo $game->Title; ?>" /></a><br /><?php echo $game->Title; ?></li> <?php endforeach; ?> </ul> <?php endif; ?> <div class="clear"></div> </div> </body> </html>
This is a simple gamer card. An awesome addition would be a side scrolling list of games, and possibly a display of achievements when you click on each game. In any event, XboxLeaders’ API will get you the information you need.
XboxLeaders’ enhanced Xbox Gamer API is easy to use, dependable, and unique. This API fills a gap Microsoft has created by not providing a public Xbox API, and does it incredibly well. As always, do your best to cache requests so as to keep their server load low and your site fast. Let me know if you create something with this API — I’d love to see it!
Read the full article at: Xbox Live Gamer API
Hosted by Media Temple, domain from Name.com.
]]>Read the full article at: Add META Tags, Scripts, and Stylesheets to the WordPress Header and Footer
Hosted by Media Temple, domain from Name.com.
]]>add_filter
function provides the a method for injecting stylesheets or scripts into the header, as well as scripts into the footer. Here’s how!
// Add items to the header! function shimify() { echo '<!--[if lt IE 9]><script src="/wp-content/themes/mytheme/shim.js"></script><![endif]-->'; echo '<style>/* some styles here */</style>'; echo '<meta http-equiv="content-type" content="text/html;" />'; } add_filter('wp_head', 'shimify'); // Add items to the footer function add_requirejs() { echo '<script src="/wp-content/themes/mytheme/requirejs.js"></script>'; } add_filter('wp_footer', 'add_requirejs');
The add_filter
function, which accepts the filter type, action function, and optional priority, provides the means to inject stylesheets and JavaScript files wherever desired. You may want to conditionally inject a different Google Analytics account if you use a WordPress install that loads different content depending on hostname. Do not use this technique if you’re adding stylesheets or scripts for your plugin — those should be added with the proper WordPress functions!
Read the full article at: Add META Tags, Scripts, and Stylesheets to the WordPress Header and Footer
Hosted by Media Temple, domain from Name.com.
]]>Read the full article at: The World Beyond MVC
Hosted by Media Temple, domain from Name.com.
]]>This post is a written version of a talk given by Garann Means at LXJS and NYCjs. It has been formatted to fit your screen.
There’s no shortage of JavaScript MVC (Model-View-Controller) architectures out there. The best-known is Backbone, but there are others: Spine, Agility, Knockback, etc. And in addition to the range of MVC frameworks, there are MV-whatever variants. This stuff, anecdotally, is pretty popular. As of this writing, Backbone is the 7th most watched repo on GitHub. Developers love MVC.
What makes MVC so appealing, especially for JavaScript where it’s still primarily used, on the client? If you’re new to application architectures, it’s definitely very accessible – the model is data, the view is.. the view, and the controller makes them do stuff. Easy! If you started coding on the server-side, MVC is probably already familiar. Most Object-Oriented Programming embraces the pattern and you can find very popular MVC frameworks for Java, .NET, Python, PHP, etc. The pattern itself actually predates and was first implemented in Smalltalk, after being invented by Trygve Reenskaug in the late 70s, so its relationship with OOP has been there from the beginning. Given the unquestioned supremacy of OOP until fairly recently, it’s unsurprising that MVC makes immediate sense to many of us.
JavaScript, however, is not exactly OOP. We can do OOP with it, but the two hardly go hand-in-hand. Therefore, the appropriateness of MVC varies by use case. For data entry, content management systems, and situations where we can pick out clear and obvious “models”, it tends to work very nicely. But where the state of an application is more amorphous and not always tracked in the same place, in applications with lots of user interaction before any data actually changes, and in apps with very complex widgets or complex, it’s less clear that it’s the right choice. And if your site is JS-heavy but still static, obviously, forget it. There’s no benefit in doing all that setup on a page that’s going to reload and lose it all.
The issue we run into when talking about MVC, or any other architectural pattern, is that, as web developers, these things were not created for us. We can trace the most common patterns back to Design Patterns (aka the Gang of Four book), which was published in 1995. The dawn of our field, literally. These patterns were for programmers building programs primarily for their own use, and certainly not for programmers whose work was easily revealed by going up to the menu and clicking View Source. While those patterns all made their way in some form to the back-end, that canon predates JavaScript completely.
MVC, though, was one of the few ancient methods that made immediate sense. Because it has a clear place for the UI to exist, it’s easily applied to the front-end (although, again, that application is not canon). Because any pattern we want to use has to be fudged a bit to get it to fit our context, MVC is a great place to start. But it’s not the only option we have.
It seems fair to call Event-Driven Architectures the second most obvious pattern. We use event-driven patterns all over the place in JS, and even in combination with MV* patterns. They work well where we need a lot of messaging, and have less need for clear-cut, classical “objects”. For the objects we do have, getters and setters (and soon, Object.observe()
) can be used as publishers and subscribers, decoupling events, the core of the application, from the things they affect. The value, though, is that these decoupled events don’t need to affect only objects, but can also affect the DOM, or server interactions, or other events, and none of that needs to be packaged up in a Model-View-Controller triad if it doesn’t make sense as one.
The Naked Objects pattern bears closest relation to MV*, and it would not be unfair to call it a variant of Presentation-Abstraction-Control (a more distant relative). This one’s good for big meaty widgets that need to contain and render their own data, and whose visual representation maps directly to the data they contain. It bears similarity to the drag-and-drop IDEs we used to use to build desktop applications, but without the drag-and-drop bit. Rebecca Murphey used a similar pattern in building the Mulberry mobile app framework, which is a perfect use case because Naked Objects is a great way of organizing a composable framework whose implementations will be better served by a different pattern.
The third pattern I think deserves more examination is Pipelines. This should be familiar to jQuery developers or anyone who deals with a lot of callbacks. Pipelines chain operations together to affect a shared state, which might be a visual representation or just a set of data (or both!). The interesting thing to me is that we can use this pattern both synchronously and asynchronously, for example applying global functions to initialize, render, and wire-up a page, then use instance-specific functions to wait for user interaction, validate it, attempt to save it, and render again, all the while modifying the state of an abstraction of that page. Anything with a state can have a corresponding state diagram in code, with the ability to modify the path it takes depending on the result of each step.
With all of these, as with MVC or any other pattern, you have to consider how and where you want your application tightly or loosely coupled, and whether you need a centralized snapshot of the application, or it’s better stored in the components it affects. Things like Naked Objects would be overkill if even your most complex controls are only used once. Things like EDA would be pointless if most of your code is setup and initialization code. And if your site is static, whatever introduces the least framework code while still helping you establish clear conventions would be preferable.
At the end of the day, you should still use Backbone rather than not use anything. However, if you find yourself with an application that fits more easily into some other pattern, you shouldn’t be afraid to use it. Sadly, for most of these patterns (and the myriad I haven’t even mentioned), you’re going to have a hard time finding anything as robust and accessible as Backbone. So, more importantly, if you’re sitting down to write a new JS application framework, you’d do all of us a service by exploring an alternative to MVC, so picking the right tool for the job won’t be a matter of choosing from a selection of nice hammers with different brandnames to tighten screws. Whatever you choose, and whatever the application, though, remember that all implementations decay and it’s just as important to leave the opportunity to improve architecture as it is to leave ways to improve the code itself.
Read the full article at: The World Beyond MVC
Hosted by Media Temple, domain from Name.com.
]]>Read the full article at: Force SSL with WordPress
Hosted by Media Temple, domain from Name.com.
]]>To secure a specific WordPress post or page, you’ll need to know its ID. When you know its ID, it’s securing the page is easy:
function force_ssl($force_ssl, $id = 0) { // A list of posts that should be SSL $ssl_posts = array(1, 12, 19); if(in_array($id, $ssl_posts)) { $force_ssl = true; } return $force_ssl; } add_filter('force_ssl' , 'force_ssl', 1, 3);
The force_ssl hook allows for us to check the post ID and force SSL if the post ID is in array of posts that should be secured! Aren’t WordPress hooks great to work with?
Read the full article at: Force SSL with WordPress
Hosted by Media Temple, domain from Name.com.
]]>