Contents
- Overview
- Register your application with Google
- OAuth 2.0 flows
- Calling the YouTube Data API
- Client libraries
Overview
The YouTube Data API supports the OAuth 2.0 protocol for authorizing access to private user data. The list below explains some core OAuth 2.0 concepts:
-
When a user first attempts to use functionality in your application that requires the user to be logged in to a Google Account or YouTube account, your application initiates the OAuth2 authorization process.
-
Your application directs the user to Google's authorization server. The link to that page specifies the scope of access that your application is requesting for the user's account. The scope specifies the resources that your application can retrieve, insert, update, or delete when acting as the authenticated user.
-
If the user consents to authorize your application to access those resources, Google will return a token to your application. Depending on your application's type, it will either validate the token or exchange it for a different type of token.
For example, a server-side web application would exchange the returned token for an access token and a refresh token. The access token would let the application authorize requests on the user's behalf, and the refresh token would let the application retrieve a new access token when the original access token expires.
This section of the API documentation covers the following topics:
-
The Register your application with Google section walks you through the registration process, which is a prerequisite to using OAuth 2.0 authorization.
-
The OAuth 2.0 flows section explains different flows for obtaining OAuth 2.0 access tokens for either server-side web applications, client-side web applications, installed applications, or devices.
-
The Calling the YouTube Data API section explains how to use the OAuth 2.0 tokens that your application obtains to make authorized API requests on a user's behalf.
-
The Client libraries section describes client library support for OAuth 2.0.
Register your application with Google
You need to register your application with Google to be able to use OAuth 2.0 authorization. The following steps explain how to register your application and create an OAuth 2.0 client ID to use in that application.
-
Create a project in the Google APIs Console.
-
If you have not created a project before, the Console page will display a big
Create projectbutton.
-
If you have created a project before, you can create a new project via the Console menu shown below.

-
-
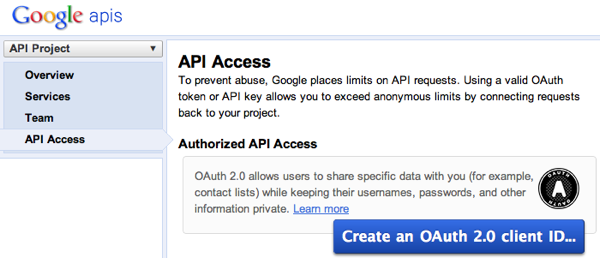
Click the API Access pane in the navigation menu.

-
Click the Create an OAuth 2.0 client ID button.
-
Enter a product name for your application and, if you wish, a URL for your product logo. By default, we will use your email address as the support email for your application. You can change the email address by signing in to the API Console with a different account that has an email address that you have verified.

Click the Next button to proceed.
-
Indicate whether your application is a web application or an installed application. If it is a web application, you will need to also provide a domain or hostname.
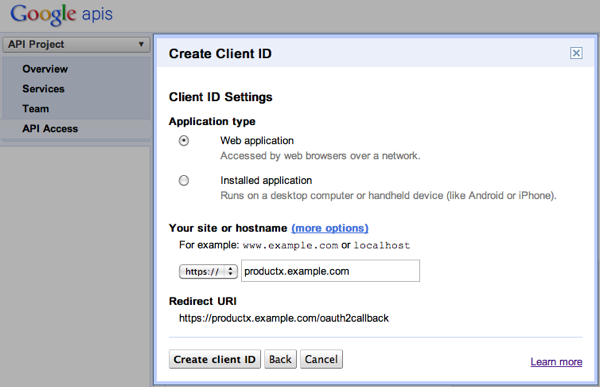
After you direct a user to Google's authorization server, and the user logs in and decides whether to grant access to your application, Google will redirect the user to a
redirect_urithat you specified.For web applications, you need to register the
redirect_urithat your application uses with Google before you will be able to complete the steps needed to obtain OAuth 2.0 access tokens. You can register more than oneredirect_uri.The Console will define a default redirect URI and a default, authorized JavaScript source. You can register additional
redirect_urivalues and add or change authorized JavaScript sources by clicking the more options link in the Client ID Settings window. -
Click the Create client ID button.
OAuth 2.0 flows
Google supports several OAuth 2.0 use cases:
- The server-side flow supports web applications that can securely store persistent information.
- The client-side flow supports JavaScript applications running in a browser.
- The installed application flow supports applications installed on a device, such as a phone or computer.
- The device flow supports devices with limited input capabilities, such as game consoles and video cameras.
Server-side web applications
This flow is designed for web applications with servers that can store information and maintain state. While this section walks through the steps your code would go through to use OAuth 2.0 in a server-side web application, you could also use one of several client libraries in your OAuth 2.0 implementation.
The following steps explain the server-side flow:
-
Obtain an access token
Note: Requests to Google's authorization server must use
httpsinstead ofhttpbecause the server is only accessible over SSL (HTTPs) and will refuse HTTP connections.When a user first tries to perform an action that requires API authentication, direct the user to Google's authorization server at
https://accounts.google.com/o/oauth2/auth. It supports the following URL parameters:Parameter Description client_idRequired. The OAuth 2.0 client ID for your application. redirect_uriRequired. A registered redirect_urifor that client ID.response_typeRequired. Set this parameter's value to code.scopeRequired. A space-delimited list of scopes that identify the resources that your application could access on the user's behalf. approval_promptOptional. This parameter indicates whether the user should be prompted to grant account access to your application each time she tries to complete a particular action. The default value is auto, which indicates that a user would only need to grant access the first time she tried to access a protected resource.
Set the parameter value toforceto direct the user to a consent page even if she has already granted access to your application for a particular set of scopes.access_typeRecommended. This parameter indicates whether your application can refresh access tokens when the user is not present at the browser. Valid parameter values are onlineandoffline. Set this parameter value toofflineto allow the application to refresh access tokens when the user is not present. (This is the method of refreshing access tokens described later in this document.)stateOptional. Any string that your application would use to maintain state between the request and redirect response. Your application will receive the same value that it sends for this parameter. For example, you could use this parameter to redirect the user to a particular resource in your application. The sample URL below shows a redirect to Google's authorization server for an application requesting permission to submit YouTube Data API requests on the user's behalf:
https://accounts.google.com/o/oauth2/auth?
  client_id=1084945748469-eg34imk572gdhu83gj5p0an9fut6urp5.apps.googleusercontent.com&
  redirect_uri=http://localhost/oauth2callback&
  scope=https://gdata.youtube.com&
  response_type=code&
  access_type=offline
-
User decides whether to grant access to your application
Google's authorization server will display the name of your application and the Google services that it is requesting permission to access on the user's behalf. The user can then consent or refuse to grant access to your application.
You can test this flow by clicking on the sample URL in step 1. If you also place a file on your server at
http://localhost/oauth2callback, you will also be able to see how the user's response appears in the redirect URI. (See step 3 for more details.) -
Google redirects user to your application
After the user consents or refuses to grant access to your application, Google will redirect the user to the
redirect_urithat you specified in step 1.-
If the user granted access to your application, Google will have appended a
codeparameter to theredirect_uri. This value is a temporary authorization code that you can exchange for an access token as discussed in step 4.http://localhost/oauth2callback?code=4/ux5gNj-_mIu4DOD_gNZdjX9EtOFf
-
If the user refused to grant access to your application, Google will have included the
access_deniederror message in the hash fragment of theredirect_uri:http://localhost/oauth2callback#error=access_denied
-
-
Exchange authorization code for refresh and access tokens
Assuming the user has granted access to your application, exchange the authorization code obtained in step 3 for a refresh token and access token. To do so, send a
POSTrequest tohttps://accounts.google.com/o/oauth2/tokenthat includes the following key-value pairs in the request body:Key Value codeThe authorization code that Google returned to your redirect_uriin step 3.client_idThe OAuth 2.0 client ID for your application. client_secretThe client secret associated with your client ID. This value is displayed in the Google APIs console. redirect_uriA registered redirect_urifor your client ID.grant_typeSet this value to authorization_code.A sample request is displayed below:
POST /o/oauth2/token HTTP/1.1
Host: accounts.google.com
Content-Type: application/x-www-form-urlencoded

code=4/ux5gNj-_mIu4DOD_gNZdjX9EtOFf&
client_id=1084945748469-eg34imk572gdhu83gj5p0an9fut6urp5.apps.googleusercontent.com&
client_secret=hDBmMRhz7eJRsM9Z2q1oFBSe&
redirect_uri=http://localhost/oauth2callback&
grant_type=authorization_code
-
Process response and store tokens
Google will respond to your
POSTrequest by returning a JSON object that contains a short-lived access token and a refresh token.{ "access_token" : "ya29.AHES6ZTtm7SuokEB-RGtbBty9IIlNiP9-eNMMQKtXdMP3sfjL1Fc", "token_type" : "Bearer", "expires_in" : 3600, "refresh_token" : "1/HKSmLFXzqP0leUihZp2xUt3-5wkU7Gmu2Os_eBnzw74" }Important: Your application should store both values.
-
The Calling the YouTube Data API section explains how to submit an authorized request using the access token.
-
The Refreshing an access token section explains how to use the refresh token to obtain a new access token if the one that you have expires.
-
Client-side web applications
This flow is designed for JavaScript-based web applications that cannot maintain state over time.
The following steps explain the client-side flow:
-
Obtain an access token
Note: Requests to Google's authorization server must use
httpsinstead ofhttpbecause the server is only accessible over SSL (HTTPs) and will refuse HTTP connections.When a user first tries to perform an action that requires API authentication, direct the user to Google's authorization server at
https://accounts.google.com/o/oauth2/auth. It supports the following URL parameters:Parameter Description client_idRequired. The OAuth 2.0 client ID for your application. redirect_uriRequired. A registered redirect_urifor that client ID.response_typeRequired. Set this parameter's value to token.scopeRequired. A space-delimited list of scopes that identify the resources that your application could access on the user's behalf. approval_promptOptional. This parameter indicates whether the user should be prompted to grant account access to your application each time she tries to complete a particular action. The default value is auto, which indicates that a user would only need to grant access the first time she tried to access a protected resource.
Set the parameter value toforceto direct the user to a consent page even if she has already granted access to your application for a particular set of scopes.stateOptional. A string used to maintain state between the request and redirect. This value will be appended to your redirect_uriafter the user consents to or denies your application's access request.The sample URL below shows a redirect to Google's authorization server for an application requesting permission to submit YouTube Data API requests on the user's behalf:
https://accounts.google.com/o/oauth2/auth?
  client_id=1084945748469-eg34imk572gdhu83gj5p0an9fut6urp5.apps.googleusercontent.com&
  redirect_uri=http://localhost/oauth2callback&
  scope=https://gdata.youtube.com&
  response_type=token
-
User decides whether to grant access to your application
Google's authorization server will display the name of your application and the Google services that it is requesting permission to access on the user's behalf. The user can then consent or refuse to grant access to your application.
You can test this flow by clicking on the sample URL in step 1. If you also place a file on your server at
http://localhost/oauth2callback, you will also be able to see how the user's response appears in the redirect URI. (See step 3 for more details.) -
Google redirects user to your application
After the user consents or refuses to grant access to your application, Google will redirect the user to the
redirect_urithat you specified in step 1.-
If the user granted access to your application, Google will have appended a short-lived access token in the hash fragment of the redirect URI. The response will also include the
expires_inandtoken_typeparameters. These parameters describe the lifetime of the token in seconds and the kind of token that is being returned, respectively. Finally, the response will include thestateparameter if astateparameter was included in the original request to the authorization server.http://localhost/oauth2callback#access_token=1/QbIbRMWW&token_type=Bearer&expires_in=3600
Note: Your application should also allow other fields to be returned in the response. The list provided above identifies the minimum set of fields that will be appended to the
redirect_uri.JavaScript code running on your page can capture the access token from the
window.location.hashvalue and either store the token in a cookie orPOSTit to a server. -
If the user refused to grant access to your application, Google will have included the
access_deniederror message in the hash fragment of theredirect_uri:http://localhost/oauth2callback#error=access_denied
-
-
Validate the user's token
Assuming the user has granted access to your application, you need to explicitly validate the token returned in the
redirect_uri. You validate the token by specifying the token as the value of theaccess_tokenparameter in a web service request tohttps://www.googleapis.com/oauth2/v1/tokeninfo. That URL accepts an access token and returns information about that token, including the application that the token was issued to, the user associated with the token, the scopes that the user granted access to, and the remaining life of the token.The sample URL below demonstrates where you would send a token validation request:
https://www.googleapis.com/oauth2/v1/tokeninfo?access_token=1/fFBGRNJru1FQd44AzqT3Zg
-
Process the token validation response
In response to a token validation request, the Google authorization server will return either a JSON object that describes the token or an error message.
-
If the token is still valid, the JSON object will include the following values:
Field Description audienceThe application that is the intended user of the access token.
Important: Before using the token, you need to verify that this field's value exactly matches yourclient_idin the Google APIs console. This verification ensures that your application will not be vulnerable to the confused deputy problem.expires_inThe number of seconds left before the token will become invalid. scopeA space-delimited list of scopes that the user granted access to. The list should match the scopes you specified in your authorization request in step 1. useridThis value lets you correlate profile information from multiple Google APIs. It is only present in the response if you included the https://www.googleapis.com/auth/userinfo.profilescope in your request in step 1. The field value is an immutable identifier for the logged-in user that can be used to create and manage user sessions in your application.A sample response is shown below:
{ "audience":"8819981768.apps.googleusercontent.com", "user_id":"123456789", "scope":"https://gdata.youtube.com", "expires_in":436 } -
If the token has expired, been tampered with, or had its permissions revoked, Google's authorization server will return an error message in the JSON object. The error surfaces as a 400 error, and a JSON body in the format shown below:
{"error":"invalid_token"}By design, no additional information is given as to the reason for the failure.
-
Installed applications
This flow is designed for applications that are installed on a device, such as a mobile phone or computer. These applications could access the YouTube Data API while the user is interacting with the application or when the application is running in the background for an extended period of time without direct user interaction.
This flow assumes that the application cannot securely store tokens that would enable a user to interact with YouTube Data API. It also requires that the application has access to the system browser or has the ability to embed a browser control. If the application does not meet either of these conditions, please refer to the OAuth 2.0 instructions for devices instead.
The following steps explain this flow:
-
Register your application as an installed application
When registering your application, make sure that you specify that it is an installed application. This results in a different default value for the
redirect_uriparameter. -
Obtain an access token
Note: Requests to Google's authorization server must use
httpsinstead ofhttpbecause the server is only accessible over SSL (HTTPs) and will refuse HTTP connections.When a user first tries to perform an action that requires API authentication, direct the user to Google's authorization server at
https://accounts.google.com/o/oauth2/auth. It supports the following URL parameters:Parameter Description client_idRequired. The OAuth 2.0 client ID for your application. redirect_uriRequired. A registered
redirect_urifor that client ID. For installed applications, you can choose between anhttp://localhost:portorurn:ietf:wg:oauth:2.0:oobas described below:http://localhost:port- This value indicates that Google's authorization server should return the authorization code as a query string parameter to the client device's web server. You may specify a port number without changing the configuration in the Google APIs console.
To receive the authorization code on this URL, your application must be listening on the local web server. If your platform supports it, this is the recommended mechanism for obtaining the authorization code. However, note that not all platforms support this approach and that even if a platform does support it, other software (e.g. Windows firewall) may prevent delivery of the message. urn:ietf:wg:oauth:2.0:oob- This value indicates that Google's authorization server should return the authorization code in the browser's title bar. This option is useful if the client cannot listen on an HTTP port without significant modifications to the client. Windows applications possess this characteristic.
If your application uses this value, it needs to determine when the browser has loaded a response from the authorization server. It will then need to extract the authorization code from the title of the page served in the browser. See step 4 for specific instructions for parsing the token from the page title.
Your application should also close the browser window if you want to prevent the user from seeing the page with the authorization code. The mechanism for closing that window varies from platform to platform.
response_typeRequired. Set this parameter's value to code.scopeRequired. A space-delimited list of scopes that identify the resources that your application could access on the user's behalf. stateOptional. Any string that your application would use to maintain state between the request and redirect response. Your application will receive the same value that it sends for this parameter. For example, you could use this parameter to redirect the user to a particular resource in your application. The sample URL below shows a redirect to Google's authorization server for an application requesting permission to submit YouTube Data API requests on the user's behalf:
https://accounts.google.com/o/oauth2/auth?
  client_id=1084945748469-eg34imk572gdhu83gj5p0an9fut6urp5.apps.googleusercontent.com&
  redirect_uri=http://localhost/oauth2callback&
  scope=https://gdata.youtube.com&
  response_type=code&
  access_type=offline
-
User decides whether to grant access to your application
Google's authorization server will display the name of your application and the Google services that it is requesting permission to access on the user's behalf. The user can then consent or refuse to grant access to your application.
You can test this flow by clicking on the sample URL in step 2. If you also place a file on your server at
http://localhost/oauth2callback, you will also be able to see how the user's response appears in the redirect URI. (See step 4 for more details.) -
Google redirects user to your application
After the user consents or refuses to grant access to your application, Google will either redirect the user to the
redirect_urithat you specified in step 2 or return a page to the user's browser.-
If you set the
redirect_uritohttp://localhost(or some path on the local web server), then one of the following two scenarios will apply:-
If the user granted access to your application, Google will have appended a
codeparameter to theredirect_uri. This value is a temporary authorization code that you can exchange for an access token as discussed in step 5.http://localhost/oauth2callback?code=4/ux5gNj-_mIu4DOD_gNZdjX9EtOFf
-
If the user refused to grant access to your application, Google will have included the
access_deniederror message in the hash fragment of theredirect_uri:http://localhost/oauth2callback#error=access_denied
-
-
If you set the
redirect_uritourn:ietf:wg:oauth:2.0:oob, Google's authorization server will return a page to the browser like the one shown below. Your application can then extract the authorization code from the page title.To extract the token, your application should assume that everything that follows the last space character in the page title is a parameter string in the format
x=a&y=b. Your code should parse the parameters from that substring, looking for acode=orerror=assignment to indicate that the page contains the final title string and the sign-in flow is complete. If the page title assigns a value to thecodeparameter, then that value is the token. However, your application should not make assumptions about the token length or the number of parameters in the parameter string.For example, the screenshot below shows a page with the following attributes:
- Page title:
Success code=4/v6xr77ewYqhvHSyW6UJ1w7jKwAzu - Parameter string:
code=4/v6xr77ewYqhvHSyW6UJ1w7jKwAzu - Authorization token:
4/v6xr77ewYqhvHSyW6UJ1w7jKwAzu

- Page title:
-
-
Exchange authorization code for refresh and access tokens
Assuming the user has granted access to your application, exchange the authorization code obtained in step 4 for a refresh token and access token. To do so, send a
POSTrequest tohttps://accounts.google.com/o/oauth2/tokenthat includes the following key-value pairs in the request body:Key Value codeThe authorization code that Google returned to your redirect_uriin step 4.client_idThe OAuth 2.0 client ID for your application. client_secretThe client secret associated with your client ID. This value is displayed in the Google APIs console. redirect_uriA registered redirect_urifor your client ID.grant_typeSet this value to authorization_code.A sample request is displayed below:
POST /o/oauth2/token HTTP/1.1
Host: accounts.google.com
Content-Type: application/x-www-form-urlencoded

code=4/ux5gNj-_mIu4DOD_gNZdjX9EtOFf&
client_id=1084945748469-eg34imk572gdhu83gj5p0an9fut6urp5.apps.googleusercontent.com&
client_secret=hDBmMRhz7eJRsM9Z2q1oFBSe&
redirect_uri=http://localhost/oauth2callback&
grant_type=authorization_code
-
Process response and store tokens
Google will respond to your
POSTrequest by returning a JSON object that contains a short-lived access token and a refresh token.{ "access_token" : "ya29.AHES6ZTtm7SuokEB-RGtbBty9IIlNiP9-eNMMQKtXdMP3sfjL1Fc", "token_type" : "Bearer", "expires_in" : 3600, "refresh_token" : "1/HKSmLFXzqP0leUihZp2xUt3-5wkU7Gmu2Os_eBnzw74" }Important:Your application should store both values.
-
The Calling the YouTube Data API section explains how to submit an authorized request using the access token.
-
The Refreshing an access token section explains how to use the refresh token to obtain a new access token if the one that you have expires.
-
Devices
This flow is designed for applications that run on devices with limited input capabilities, such as game consoles or video cameras. In this flow, the user interacts with an application on the device to obtain a URL and a device code. The user then switches to another device, such as a computer or smartphone, that has richer input capabilities to authorize the device code.
The following steps explain this flow:
-
Embed your
client_idandclient_secretin your applicationYou need to register your application with Google and embed the
client_idandclient_secretcreated during the registration process into your application. -
Request a device code
Your device sends a
POSTrequest to Google's authorization server athttps://accounts.google.com/o/oauth2/device/code. The request specifies the following parameters:Parameter Description client_idRequired. The OAuth 2.0 client ID for your application. scopeRequired. A space-delimited list of scopes that identify the resources that your application could access on the user's behalf. The following sample request shows how to retrieve a device code:
POST /o/oauth2/device/code HTTP/1.1
Host: accounts.google.com
Content-Type: application/x-www-form-urlencoded

client_id=1084945748469-eg34imk572gdhu83gj5p0an9fut6urp5.apps.googleusercontent.com&
scope=https://gdata.youtube.com
-
Handle the response
Google will respond to your request by returning a JSON object to your device. A sample response is shown below:
{
  "device_code" : "4/L9fTtLrhY96442SEuf1Rl3KLFg3y",
  "user_code" : "a9xfwk9c",
  "verification_url" : "http://www.google.com/device",
  "expires_in" : "1800"
  "interval" : 5,
}
The application on your device should display the
user_codeandverification_urlto the user. It should store thedevice_code,expires_in, andintervalvalues for use in step 4. -
Begin polling Google's authorization server
Your application can begin polling Google's authorization server using the
device_codereturned in the JSON response in step 3. To do so, your application sends aPOSTrequest tohttps://accounts.google.com/o/oauth2/tokenthat specifies the following key-value pairs:Key Value client_idThe OAuth 2.0 client ID for your application. client_secretThe client secret associated with your client ID. This value is displayed in the Google APIs console. codeThe device code obtained in step 3. grant_typeSet this value to http://oauth.net/grant_type/device/1.0.A sample polling request is shown below. The
intervalreturned in the JSON response in step 3 specifies the minimum amount of time, in seconds, that your application should wait between polling requests.POST /o/oauth2/token HTTP/1.1 Host: accounts.google.com Content-Type: application/x-www-form-urlencoded client_id=1084945748469-eg34imk572gdhu83gj5p0an9fut6urp5.apps.googleusercontent.com& client_secret=hDBmMRhz7eJRsM9Z2q1oFBSem& code=4/YMSlR3fSCC1NtUh073DuZKTJJ3ss& grant_type=http://oauth.net/grant_type/device/1.0
Until the user completes steps 5 through 7, your application will receive one of the following responses to each polling request:
-
The following response indicates that the user has not yet completed the steps to grant API access to the device:
{ "error" : "authorization_pending" } -
The following response indicates that your application is sending polling requests too frequently:
{
  "error" : "slow_down"
}
-
-
User enters
user_codein separate browserThe user launches a browser on another device, such as a computer or mobile phone, and navigates to the
verification_url. That URL will display a page where the user can enter theuser_codeobtained in step 3.
Note: The
user_codeis case-sensitive, so the user will need to enter it exactly as it appears in the response. -
User logs in to Google Account that will be used on your device
After entering the
user_code, the user will be asked to log in to the Google Account that will be used to authenticate YouTube Data API requests from your device. (If the user is already logged in, she will proceed directly to the next step.) -
User decides whether to grant access to your application
After the user logs in, Google's authorization server will display a page that shows the name of your application and the Google services that it is requesting permission to access on the user's behalf. The user can then consent or refuse to grant access to your application.
-
Process response from polling server to obtain tokens
If the user grants access to your application, the next polling request that your device sends will return a JSON object that contains an access token and a refresh token.
{
  "access_token":"1/fFAGRNJru1FTz70BzhT3Zg",
  "expires_in":3920,
  "token_type":"Bearer",
  "refresh_token":"1/6BMfW9j53gdGImsixUH6kU5RsR4zwI9lUVX-tqf8JXQ"
}
Important: Your application should store both values.
-
The Calling the YouTube Data API section explains how to submit an authorized request using the access token.
-
The Refreshing an access token section explains how to use the refresh token to obtain a new access token if the one that you have expires.
-
Calling the YouTube Data API
After obtaining an access token for a user, your application can use that token to submit authorized API requests on that user's behalf. The API supports two ways to specify an access token. The first option provides greater security and is the recommended approach.
-
Specify the access token as the value of the
Authorization: BearerHTTP request header:POST /feeds/api/users/default/uploads HTTP/1.1 Host: gdata.youtube.com Authorization: Bearer ACCESS_TOKEN ...
You can test this using cURL with the following command:
curl -H "Authorization: Bearer ACCESS_TOKEN" gdata.youtube.com/feeds/api/users/default/uploads
-
Specify the access token as the value of the
access_tokenquery parameter:https://gdata.youtube.com/feeds/api/users/default/uploads?access_token=ACCESS_TOKEN
You can test this using cURL with the following command:
curl gdata.youtube.com/feeds/api/users/default/uploads?access_token=YOUR_ACCESS_TOKEN
The API will return an HTTP 401 response code (Unauthorized) if you submit a request to access a protected resource with an expired access token. The following section explains how to refresh an access token.
Refreshing an access token
If your application obtains a refresh token during the authorization process, then you will need to periodically use that token to obtain a new, valid access token. Server-side web applications, installed applications, and devices all obtain refresh tokens.
At any time, your application can send a POST request to Google's authorization server that specifies your client ID, your client secret, and the refresh token for the user. The request should also set the grant_type parameter value to refresh_token. The following example demonstrates this request:
POST /o/oauth2/token HTTP/1.1
Host: accounts.google.com
Content-Type: application/x-www-form-urlencoded

client_id=21302922996.apps.googleusercontent.com&
client_secret=XTHhXh1SlUNgvyWGwDk1EjXB&
refresh_token=1/6BMfW9j53gdGImsixUH6kU5RsR4zwI9lUVX-tqf8JXQ&
grant_type=refresh_token
The authorization server will return a JSON object that contains a new access token:
{
  "access_token":"1/fFAGRNJru1FTz70BzhT3Zg",
  "expires_in":3920,
  "token_type":"Bearer"
}
Client libraries
The Google Data client libraries that support the YouTube Data API do not currently support OAuth 2.0. However, a newer set of Google API client libraries, which do not support the YouTube Data API, do provide OAuth 2.0 support.
As such, it is an option to use these newer libraries, which are listed below, for their OAuth 2.0 capabilities and then force the Google Data client library to use the OAuth 2.0 token(s) that you have obtained.
- Google APIs Client Library for Java
- Google APIs Client Library for Python
- Google APIs Client Library for .NET
- Google APIs Client Library for Ruby
- Google APIs Client Library for PHP
- OAuth 2.0 Library for Google Web Toolkit
- Google Toolbox for Mac OAuth 2.0 Controllers
You can also follow the instructions in the Calling the YouTube Data API section to modify your code to properly set the OAuth 2.0 token values.
|
« Previous Authentication |
Next » Flash Applications |