FormsCentral allows paid users (Basic or Plus) to collect money from respondents using PayPal as the payment processor. PayPal supports collecting money using an existing PayPal account or credit card (Visa, MasterCard, Discover or American Express). Common types of forms that often require money to be collected include registration, donation and order forms.
First, create your form from scratch or use one of our many templates. Once you have created the form, go to the "Options" tab, select "Payment Processing" and check the "Enable PayPal Payments" check box.

Click image to view full size
PayPal Account Registration
In order to process payments using PayPal you must have a verified Premier or Business PayPal account. If you have a Personal PayPal account you can upgrade it to Premier or Business. You can learn more about the various types of accounts in the PayPal Help Center: PayPal Account Types. PayPal also provides instructions on how to verify your PayPal account.
NOTE: If your PayPal account is Personal or not verified the account registration process explained below will not be successful.
If you are not sure if your account is the right type or verified then sign into your PayPal account (on paypal.com) to see your account type and verification status in the upper left corner of the UI:

If you don't have a PayPal account click "Sign Up Now" on the PayPal Setup tab and you will be taken to the PayPal website to create a Premier or Business account. Once you complete your PayPal account creation make sure you verify your account. Also make sure you confirm the email address associated with your PayPal account.
Enter the email address associated with your verified Premier or Business PayPal account into the "PayPal Account" field and click on "Register Account".
The following dialog will appear. If you have a Personal PayPal account or don't know the type of account you have then click "Upgrade", otherwise click "Continue". If you choose to upgrade you will be taken to the PayPal.com website to upgrade your account to Premier or Business. Once completed, come back to FormsCentral and click the "Continue" button on the upgrading account dialog that will be shown.

Once you have completed the first step another dialog will pop up asking you to grant Adobe FormsCentral permission to access your PayPal account. Click on "Grant Permissions".

You will be taken to the PayPal.com website to grant permissions to allow Adobe Systems to access your account. The permissions we request allow FormsCentral, on your behalf, to perform transactions into your account. We do not have permissions to transfer money out of your account (only in). Click the "Grant Permission" button shown below.

Click image to view full size
You will then see the below confirmation page stating permissions have been granted.
IMPORTANT: DO NOT CLOSE THIS WINDOW. Either wait for it to redirect back to FormsCentral -or- Click "Return to Adobe Systems, Inc". If you close the browser window/tab on your own then the registration process will fail.

Click image to view full size
Once the browser windows disappears you should go back to the FormsCentral application. Click "Close" on the "Authorizing Account..." dialog.
On the PayPal Setup tab you should now see a checkmark indicating that you have successfully setup your PayPal account registration.

Click image to view full size
If instead you see an alert icon then the registration process failed:

These are some common reasons why registration might fail:
- PayPal account does not exist or is disabled
- PayPal account is not a Premier or Business Account
- PayPal account is not Verified
- The email adddress associated with your PayPal account is not confirmed. Follow these instructions to confirm your email address.
- The PayPal.com Grant Permission confirmation web page (shown above) was closed by you before the redirect occurred
Correct the issue then click the "Register Account" button to attempt registration again.
Purchase Field Mapping
Next you need to map your form fields in the form you created to items that can be purchased using PayPal. Go to the "Purchase Fields" tab.

Click image to view full size
Column Definitions
- Purchase Field - Select fields on the form that, when selected, will add a purchase to the PayPal order.
- Quantity Field - If you would like the respondent to add multiple quantities of their selection, add a quantity field to your form and link it to the purchase here. NOTE: Only fields of type "Number" will appear in this drop down. To add a number field to your form - go to the Design tab, add a text field then change its field properties to type "Number".
- Price - Price for an item can be a fixed amount or an amount inputted by the user.
- Description - How the item will be described in the PayPal check out summary. It defaults to the choice label and can be customized by you.
A Form-wide Charge is not associated with a field and is always added to the items purchased when a respondent proceeds to checkout. Common use cases for a form-wide charge include processing fees, handling charges, or a form that only has one item to purchase. To setup a form-wide charge enter a fixed price and description for the charge. Optionally, you can associate a quantity field. If you do not want to include a form-wide charge with your form then just leave the price empty, description as default text and quantity drop down set to n/a.
To add an additional item to purchase click the "Assign Field" button. Here are some examples of different ways to setup items to be purchased:
Order Form - Choose Multiple Items From a List Of Items
In this example you have a multiple choice field for various items a user can purchase. In the Purchase field tab, click "Assign Field" then choose the "Pick the services you..." field in the purchase field drop down and choose "Lawn Aeration ($40)" in the fly-out. Leave Quantity as "n/a", fill in a Fixed price of $40.00 and type a Description. Repeat this for each choice of the "Pick the services you..." field. Leave the form-wide charge price blank and description unchanged since it isn't needed.

Click image to view full size
Registration Form - Choose One Item From a List Of Items and Include a Processing Fee
This is exactly the same as the above example except this is a single choice field with the additional form-wide charge of a $1.00 processing fee.

Click image to view full size
Donation Form - Choose One Item From a List Of Items with Option to Pay an Arbitrary Amount
This is similar to above examples except in this case you assign the Other Amount choice to a User Inputted price. This way the respondent can donate an arbitrary amount.

Click image to view full size
Membership Form - Choose One Item From a List Of Items and Select Quantity of Item Chosen
In all of the previous cases the Quantity field has been "n/a". In this example, we map the "Number of classes" field to both choices as a quantity so the respondent can pick the type and number of classes to attend. NOTE: Only fields of type "Number" will appear in the Quantity drop down. To add a number field to your form - go to the Design tab, add a text field then change its field properties to type "Number".

Click image to view full size
Order Form - Select Quantity for Each Item Listed with Delivery Charge
This example doesn't use a choice field. Respondents pick an item by providing a quantity. In these cases, the purchase field and quantity field will mapped to the same field (e.g. "Cheese Pizza ($10)"). NOTE: Only fields of type "Number" will appear in the Quantity and Purchase Field drop downs. To add a number field to your form - go to the Design tab, add a text field then change its field properties to type "Number".

Click image to view full size
Address Field Mappings
When respondents go to the PayPal checkout summary and pay with a credit card they must provide their billing address. If you also ask for their address in your form then they will need to type it twice. You can provide a better user experience by mapping the data the respondent enters in the FormsCentral form to the billing fields that will be shown in the Paypal checkout. That way when they fill out their address in the FormCentral form it will prepoulate the billing address within PayPal.

Click image to view full size
Test Form
Make sure you test your form before making it available to respondents. Go to the "Test" tab and click the "Test" button. You can go through the entire form filling and purchasing process to make sure you set up everything correctly. When you use this method to test you still need to provide valid PayPal accounts or credit card information in the PayPal checkout. However, when testing the form, FormsCentral will not complete the actual transaction so your account or credit card will not be charged. These tests will be marked as "Test" in the View Responses table.
Respondent Experience When Purchasing Items
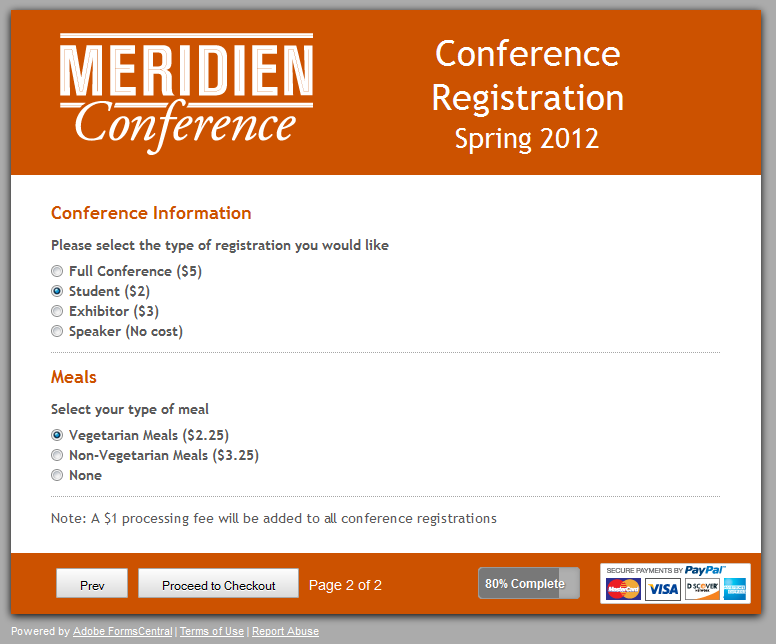
Forms that are payment enabled act like any other FormsCentral form. The only difference is the "Submit" button on the last page of the form is now labeled "Proceed to Checkout" and the PayPal logo is shown in the lower right corner.
Click image to view full size
When the respondent hits "Proceed to Checkout" the data that was filled into the form will be submitted to FormsCentral and the respondent will be redirected to paypal.com to complete the financial transaction. They will see a summary of their order (which we defined above) and be given the option to pay using their PayPal account or a major credit card. If you have setup the address field mappings then the billing/contact information will be prepoulated for them.
Here is the credit card user experience:

Click image to view full size
Paying via PayPal just requires you to log in.

Click image to view full size
Once you have provided valid information you are taken to a summary page. Clicking "Pay Now" will finalize the transaction and take you back to FormsCentral.

Click image to view full size
FormsCentral will then present the normal customized confirmation page.

Click image to view full size
View Responses and Payment Information
Once the transaction is completed then the "Payment" columns in the View Responses table will be populated. These columns are automatically added by FormsCentral and appear as the last columns in the table.
Column Definitions
- Provider ID - Always set to PayPal.
- Merchant Account - PayPal merchant account used to process the transaction.
- Transaction ID - ID of the PayPal transaction. You can use this to cross reference this response with the more detailed transaction data stored within your PayPal account.
- Status at Checkout - Status of the transaction at checkout time. It is possible for the status to change at a later point. You should go to your PayPal account to see the latest status of a transaction.
- Completed - Transaction was completed successfully and money moved into your account.
- Cancelled - Respondent cancelled the transaction during checkout by clicking the "Cancel" button on the PayPal checkout summary. No financial transaction occurred.
- Pending - Status of transaction is unknown at time of checkout. Check your Paypal account to see why.
- Total Amount - Amount transacted at checkout time. Like status, it is possible for the amount to change at a later point. You should go to your PayPal account to see the latest amount of a transaction.
If these values are all blank it means that a respondent submitted their form data, was redirected to the Paypal checkout page and abandoned the PayPal checkout (they never clicked Cancel or Pay Now on the checkout page)

Click image to view full size
