Header
Search Blogs
Most Popular
Posted November 9, 2011, 5:04 pm

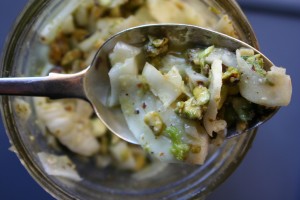
Fennel Pistachio Compote

There are three kinds of fennel, bitter, sweet, and Florence. Bitter and sweet fennel have long histories—the seeds and stem of bitter fennel was used to flavor foods in the classical era, and maybe earlier. Sweet fennel has a slight anise flavor, but it is Florence fennel, or finocchio, the one with the big bulb, that really packs that licorice punch.

You can get finocchio year round these days, but traditionally, its season is wintertime. I grew up eating it in salads, roasted with parmesan cheese sprinkled over, and braised in chicken stock. Look for bulbs that are very hard and white, with their feathery greens attached. The greens add great flavor to chicken and fish stocks.

Last year I pickled fennel and it was delicious—I used it a variety of ways. One was as a salad on top of mortadella salami, garnished with pistachio nuts. I was thinking about that garnish and figured it would be tasty to have on hand a finocchio and pistachio compote in oil to hold in the fridge.

I tried it and it turns out to be one of those addicting combinations. I’ve eaten, like, a quarter cup just out of the pint jar with my fingers, shaking off the oil before dropping a pinch in my mouth. But I am going to stop because next time I’ll test it with a very beautiful piece of stripped bass a Montauk fisherman friend gave us, in an egg salad, and I have a slightly weird pasta idea…but first, the compote.

Fennel Pistachio Compote
Makes 1 pint
I like to keep the ingredients chunky for this recipe. If I want to use the compote less as a salad and more as a sauce, I can always grind it up later. The compote is covered with oil, which is only a prophylactic to keep new spoilers out of the jar. But inevitably, there are yeasts and mold spores floating around and they are going to be on these raw ingredients. Eventually, the compote will ferment. It won’t freeze, and it won’t can. So make it, refrigerate it, but try to use it within 10 days (that will be easy when you taste it).

½ lb fennel (about ½ of a large bulb)
½ cup plain pistachios
½ cup olive oil (plus more to cover)
Juice from 1 lemon
1 teaspoon minced garlic
½ teaspoon salt
Freshly ground black pepper to taste

What you need to make the compote

Core and thinly slice the fennel, then chop into pieces about ½ inch long. Place the pistachios in a food processor and pulse to chop, or chop with a knife. You don’t want pistachio powder, just crushed nuts. Combine the fennel, pistachios, and remaining ingredients in a bowl.

Sterilize a pint jar, band, and lid (it’s okay to use a used lid) by boiling in water for 10 minutes (add 1 minute for every 1,000 feet above sea level). Pack in the compote and cover with oil. You could fully saturate with oil. That would be best and give your product the longest life because less air pockets mean less spaces for yeasts and so on to grow. But spoilers will grow, eventually, in the dish like this, so I think it is best not to create a totally oily compote, and just eat it a bit sooner.

Refrigerate for up to ten days. Next time, recipes for using the compote.

The is over. Congratulations in advance to all you winners! I hope you like the book. I’ve put up a website with links to some of the scientists and their papers I cite, my mushroom recipes, and all the mycological clubs in the USA, as well as retail links and a calendar of mushroom forays and festivals events (although that’s still evolving…not every festival has a long lead-time web presence). Check it out!

Posted November 1, 2011, 6:42 pm

Recipes for Homecanned Shell Beans

Homecanned shell beans

Even if you didn’t get around to canning fresh , you can still make a fabulous () with dried or fresh beans. I make this dish quite a few times during the winter: it’s rich and satisfying, but simple and humble, and quite inexpensive to make. (And if you’ve canned fresh cranberry beans, takes about 15 minutes to prepare.) I think one of the definitions of a comfort food is when a recipe has a myriad of small adaptations that become beloved to a particular family, and certainly, pasta e fagioli fits the bill. Some families prepare pasta e fagioli with tomatoes or carrots. Others with tuna fish canned in olive oil (it’s marvelous). The beans may be mixed with the pasta whole, semi-pureed, or pureed smooth, and the overall body of the dish can run the gamut from bean soup with pasta to pasta with bean sauce. It’s a matter of the ratio between the chicken stock, the pasta, and the beans, and every take is valid. You may have heard this dish called pasta “fazool.” Like broccoli raab or rabe, fazool is derived from southern Italian dialect.

If you make a soupy pasta e fagioli calls use a small cut pasta, like tubettini. If you are make the pasta version I describe below, then use a larger cut pasta like bow ties, penne, or Fiorentini (which are in the photo). One word of caution: if you make a soupy version, cook the pasta separately, then add it to the fagioli. I find that when you cook pasta in soup it tends to overcook, and if there are any leftovers, when you reheat the pasta it will definitely overcook.

Pasta e Fagioli

Pasta e Fagioli
Serves 4
If the beans sit around a while, even ten minutes, you may need to rehydrate them with a little warm chicken stock or water. The object in this recipe is to make the sauce thick and loose, like a heavy marinara sauce. I amp up the flavor when preparing this dish for the table, but you don’t have to. Directions for making this dish with dried or fresh shell beans is found below.

This dish is terrific garnished with chopped fresh arugula or watercress, or with tuna canned in olive oil, drained and the fish gently flaked and scattered over the top! Roasted would be good, too. In fact, I make a version of pasta e fagioli with no fagioli: I used roasted instead. I grind the up with some chicken stock to make a heavy, loose sauce.

1 pint home-canned cranberry beans (See Note)
1/2 cup chicken stock, warm
2 garlic cloves, minced
Juice from 1/2 lemon
1/2 teaspoon dried marjoram (or 1 teaspoon if you have fresh)
Salt and freshly ground black pepper to taste
6 cups cut pasta, like bow ties
4 tablespoons grated parmesan cheese for garnish
2 tablespoons minced fresh flat leafed parsley for garnish
Dribble of extra virgin olive for garnish

Pour the beans and 1/4 cup of stock in a medium sized skillet over a medium heat and heat until bubbling and hot through, about 5 minutes.

Warming the beans

Add the minced garlic, lemon juice, marjoram, salt and pepper to taste.

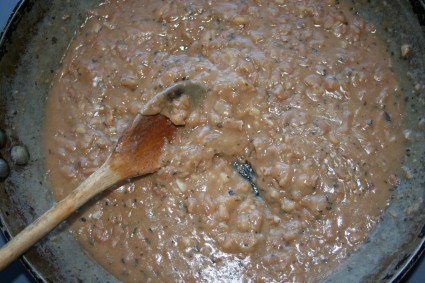
Mash the beans. You will probably need another 1/4 cup of stock in order to do this. The beans will be very soft.

The mashed beans

Bring a large pot of salted water to a boil and add the pasta. Cook until al dente, around 10 minutes. Drain and pour into a bowl.

Add a little of the pasta water to the beans if they are getting crusty. Pour the bean sauce over the pasta and toss. Garnish with cheese and parsley, and/or the other, most exotic garnishes mentioned above.

Serve immediately!

I used a white wine, Arnaldo Caprai Grecante Grechetto in canning the beans, then drank the remainder with the pasta

Note: If you want to make this recipe from scratch you can do it with either 2 cups of fresh cranberry beans or with 2 cups of dried beans that have been soaking in a bowl of water overnight. (Cool tip: add 1/2 teaspoon of baking soda to the water and the cooked beans will be more tender). In either case, place the beans in a pot, cover with water or chicken stock, throw in a piece of carrot,a hunk of onion, a bay leaf. Cover and boil gently over a medium low heat until the beans are very tender and soft, around an hour plus for dried, less for fresh. Drain the beans but keep the cooking liquid. Place the beans in a skillet with lots of minced garlic, the juice from 1 lemon, and a teaspoon of marjoram. Add some of the cooking liquid to keep everything moist, and mash the beans/ continue with the recipe as described above.

Refried Bean Tortillas

You can also make very quick refried bean tortillas with your home-canned beans. Follow the recipe above, then smear the mashed beans into a hot tortilla, grate cheddar or jack cheese over the beans, add chopped cilantro, a few dashes of tabasco and a squeeze of lime juice!

One more week in the ! Send an email aly.mostel@rodale.com to win a signed copy. Write
“Mycophilia Giveaway” in the subject line and hit send. Ten winners
will be chosen at random one week from today, November 1, 2011. No
purchase necessary to win. Winners will be mailed their signed books on November 15.

Posted October 25, 2011, 7:03 am

Mycophilia in Bookstores Today!

Rodale

is in physical and virtual bookstores today! and I wanted to share an excerpt from it. The book is a combination of travelogue and mycology primer. It describes many of the mushroom fairs and festivals, forays and camps that are conducted throughout the year in the USA, and the eccentric people that populate the mushroom community, dropping in and out of the science along the way. I wanted write a book for people who, like myself, were not biology aficionados, but are inspired by the complexity of nature: so it’s easy to read, but not dumbed down. The excerpt below is a travelogue bit.

I didn’t include recipes—no room—but I have put together a website, which has lots of recipes on it, as well as links of all sorts. The website is still in construction, but will be up shortly and will grow with time. I would love to publish your mushroom recipes: my email contact is on the website.

Read more…

Posted October 17, 2011, 3:57 pm

Canning Shell Beans

Fresh cranberry beans or borlotti beans are one of my favorite fall foods. I used to start eating them around Thanksgiving when they came out of California, but more and more local growers are producing them and now they are turning up in my New York farmer’s market much earlier. They are creamy, mild, and extremely versatile. The bean is ivory colored with red speckles (as are the 4-inch long pods), and they turn a brownish pink when you cook them. The Latin binomial is Phaseolus vulgaris, or “common bean.” There is a lot of variability within this species, which includes cultivars like Anasazi beans, pintos, and navy beans.

Dried bean are great, though their nutrition and flavor degrades after 12 months and they take longer to cook, so if you don’t know the age of your beans when you buy them, a dried cranberry bean can be pretty disappointing. Since the beans are coming in now, you can always dry them yourself, which is easy to do: if you grow them, you can allow them to dry on the vine or stalk until the beans inside rattle, or you can place the pods on newspaper in a dry attic, again, until the beans inside rattle. Beans dried in this manner will need to be pasteurized: Either bake the dried beans (in their pods) at 160 F for 30 minutes, or place them in freezer baggies and freeze for 48 hours at 0 F. This kills any insects and their eggs. If using a dehydrator, shell the beans and spread them on the trays. Dry at 140 F for a few hours, until the beans are hard. You can dry in your oven, of course, but honestly, it will drive you crazy. Often the beans cook rather than dry out.

Read more…

Posted October 5, 2011, 8:38 am

Canning Inventory, Indoor Grilling, and Pissaladiere

That's smoked trout, , and peaches in front...

I had to do an inventory recently of my canned goods—which basically means weeding out the very ancient and flushing them down the toilet. I do this every fall, bringing leftover stuff from last year to the forefront of my pantry, and tucking the new stuff further back.

I only do small batches of canned goods, but I do them often. This summer was no different. I managed to can cherry jam and cherry juice, raspberry jelly, blackberry jam, various berry syrups, apricot jam, tomatoes (passato and chunky), ketchup and tomato paste, froze Genoa-style pesto and garlic scapes pesto, dried boletes, pickled chanterelles, dried oregano leaves and oregano flowers (separately), canned crabapple jelly and vertjus (an acidic juice made from unripe wine grapes used in place of vinegar in cooking), peach jam, plum jam (and dried plums), marinated red peppers, salmon, and canned smoked trout.

Read more…

Posted September 23, 2011, 12:00 pm

More Than One Small Batch, But Just One Processing

and ...process at the same time!

Even though I have the smallest pressure canner one can buy for a ceramic stove top (works on gas, too), I am often frustrated because I usually put up only a couple of half pints or pints of something that needs to be pressure canned. So often I will end up freezing, or refrigerating.

I recently encountered this problem when I prepared three half-pints of caramelized opinions that need to be pressure canned. Hmmm, what to do? I looked at my data sheets and found a number of vegetables that are also processed at 10 pounds for 25 minutes (at seal level). Voila! I had a load of carrots in the fridge—way more than I could eat before they became rubbery as erasers–and so I put up two pints of carrots with powdered ginger in the same canner, for the same amount of time.

I don’t know what took me so long to figure out that I could process multiple products at once, as long as they all call for the same processing time. And since pints and half pints are processed for the same amount of time (quarts take longer), I can mix the sizes of jars as well as the products within them. It’s my new thing!

Read more…

Posted August 17, 2011, 7:18 am

Canned Salmon

Beautiful wild Coho has been coming in to my local market in Hotchkiss and as usual, I bought too much. I decided to can the leftover and was thrilled with the results. Home canned is tender and moist, with no fishy taste. It’s really a great product to preserve and have on hand.

Canning salmon, and any other fish for that matter, is different from canning tuna. (All fish must be pressure canned.) With salmon, you do not add any liquid. The salmon extrudes quite a bit of water during processing, as well as rich fat. If you topped off your jars with oil or water, your seals would fail. Some recipes call for a bringing stage, but that’s for flavor, not safety. I prefer to add a ½ teaspoon or so of salt to my jars, and then process as usual. You can also lightly smoke salmon before canning it: the method is the same as putting up the raw fish. I am going to be teaching a class at the Brooklyn Kitchen in NYC this fall on canning salmon, and demonstrating a few unusual recipes for using it. http://www.thebrooklynkitchen.com/

Read more…

Posted August 7, 2011, 3:49 pm

Berry Syrups

View from the porch of our place in Crawford

Along with rainbows, berries are one of the great pleasures of summer, with a short but intense season, but luckily, one fruit tends to come in after another. One of the easiest and most satisfying ways to take advantage of the bounty is to make syrups. Berry syrups are simply berry juice combined with sugar, and all kinds of berries can be used, like blueberries, cherries (okay, cherries are not berries but they still make great syrup), grapes, raspberries, strawberries, and blackberries. Syrups are made using a formula of 1 cup of juice to 1 1/4 cup sugar. The differences between the berry varieties occur when you are cooking them down: some berries are very juicy, like grapes, others are pulpier, like blueberries. Still others, like wild berries, may take a bit longer to release their juice and so you need to add a bit more water to the pot to avoid scorching in the early stages of heating.

Read more…

Posted July 25, 2011, 7:53 am

Dried Cherries and Cherry Juice

All the cherries are off the trees in the North Fork Valley, but there are still plenty for sale at the farm stands. I know from experience that the best way to stock my larger is to have a small quantity of any given food stuff put up a in a variety of ways. So of course I am putting whole cherries up in syrup, but this year I also dried cherries, to cook with other dried fruits for winter desserts, to add to oatmeal or chocolate cookies, use in making chocolates around Valentines day (I dot little puddles of tempered chocolate with the cherries, then chill — they’re lovely), or to eat mixed into yogurt or granola for breakfast.

Read more…

Posted July 18, 2011, 3:55 pm

Low Sugar Cherry Preserves

Despite a cold spring and a ton of rain, Colorado’s North Fork Valley still managed to produce a beautiful crop of cherries, and within days of settling into the cabin, I bought my first case.

I was curious about how Jacques Pepin’s slow cooking method—baking the fruit with sugar at a low temperature for a long time and then water bath canning–would work with cherries, so the first colander full of pitted fruit was put to the task.

The result was a preserve that was just sweet, allowing some of the natural tartness of the fruit to come through, an intensification of flavor, and the cherries became softly chewy, kind of like a dried fruit that has been stewed a long time. They are really delightful, though not so much for spreading on toast. Rather, the cherries are perfect for baking. I used some of mine in (basically your favorite brownie recipe with strained cherries mixed into the batter). In the past I’ve used cherries that I’d put up in syrup or fresh cherries, but in both cases the cherry taste really wasn’t as strong as I wanted. It’s tough to compete with the deep flavor of bittersweet chocolate. But because these cherries have such a concentrated flavor, they held up beautifully.

Read more…

Advertise on The Denver Post