


University IT offers access to statistics, analytics, and modeling software packages for academic use through the Univeristy IT Virtual Lab. These applications are hosted on UNT servers and presented virtually to your on- or off-campus computer, meaning that you may use these full applications without the need to install them on your local computer.
Request access to the UIT Virtual Lab
To request access to the UIT Virtual Lab, submit a UNT IT Help Ticket through UNT's self-service system.
1. Available applications
2. How to get started
3. Using the virtual lab
4. Additional notes
1. Available applications in the UIT Virtual Lab
EViews 10
LISREL 9.3
Mathematica 11.3
MATLAB R2019a
NVivo 12
RStudio 3.5 (CRAN, CRANextra, BioCsoft, Rtools)
SAS 9.4 (less Text and Enterprise Miner)
SPSS Statistics 25
SPSS Modeler 18.1
Stata/IC 15.1
ELAN 5
FieldWorks Language Explorer 8.3
Keyman 10
PRAAT
SayMore 3
2. How to get started using the UIT Virtual Lab
This tutorial will guide you through our recommended setup of using the VMware Horizon desktop client for macOS or Windows. Clients for other platforms are available, such as Windows 10 UWP, Chrome OS, etc. but these may lose some useful features like access to local storage which may impede your workflow. Similarly, Web/HTML usage is possible and covered in the “additional notes” section along with accompanying caveats.
1. Visit https://view.euc.untsystem.edu/ in your web browser of choice.
2. Click the left icon labeled “Install VMware Horizon Client.”
3. On the VMware webpage, click the “Go to Downloads” link off to the right of the product for your platform – for instance, VMware Horizon Client for Windows (not Windows 10 UWP) or VMware Horizon Client for Mac.
4. By default, the most recent version is selected and this is fine for our use. Click the blue “Download” button to start downloading the VMware Horizon installation media.
5. The installation process will vary by platform.
a. Windows
i. Open the installation executable that you downloaded. It’s likely named VMware-Horizon-Client-(version).exe
ii. A standard installation is acceptable for our uses, so review the license agreement and click “Agree & Install” to continue.
iii. The installer will install the application and prompt you if a system restart is necessary.
iv. You should then be able to find the VMware Horizon Client in your Start Menu.
b. macOS
i. Open the installation image that you downloaded. It’s likely named VMware-Horizon-Client-(version).dmg
ii. Review the license agreement and click “Agree” to accept.
iii. A “VMware Horizon Client” image will be mounted and open a new window. In this window, drag the “VMware Horizon Client.app” icon to the “Applications” folder to complete the installation.
iv. You should then be able to find the VMware Horizon Client in your Applications folder.
6. Open the VMware Horizon Client.
7. When prompted for a Connection Server, enter view.euc.untsystem.edu and click “Connect.”
8. You will be prompted to log in. For the username, students will use STUDENTS\EUID and employees will use UNT\EUID. Alternatively, you may use your university-provisioned email address as the username which omits the need for a “domain\” prefix. For students, that username will follow the format FirstLast@my.unt.edu, while employees will have First.Last@unt.edu.
3. Using the UIT Virtual Lab
Launching applications
Applications may be launched from the VMware Horizon Client window by double-clicking on them.
Computer Use Policy
When launching your first application, you will be asked to confirm that you agree to abide by UNT’s Computer Use policy, just as you would in a physical computer lab.
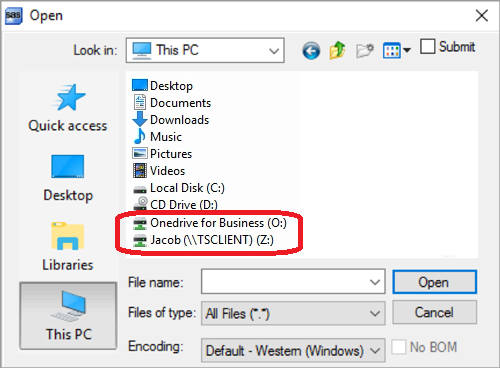 Accessing and saving your files
Your university-provided OneDrive, local computer storage drives, and USB storage devices are mounted as “network drives” in the virtual environment. This means you may access files stored in your OneDrive and those stored locally on your computer within the virtual environment by navigating to that “drive” within an application’s file explorer.
NOTE: Virtual applications have their own virtual disk that is not necessarily persistent between your sessions, so it is recommended you access and save your files with one of these aforementioned external sources where your files are saved outside the virtual environment.
For instance, when in SAS, you may go to File -> Open, then select “This PC” on the left and open the O:\ drive to access your OneDrive or the Z:\ drive mapped using your local computer username to gain access to files under your local computer user profile.
Some applications’ file explorers may look different from others. So, whichever way the navigation is done, just remember to first find and navigate to “This PC” to find your mapped network drives in order to gain access to the files on your computer and your OneDrive.
4. Additional notes
The UIT Virtual Lab may also be accessed using the web/HTML client presented during Step 2 of the “How-to” section, as opposed to using the installed desktop client. However, there are significant drawbacks that may hinder your workflow, which is why we recommend the desktop client. Drawbacks to using the web/HTML client include:
• The files stored locally on your computer are not accessible within the virtual lab when using the web client.
• Your local computer clipboard (i.e., copy, cut, paste) is not shared with the virtual lab when using the web client.
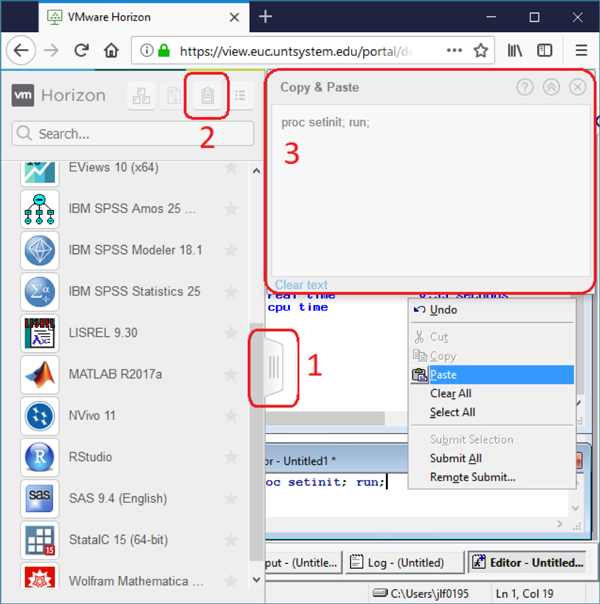
Given this limitation, VMware has included an intermediate clipboard as a staging area where text may be copied from your computer to their virtual clipboard, then that virtual clipboard can be used to paste the text into virtual applications. This method cannot be used to copy text out from the virtual applications – it can only be used to copy text in from your computer. To use this virtual clipboard:
1) Click the tab off to the left of your web browser to slide out the VMware menu
2) Click the Clipboard icon near the top right of this menu
3) Paste (Ctrl+V / Cmd+V) your text into the “Copy & Paste” window that opens.
Now that your text is in the virtual clipboard, you may paste (Ctrl+V / Cmd+V or right-click, Paste) your text into the Virtual Lab application. The “Copy & Paste” window will remain open to make subsequent copy and paste actions quicker.
For more information, please send an email to HostComputingServices@unt.edu.