
![]()
|
|
| Home | Exhibits | Hoover Information |
Museum | Coming Events |
Students | Educators | Laura Ingalls Wilder |
Research | Links |
|---|
This "straw" hat is made to resemble one that a boy might have worn on the trail west. It is fairly simple to construct with brown paper bags or kraft paper, and a small bowl for shaping the crown. However, an adult should make the pattern template ahead of time.
Pattern template: To make a template that will withstand multiple use, you will need a 14" cardboard circle. You can either cut one yourself or it can be purchased where they sell cake decorating supplies. Take the bowl you will be using to shape the crown and center it on the cardboard. Draw around it with a pencil and cut out the smaller circle with a mat knife. Your template should resemble a flat donut.
Materials for hats:
Cut down the center of a side of the paper bags, then cut out the bottom of the bags so they form two large sheets of paper. Using the template draw three 14" circles on the paper bags. One will form the crown and two will form the brim of the hat.
To shape the crown, dip one of the paper circles in the water. Dip it quickly - do not let it soak. Center the wet circle over top the upside down bowl. If there is printing on the paper circle, put that side down against the bowl. With your hands press the paper over the bowl, trying to distribute the wrinkles so there are no really large ones.
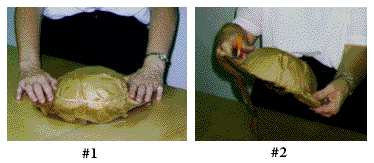
Next, take the large rubber band and stretch it over the bowl (#1) as far down as you can to hold the paper in place until it dries. The excess paper should form a lip, extending out from the bowl and lie fairly flat against the table. Allow it several hours to dry. When the crown is dry, remove it from the bowl and trim the lip (#2) so it only extends 1 to 1 1/2 inches out from the bottom of the crown all the way around.
To make the brim, lay the template back on the two remaining circles and trace the inside circle. Cut out both inside circles. Take the crown and spread a bead of glue on the top side of the lip. Take one of the brim circles, if it has printing on it, put the print side down. Slide the brim circle over the crown (#3), so the crown extends all the way up through the center hole. Press the inner edge of the brim into the glue on the crown lip. Take your last brim circle and place it print side up, spread it with a thin layer of glue. A small piece of cardboard will act as a squeegee to spread it evenly. Carefully place the top brim and crown over the bottom brim, so that the brim circles are directly on top of each other, and the lip of the crown is sandwiched between the brims. Press the brims together to seal the glue between them.

Your hat is finished (#4)! If you wish, you could add a hat band at the base of the crown using twine or leather cord.
Prepared for the Hoover Library by Joyce Harken, 1996
|
|
|
|---|