How to Use the Trainer's Guide
Adult Learning Principles
Plan
Implement
Summary and Conclusion
Reference List
Appendix A: Examples of Icebreakers, Energizers, Closing Activities, and Training Evaluations
Appendix B: Worksheets for Planning and Implementing a Training Session
How to Use the Trainer's Guide
The guide is divided into four sections:
|
I. Adult Learning Principles

|
Introduction Principles of adult learning (underscores the
importance of using the adult learning cycle to help
participants apply skills learned beyond the training) Assess participants' strengths and needs to design an
appropriate training
|
|
|
|
II. Plan

|
Defining an appropriate plan, training goals, and
objectives Selecting appropriate training methods (seven commonly
used training methods are explained) Principles for selecting and using audiovisual
materials Tips for developing a realistic, responsive training
plan
|
|
|
|
III. Implement

|
Ways to create a safe and comfortable learning
environment Tips on facilitating the training, including giving
feedback, managing time, and ensuring cultural
sensitivity Ways to actively engage participants using icebreakers
and energizers Ideas on how to provide closure Evaluation methods
|
|
|
|
IV. Summary and Conclusion
|
Puts it all together
|
|
|
|
Appendixes

|
Appendix A 1provides examples of icebreakers, energizers,
closing activities, and training evaluations
Appendix B 2contains worksheets to apply concepts and tips
discussed throughout the guide
|
 |
Adult Learning Principles
|
Education is one tool in the fight against cancer. Fully
informed health care professionals and consumers can act
more effectively to care for their patients, themselves, and
their loved ones. It is vitally important that everyone
learn how to decrease their risks for getting cancer, the
importance of screening and early detection, and ways to
access various treatment options.
|

|
Cancer education can take many forms: individual counseling and
education, group training sessions, media campaigns, and printed
materials such as brochures, pamphlets, and newsletters. This
trainer's guide is designed for both lay people and health
professionals who are conducting group-training sessions with
community and scientific audiences. It offers practical suggestions
for taking your knowledge, tailoring it to the specific needs of your
audience, and packaging the information in new ways. The guide
provides ways to enliven your training, encourage more active
participation, and enrich the learning experience for everyone
involved.
The trainer's guide also provides examples of icebreakers,
energizers, and closing activities as well as checklists and charts
to help you write objectives, develop a training plan, and conduct an
evaluation.
Guiding principles that serve as underpinnings for the development
of this trainer's guide are:
We all have incredible assets to bring to the training
experience. You, as trainers, already have a wealth of
information and skills. This trainer's guide is merely an opportunity
to review, refresh, and reinvigorate your training. This guide also
describes ways to elicit the experiences and skills of your
participants so that they are actively engaged in the learning
experience. Application is an important part of any learning
experience. Just as the trainer's guide encourages you to
construct opportunities for your participants to apply their new
information and skills during your training, it also provides you
with a chance to do the same. Most sections have worksheets that give
you an opportunity to apply the information from that section. Changes in knowledge, attitudes and behaviors, and
skills are primary objectives. The trainer's guide provides
suggestions for ways to use training methods that lead to increased
information and skill acquisition, and to improved attitudes.
All trainers should understand the principles of adult learning;
however, cancer education poses some unique challenges. The word
"cancer" still strikes fear in the hearts and minds of many people.
Participants in your training sessions may come with a number of
emotions, unresolved feelings, fears, and concerns that will
influence their receptivity to the training content. They also may
bring experiences, perspectives, and insights that will enrich the
training. Thus, cancer education is not just a matter of presenting
new information to a passive, receptive audience. The trainer must
carefully consider the emotional context in which this education
takes place.
Malcolm Knowles, often referred to as the "father of adult
education," found that adult learning occurs best when it follows
certain principles. If trainers follow these guidelines, they will
greatly enhance the learning experience for participants (Knowles,
1990). Arnold et al. (1991), among other adult educators, state that
people retain:
20 percent of what they hear 30 percent of what they see 50 percent of what they see and hear 70 percent of what they see, hear, and
say (e.g. discuss, explain to others) 90 percent of what they see, hear,
say, and do
|

|
Therefore, for participants to retain what they learn in
cancer education workshops, they need a chance not only to
hear a lecture or discussion, see a demonstration or visual
aids, and discuss the material, but they must also have an
opportunity to do something with the new information and
skills. This can take the form of applying their new
insights to a case study or role play exercise, or it can
take the form of developing an action plan of ways to use
their training insights in real life.
It is also important to remember the adult learning
cycle. Participatory training is the hallmark of adult
learning. It moves participants through the four phases of
the adult learning cycle.
|
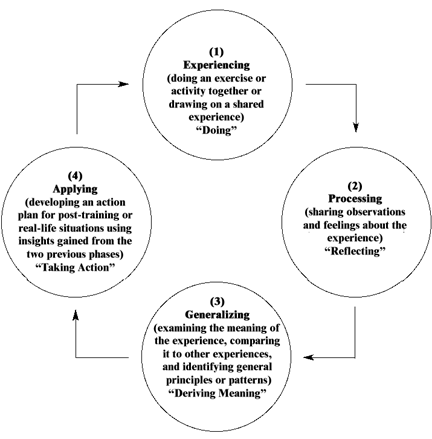
Using the Adult Learning Cycle
It is important to move participants through this cycle at least
once per module or 4-hour session. If your training will be more than
4 hours in length, it will be necessary to complete proportionately
more full cycles.
Applying the Adult Learning Cycle to Cancer Education: An
Example
Let's look at how a training program on cancer survivorship might
move participants through this cycle.
Once the trainer has set the stage for the training, reviewed the
agenda, and conducted an icebreaker, he or she can move through the
adult learning cycle.
Phase 1: Experiencing
The trainer might first lead an activity designed to get
participants talking about how receiving a cancer diagnosis impacts
their life.
If all of the participants were cancer survivors, the trainer
would know that everyone has had the experience of first learning
their diagnosis, so a small group discussion might be an appropriate
beginning place. However, if some participants were not survivors but
were social workers from an oncology unit, the design of this
activity should be modified. Since they have not necessarily
personally experienced the feelings associated with a cancer
diagnosis, a small group discussion would not be appropriate as a
beginning place. A more appropriate beginning might be a panel
presentation by a group of survivors.
Phase 2: Processing
The trainer would then lead a discussion about what people heard
during their small group discussions or what feelings the panel
aroused in them.
Phase 3: Generalizing
The next part of the discussion might lead to a comparison between
getting a cancer diagnosis and other life-altering news.
Phase 4: Applying
The trainer would then encourage all participants to think of ways
they might use these new insights. For oncology social workers, the
discussion might yield insights that would help them be more
compassionate and understanding with their newly-diagnosed patients.
For cancer survivors, the discussion may have generated ideas to take
back to their support groups or about how to get more support for
themselves.
Repeating the Cycle
The trainer would then move to the next activity and the adult
learning cycle would be repeated using the same structure of
experiencing, processing, generalizing, and applying.

Ensuring that the Training Addresses the Fact that People
Learn in Different Ways
Trainers must be aware that in any audience the participants will
learn in different ways:
Since trainers are unlikely to know the individual learning styles
of the participants in their audience, it is best to assume that
there are people with all learning styles in each group and design a
variety of strategies to meet the learning needs of all participants.
These training methodologies will be discussed in detail in section
II.2.
It is also important to consider the learning strategies to which
different audiences are accustomed. For example, health care
professionals are used to learning from lectures, demonstrations, and
case studies. They may be less used to learning via experiential
exercises and some of the creative strategies listed in section II.2.
On the other hand, community members and groups of survivors or
patients and family groups may prefer more interactive methods over
lectures and PowerPoint presentations.
Trainers need to be judicious about matching training
methodologies to the specific audience. This does not mean that
health care professionals will never respond to experiential
exercises, nor that community groups will never benefit from
lectures. However, it does mean that training methods that the
audience is not accustomed to should be used in moderation and with
sensitivity.
For example, the trainer might warm up an audience of health care
professionals by using experiential methods such as small group
discussions about a case study before using role plays. Likewise,
community groups might prefer lecturettes (i.e., brief lectures of no
more than 15-20 minutes) followed by a question and answer period
rather than a lengthy lecture.
Trainers will be most effective if they carefully consider the
"culture" of their audience when choosing appropriate methodologies.
In this way, participants can be carefully encouraged to explore new
ways of learning.
Assisting Participants in Being Comfortable with the Learning
Process
One of the trainer's primary tasks is to help participants feel
comfortable with the learning process. There are many factors that
hinder learning, such as fear of finding out that one's lifestyle
predisposes one to a higher risk of cancer, fear of exposing one's
ignorance to others, or fear of stirring up painful memories of loved
ones lost to cancer. By creating a positive and non-threatening
learning environment, the trainer can reassure the participants that
these feelings are normal and will be carefully considered throughout
the course of the training session.
Before designing a program that is "one size fits all," it is
important to conduct an assessment of participants' prior knowledge
and experience as well as their hopes and expectations for the
training. This can be accomplished through a variety of mechanisms
that are employed before or at the very beginning of the training. It
is important to keep in mind that training participants will bring a
number of strengths and experiences as well as the need for new
information, insights, and skills. Often assessments focus on "needs"
but a comprehensive assessment should include both the strengths and
needs of participants.
Before the Training
If you know the backgrounds of the people (i.e., general community
members, health care professionals, or cancer patients and survivors)
who will be participating in the training, you can conduct an
assessment before planning the content and format. The best case
scenario is to do this assessment with some or all of the people who
will actually be participating in the training.
If you do not have a roster of who will be participating or your
time is limited, another option is to conduct an assessment with key
informants (i.e., people who may be demographically matched to those
who will be participating, such as oncology nurses, survivors from a
local support group, etc.). With this information, you will be able
to design a training that builds on the strengths of the participants
in order to add new information, develop new skills, and enhance
understanding. Assessment methods that work well with particular
participant groups include the following:
|
Audience
|
Assessment
Methods
|
|
Health care professionals
|
E-mail, fax-back, or telephone surveys
|
|
Community members or survivors
|
Focus groups, in-person interviews, or telephone
surveys
|
|
|
It is important to include enough people in your
assessment to cover a variety of perspectives and
experiences. For example, if you were conducting a community
training on the importance of colorectal screening, it would
be important to include a variety of health care providers
(e.g., physicians, nurses, social workers, and health
educators), general community members, colon cancer
survivors and their family members, etc. This would give you
a fuller picture of the knowledge and experience the
community participants will bring to the training.
Possible questions include:
What do participants already know about the
topic? What experiences or insights related to the topic
do participants already possess? What do participants believe are the challenges or
barriers related to the issue? (For example, why do they
think people do not avail themselves of colorectal screening
services?) What do participants hope to gain from the
training? (This includes new knowledge, skills, resources,
etc.) What do participants desire regarding the
logistics of the training (e.g., location of training,
length of program, optimal number of days of training, best
day of week, time of day, etc.)?
The more specific the questions, the more useful the
feedback will be. You can then use the information to
develop the content and format of the training as well as to
guide decisions related to training logistics. Assessments
can pique community members' interest in the training topic
as well as gather data for planning.
If you do not have access to community members or enough
time to conduct an assessment, it is also helpful to review
evaluations from prior training programs.
|
At the Beginning of the Training
If you are not able to conduct an assessment before the training,
there are a variety of techniques that can be used to determine
participants' knowledge and expertise as well as their hopes for the
training that day.
Hopes and Expectations
One quick way to conduct an assessment is to ask participants to
write down their hopes and expectations about the training as they
arrive. One way to accomplish this assessment follows:
Post sheets of flipchart paper on the walls of the training
room with titles such as "one to two things I hope to learn at this
training" and "one to two concerns I have about this training." Ask each participant (as they enter the training room) to
write their comments on the flipchart paper. Review all of the comments. Let participants know which expectations will likely be met
through the training and which may be beyond the scope of the
training.
|
|
For example, if one of the participants wrote that he was
concerned that the trainer would use too much technical
language or difficult scientific concepts, the trainer can
reassure him by saying, "Some people seem concerned that
this training will have too many concepts that are difficult
to understand. We are really going to try hard to make the
concepts as user-friendly as possible. However, if we start
using scientific jargon or talk about things you don't
understand, please let us know at that time or talk with one
of the trainers during a break. We really want this training
to be meaningful for everyone, so please help us by asking
questions and giving us feedback."
|
|
|
For another example, if someone wrote that she wanted to
find specific clinical trials for a particular stage of
colon cancer, the trainer might state, "Actually, we
won't be covering that specific information but I can refer
you to the NCI Web site for clinical trials and give you the
toll-free telephone number to call for more
information." In this manner the trainer can be a
helpful resource for topics outside the scope of the
training. However, if a number of participants have hopes
and expectations that are not covered in your training plan,
it would be helpful to take time to address these
expectations before moving on with the training as
you have planned.
This approach is respectful of peoples' perceived needs
and eliminates one impediment to learning. If you feel that
it is necessary, you can even revise your agenda by spending
time addressing the needs of your participants and
discarding a less important portion of the training. In
this case, flexibility is key.
|
|
|
Group Snapshots
Another quick way to assess participants' knowledge or
experience is to take a group "snapshot." To do this, give
participants a series of questions, and ask for a show of
hands if the question pertains to them. For example, you
might ask:
How many of you know someone who has been screened
for colorectal cancer? How many of you know someone who has been
diagnosed with colorectal cancer? How many of you know the screening recommendations
for colorectal cancer?
This information can help the trainer structure or
restructure activities to more closely draw on the
participants' experiences and meet their needs.
|
Throughout the Training
The following strategy is not considered an assessment strategy.
However, it is a way to continue the assessment process throughout
the training. A good trainer is able to read the body language of the
participants to ascertain the appropriateness of the content, the
pace of the training, and the energy level in the group. This
technique is further discussed in section III.1.
In summary, the needs and strengths assessment provides invaluable
information that will assist the trainer in developing appropriate
training goals and objectives.
Plan
To develop an effective training plan that achieves the
point of the educational session: i.e., to make changes in
knowledge, attitudes, behaviors, and skills, a number of key
questions must be answered. Some of these questions will be
addressed in the needs assessment. The answers to these
questions will affect the content, format, and logistics of
the training. The following questions are a guide.

Questions
Who are your participants?
What is their educational level? What is their experience and skill level? What gender and age are they? Are they employed? What kind of work do they do? Do they work together? What is their literacy level? How many will there be? (approximately)
When will you conduct the training?
What day of the week? What time of day? What time of the year? How long will the session be? What will be the length of the entire program? How much time is there for recruitment?
Where will you conduct the training?
What is needed?
What size room is needed? What equipment is available? What other supplies are needed?
Location
Is the location accessible? Is the location easy to find? Can it be reached by public transportation? Is there safe parking? Is it handicap accessible? Is it a place that does not have negative connotations for
intended participants (e.g., some places are associated with
poor service or indigent care, which may make some participants
uncomfortable)?
What will the training involve?
What will be the content of the training plan? What training tools will be needed? What participant materials and resources will be
needed? Will there be advance work for participants?
What is the purpose of the training?
What changes in knowledge, attitudes, behaviors,
and skills are you hoping to accomplish through the training? What are the goals and objectives of the training?
How will you do it?
How will you enroll people for the training? Some
possible recruitment strategies include: flyers; PSAs on TV and
radio; ads in newspapers and newsletters; and word of mouth. How will you engage participants? How will you get feedback or evaluate the effectiveness of
your training?
Once these questions have been answered, the training goals and
objectives can be developed. The following section provides
definitions and examples of goals and objectives.
Setting Goals and Objectives
Goals
Goals are broad, general statements of what one hopes to
accomplish as a result of the training. An example of a goal might
be:
"Increased awareness of the importance of cancer clinical
trials."
Objectives
Objectives should describe the hoped-for changes in knowledge,
attitudes, skills, or behaviors in very precise terms. Usually they
are written in the following manner:
"By the end of this training (session), participants
will be able to __________________________."
The word that follows 'to' should be an action verb.
For objectives to be helpful in determining training
effectiveness, they should be measurable (e.g., "list five common
myths about mammography" or "compare three ways that barriers
to cervical and breast cancer screening are similar"). Attainment
of training goals and objectives is one important aspect of the
evaluation. Not all objectives are easily measured but most can be
evaluated using standard evaluation tools or other creative
strategies.
There are seven types of objectives:
Depending on what you hope to accomplish through the training,
some or all of these types of objectives need to be developed.
Keep in mind the adult learning cycle described in section I.2
when developing your training objectives. Fact, understanding,
attitudinal, and skill objectives might pertain to the
"experiencing" part of the cycle; analysis and synthesis might
pertain to the "processing" and "generalizing" parts of
the cycle; and application objectives might pertain to the
"applying" stage. Remember to move participants around the
adult learning cycle at least one time per module and design
objectives accordingly.
When writing the seven different types of objectives, the trainer
might find the following chart of verbs helpful.
|
Seven Objective
Training Types
|
|
|
|
|
|
|
1. Fact objectives:
|
|
|
|
|
|
|
2. Understanding or comprehension objectives:
|
|
Identify Translate Restate
|
|
|
|
|
3. Application objectives:
|
Compute Demonstrate Illustrate
|
Operate Perform Interpret
|
|
|
|
|
4. Analysis objectives:
|
|
Distinguish Contrast Classify
|
Differentiate Categorize Critique
|
|
|
|
5. Synthesis objectives:
|
Synthesize Design Summarize
|
|
Propose Hypothesize Formulate
|
|
|
|
6. Attitudinal objectives:
|
Show sensitivity Respect opinions
|
Accept responsibility Demonstrate commitment
|
|
|
|
|
7. Skill objectives:
|
Perform Demonstrate Show Conduct
|
Compute Teach Role play Take
|
Operate Complete Design Do
|
|
|
Some examples of learning objectives that trainers expect
participants to achieve are listed below:
|
Seven Learning
Objective Types
|
|
|
|
Fact objective:
|
By the end of this training, participants will be able
to: List four risk factors for skin cancer.
|
|
Understanding objective:
|
By the end of this training, participants will be able
to: Describe three ways parents can protect their
children from the harmful effects of UV radiation.
|
|
Application objective:
|
By the end of this training, participants will be able
to: Demonstrate their ability to use NCI's Physician
Data Query to research information on cancer clinical trials
related to two case studies.
|
|
Analysis objective:
|
By the end of this training, participants will be able
to: Contrast the barriers to fecal occult blood testing
and colonoscopy by naming two barriers that are similar and
two barriers that are different.
|
|
Synthesis objective:
|
By the end of this training, participants will be able
to: Design an action plan to increase community
awareness of the importance of cancer clinical trials
through working within their own community-based
organizations.
|
|
Attitudinal objective:
|
By the end of this training, participants will be able
to: Demonstrate a commitment to increasing the number of
women aged 50 years or older who get mammograms by agreeing
to tell five friends in the next 3 months to schedule a
mammogram.
|
|
Skill objective:
|
By the end of this training, participants will be able
to:Perform a correct clinical breast exam using the
vertical strip method by demonstrating this to the trainer
during a simulation exercise with two standardized
patients.
|
Suggested Methods for Creating Behavior Changes through
Training
To help people gain new awareness and information that will
translate into changes in attitudes and behavior, you must choose
training methods that correspond to the changes you hope to
accomplish. A variety of training strategies will ensure that the
learning needs of all types of participants are met. The list below
provides some suggested training methods for accomplishing changes in
each of these domains. A description of some of the more common
training methods, their advantages and disadvantages, and how to
implement them follows the list.
Knowledge (Concepts, Facts)
Attitude (Feelings, Opinions)
Behavioral Skills
Training Methods Overview
The following table summarizes which of the training methods
described below can be used to achieve changes in participants'
knowledge, attitudes, and behavior skills.
|
Training
Method
|
Knowledge
|
Attitude
|
Behavior
Skilll
|
|
1. Lecture
|
X
|
spacer
|
spacer
|
|
2. Small Group Discussion
|
X
|
X
|
spacer
|
|
3. Brainstorming
|
X
|
X
|
spacer
|
|
4. Case Study
|
X
|
X
|
X
|
|
5. Demonstration
|
X
|
spacer
|
X
|
|
6. Role Play
|
X
|
X
|
X
|
|
7. Creative Work
|
X
|
X
|
spacer
|
Note: For tips on how to facilitate an entire training, see
Facilitating the Training Experience. 6
Training Method #1: Presentation/Lecture/Panel
Discussions
A presentation or lecture can convey information, theories, or
principles quickly and easily. Some examples specific to cancer
education might be reviewing the epidemiology of a specific type of
cancer or reviewing a current screening protocol. Presentations can
range from straight lecture to some involvement of the participants
through questions and discussion. Presentations depend on the trainer
for content more than any other training technique does.
Uses
Introduces participants to a new subject Provides an overview or a synthesis Conveys facts or statistics Addresses a large group
Advantages
Covers a lot of material in a short time Works with large groups Provides context for more practical or hands-on training
techniques Gives lecturer or presenter more control than in other
training situations
Disadvantages
Emphasizes one-way communication Is not experiential in approach Requires that participants take passive role in their
learning Requires that lecturer possess skills as an effective
presenter Is not appropriate for changing behavior or for learning
skills Limits participant retention unless it is followed up with
a more practical technique
Process
Introduce the topic: Tell the participants what you
are going to tell them.
Use an opening that:
Explains the purpose of the presentation and
why it is important Relates to the topic, situation, participants, or
speaker Involves and stimulates the audience Creates positive thinking and peaks interest Gets attention, for example, by using:
Serves as a preview to subject matter
Present the topic Hold participant attention and interest by:
Being enthusiastic, dramatic, or humorous Using specific examples that:
Provide clarity, color, and credibility Help a general thought become a specific one Make the impersonal become more personal
Avoiding jargon Varying the pace Providing opportunities for participant involvement,
by:
Questioning both ways Acknowledging individuals, by name, if possible Asking for participant assistance
Using references that show material is aimed at a
specific group Using surprises and extras Inviting the participants to ask questions
Use a closing that:
Summarizes the entire activity and emphasizes
the key "take home" message Makes a meaningful statement Relates to the topic, situation, participants, or
speaker Ties together the activity as an entity
Variations
A lecturette is a term used for a brief (e.g., no more than 15-20
minutes) presentation or lecture. Often these are made more
interactive by using a "call and response" format such as
interspersing questions to the participants in between lecture points
made by the presenter. For example the trainer might ask, "Which
communities or populations are most impacted by cervical cancer?"
After participants offer answers, the trainer could then validate the
right answers, correct misinformation or wrong answers, and then
briefly summarize the take-home messages. In this manner,
participants are acknowledged for what they already know while new
and accurate information can be offered by the trainer.
Another variation on the presentation method is a panel
discussion. A group of experts (e.g., cancer survivors, family
members, or health professionals) present their perspectives to the
participants through prepared remarks or spontaneous answers to
questions posed by a moderator or facilitator. This approach can be
made more interactive by allowing time for participants to ask
questions or make comments. A moderator or trainer can model this
interaction by asking one or two questions to "prime the pump."
Participants can also write their questions on index cards if the
size of the training group makes it logistically difficult for
participants to ask questions verbally.
Training Method #2: Small Group Discussion
A small group discussion is an activity that allows participants
to share their experiences and ideas or to solve a problem. It
exposes participants to a variety of perspectives and experiences as
they work together to accomplish the task. Some examples specific to
cancer education include breaking people into small groups to discuss
ways to encourage more people over the age of 50 to have regular
colorectal screenings or, for a health care professional audience,
ways to improve cancer pain management.
Uses
Enables participants to present their ideas in a
small group Enhances problem-solving skills Helps participants learn from each other Gives participants a greater sense of responsibility in the
learning process Promotes teamwork Clarifies personal values
Advantages
Allows participants to develop greater control
over their learning Encourages participants to be less dependent on the
trainer Encourages shy or less talkative participants to become
involved Allows for reinforcement and clarification of the lesson
through discussion Builds group cohesion Elicits information from participants
Disadvantages
Process
Arrange the participants in small groups using some of
the ideas listed on page 30 Introduce the task that describes what should be discussed
in the small group Tell participants how much time they have Ask each small group to designate:
Check to make sure that each group understands the task
Give groups time to discuss Circulate among the small groups to:
Clarify any questions participants may have Make sure that participants are on task Make sure that a few participants are not dominating the
discussion
Bring all of the small groups together to have a large group
discussion Have the people designated by each group present a summary
of their group's findings (this could be a solution to a problem,
answers to a question, or a summary of the ideas that came out
during the discussion) Identify common themes that were apparent in the groups'
presentations Ask the participants what they have learned from the
exercise Ask them how they might use what they have learned
Determining Group Size
Participants learn through their own experience, especially by
discussing questions posed by the trainer. Discussions can take place
in a large group, in a small group, or between two participants. The
following information is useful in determining the appropriate size
of the group for specific activities.
Most people find it difficult to speak in a group of
strangers. Also, there is usually not enough time for everyone to
speak. Therefore, if everyone is to participate actively, small
groups are essential. Most people find it difficult to listen attentively for
long periods. Therefore, talks should be short, and people should be
given an opportunity to discuss a topic or issue in small groups. We all remember much better what we have discovered and
said ourselves than what others have told us. Therefore, participants
should be given questions leading them to express all they have
learned from their own experience first. This needs to be done in
small groups. A resource person or facilitator can briefly sum up the
points from each group and add his or her own insights later, instead
of taking a long time to tell people what they know. Pairs are useful for:
Interviews Intimate sharing Practicing some skills (e.g., listening or feedback) A quick "buzz" with one's neighbor to stir a passion or prompt a
sleepy group into action
|
|
For example, if your group consists of breast cancer
survivors, participants can pair up to discuss how they felt
when they were first diagnosed with breast cancer and
strategies they used to cope with their diagnosis.
|
|
|
If your group consists of health care professionals, they
may pair up to discuss how they feel when they have to
notify a woman that she has breast cancer and strategies
they use to deal with being the bearer of such devastating
news.
|
Triads (groups of three) are very useful for:
Getting everyone to think and participate actively; one
can be passive in a group of five, but that is unlikely in a group
of three Testing out an idea one is hesitant to present to the full group
Groups of four, five, or six will add a bit more variety
for sharing ideas and insights. Four, five, or six can be a good size
for a planning team, a film discussion group, or a more complex
situation.
However, the bigger the group becomes, the longer the discussion
and the decision-making process.
Dividing Groups and Assigning Roles
When facilitating an interactive training, it sometimes is
necessary to divide participants into groups and assign them roles.
The following are some imaginative ways to divide participants into
groups:
Deck of cards-the four suits are the four groups Colored stickers or dots placed on or under chairs Different types of candy (e.g., peppermints, butterscotch,
cinnamon, or fruit flavors), which participants pick out of a
basket M&Ms of different colors If groups do not need to be exactly even, use things like
types of cars participants drive, types of toothpaste they use,
preferences for different types of music, etc.
Selecting a Group Recorder/Reporter
Select any date at random; the person whose birthday is
closest to that date becomes the recorder Choose a person who lives closest (or farthest) from the
meeting site Choose the person newest (or oldest) to the organization Choose the person with the most pets (including fish) Choose the person who exercises the most Choose the person who watched the least TV in the past
week
Training Method #3: Brainstorming
Brainstorming is an activity that generates a list of ideas,
thoughts, or alternative solutions around a particular theme or
topic. Creative thinking is more important during this activity than
practical thinking. No idea is dismissed or criticized; anything
offered is written down. Often participants stimulate each other's
thinking.
After the list of ideas is completed, the group clarifies,
categorizes, or discusses one item at a time, depending on the
situation. Some examples related to cancer education include
brainstorming all the reasons teens start using tobacco or all the
barriers to referrals for clinical trial participation on the part of
primary care physicians in rural areas.
Uses
Introduces a problem or question (e.g., "Let's
brainstorm all the reasons women might be reluctant to return for
followup after an abnormal pap result.") Forms the basis of discussion Can use in conjunction with group discussion
Advantages
Generates ideas and leads to discussion
quickly Allows everyone's ideas to be expressed and validated
without judgment Generates energy to move forward with problem solving Stimulates thought and creativity
Disadvantages
Can be difficult to get participants to follow the
rules of not diminishing or criticizing the ideas generated during
the actual brainstorming activity Affords opportunity for participants to get off track and
develop a list too broad to guide discussion Opens up the possibility that participants may feel badly
if their idea meets with criticism Requires that participants have some background related to
the topic
Process
Establish the rules for brainstorming, including the
following:
All ideas will be accepted for the list At no time should an idea be discussed or criticized Discussion occurs only after the brainstorming session
is complete
Warm up the group by doing a "practice" exercise such as
having everyone write down on a piece of scrap paper everything
you can do with a rule-then go around the room and generate a
group list Announce the cancer-related topic, problem, or question Write the ideas and suggestions on a flipchart to prevent
repetition and keep participants focused on the topic
|
Note: It is helpful for your co-trainer to record the
ideas while you call forth the ideas from the group. If
there is no co-trainer, a trusted participant can function
in this role. Be sure, however, that the participant chosen
for this recorder role can keep up with a fast-paced
generation of ideas. Nothing impedes the brain-storming
process more than a recorder who constantly asks for ideas
to be repeated, words to be spelled, or acronyms to be
explained.
|
Allow silence; give participants time to think
Provide positive feedback to encourage more input from participants (i.e.,
say "These are great ideas...")
Review written ideas and suggestions periodically to stimulate additional ideas
Conclude brainstorming when no one has any more ideas to add to the list
Review the final list before discussion
Variation
A variation to the method described above is to ask each participant to write down
his or her thoughts or ideas about the topic on Post-it notes. The trainer then collects all
the notes and quickly organizes the categories and responses under each one and discusses
the similarities, differences, consistencies, inconsistencies, and take-home messages.
Training Method #4: Case Study
A case study is a written description of a hypothetical situation
that is used for analysis and discussion. It is a detailed account of
a real or hypothetical occurrence (or series of related events
involving a problem) that participants might encounter. It is
analyzed and discussed, and participants are often asked to arrive at
a plan of action to solve the problem. Case studies can help group
members learn to develop various alternative solutions to a problem
and may help develop analytical and problem solving skills. Some
cancer-related examples are illustrated below.
Uses
Synthesizes training material Provides opportunity to discuss common problems in a
typical situation Provides a safe opportunity for developing problem solving
skills Promotes group discussion and group problem solving
Advantages
Allows participants to relate to the situation Involves an element of mystery Avoids personal risks by using hypothetical situations Involves participants in an active manner
Disadvantages
Process
Introduce the case study to participants Give participants time to familiarize themselves with the
case Present questions for discussion or the problem to be
solved Emphasize that there is not always only one right solution,
if appropriate for the specific case Give participants time to solve the problems individually or
in small groups Circulate among the small groups to:
Clarify any questions participants may have
Make sure that participants are on task
Make sure that a few participants are not dominating
the discussion
Bring everyone back together for a larger group
discussion Invite participants to present their solutions or
answers Discuss all possible solutions or answers Ask the participants what they have learned from the
exercise Ask them how the case might be relevant to their own
lives Summarize the points made
Tips for Developing Case Studies
Develop a case study that is as realistic as
possible. Describe the people in the case study. Use names (but be sure to indicate that they are not the
names of real people). State their genders, ages, ethnicities, and other relevant
characteristics. Describe the specific situation. Think about the specific issues you want the participants
to address. Use the case study to challenge assumptions (e.g., health
care worker doesn't always know the answers, patients aren't
always uninformed). Avoid giving solutions to the problems raised in the case
study. Avoid making the case study too complex or too simplistic.
Some examples of discussion questions that use the adult learning
cycle as a model include the following:
|
|
Describe what you see and hear happening in this
case study. What feelings does the case study evoke in you? What are the key issues that are brought to light by
this case study? What do you think are some of the underlying causes
that lead to these issues? What are some possible strategies for dealing with
these issues? How can we each make a difference in addressing these
issues?
|
Example Case Study
You have been invited to conduct a training for home health nurses
on the topic of cancer pain management. You were told that there are
a number of issues that impede the use of appropriate pain medication
with cancer patients who are followed by the home health agency. One
of these in particular involves nurses not feeling comfortable
advocating with physicians for their patients because of fear of
addiction to opiate derivatives.
During the training, a nurse participant, Suzanne, brings up a
recent article she read in the New York Times Magazine. The article
described the abuse of oxycontin in rural America. Suzanne says,
"There's no way I'm going to contribute to getting a whole generation
hooked on those things. I'm just trying to protect my patients'
grandkids by keeping those things (oxycontin pills) out of the
house." Another participant, Ellen, adds that most of her "little old
ladies" are too sensitive to medications to "get them started on
something that powerful." You realize that there are a lot of
passionate feelings about this topic and wonder how you should handle
the situation.
Case study questions for training participants to discuss:
Describe what you see happening in this case study. What feelings does the case study evoke in you? How do you think Suzanne is feeling? How do you think Ellen is feeling? What do you think are the underlying issues behind each of
their responses? What are some effective ways you, as the trainer, could handle
this discussion? How will your discussion about this case study influence how
you might handle other difficult training discussions in the
future?
Training Method #5: Demonstration
A demonstration is a method for showing precisely how a skill,
task, or technique should be done. The trainer or a skilled
participant shows other participants how to successfully perform a
given task by demonstrating it, describing each step, and explaining
the reasons for performing it in a particular way. It is often
followed by a practice session in which the participants carry out
the activity under the supervision of the trainer. The use of models
or props (e.g., silicone breast models or fecal occult blood
collection kits) greatly enhances a training on self breast exams or
colorectal screening. Having simulated or standardized patients for
clinicians to practice new skills (e.g., performing clinical breast
or pelvic exams) leads to effective acquisition of these new
skills.
Uses
Show participants how to perform a skill (e.g.,
showing community members how to do a self breast exam or use the
collection kit for a fecal occult blood test) Clarifies and corrects misconceptions about how to perform
a task Shows how participants can improve or develop skills Models a step-by-step approach (e.g., how to do a clinical
breast exam using the vertical strip method)
Advantages
Provides learning experience based on actual
performance and is relevant to the participant's job or personal
experience, especially when combined with hands-on practice Illustrates processes, ideas, and relationships in a clear
and direct manner Requires low development costs Helps participants' focus their attention Involves participants when they try the method themselves
Disadvantages
Has limited usefulness Requires a lot of planning and practice ahead of time Requires facilities and seating arrangements that are
carefully planned so all members of the audience have an
unobstructed view of the demonstration Requires enough materials for everyone to try the skill
being demonstrated Does not ensure that participants will immediately be able
to duplicate the skill being demonstrated after seeing it
demonstrated Requires that participants take passive role during
demonstrations which may cause them to lose interest, particularly
during afternoon hours and toward the end of the session
Process
Introduce the skill being demonstrated: What is the
purpose? Present the materials that are going to be use Demonstrate the skill for participants Repeat the demonstration, explaining each step in detail Invite the participants to ask questions Allow participants to practice the skill themselves Circulate around to each person to:
Bring participants back to the larger group Discuss how easy or difficult it was for them to perform the
skill Summarize the take-home messages or key points
Training Method #6: Role Play
Role play is a technique in which several individuals or a small
group of participants act out a real-life situation in front of the
group. The scenario of the role play is related to the training topic
and must have a skill-based objective. For example, in a training on
breast cancer for nursing students, two participants might role play
how to teach a woman how to do a self breast exam. There is no
script; however, the situation is described in as much detail as
appropriate. The participants make up their parts as the situation
unfolds. The role play is then discussed in relation to the situation
or problem under consideration.
Uses
Helps change people's attitudes Enables people to see the consequences of their actions Provides examples of possible reactions or behaviors Provides a safe environment for exploring problems they may
feel uncomfortable discussing in real life Enables participants to explore alternative approaches to
various situations Explores possible solutions to emotion-laden problems
Advantages
Provides opportunity for stimulating new ideas
while having fun Engages the group's attention Simulates the real world Provides a dramatic way of presenting a problem and
stimulating a discussion Allows participants to assume the personality of another
human being-to think and act as another might
Disadvantages
Requires that participants feel comfortable being
in front of a group (some participants may feel self-conscious,
shy, or may fear looking "ridiculous") Requires dyads or triads in which everyone is either acting
or observing to address participant reluctance
Process
Prepare the actors so they understand their roles and
the situation Set the climate so the observers know what the situation
involves Observe the role play Thank the actors and ask them how they feel about the role
play (be sure that they get out of their roles and back to their
real selves) Share the reactions and observations of the observers Establish ground rules for having a group discussion about
the role play. For example:
|
|
Make your comments in a self-oriented manner.
Try to express your feelings as you were watching the
role play. For example, "The interaction in the role
play made me feel…" Make your comments descriptive of what happened.
For example, "I noticed that the woman had eye contact
twice with her friend." Try not to interpret the behavior of the players
in terms of why they did what they did. If this seems
necessary, however, ask the players in an open-ended way
rather than putting words into their mouths (e.g., "I
was wondering why you asked the woman her marital
status.")
|
|
As a group leader, your attitude and direction in this discussion are important. Try to protect
the role players from too much exposure to negative comments. In addition, try to get the observers to put their comments in the form of suggestions on how to improve the handling of the situation. The best way to do this is to set the example yourself. Attempt to be as nonevaluative as possible. Try to invite people to talk freely about their own experiences. Then summarize the comments given in relation to the learning points.
|
Discuss as a group the different reactions to what happened
Ask the participants what they have learned
Ask the participants how the situation relates to their own situation
Summarize the main messages or points and application
Handling Participant Resistance
There might still be some resistance to role playing. Several
types of resistance you might encounter are presented below along
with suggestions on handling.
Fear of exposure: This usually relates to a
person's fear of being exposed to the total group and acting as a
fool. One way of handling this is to use multiple role playing rather
than single role playing. Divide the group in pairs and ask them to
do their own role plays in different corners of the room. Using this
method, you should walk around to get a feel for how each dyad is
doing and whether the role play is being used the way it was
intended. What is going to happen to me? Generally this refers
to a person's fear of not knowing the procedures involved in role
playing. This may be related to lack of knowledge about the topic or
lack of role playing skill. Usually a good explanation of the
different steps in the session clarifies the issue. You should ensure
that people won't be criticized by acknowledging how difficult role
plays can be and thanking participants for their bravery in being
willing to step outside their comfort zone to provide an excellent
learning experience for everyone.
The most important thing in dealing with resistance seems to be to
allow it to be there, accepting the feelings and thoughts behind it.
But at the same time, you should try to be clear that you want to do
the role play and why. If you feel good about it, this will be
reflected by the group.
|
|
Role Play Example: A Woman with Colon Cancer
Considering Clinical Trials
You are Sonya, a woman just diagnosed with
colon cancer. You have no medical insurance. You are
talking to Mary, the local support group leader, about
recommended treatment options. You've heard about
clinical trials, but you tell her, "I don't want to be a
guinea pig just because I'm poor."
You have heard about the Tuskegee study, in which
African American men with syphilis were studied for years
without getting treatment. You know that some of your
neighbors get paid for participating in asthma studies.
You want the best treatment, but you don't want to be
treated poorly.
You want to know:
What are clinical trials? Why can't I choose my treatment if I decide to be
on a trial? What are the pros and cons of participating? Are they experimenting on people? How do I know I'm being protected?
|
|
You are Mary, a local community leader who runs
a support group. You want to assist Sonya by helping her
understand more about what clinical trials have to offer
and refer her to community resources. Talk with her using
the following guidelines:
Be sensitive to Sonya's concerns. Remember to provide information that is
fact-based, not your opinion. Provide resources and support.
During the discussion, you may wish to address the
following:
What clinical trials are How patients are protected Risks and benefits of participating Informed consent How to find out about clinical trials in the
community that might be appropriate Talking about this information with her doctor or
nurse Talking with her family
|
Training Method #7: Creative Work
Although some people believe that using the arts in training is
"touchy feely" and therefore not appropriate, others have found that
this approach is well received by many audiences. These training
activities give participants an opportunity to think or act "outside
the box." Examples of creative activities include:
Making a collage (e.g., make a collage of ways you got
support when you were diagnosed with cervical cancer) Drawing or painting with markers, water colors, chalk, or
colored pencils (e.g., painting a picture of what fear of recurrence
looks like) Modeling with clay (e.g., making a sculpture of the body
post-mastectomy) Composing songs, poems, stories, or plays (e.g., writing a
play about teens who changed their peer group's norms related to
smoking tobacco)
Uses
Encourages participants to engage the "right
brain" (creative, non-linear part), especially important after a
"left brain" training method (i.e., didactic or linear
presentation) Explores other ways to think about familiar situations Enables participants to explore emotionally-laden topics in
a safe way Encourages people to move beyond their comfort zone
Advantages
Gives participants an opportunity to have fun
while dealing with emotionally laden issues Allows participants to move around (especially good for
kinesthetic participants) Provides a creative way of dealing with sensitive
issues Fosters interaction and emotional connections among
participants
Disadvantages
Requires additional space and materials Intimidates participants who feel shy about artistic
endeavors (But don't assume that your audience won't respond well
to this technique. You might try out the idea with a few people
who are demographically matched to your potential participants
before your training session.) Causes participants who are used to linear thinking and
came to the training to get new information to question the
usefulness of this approach
Process
Introduce the creative activity to participants Discuss how the activity ties into the topics being
covered Provide participants the "permission" to take risks, be
creative, and not feel that they have to strive for perfection.
Sometimes asking people to remember what they were like in the 5th
grade will help them to be less inhibited and "let go" of their
inner critic Assure participants that these activities are not intended
to be judged on artistic merit but rather to stimulate new ways of
thinking about the topic Review the materials that are available to complete the
creative activity (e.g., clay, markers, magazines, scissors, glue,
etc.) Tell participants how long they will have to work on their
creations (e.g., minimum of 30 minutes). Explain that you will
give them a 10-minute warning before they have to finish their
work Provide the allotted time for participants to create Circulate around the room to see how participants are
doing Give the 10-minute warning, as promised Bring everyone back together for a larger group
discussion Discuss the ground rules for the discussion:
Participants should support each other Comments made about another person's creation should
relate to how the creation makes them feel Comments should not be evaluative or judgmental
Invite individuals to share their creations and how they
tie into the topic Ask participants to discuss both of the following:
Summarize the discussion Affirm participant's work and ability to be creative
Audiovisual materials are essential to effective instruction.The
primary purposes of training media are to support the explanations
(by illustrating, demonstrating, and emphasizing) and to provide
motivation (by increasing sensory appeal, adding variety to the
instructional approach, saving time, and retaining participant
interest). They can be used to increase knowledge and change
attitudes.
Characteristics of Effective Training Media
They should be:
Simple (easy to understand, uncomplicated) Accurate (facts and figures, current information) Manageable (easy to operate and manipulate, simple, neat,
and practical) Colorful (use color to emphasize main points) Necessary (illustrate essential materials, contribute to
successful accomplishment of learning objectives)
When Selecting Training Media
Use your training objectives to determine where
audiovisual materials are needed to assist participant
learning. Be selective. Remember that a few good training media will
do more for the achievement of objectives than will many confusing
ones. Update and improve your use of training media or develop
new ones for more effective participant learning. Consider the enhanced visual/verbal relationship that
different media can create. The objective is to maintain visual
simplicity and verbal clarity for maximum retention of
information. Remember that dark rooms can put participants to sleep
especially after a meal. Keep the area as well lit as possible
while ensuring participants can see the words on the screen. Maximize the use of media by following slides, videos,
audiotapes, and photos with a targeted discussion. Consider the
following format as one useful way to move participants from
description, to feelings, insights, and action steps:
Describe what you see and hear happening in this
video. What feelings does the video evoke in you? What are the key issues that are brought to light by this
video? What do you think are some of the underlying causes that lead
to these issues? What are some possible strategies for dealing with these
issues? How can we each make a difference in addressing these issues?
Main Types of Training Media
Handouts
Handouts are supplementary materials that provide a detailed
expansion or reiteration of one or more aspects of the
presentation.
Hints:
Handouts can be your worst distraction during a
presentation if distributed while you are speaking. Whenever
possible, provide handouts at the end of a presentation unless the
audience will use them during the training. In that case, provide
the handouts before the presentation to avoid distraction. Reduced-size reproductions of charts or slides used during
the presentation can be extremely useful to participants as
reference material. Adding brief interpretive statements can
remind participants of your key points at a later date.
Flipcharts
A flipchart pad can provide flexibility for
developing and modifying simple sketches, diagrams, and statements
during the course of a presentation. Color is extremely important. Green, blue, and brown should
be used primarily for words. Avoid visuals that are one color. Use
red, orange, or yellow for highlighting only. If you have five- or
six-line visuals, use colors to separate them or to group them.
Hints:
Maintain the flow of your talk while you
write. Avoid talking to the board. Stay to the side while writing on a flipchart pad. Write large and neatly. Draw a faint outline of a diagram or model in pencil before
the presentation to provide guidelines for the marker or
chalk. Limit the number of words to avoid pages that are too
"busy" and thus distracting. If you prefer, have a co-trainer or participant write while
you facilitate group discussion.
Overhead Projector
An overhead projector is used to project material from a book or a
prepared transparency onto a screen.
Hints for designing transparencies:
Do not use more than four of five words per line.
Keep in mind that the area that can be projected is only 7.5" x
9.5". Do not crowd too many lines onto a transparency. Design it so it can be read from the back row of the
training room. Use dark letters on light backgrounds.
Hints for using overhead projectors:
Place a transparency on the projector before the
training in order to focus it. Always have a spare light bulb (in case the one provided
with the overhead projector burns out) and extension cord with
you. Designate someone to control the room lights.
Slides, LCD Projectors, and Computers (for computer-generated
presentations)
Slides are still the most common visual aid used in training.
However, many health care professionals are switching to LCD
projectors and computers to project computerized presentations onto a
screen. The following information applies to both slides and
PowerPoint presentations.
Hints for designing slides or a computer-generated presentation
(e.g., PowerPoint):
Keep each screen simple with bullet points and
simple visuals. Each bullet point can be elaborated during the
presentation. Use large enough font (30 point) so that the text can be
read from the back row of the training room. Use colors and designs that are pleasant, but not
distracting for the viewer. Use colors that make text stand out on a slide. Use a light
color for the text on a dark colored background (pale yellow on
dark blue is best). The more color used, the less effective it
will be. Use visual aids that complement the text. Use uniform font. No more that 75 percent of each slide should have text. Use animation (on PowerPoint presentations) sparingly.
While it is interesting to have bullet points appear or cross the
screen as you read them, too much animation can be distracting.
Hints for using slides:
Make sure your slides are placed in the carousel
so they project right side up. Practice showing your slides before the training. Practice using the remote control for changing slides. Practice operating the electronic pointer if you will be
using one during your presentation. Always have a spare bulb and an extension cord with
you. Designate someone to control the room lights.
Hints for using an LCD projector and computer:
If you do not have your own slide projector or LCD
and portable computer, reserve one for your training. Make sure the computer is equipped with compatible software
to run your presentation (e.g., does the computer have
PowerPoint?). Make sure that your presentation fits onto a diskette, or
put it on a Zip Disk. If a Zip Disk is needed, you will need a
portable Zip Drive. Before the training, do a test run of your presentation to
assure that there are no problems using your disk in the
computer. ALWAYS BRING A COPY OF YOUR PRESENTATION ON
OVERHEADS-JUST IN CASE!
Examples
Examples of good and bad slides from computer presentations
follow:
|
Bad Example
|
|
Ways to
Prevent Skin Cancer
|
Stay out of the sun between 10:00 a.m. and
4:00 p.m. unless you are adequately protected. Wear sunscreen that is 15 SPF or higher. Make
sure that the sunscreen has not expired. Reapply
sunscreen several times thoughout the day. Be sure to wear long-sleeved shirts, long pants,
wide-brimmed hats, and sunglasses. Talk with your friends and family members about
sun protection. Remind them to stay away from the
midday sun, use sunscreen, and wear full coverage
clothing. It is best to combine these strategies to make
sure that you are getting full prevention from the
sun and decrease your chances of developing skin
cancer.
|
|
|
Good Example
|
|
ABCs of
Decreasing Skin Cancer Risk
|
Away-Stay away from the midday sun
Block-Use 15 SPF or higher sun block
Cover-up-Wear full coverage clothing
Use a combination of these strategies
|
|
Videotape Players
Because the videotape player is extremely versatile, it is rapidly
becoming a major tool in presentations.
Hints for using videotape players:
Use is limited for large groups (i.e., more than
20 participants) because multiple monitors or large video
projection screens are needed. Most equipment is portable but cumbersome. Compatibility of the type and size of the videotape and
cassette to the available equipment should be carefully
considered. Have tapes set at the proper starting point so that only
the PLAY button needs to be pushed.
Once you are clear about the characteristics of the participants
and the training goals and objectives, you can design a realistic and
effective training plan.
It is important to consider not only what you hope to achieve in
terms of changes in knowledge, attitudes, and skills, but also the
sequence of various training activities and information. There should
be a good balance between didactic and interactive activities,
between acquiring new knowledge and skills, and having an opportunity
to synthesize and apply new information and behaviors. Most trainers
design trainings that are too packed with activities and information.
While it is important to have additional activities that can be used
if needed, it is essential to remember that participants will retain
more if given opportunities to reflect, synthesize, and practice new
insights and skills. Some guidelines to follow include the
following:
Vary Activities
Change the type of activity approximately every 30 minutes (e.g.,
if you just gave a 20-minute lecturette on a new cervical cancer
screening policy, give participants an opportunity to discuss in
small groups the implications of this policy on their client base or
have participants apply this new information to a prepared case
study).
|
|
Intersperse didactic activities such as lecturing
and demonstrations with more participatory ones such as
small group exercises, individual work, role plays, and a
variety of other training strategies. Vary learning activities to appeal to all types of
participants. Structure activities to go from simple
to complex concepts; from safe to more
risk-taking activities. Include activities that encourage real-life problem
solving. Include opportunities for application and
practice.
|
Set Realistic Goals for the Training
Choose information or skills that participants
need to know; not information that would be nice to know. Think about your learning objectives (developed in section
II.1 and develop your take-home messages to correspond with
them. Remember that three to five take-home messages are the most
people can retain in a one-day training. Match objectives to training and evaluation methods. For
example, didactic or lecture methods can lead to knowledge change
but probably not attitude change or skill acquisition. Interactive
methods can lead to change in knowledge and attitudes.
Demonstrations and practice can reinforce skill acquisition. Think about how you will evaluate the training.
Be Aware of Time Management Issues
Build in time for movement from one activity to
another. This is especially important if small group breakouts
take place in a different room from the main meeting room. Build in time for forming small groups. Build in some "slush" time to make up for a late start,
getting behind schedule because of lengthy discussion, dealing
with unforeseen circumstances (e.g., fire drill), or other time
challenges. Build in time for breaks. Give participants a break no less
frequently than every 90 minutes.
Prepare a Clear Training Plan
The level of detail with which a training plan is written depends
on a number of factors:
Whether you or another person will be conducting the training, it
is extremely important that all directions for activities be
explicitly written as well as examples of questions to be used to
process or discuss the activities. The suggested time allotment for
each activity should also be clearly stated as well as the materials
needed to conduct all the activities. This level of detail will
ultimately make your life easier and will ensure a smoother training
program.
A "Sample Training Plan Template" and a "Training Plan Worksheet"
are located in appendix B. A sample training plan follows on the next
few pages. For this sample,
|
The left column contains:
Plenty of blank space so you can jot down your own
notes A list of training materials that are needed for each
portion of the training An estimate of how much time it will take to complete
each portion of the training
|
The right column contains:
Detailed instructions for what to do and say Description of how to use any training materials that
are needed for each portion of the training Lists of possible answers to questions posed to
participants during the training session Text in italics indicates things for the trainer to
say to participants
|
Sample Training Plan
|
Time and
materials
|
Task
|
Trainer
instructions
|
|
60 minutes
|
Set up room and familiarize self with location
|
Arrive early to set up the room.
Make sure there are enough chairs and that they are arranged
in a circle (around a table) to facilitate participation
anddiscussion.
Organize handouts, training materials, and visuals (e.g.,
breast models, mammography films).
Locate lights.
Set up and test audiovisual equipment.
Put out refreshments, candies, etc.
Put out a sign-in sheet and name tags.
Make the room more comfortable and enjoyable (tablecloths,
decorations, music, etc.).
Locate restrooms, telephones, and water fountains.
|
|
10 minutes
Sign-in
sheet
Drinks and refreshments
|
Participant arrival and sign-in
|
As participants arrive:
Ask participants to write their names on sign-in sheet.
Ask participants to write their names on a name tag.
Offer drinks and light refreshments.
Welcome participants and thank them for taking time to
participate in this training.
Reassure them that we are going to have fun while we learn
about breast cancer early detection measures.
Review "housekeeping" details such as the location of
restrooms, telephones, and water fountains.
|
|
Time and
materials
|
Task
|
Trainer
instructions
|
|
5 minutes
Prepared
flipchart - Agenda
Prepared flipchart - Goal and objectives of training
|
Welcome and introduction
|
Welcome and make brief introductions.
Refer to flipchart with agenda. Explain that we have a lot
to cover, but hopefully it will be interesting and
engaging.
Refer to flipchart with goal and objectives of the training.
Explain that the goal of this training is to:
Explain that the objectives of this training. By the end of
this training participants will be able to:
Demonstrate steps involved with making an
appointment for a mammogram List at least three barriers women may face to
obtaining a mammogram and suggestions on how these barriers
can be addressed by health care organizations. Describe American Cancer Society recommendations
for mammography screening. Demonstrate commitment to increasing awareness
about the need for mammography screening by telling at least
four friends to schedule a mammogram in the next month.
|
|
15 minutes
|
Icebreaker
|
Explain
that we will be doing a lot of work together today so it's
important to know a little about each other.
Give instructions for the icebreaker:
In a roundtable format, ask participants to say
their name, what they know about why they were given their
name (e.g., named after great aunt), or what it means (e.g.,
the name Athena is the Greek word for "light"). Ask the women if they think their name fits their
personality.
|
|
5 minutes
Prepared flipchart - Norms
|
Group discussion and group norms
(this will be covered in more detail in section III. 1.)
|
Explain to participants that setting "norms" or ground rules
for the training will help make the training a safe,
respectful, and comfortable environment for everyone to
learn and share.
Refer to flipchart with norms listed on it. Review each norm
and give a brief explanation.
Ask if anyone has additional ground rules to add.
Post the ground rules on the wall to serve as a visual
reminder.
|
|
15 minutes
Blank flipchart paper
Colored markers
|
Group brainstorm:
barriers women may face to obtaining a
mammogram
|
Explain to participants that studies have shown that many
women face several barriers to obtaining a mammogram.
Ask the participants to brainstorm a list of barriers women
may face.
Review the rules of brainstorming with participants. That
is, that during the actual brainstorming of ideas, nobody
should criticize any ideas that others suggest. Ideas will
be discussed only after the brainstorming session is
completed.
Using a blank flipchart paper, write down the barriers
participants suggest.
|
|
Time and
materials
|
Task
|
Trainer
instructions
|
|
15 minutes
Blank flipchart paper
Colored markers
|
Group brainstorm:
barriers women may face to obtaining
a mammogram (continued)
|
Some examples of barriers women may face include:
Lack of insurance to cover mammogram
Lack of transportation to the appointment
Lack of childcare during the appointment
Difficulty in taking time off work for appointment
Embarrassed to disrobe in front of the
provider Fear that the mammogram will hurt Fear of finding breast cancer Fear that having a mammogram means that the woman
has no faith in God
When the participants are finished brainstorming the list of
barriers, add the barriers that may have been missed.
Read through the list out loud, getting rid of duplicate
answers or grouping similar types of barriers suggested.
Explain that in the next portion of the training,
participants will work in small groups to discuss ways that
health care organizations can address these barriers so that
more women will be able to obtain mammography screening.
|
|
Implement
|
Adults learn best when the training environment is
emotionally safe and physically comfortable. There are a
number of different strategies trainers can employ in order
to create a positive learning environment.
|

|
Setting Up: Ensuring a Comfortable Room Ambiance
Adults learn best in a pleasant environment where their physical
needs are met. If possible, when selecting a room make sure there are
adequate measures for controlling the temperature. Rooms that have
windows that provide natural lighting and contact with the outside
world are preferable.
Beware of the following conditions that may distract from the
training session:
Windows that provide outside noise or visual distractions
such as people walking by or nature scenes Inadequate facilities (uncomfortable chairs, no tables to
write on, inadequate lighting, and poor acoustics). Note: For large
groups a microphone may be needed. A lavaliere microphone will allow
the trainer to move freely around the room.
Sometimes it is difficult to control room conditions. Simply
acknowledge to the participants that you are sorry for the discomfort
and state what you can and cannot control.
Enhancing the Room
Even the drabbest meeting room can be made more pleasing through
the use of decorations. Bring in posters that pertain to your topic,
wall hangings, flowers, tablecloths, and candles. Use colorful
markers when writing flipcharts.
Setting Up the Room with Chairs
How the room is set up will greatly affect participant
interaction. Four common room arrangements and their benefits and
drawbacks are described below.
|
Room
Set-up
|
Benefits
|
Drawbacks
|
|
Circle Seating

|
|
Visual aids difficult to use More difficult if large number of participants No room to write; materials must be balanced on
laps
|
|
"U" - Shape Seating

|
Leader more easily becomes a part of group
|
|
|
Workshop Clusters

|
Good freedom for participants Good discussion and diverse communication Lots of participant working space Can accommodate large groups
|
|
|
Standard Classroom Seating

|
|
Participants cannot easily talk with or see one
another Leader clearly apart from the group Visuals may be difficult to see
|
 = Trainer
  = Participants
Getting Started
Once the training room is set up, you are ready to welcome
participants to the training. As participants enter the training
room, welcome them, ask them to sign in, give them name tags and any
training materials or handouts for note taking, and remind them of
the starting time. Start the training as close to the scheduled time
as possible to signal respect for participants' time.
Help Participants Know What to Expect
Emotional safety is essential in creating a positive learning
environment. For participants to feel comfortable in a new training
situation they need to know what to expect from the training and what
is expected of them as participants. The trainer should review the
following with participants:
The goals and objectives of the training An overview of the agenda including:
The trainer's role (i.e., a facilitator rather than a
speaker or presenter) The participants' roles (i.e., active contributors to the
group discussions and activities). The trainer should emphasize that
the participants have a lot of wisdom to share with the group and
that everyone will be greatly enriched if people participate fully in
the training activities Where they can take care of their basic needs [e.g.,
location of restrooms, telephones, and places to obtain food and
drink (if not provided by the training)]
Learn About Participants' Strengths and Needs
See "Conducting a Participant Strengths and Needs Assessment" 9 for conducting a needs assessment at the beginning of
a training if not done before.
Create Ground Rules
Ground rules (also called group norms) are guidelines that help
create a safe environment and enable tasks to be accomplished
efficiently. Examples of ground rules include:
Honor everyone's input regardless of educational degrees,
professional or community status, or personal experiences with the
topic Value each person's unique opinions and perspectives Agree to disagree, but do so respectfully Speak one-at-a-time Allow each person time to talk Start and end on time; come back from breaks promptly Keep personal comments said during the training
confidential Support those who may have anxiety talking about emotionally
difficult topics Step outside your comfort zone Speak for yourself, not other people (i.e., use "I" statements
rather than "everybody" or "other people") Take charge of your own learning (i.e., take breaks when you
feel necessary, ask for clarification) Have fun even though the topic is a serious one Ask questions Feel free to "pass" when discussing a certain topic
It is preferable for a training group to develop their own ground
rules that reflect what is important for them to feel safe. However,
if there is limited time, the trainer can suggest a set of ground
rules and then ask the group for any additional ones. For example, in
professional audiences it may be important to add the ground rule
"put all cell phones and pagers on vibrate or turn them off." The
trainer should address any participant concerns about the ground
rules and then ask for people to follow these throughout the
training. Tape the list of ground rules on the wall so all
participants can see them. Refer to them if necessary during the
training.
Create a "Parking Lot"
Explain to participants that the parking lot is a place to put
questions, comments, or concerns that are important but slightly off
the topic currently being discussed. Assure them that everything
placed in the parking lot will be addressed by the end of the
training (and keep your word, revisiting the parking lot as
appropriate throughout the training).
After the trainer has "set the stage" for how the group will move
through the training together, she or he can then move into the
icebreaker or warm-up activities. "Using Icebreakers and Energizers" describes these in
more detail.
As a trainer, your goal is to help participants learn new
information and build skills. The best way to help people learn is to
use facilitation techniques that recognize and build on the
knowledge, skills, and experiences they already have.
All of the training methods that were discussed in "Selecting Appropriate Training Methods" will be greatly enhanced through the use of good facilitation skills.
For some of you, the following information is undoubtedly a review.
However, even the most experienced trainers may find a few new ideas
or strategies to add to their trainer's tool kit. This section is
divided into three parts. The first part covers general guidelines of
facilitation and the second part describes effective strategies for
working with multicultural training groups. The third part addresses
additional considerations.
Part 1. General Guidelines for Facilitation
Encouraging Group Participation
When participants take an active role in their learning, they are
more likely to "own" the information and skills covered in the
training. People are more likely to participate actively in the
training session if you do the following:
Maintain relaxed body language. Use an icebreaker to help participants relax, get to know each
other, and get ready to learn. (Specific examples of some icebreakers
are described in appendix A) Set group norms (sometimes called ground rules) to help make
the training a safe, comfortable, and productive learning
environment. Ask participants to give examples to illustrate a point. This
strategy ensures that examples are relevant to participants. Bounce back to the group questions you receive from
participants, as appropriate. "What do other people think about
this?" and "What other ideas do you have?" are ways to show
participants that you recognize their expertise. Show participants that you appreciate their contributions by
saying things such as, "That's a good point," "Thank you
for bringing that up," or "Many people have that same
question." Link discussion back to comments participants made earlier in
the session (e.g., "As Monique (or we) said earlier, this is a
very emotionally charged subject.") Bridge forward to what comes next (e.g., "After break we're
going to practice putting these new insights into action!") Move around. If you stand behind a podium, you are likely to
appear distant or inaccessible to participants.
|
|
Open-ended Questions
Whenever possible, ask questions instead of talking "at"
participants. You can do this by asking open-ended
questions-questions that cannot be answered with a simple
"yes" or "no." These questions usually begin with words like
"where," "when," "what," and "how." The word "why" can be
used if it is said in a questioning way rather than a
confrontational way. For example, asking, "Why do you
think some people are reluctant to get
a colonoscopy?" would be appropriate, but asking,
"Why aren't you getting regular
screenings?" might be seen as confrontational.
|
Open-ended questions can be used early in a training to get a
sense of participants' expectations and baseline knowledge levels.
Open-ended questions send the message that participants' input is
welcome.
|
|
You also can use open-ended questions to review
information already covered. For example, you could have
participants review or summarize parts of the training by
asking the following questions:
|
|
|
In addition, you can use open-ended questions to help
participants share ideas, experiences, barriers, and
solutions when you process activities or discuss content.
Examples of these types of questions include the
following:
"What has been your experience in finding
information about cancer clinical trials?" "What are some of the barriers you may face in
encouraging your mothers to get mammograms?" "How can you overcome the barriers you have
identified?"
|
Open-ended questions are a simple way for trainers to acknowledge
that participants have valuable information and experience to share.
However, using open-ended questions often takes longer than
lecturing. If you find that you are running out of time in a session,
you may need to limit responses from participants (e.g., "We have
time for one or two more comments.").
Active Listening
Active listening skills can help participants feel like their
ideas are truly an important part of the training experience. In
addition, active listening helps the trainers understand
participants' concerns. This greater understanding helps you tailor
the training to better meet their needs. An effective, active
listener uses both verbal and nonverbal skills to acknowledge
participation, clarify information, and encourage dialog.
|
|
Verbal active listening skills include:
Repeating what participants say to emphasize their
points Rephrasing participants' words to see if you
understand what they are saying Connecting participants' points to something covered
earlier in the training Asking for clarification if you are not sure what
participants mean Thanking participants for their contribution
|
|
|
Nonverbal active listening skills include:
|
Managing Time
Time management can be one of the most challenging aspects of
conducting a training session. It takes a skilled trainer to cover
content in a way that involves and engages participants within a
limited timeframe. Some ways to manage time effectively are:
|
|
Make clear that participants and trainers will be
expected to respect starting, ending, and break times. Help participants who wander off the topic to tie in
their comments with the discussion at hand. Ask participants' permission to "table" questions,
suggestions, or comments. Limit comments on any given topic. (Always encourage
participants to continue their dialog on breaks or after the
training session.)
|
If you run into a situation in which you have too little time to
cover all topics on the agenda, you may need to negotiate with
participants about what they most want to cover. By allowing them to
identify what is most useful to them, you make the most of the time
remaining and meet participants' needs.
Giving Feedback
As noted above, it is important to give positive feedback to
participants throughout the training. In addition, it may be
necessary to give corrective feedback at several points in the
training, as you help participants build their skills and
knowledge.
|
|
Effective corrective feedback, which is always given in a
supportive manner helps participants improve. Tips for
giving corrective feedback include the following:
Focus your comments on the participant's behavior
rather than on the individual. Always point out something the participant did
well. Point out something specific the participant could
improve on.
|
Corrective feedback is never a personal attack on an individual;it
is always offered as a way of helping someone increase knowledge or
improve skills.
"Checking In" with Participants
A good trainer is able to read the body language of the
participants to ascertain the appropriateness of the training
content, the pace of the training, and the energy level in the group.
This can be done informally on an individual basis during breaks or
more formally with the entire group. Asking questions such as "How's
everyone doing?" (and allowing time for honest responses) or asking
people to summarize the key points from a particular segment of the
training will help trainers assess whether participants are grasping
new information. Mid-training adjustments may need to be made if it
appears that many of the participants have not understood the
material, appear bored, or need additional help with concepts or
skills.
Trainer observations during role plays, demonstrations, or small
group activities can provide assessments of how well new material is
understood and integrated. For example, if after teaching a group of
women how to do a self breast exam, you notice that people are
performing it incorrectly during a practice session, you can review
and reinforce the correct method. Be careful not to put all of your
focus on the one or two "challenging participant(s)" to gauge how the
entire group is responding to the training (discussed in detail
below).
Working with Challenging Participants
In most training groups there are a couple of participants who
pose some challenges to a smooth and effective training process. The
table below summarizes some of these challenges.
|
Types of
challenging participants
|
Why are they
challenging?
|
Ways to work
effectively with this type of participant
|
|
"Know it alls"
|
|
At the same time, express your concern that you want to
encourage everyone to participate and enlist his or her help
in doing so.
|
|
"I'm only here because I have to be"
|
|
Acknowledge that you know that some of the
participants are present because they have to be. Ask for their assistance in making this a meaningful
experience. Ask specifically "How can I make this workshop
helpful to you?"
|
|
"Talkers"
|
May be "eager beavers" or show-offs May be exceptionally well informed and anxious to
show it, or just naturally wordy May need to be "heard"because they are still working
through difficult emotional issues May take time away from other participants
|
Don't be embarrassing or sarcastic; you may need
their help later. Slow them down with some difficult questions or
difficult tasks (such as group leader). Interrupt tactfully with something like: "That's
an interesting point…now let's see what the rest of the
group thinks of it." In general, let the group take care of them as much
as possible. Avoid eye contact. Give them a role. State that your role is to keep people on time. Quick interruption-move to them and put your hand on
his or her shoulder. Paraphrase what they say and move on. Acknowledge that their stories are important and you
and others would love to hear them later or after the
workshop.
|
|
Types of
challenging participants
|
Why are they
challenging?
|
Ways to work
effectively with this type of participant
|
|
"Questioners"
|
|
Acknowledge that they seem to have a lot of
questions about a particular topic. If the questions seem like legitimate attempts to
gain content information (which other members of the group
already know), tell them that you will be happy to work with
them later to fill in the gaps or put the question on the
parking lot. Reframe or refocus. Send the questions back to the
questioner. Establish a buddy system (i.e., ask for volunteers
who would be willing to meet with them).
|
|
"Arguers"
|
Have combative personalities May not want to be at the workshop May be upset by personal/family health issues May upset other participants
|
Keep your own temper firmly in check. Don't let
the group get excited either. Honestly try to find merit in one of their points (or
get the group to do it) then move on to something else.
"That was a good point" or "We've heard a lot from
[person's name], who else has some ideas?" If facts are misstated, ask the group for their
thoughts; let them turn it down. As a last resort, talk with them in private, find out
what's going on, and ask for cooperation. For example: say,
"Let's talk at break/end of session. How can we be on the
same team?" Give them a role.
|
Part 2. Strategies for Working Effectively with Multicultural
Training Groups
Ensuring Cultural Sensitivity
To be effective, trainers must be aware of cultural issues that
can affect the training environment. Culture can influence people's
values, attitudes, beliefs, and behavior, and therefore has an impact
on how people learn, communicate, make decisions, and interact in
groups.
Many people think of culture simply as a person's race or
ethnicity. However, culture includes many different aspects of
people's lives. That is, people's cultural background may be
influenced by their:
When you work with multicultural groups, keep in mind that
although people from a specific cultural group may share common
traits, all members of a cultural group are not alike. Individuals
within cultural groups have their own personal experiences,
personality traits, values, and belief systems. It is therefore
important to respond to a person's needs and not assume that the
person will respond in a certain way because she or he belongs to a
particular cultural group.
For those of you who train health professionals, keep in mind that
there is a "culture of medicine." People who work in health care have
a common language and view of health and illness. These views may or
may not be shared by community and patient groups. Therefore, when
training audiences that are made up of both health professionals and
others who do not work in health care, make sure that acronyms,
medical jargon, or other abstract concepts are not used unless they
are well explained. Also, it will be important to be alert for biases
and assumptions that health professionals may share but which may
conflict with community members' cultural values, attitudes, and
beliefs.
|
|
Considering Power Differentials
In training groups where participants might come from
diverse backgrounds or positions of power, be alert for ways
that power imbalances might affect the training. For
example, if you are training a group of health
professionals, some may be supervisors of others in the
room. The "supervisee" might feel awkward about sharing
certain feelings or revealing a lack of skill or knowledge
related to the topic with his or her supervisor in the room.
Likewise, patients may feel awkward discussing health care
concerns if their nurse, physician, or social worker is in
the same audience.
|
Some tips for dealing with power differentials within an audience
are the following:
Acknowledge that the situation exists. Emphasize that each person's unique perspective and experience
is equally valued and refer to other ground rules that address issues
such as these. Avoid participant introductions that emphasize academic
degrees or professional status. Instead ask people to describe their
connection to the topic. Lay advocates might need to pair with a health care
professional "buddy" when addressing professional audiences so that
they can learn what the expected protocol for training these groups
is (e.g., Do the professionals want a personal story or a PowerPoint
presentation?).
Self-awareness
To fully appreciate cultural power and differences, trainers
must:
Recognize their own culture's influence on how they think
and act. Understand the complexities of cross-cultural interactions and
fully appreciate, value, and respect participants' diversity. Be aware of the impact of institutional and societal racism,
sexism, ageism, and other such "-isms," and acknowledge how these
forms of oppression can influence group dynamics. Share appropriate personal experiences from one's "own"
culture while not attempting to be an expert on other cultural
groups. Be aware of their own power within the group and use that
power appropriately (i.e., acknowledge that everyone in the room has
something important to share and that you, as the trainer, hope to
learn from the group).
Cross-cultural Communication
To improve cross-cultural communication skills, trainers
should:
Avoid statements based on stereotypes. If generalizations
are used, they should be clearly labeled as such and modified with
terms such as "many" or "some." Appreciate the different ways that people from various
cultures engage in group discussions. Silence, for example, has a
different meaning, depending on personal experience and cultural
background. Ensure that all participants have an opportunity to express
their ideas to the group during discussions. Remember that participants have different levels of
proficiency in reading, writing, speaking, and understanding the
language used in a training session.
Finally, even with all cultural considerations in mind, there is
no substitute for exercising good common sense and judgment in
considering how, what, and when to address various issues in a
training. Almost any training activity has the potential to be
culturally offensive when facilitated by someone who does not
demonstrate respect for participants. Demonstrating respect for
participants is crucial and opens the door for mutual growth and
learning.
Body Language and Movements
Trainers also must be aware of the different ways people share
information. In addition to talking, people use body language,
physical contact, and body movements to express themselves. Be aware
that the appropriateness of physical space, touching, physical
contact, and eye contact can vary depending on cultural norms,
personal experiences, and personal preferences.
Part 3. Other Considerations
Other considerations on training facilitation:
Training team composition sends a message. Whenever
possible, trainers' cultural backgrounds should be representative of
participants' backgrounds. Diverse groups of participants will
benefit from seeing people from their own communities among the
trainers. In addition, a multicultural training team models
cooperation and sharing among cultures. Trainer styles differ, just as learning styles do; therefore,
be careful in designing the training on the basis of an individual
trainer's preferred style. Acknowledge areas of weakness and expertise. If given a direct
question, make an attempt to answer it in an accurate and forthright
manner. If you do not know the answer, admit it. If you can get back
to the questioner with the correct answer at a later date, do so. Keep training goals and objectives in mind at all times, but
especially when processing. Be aware of participants who might take
over or seek to control. If you are uncomfortable with conflict, or
uncertain about how to address it, seek training in conflict
resolution. Conflict inevitably occurs whenever two or more people
come together, so be prepared.
Review the Characteristics of Effective Trainers
Those who are conducting cancer education training programs need
to posses certain skills to be effective. Consider using the "Trainer
Skills Checklist" 10 located in appendix B to assess your owns strengths
and needs.
In addition to the training methods discussed in the "Plan" 11 section,
icebreakers and energizers are important parts of participatory
trainings.
Icebreakers
Icebreakers can be a good way to start your training. They warm-up
participants, put them at ease, get people involved, and open up
communication. Icebreakers create a positive learning climate within
the group. They foster interaction, build group identity, stimulate
creative thinking, acquaint participants with each other, and help
establish comfort.
Considerations for selecting an icebreaker:
Think about the group with whom you are working. Consider participants' ages, cultural backgrounds, educational
levels, occupations, and personalities. The length of the icebreaker depends on the length of the
training. More time can be devoted to icebreakers when the training
is a full day or longer. Icebreakers should make people feel comfortable. Do not use an
icebreaker which would embarrass someone, or at which people would
fail. Use an icebreaker that makes you feel comfortable, not one that
raises anxiety. Choose icebreakers that encourage everyone to speak. This is
especially important for shy or timid participants. Once their voice
is "in the room," shy participants are more likely to contribute to
subsequent discussions. Icebreakers are best when they are related to the topic of the
training. However, sometimes it is important to have a "fun"
icebreaker not related to the topic to lighten the mood or create a
comfortable environment!
|
Examples of icebreakers are found in appendix A of this
trainer's guide.
|
|

|
Energizers
Energizers can be used at anytime during a training when
the energy or attention of the participants is low.
Energizers should take no more than 5-10 minutes. They are
really intended to get people up and moving-not to spend a
long time discussing ideas. They are especially helpful
right after a meal when people are often sluggish.
Introduce energizers with enthusiasm since some
participants may be reluctant to "act silly." Model the
activity first and be an active participant yourself. This
gives participants "permission" to get involved, too.
|
Close the Training
It is important to close a training. Often this step is overlooked
due to time constraints. In addition, some trainers feel that the
evaluation serves as the closing activity. However, closings are
different from conducting an evaluation of the program. They provide
a way to summarize or "wrap-up" the training content as well as an
opportunity to "close out" the emotional aspects. Done well, they
help participants draw a boundary between the training and the rest
of their lives and prepare them for the reentry process.
Put Closure on the Content of the Training
Participants should experience a sense of closure with regard to
the content of the training. Some examples of ways to do this are
listed below:
|
|
Ask for a volunteer to summarize the key take-home
messages. Conduct games that review concepts or information
learned during the training. Do a post-test. Develop an action plan describing how the participant
will use the new knowledge, attitudes, or skills. Review expectations from the beginning of the
training and ask if all have been met. Answer any lingering
questions or concerns.
|
Trainings where there has been a lot of personal sharing or where
participants have formed strong emotional bonds need closure so that
participants are not left with unfinished feelings.
Put Closure on the Emotional Component of the Training
Examples of ways to put some closure on the emotions that were
generated by the training include the following:
|
|
Take a group photo. Have participants stand in a circle and say one thing
they have appreciated about the other participants. A
variation is to have people write comments on small pieces
of paper and put their contributions in cups marked with
each participant's name. This strategy works best when
participants have been together over a 2- to 3-day training
or part of a group that meets over several months. Give participants an opportunity to plan a reunion or
another time to get back together (again, this is most
appropriate for groups that have met over time or where deep
bonding has occurred). Give certificates of participation or completion. Give gifts or incentives as a way to thank people for
their time.
|
|
An example of a closing statement is located in appendix A.
|
It is important to give participants an opportunity to give
feedback about the content of the training, the trainer(s), and the
logistics of the training. There are a number of ways trainings can
be evaluated-some more formal and some less formal. Ideally the
evaluation should relate back to the training goals and objectives.
Choose an evaluation strategy that will be most appropriate for your
audience. While health care professionals might be familiar with
Likert type scales, diverse community groups might prefer a less
structured approach. The sample evaluations that follow range from a
more structured, quantitative approach to a very informal,
qualitative instrument.
Many trainers feel that it is important to wait at least some
amount of time before looking at training evaluations. Right after a
training you may feel somewhat vulnerable so try to wait until the
next day, at the earliest, to review the evaluations. When reading
the evaluations, remember that feedback is a gift. Most gifts come
from well-intentioned people but not all of them are "on target."
Read each evaluation carefully, then review them for themes. Trainers
learn most from the reactions of the majority of the participants
rather than focusing on one or two comments. Although "outlier"
comments can be helpful, most often they say more about the
participants than about the trainer or training. If you are using a
quantitative or Likert scale evaluation form, enter them into a
database if you have one and then review the average scores for each
item. If you are using a qualitative evaluation tool, summarize
participant comments and reactions.
Finally, in order for evaluations to be most useful, trainers need
to develop an action plan for incorporating useful feedback into
future trainings.
|
Examples of training evaluations can be found in appendix A.
|
14Summary and Conclusion
Comparison of Training Elements for Three Audiences
For each training you conduct, you will need to plan Assessment,
Goals/Objectives, Training Strategies, Use of Training Media,
Icebreakers, Energizers, Evaluation, and a Closing Activity. The
chart below summarizes much of the information contained in this
guide, and how it applies to running trainings for different
audiences.
|
spacer
|
Patients/Survivors
|
General Community
(People not already involved in cancer as
a patient or family member)
|
Health Professionals
|
|
Assessment
|
|
|
|
|
Objectives
|
All seven types may be appropriate according to training
goals
|
|
Training Strategies
|
Role plays Small group discussions Creative strategies Case studies Demonstrations Lecturettes
|
Role plays Small group discussions Creative strategies Case studies Demonstrations Lecturettes
|
Lectures Case study Demonstrations Small group discussions
Note: Role plays and other creative endeavors might be
appropriate for certain topics
|
|
Use of
Training Media
|
|
|
|
|
Icebreakers
|
|
|
|
|
Energizers
|
|
|
|
|
Evaluation
|
|
|
|
|
Closing Activity
|
|
|
|
|
Reference List
Armstrong, T. (1993). 7 kinds of smart: Identifying and
developing your many intelligences. USA: Plume.
Arnold, R., Burke, B., James, C., Martin, D., & Thomas, B.
(1991). Educating for a change. Toronto: Doris Marshall
Institute for Education and Action Between the Line.
Centre for Development and Population Activities. (1994).
Training trainers for development. Washington, DC: Author.
Center for Substance Abuse Prevention (CSAP). (1994).
Facilitation skills development process. Training manual.
Rockville, MD: Center for Substance Abuse Prevention, Substance Abuse
and Mental Health Services Administration, Department of Health and
Human Services.
De Mauro, D., & Patierno, C. (1990). Communication
strategies for HIV/AIDS and sexuality: A workshop for mental health
and health professionals. New York: Sex Information and Education
Council of the United States.
Gesell, Izzy. (1997). Playing along: 37 learning activities
borrowed from improvisational theater. Duluth, MN: Whole Person
Associates.
Hope, A., & Timmel, S. (1995). Training for transformation:
A handbook for community workers (Rev. ed.). (Vols. 1-3).
Zimbabwe: Mambo Press.
Knowles, M. (1990). The adult learner: A neglected species (4th
ed.). Houston, TX: Gulf Publishing Company.
Kolb, D.A. (1984). Experiential learning: Experience as the
source of learning and development. Englewood Cliffs, NJ:
Prentice-Hall, Inc.
Kroenhart: G. (1995). Basic training for trainers: A handbook
for new trainers (2nd ed.). Sydney: McGraw-Hill Book Company.
Margulies, N. (1991). Mapping inner space: Learning and
teaching mind mapping. Tucson, AZ: Zephyr Press.
Markova, D. (1996). The open mind: Exploring the 6 patterns of
natural intelligence. Berkeley, CA: Conari Press.
Mountain-Plains Regional AIDS Education and Training Center.
(1994). HIV/AIDS Curriculum, 5th Edition. Denver, CO:
Author.
Newstrom, J.W., & Scannell, E.E (1980). Games trainers
play. USA: McGraw-Hill, Inc.
Newstrom, J.W. & Scannell, E.E. (1994). Even more games
trainers play. USA: McGraw-Hill, Inc.
Pike, R. (1994). Creative training techniques handbook: Tips,
tactics, and how-to's for delivering effective training (2nd ed.).
Minneapolis: Lakewood Books.
Schott, C., & Phillippo, J. (Eds.). Expressing our
creative selves: A recreational manual for youth care workers.
Athens, GA: Southeastern Network of Youth & Family Services.
Silberman, M. Active training: A handbook of techniques,
designs, case examples, and tips. New York: Lexington Books.
Swift, R. (ed.) (1998). The HeART of training: A manual of
approaches to teaching about AIDS. Cooperative Agreements
Training Working Group, Special Projects of National Significance
Program, HIV/AIDS Bureau, HRSA.
Vella, J. (1998). Learning to teach: training of trainers for
community development. Washington, DC: Save the Children/OEF
International.
Vella, J. (1994) Learning to listen learning to teach: The
power of dialogue in educating adults. San Francisco: Jossey-Bass
Publishers.
Vella, J. (1994) Training through dialogue: Promoting effective
learning and change with adults. San Francisco: Jossey-Bass
Publishers.
Werner, D., & Bower, B. (1982). Helping health workers
learn: A book of methods, aids, and ideas for instructors at the
village level. Palo Alto, CA: The Hesperian Foundation.
Appendix A: Examples of Icebreakers, Energizers, Closing Activities, and Training Evaluations
Paired Interviews
Purpose
To help participants get acquainted with their fellow participants
and practice their interview skills
Time
Depends on number of participants. Allow 1 to 2 minutes per
participant
Group Size
No more than 20 for one large group; can divide large groups into
smaller ones but then everyone would not hear all the
introductions
Materials
Scrap paper and pens/pencils for participants to jot down
notes
Directions
Pass out postcards or playing cards that are cut in half. Instruct participants to find the person who has the other half of
their card. (This gets people up and moving around.) When all pairs have matched up, ask them to take turns
interviewing each other. Each person will have four minutes to learn
the following things about his or her partner:
Name How they spend their day (e.g., job or other responsibility
like caretaking for a sick spouse) Their interest in or connection to the training topic One hope for the training One interesting thing about them (e.g., hobbies) Tell participants that they will be introducing their partner
to the entire group when it reconvenes, so they may want to take
notes. After 4 minutes, give participants a signal to change
partners. At end of 8 minutes (or after each person has had a chance to be
an interviewer and be interviewed), call large group back
together.
Go-Rounds
Purpose
To give participants a chance to learn something about their
fellow participants and to encourage everyone to speak out
Time
One minute per person
Group Size
No more than 20 for one large group; can divide into small groups
but then everyone would not hear all the introductions
Materials
None
Directions
State the purpose of the exercise and ask each person to say
his or her name followed by the answer to one of the following
questions:
What is one thing you'd do if you were given
$100,000 with no strings attached? What is one thing you'd like to change about the world (or
about cancer care, education, or screening)? Describe a strong feeling you've had in the past week and a
reason for that feeling. What is one thing you'd like to get from the training?
Post the questions on a flipchart paper or overhead so
participants can focus on the discussion and not on remembering the
question.
Beach Ball Toss
Purpose
To review material learned from a previous session or determine
what participants would like during the current session
Time
5-10 minutes
Group Size
No more than 20-25 participants
Materials
Choice of using either a beach ball, Nerf ball, or Koosh ball
Directions
Instruct participants to form a circle. Explain that you will throw the ball to someone within the circle.
When that person catches the ball, he or she should mention a key
message or concept heard during a previous session.* Once he or she
has made a statement, he or she should toss the ball to another
person within the circle. Ask participants not to toss the ball to the person on their
immediate left or right. Suggest that participants should step out of the circle once they
have participated. Continue tossing the ball until all participants have had an
opportunity to participate.
*Note: If this is the first session for the training
program, ask person to tell you what he or she expects to learn.
That's Me
Purpose
To get participants moving, i.e., standing up and down; it also
allows participants to get acquainted with each other
Time
5-10 minutes
Group Size
Unlimited
Materials
None
Directions
Give the following directions:
You will ask a question, such as "Who has
grandchildren?" If that characteristic "fits," participants will stand
up, raise both arms outstretched over their head, and shout,
"That's Me!"
Ask the group to practice standing up and shouting "That's Me!"
when you count to three. Ask the group as many of the following questions (or questions
of your choice) as time allows. Mix in questions that are more
personal with those that pertain to the topic of the training.
Who lives in (this state)? Who traveled more than 4 hours to get here? Who has grandchildren? Who exercised this morning? Who took a vacation last summer? Who ate at least one serving of fruit this morning? Who had a clinical breast exam within the last year? Who watched at least one movie or videotape in the last
month? Who plans to shop while in (this city)? Who knows someone who has been on a cancer clinical
trial? Who has a pet? Who has read a nonfiction book in the last 3 months? Who is eager to learn more about (the topic)?
Closing Statements and Handout
Some activities serve to close out both the emotional aspect and
content of the training. This exercise is an example of one that
serves both purposes.
Purpose
To give every participant a chance to summarize their experience
of the training in a way that the group can share
Time
10-15 minutes
Group Size
Up to 20 participants
Materials
Closing statement handout for each participant
Directions
Ask participants to:
Take a Closing Statements Handout (see below). Take a minute to complete any of the sentences on the handout
that they choose (give participants 5-10 minutes to complete
handout). Form a circle in (the back of the room). Ask participants to go around the circle and share one of the
closing statements out loud.
Notes to Facilitator
You can place this before or after the evaluation,
but don't hurry it. Give people a sense of how much longer you
plan to keep them (i.e., "We'll do this exercise for 10 minutes,
spend 5 minutes finishing evaluation forms, and then we'll
adjourn"). Be sure participants will be able to see and hear each
other. Don't respond to what is shared; model respectful, quiet
acceptance of what's offered. End by thanking everyone for sharing the training with you.
Closing Statements Handout
Please complete any of these sentences to summarize your
experience of this training event. You will be asked to share one
with the group.
I learned_____.
I feel_____.
I was surprised_____.
I'm wondering_____.
I've re-discovered_____.
I figured out_____.
I appreciated_____.
I felt challenged_____.
I'm clearer about_____.
Form (Version A)
Goal 1: The overall goal/purpose of the training is to provide
health education coordinators with the knowledge and skills to plan,
implement, and evaluate effective outreach strategies for increasing
the number of adults aged 50 years and older who get colorectal
screening at appropriate intervals.
Goal 2: A second goal is to provide health education coordinators
with the knowledge and skills to provide tips for training peers to
conduct effective outreach for colorectal screening.
Name (Optional)
Were the overall program goals met?
If no, please explain and give suggestions for improvement.
What are the top three things you learned from this
training? If you could give the trainers one piece of advice on how to
improve the training, what would it be? What were some of the training's highlights or parts that you
valued most? What did you like least about the training? What other types of training would you like? What problems or dissatisfaction did you have with the way the
program was scheduled?
Form (Version B)
Circle the appropriate response.
Trainer organized the material effectively.
|
Strongly
Agree
|
Agree
|
Neutral/No
Opinion
|
Disagree
|
Strongly
Disagree
|
Comments:
Trainer managed discussions effectively.
|
Strongly
Agree
|
Agree
|
Neutral/No
Opinion
|
Disagree
|
Strongly
Disagree
|
Comments:
Trainer used effective teaching methods.
|
Strongly
Agree
|
Agree
|
Neutral/No
Opinion
|
Disagree
|
Strongly
Disagree
|
Comments:
Trainer used handouts and audiovisuals that were appropriate
and contributed to the presentation.
|
Strongly
Agree
|
Agree
|
Neutral/No
Opinion
|
Disagree
|
Strongly
Disagree
|
Comments:
Discussion materials were clear.
|
Strongly
Agree
|
Agree
|
Neutral/No
Opinion
|
Disagree
|
Strongly
Disagree
|
Comments:
The training can be applied to my current job.
|
Strongly
Agree
|
Agree
|
Neutral/No
Opinion
|
Disagree
|
Strongly
Disagree
|
Comments:
The material presented is useful on a personal
level.
|
Strongly
Agree
|
Agree
|
Neutral/No
Opinion
|
Disagree
|
Strongly
Disagree
|
Comments:
The material presented is useful on a professional
level.
|
Strongly
Agree
|
Agree
|
Neutral/No
Opinion
|
Disagree
|
Strongly
Disagree
|
Comments:
Would you be interested in attending a followup session on
this topic?
If yes, specify the areas that you would like to see included in
the agenda.
Feedback Cards Exercise
Purpose
To provide a mechanism for participants to give feedback regarding
the training/learning experience
Time
5-10 minutes
Group Size
Any size
Materials
Two colors of 3" x 5" index cards, enough for each participant to
receive one card of each color
Directions
Pass around two stacks of 3" x 5" index cards. Each stack
should be a different color (best to use colors that are easily
distinguishable from each other, e.g., blue and yellow) Ask each participant to take one card of each color. Ask each participant to write, "One thing you really liked or
appreciated about this training (or this day of training) on the ____
color card." Ask participants to write, "One thing you wished had been
different about this training (or this day of training) on the ___
(other than in step #3) color card." When all participants have completed the cards, ask that they pass
both cards to the front. Thank participants for their input and assure participants that
the trainers will carefully consider their feedback.
Head, Heart, and Feet Exercise
Purpose
To evaluate the session at its conclusion, especially useful for
audiences with limited literacy skills
Time
15 minutes
Group Size
Any size
Materials
Evaluation sheet for each participant, flipchart, markers, and
tape
Directions
Hand out the evaluation sheet that follows. Explain its
objective and how the information will be used. Invite participants to use the markers to draw their head, heart,
and feet on the paper. Ask participants to fill in the form (individually or with someone
else). If there is time, ask them to share something they learned or to
give final comments.
Variation
Draw a large head, heart, and feet on flipchart paper and post it.
Distribute small slips of paper and ask participants to write down
the major things they learned or got out of the event. Post these
points in the appropriate position on the flipchart and discuss
them.
 Head:
What did you learn today? Head:
What did you learn today?
 Heart:
How did today's training feel to you? Heart:
How did today's training feel to you?
 Feet:
What are you going to do as a result of the training today? Feet:
What are you going to do as a result of the training today?
Faces Exercise
Please circle the face that best describes your feelings about
each given training activity:
Icebreaker

Lecturette on risk factors
Values clarification exercise
Small group exercise on barriers and facilitators
Video
Energizer
Role play exercise
Appendix B: Worksheets for Planning and Implementing a Training Session
Think about your own skills as a trainer then read through the
following statements.
Determine if the statements you feel describe your strengths or if
they describe areas where you'd like to improve. Think about one or
two things you could do to build on your strengths to address areas
that need improvement.
You know yourself. You are confident and fully prepared. You
are just nervous enough to keep alert. You know your subject matter. You have studied your topic and
have experienced the events about which you speak. You know your audience. You respect and listen to the
participants. You call them by name, if possible. You are neutral and non-judgmental. You validate everyone's
experience and their right to individual perspectives. You respect
differences of opinion and lifestyle. You are culturally sensitive. You are aware that your own
views and beliefs are shaped by your cultural background just as
your participants' cultures shapes their perspectives. You are self-aware. You recognize your own biases and
"hot-buttons" and act in a professional manner when your
"hot-buttons" are pushed. You are inclusive. You encourage all participants to share
their experiences and contribute to the group learning
process. You are lively, enthusiastic, and original. You use humor,
contrasts, metaphors, and suspense. You keep your listeners
interested and challenge their thinking. You use a variety of vocal qualities. You vary your pitch,
speaking rate, and volume. You avoid monotones. You use your body well. Your body posture, gestures, and
facial expressions are natural and meaningful, reinforcing your
subject matter. You make your remarks clear and easy to remember. You present
one idea at a time and show relationships between ideas. You
summarize when necessary. You enhance with illustrations. You use examples, charts,
visuals, and audio aids to illustrate your subject matter. You understand group dynamics, and the stages all groups go
through.You are comfortable with conflict resolution. You are flexible. You read and interpret your participants'
responses-verbal and nonverbal-and adapt your plans to meet their
needs.You are in charge without being overly controlling. You are open to new ideas and perspectives. You are aware that
you don't know all the answers. You recognize that you can learn
from participants as well as offer them new knowledge or
perspectives. You are compassionate. You understand that much of the
material may have an emotional impact on the participants. You are
empathetic and understanding about participants' emotional
reactions. You are interested in evaluating your work. You encourage
co-trainers and participants to give feedback.
Think about one or two steps you can take to improve your skills
as a trainer.
This worksheet will help you conduct a needs assessment
for each training you are planning.
What information do you need in order to design an effective
training? (Logistics, content, format, etc.)
What do participants already know about the topic?
What experiences or insights related to the topic do participants
already possess?
What do participants believe are the challenges or barriers
related to the issue? (For example, why do they think people do not
avail themselves of colorectal screening services?)
What do participants hope to gain from the training? (This
includes new knowledge, skills, resources, etc.)
What do participants desire regarding the logistics of the
training?
Which is the most effective assessment strategy for your
audience?
E-mail survey Fax-back survey Mail survey Telephone survey In-person interview Focus group
This worksheet will help you prepare your plan, goals, and
objectives for each training you are planning.
Who are your participants?
What is their educational level?
What is their experience and skill level?
What gender and age are they?
Are they employed?
What kind of work do they do?
Do they work together?
What is their literacy level?
How many will there be? (approximately)
When will you conduct the training?
What day of the week?
What time of day?
What time of the year?
How long will the session be?
What will be the length of the entire program?
How much time is there for recruitment?
Where will you conduct the training?
What is needed?
What size room is needed?
What equipment is available?
What other supplies are needed?
Location
Is the location accessible?
Is the location easy to find?
Can it be reached by public transportation?
Is there safe parking?
Is it handicap accessible?
Is it a place that does not have negative connotations
forintended participants? (e.g., some places are associated with
poor service or indigent care which may make some participants
uncomfortable)
What will the training involve?
What will be the content of the training plan?
What training tools will be needed?
What participant materials and resources will be needed?
Will there be advance work for participants?
What is the purpose of the training?
What changes in knowledge, attitudes, behaviors, and skills
are you hoping to accomplish through the training?
What are the goals and objectives of the training?
How will you do it?
How will you enroll people for the training? (Some possible
recruitment strategies include flyers, PSAs on TV and radio, ads
in newspapers and newsletters, and word of mouth.)
How will you engage participants?
How will you get feedback or evaluate the effectiveness of
your training?
|
Time and
materials
|
Task
|
Trainer
instructions
|
|
f
i
l
l
e
r
|
2f
i
l
l
e
r
|
f
i
l
l
e
r
|
This worksheet will help you plan a training.
Goal:
|
spacer
|
Objectives
"At the end of the workshop participants should be able
to…"
|
What content is needed to meet the objectives
|
What strategies are needed to deliver the content (list 1
strategy) and regulate the energy flow
(icebreakers,energizers)
|
How much time should be allotted each strategy
|
|
|
|
|
|
|
|
|
Worksheet for your training:
|
|
f
i
l
l
espacer
r
|
f
i
l
l
e
r
filler
|
f
i
l
l
e
r
|
f
i
l
l
e
r
|
f
i
l
l
e
r
|
The goal for my training is____.
The changes I want to see as a result of my training
are____.
Increase in knowledge____.
Newly acquired skills____.
Changed attitudes (e.g., more compassionate, etc.)____.
Increased proficiency in existing skills____.
Based on the above, the most appropriate objectives for my
training are____.
|