Featured Mac Basics Tutorials
Feedback
Dear Customer:
Thank you for your feedback regarding Find Out How. We cannot respond to you personally, but please know that your message has been received and will be reviewed by the Find Out How Feedback Team. If we need to follow up with you on your ideas for improving Find Out How, we will contact you directly.
We appreciate your assistance in making Find Out How better.
Find Out How Team
Apple
Browse all video tutorials
Get Started with Mac
-
Anatomy of a Mac
src="http://images.apple.com/findouthow/images/qt_endstate.jpg"
-
Move to Mac
src="http://images.apple.com/findouthow/images/qt_endstate.jpg"
-
Windows on a Mac
src="http://images.apple.com/findouthow/images/qt_endstate.jpg"
-
PC to Mac: The Basics
src="http://images.apple.com/findouthow/images/qt_endstate.jpg"
-
Finder Basics
src="http://images.apple.com/findouthow/images/qt_endstate.jpg"
-
The Finder: Doing More with the Sidebar
src="http://images.apple.com/findouthow/images/qt_endstate.jpg"
Wireless
-
Wireless Basics
src="http://images.apple.com/findouthow/images/qt_endstate.jpg"
-
Setting Up Your Wireless Network
src="http://images.apple.com/findouthow/images/qt_endstate.jpg"
-
Wireless Printing, Backup, and More
src="http://images.apple.com/findouthow/images/qt_endstate.jpg"
-
Streaming Music Wirelessly
src="http://images.apple.com/findouthow/images/qt_endstate.jpg"
Going Further with Leopard
-
Parental Controls
src="http://images.apple.com/findouthow/images/qt_endstate.jpg"
-
Time Machine Basics
src="http://images.apple.com/findouthow/images/qt_endstate.jpg"
Browse all text tutorials
Customizing Your Mac
-
Customize Your Mighty Mouse
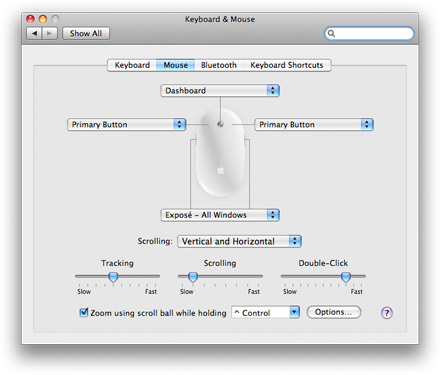
Customize Your Mighty Mouse
Whether you’re using a wired or wireless Mighty Mouse, you can customize it easily:
- Choose System Preferences from the Apple menu.
- Click Keyboard & Mouse; then click the Mouse tab.
You can program the four buttons on your Mighty Mouse, set scrolling options, and set response sensitivities for tracking, scrolling, and double-clicking.
-
Customize Your Mac with a Screen Saver
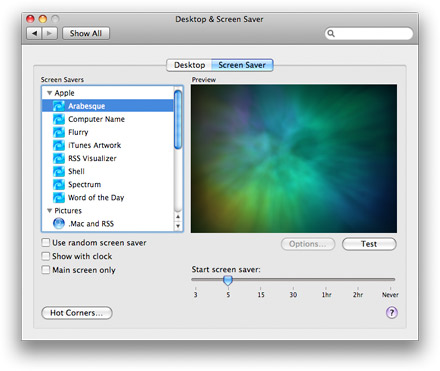
Customize Your Mac with a Screen Saver
Screen savers offer a great way to customize — and enjoy — your Mac. You have a variety of screen savers to choose from:
- Choose System Preferences from the Apple menu.
- Click Desktop & Screen Saver; then click the Screen Saver tab.
The column on the left lists the possibilities. You can also tell Mac OS X to generate a screen saver automatically based on the album art in your iTunes library or the photos in your iPhoto or Aperture photo libraries.
Simply click any of the available options to choose a screen saver. You can try it by clicking Test below the Preview screen.
-
See Your Way Clear with Exposé
See Your Way Clear with Exposé
Mac OS X offers a simple way to see what's on your desktop when you have a lot of windows open. It’s called Exposé, and here’s how you can use it.
Press the F9 key and Exposé instantly creates thumbnails of the open windows and displays them neatly on your screen. Click the window you want, and Exposé brings it to the front, switching automatically to the appropriate application.
You can press the F10 key to create thumbnails of the open windows of your current application. Or F11 to move all open windows to the side, so you can see the files on your desktop.
-
Open Applications Automatically on Startup
Open Applications Automatically on Startup
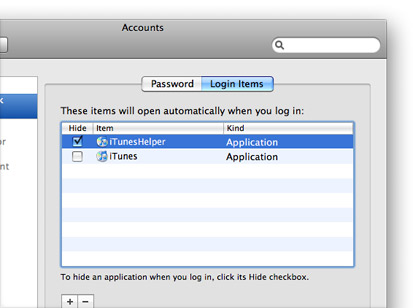
If you frequently listen to music, surf the web, get your email, or chat with friends, you may want your computer to open those applications every time you start up. On a Mac, it’s simple to do. Select System Preferences from the Apple menu, then:
- Click Accounts (in the System row of the System Preferences window).
- Click the Login Items tab.
- Click the Add (+) button.
- Scroll down and click Applications
- Select iTunes and click the Add button.
The next time you start up your Mac, iTunes will start up, too. In addition to opening applications at Start Up, you can have Mac OS X open documents.
-
Quickly Switch Between Applications
Quickly Switch Between Applications
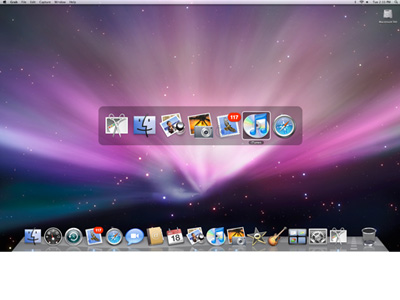
The Mac makes it easy to have multiple applications — Mail, Safari, iTunes, Pages, iChat, iPhoto, and others — open at the same time. So how do you quickly switch from Safari, let’s say, to Mail?
Just hold down the Command key and press the Tab key (Command-Tab). Mac OS X immediately displays a mini-Dock with icons for each of your open applications. At the left side of the mini-Dock, you’ll see the icon for your current application. Next to it (and highlighted), you’ll find the icon for the application you last used. Each time you press the Tab key (without releasing the Command key), you can cycle through your open applications.
One more tip: You can also use the Left Arrow and Right Arrow keys to navigate your open applications.
-
Get Dictionary Definitions in One Click
Get Dictionary Definitions in One Click
You’re using Safari to research a paper on climate change and you find the phrase “anthropogenic greenhouse gas concentrations.” What exactly does “anthropogenic” mean?
Here’s a fast way to get the definition of a word you’re not familiar with.
- Hover your Mighty Mouse over the word and right-click.
- Choose Look Up in Dictionary from the menu that appears.
- Mac OS X immediately opens Dictionary and finds the meaning of “anthropogenic” for you.
Stored in the Applications folder, Dictionary works with all Mac OS X applications.
-
Go Home
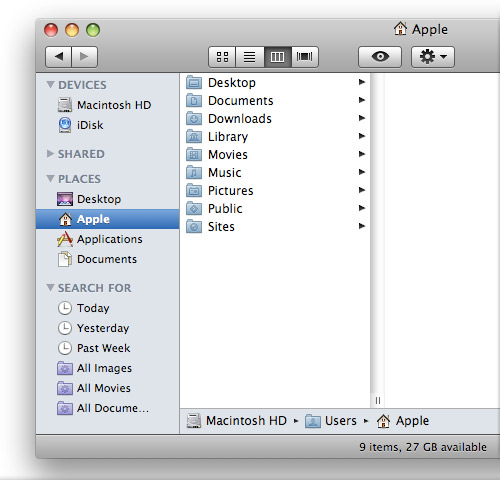
Go Home
Whether you share a Mac with others or have one all to yourself, you can find all your personal data &mdash documents, downloads, music, and more &mdash in the home folder Mac OS X created for you when you set up your Mac (or when someone created an account for you).
You can spot your home folder easily: It’s the one with the icon of a house and your account name. And if you place it in the Dock, you can open it quickly without having to open any folders. Here’s how:
- In the Finder, click the icon for your hard drive. (Unless you’ve renamed it, it’s probably called Macintosh HD.)
- Open the Users folder.
- Then drag your home folder from the Users folder into the Dock and release the mouse button.
Now, whenever you need anything in your home folder, you can access it quickly from the Dock.
-
Back Up Your Music, Photos, and Documents
Back Up Your Music, Photos, and Documents
Time Machine is the fabulous backup application that’s part of Mac OS X Leopard. To use Time Machine, simply connect an external hard drive to your computer. The first time you connect it to your Mac, Leopard displays a dialog asking if you’d like to use it as your backup location. If the dialog doesn’t appear, don’t worry:
- Choose System Preferences from the Apple menu.
- Click the Time Machine icon.
- Click Choose Backup Disk.
Time Machine toggles on, changes the image for your backup disk, and indicates when the next (in this case, the first) backup will occur). For best results, you should use a drive that’s at least as large as your Mac startup drive. (If your internal hard drive can hold up to 250GB of data, your Time Machine volume should hold at least 250GB.) And it’s a good idea not to store any other data on your Time Machine drive. That way, you maximize the amount of space you have to backup your files.
-
Quickly Activate Your Screen Saver
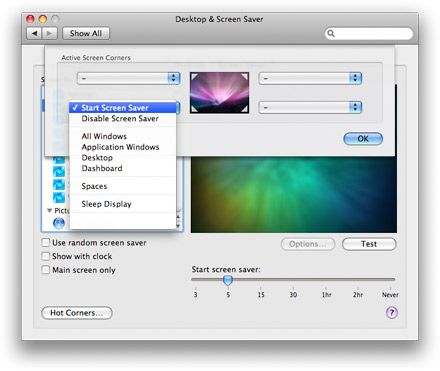
Quickly Activate Your Screen Saver
By designating a Hot Corner, you can have your screen saver start whenever you move the mouse into that corner. Here’s how:
- Choose System Preferences from the Apple menu.
- Click Desktop & Screen Saver and click the Screen Saver tab.
- Choose one Screen Saver option and click the Hot Corners button.
- Use the pull-down menus to indicate the corner you’d like to use to activate your screen saver.
-
Take a Quick Look
Take a Quick Look
How do you quickly find a photo without opening them one at a time?
Let Quick Look help you. A new feature in Leopard, Quick Look lets you browse files — photos, Pages documents, Keynote presentations, QuickTime movies, Microsoft Word and Excel files — without having to open an application. Here’s how:
- In the Finder, open the folder that contains the item you hope to find.
- Select a photo; then click the Quick Look button in the folder’s toolbar (or press Command-Y).
Leopard instantly opens a Quick Look window with the photo you selected.
Not the photo you were looking for? Just click another. Quick Look keeps the preview window open, letting you click photos until you find the one you want.
-
Capture Screen Shots
Capture Screen Shots
In Mac OS X, you can use simple keyboard shortcuts to do all sorts of things, including capturing images of what’s on your Mac screen. For example, you can take a screen shot of your entire screen by holding down the Command and Shift keys and pressing a 3.
If you hold down the Command and Shift keys and press 4, Mac OS X turns the cursor into crosshairs you can use to select whatever portion of your display you’d like to capture in a screen shot.
If you immediately hit the Spacebar after typing Command-Shift-4, Mac OS X replaces those crosshairs with a little a camera. Using the camera, you can take a screen shot of the Dock, the entire menu bar, a single open menu, the desktop, or any open window.


Using the Dock
-
Change the Position of the Dock
Change the Position of the Dock

Mac OS X lets you customize the Dock in a number of ways.
If you choose Dock from the Apple menu and select Dock Preferences, a dialog will open giving you access to all of the Dock customization options.
Use them to:
- change the size of the Dock
- turn Magnification On (or Off) by clicking the check box and, if On, the degree of Magnification
- indicate where you’d like the Dock to appear
- select the effect (Genie or Scale) used to minimize a window
- check the Animate box, which makes the icon for an application bounce when you open it
- check the box to have Mac OS X hide the Dock when it’s not being used
-
Add an Application to the Dock
Add an Application to the Dock
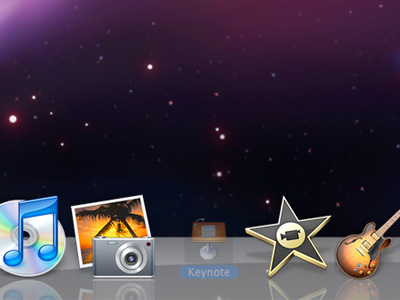
If you enjoy the convenience of the Dock, you can make it even more useful by adding items to it you use regularly. Here, for example, you’ll find two ways to add one or more applications to your Dock.
Let’s say you’re currently using Keynote ’08, your favorite presentation software, and would like to keep it in the Dock at all times. Right-click on its icon in the Dock, and select Keep in Dock from the contextual menu that appears.
Or try this option. Open the Applications folder, grab Text Edit, and drag it to the Dock. Next time you want to use Text Edit, just click its icon in the Dock.
You can use this method to add multiple applications just as easily. In that open Applications folder, choose Calculator and Dictionary, two handy utilities, and drag both into the Dock.
-
Remove an Application from the Dock
Remove an Application from the Dock
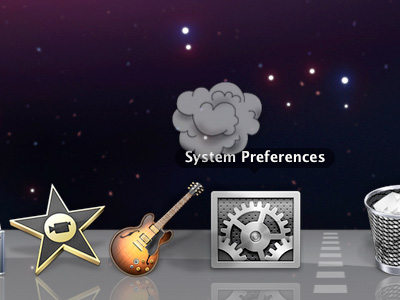
If you’d like to reduce the number of applications from the Dock, you can do so at any time. Simply grab the icon of the document, folder, or application you’d like to remove, and drag it out of the Dock. Release the mouse button, and the item will vanish in a puff of virtual smoke.
Using Mail
-
Email a PDF
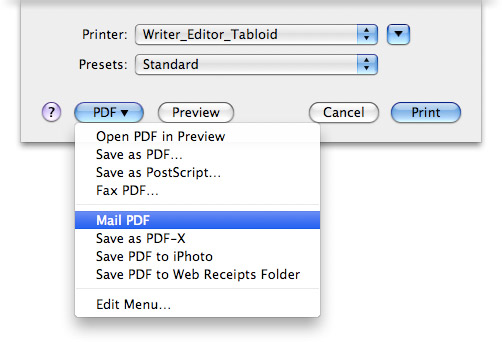
Email a PDF
“Send me a pdf pdq,” your headhunter tells you. And you smile. Because you know that, thanks to Mac OS X, you can create and dispatch a PDF in seconds. Here’s how:
- Choose Print from the File menu.
- Click the drop-down PDF menu and choose Mail PDF.
- Enter a subject, an email address, and click Send.
What applications let you do this? All of them. Creating PDFs — and emailing them — is a feature built into Mac OS X, so whether you’re surfing the web in Safari, writing a business plan in Pages, honing a budget in Numbers, working on a presentation in Keynote, or updating your resume, you can create a PDF and email it quickly and easily.
-
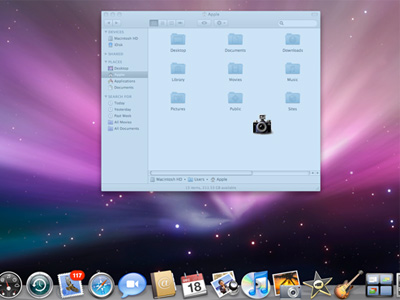
Quickly Email a Photo
Quickly Email a Photo
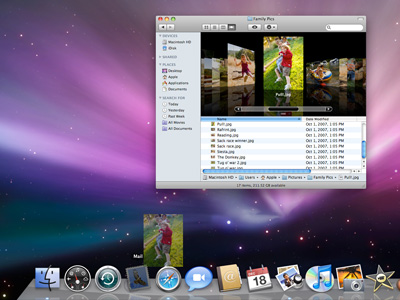
You can quickly email a photo to one or more friends or colleagues by grabbing the photo with your mouse, dragging it to the Dock, and dropping it on the icon of the Mail application.
Mac OS X will immediately open Mail (if it’s not already open) and create a new Mail message with your photo already enclosed. You simply have to add recipients and click Send. If you select multiple photos, Mac OS X will put them all into a single mail file.
-
Add an RSS Feed to Mail
Add an RSS Feed to Mail
In Leopard — the best version of Mac OS X ever — the versatile Mail program offers a great new feature. Its built-in RSS support lets you read the RSS feeds you subscribe to. That means you can use the same application to read both your mail and your favorite RSS feeds.
Let’s say you visit the Apple Hot News page all the time and would like to be notified when new Hot News articles appear. To do so,
- Launch Safari and go to the Hot News page.
- Click the RSS icon in the Address Bar and the browser window will change to display Hot News as a series of single-line RSS feeds.
- Click the + button at the top of the page as if you were going to create a bookmark for this page.
- In the sheet that drops down, click the checkbox next to Mail; then click the Add button.
- In the Mailboxes sidebar, Mail automatically creates a new folder to hold all your RSS feeds and puts Apple Hot News to the new folder.
To browse the feeds, simply click on Apple Hot News and Mail displays the headlines of all the articles in the Message pane. Click any of the headlines to have the Hot News article displayed in full. To visit the source of the Hot News article, click the Read more link, and Mail will open (or switch to) Safari and display the page.
-
Email a Web Link Instantly
Email a Web Link Instantly
Have you ever found a web page that you can’t wait to share with a friend or colleague? Leopard offers a great way to share such web links. Here’s how:
- In Safari’s address bar, select the URL for the page you’re browsing.
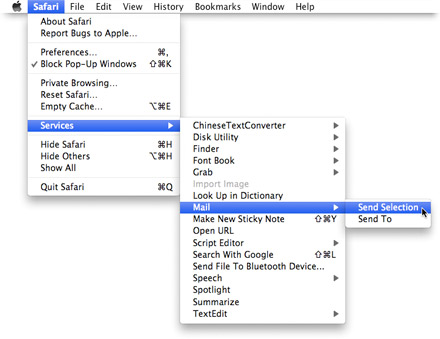
- Pull down the Safari menu.
- Highlight the Services option and select, first, Mail and then Send Selection from the hierarchical menus that pop up.
Mac OS X Leopard automatically starts Mail (if the application’s not already open), creates a new email message, and places the selected web link in the body of the email document. All you have to do is enter the email addresses of your recipients, add a subject, and include a note about the web link.
Using Address Book
-
Fill Out Forms Quickly

Fill Out Forms Quickly
Enter it once. Use it practically everywhere. One of the brightest gems in Mac OS X, Address Book integrates with Safari, Mail, iChat, iCal, and other applications. And it syncs effortlessly with iPhone, iPod, and .Mac — so you can take contacts wherever you go.
Because it integrates with Safari, you can use it to fill in forms when you’re shopping online. Here’s how:
- Open Safari and choose Preferences from the Safari menu.
- In the Preferences dialog, click the AutoFill tab and click the checkbox next to Using info from my Address Book card.
- Click the Edit button to view, and if you’d like, modify any of the information on your Address Book “My Card”.
Next time you shop online, Safari will retrieve the information it needs from Address Book.
-
Automatically Add Email Addresses in Mail
Automatically Add Email Addresses in Mail
When you’re reading messages in Mail, you can automatically add someone’s email address to Address Book simply by typing Command-Shift-Y. And once you create a group address in Address Book, you can add all of the group members simply by type the group name in the To (or cc) field in Mail. Here’s how:
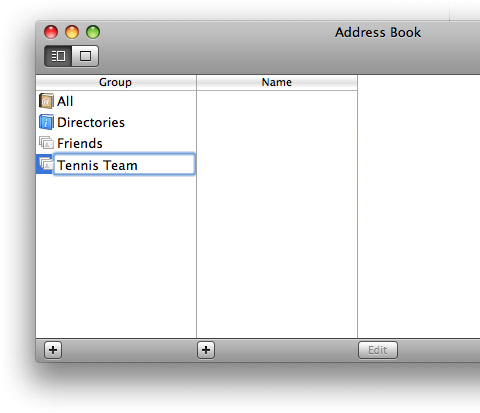
- Go to Address, click the + sign below the Group column, and give your new group a name — “Tennis Team,” for example.
- Click “All” at the top of the Group column (so the name of everyone in your Address Book appears) and drag the names of everyone on the tennis team into the new Tennis Team group.
And you’re done. The next time you want to send email to the team, you won’t have to enter each name one at a time. Just start typing “Tennis Team” and let Mail fetch and fill in all the email addresses for you.
-
Create a Birthdays Calendar
Create a Birthdays Calendar
Thanks to Address Book, you’ll never forget a birthday again. That’s because iCal will create a Birthdays calendar for you, so you’ll have plenty of time to pick up a card or present. First you need to add a birthday field to Address Book. Here’s how:
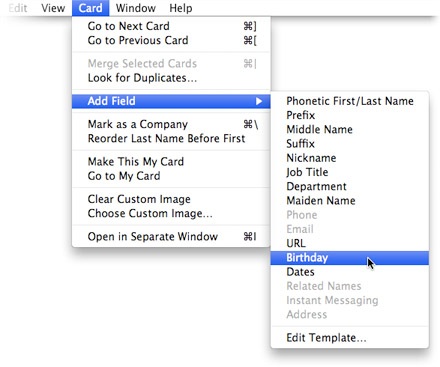
- Open Address Book and go to a contact to which you’d like to add a birthday.
- Pull down the Card menu and choose Birthday from the Add Field option.
The birthdays you add in Address Book automatically appear in iCal if you:
- Open iCal.
- Choose Preferences from the iCal menu.
- Click the checkbox next to Show Birthdays calendar (under the General tab).
Using Safari
-
Block Internet Ads
Block Internet Ads
Tired of seeing pop-ads when you visit websites? You can eliminate the vast majority of them quickly and easily in Safari. Here’s how:
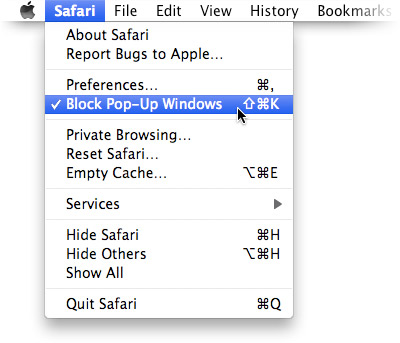
- Open Safari.
- Choose Block Pop-Up Windows from the Safari menu
Wasn’t that easy?
-
Create Your Own Dashboard Widget
Create Your Own Dashboard Widget
Thanks to Mac OS X Leopard, you can make your own custom Dashboard widget. In seconds. They’re called Web Clip widgets, and they’re easy to create. Let’s say you’d like to keep tabs on the “Videos being watched right now” section on You Tube. Here’s how:
- In Safari, visit You Tube at www.youtube.com. (You may already see a link for it in Safari’s Bookmark Bar.)
- Click the Web Clip button in the Safari toolbar.
- Position the clear box that appears over the Videos being watched right now section, click once to place it, then resize the box using the handles that appear along the sides of the box.
- When it’s the size you want, click the Add button.
And your part’s done. Mac OS X Leopard does the rest, creating your widget and opening Dashboard, so you can check your handiwork. Since your new Web Clip is live, its contents will update automatically. Click the little information button in the lower, right-hand corner to customize your widget’s border.
One more thing. Click a video (or a link on a featured story), and Mac OS X Leopard closes Dashboard, launches Safari, and takes you to the page whose link you clicked.
-
Create a Bookmark
Create a Bookmark
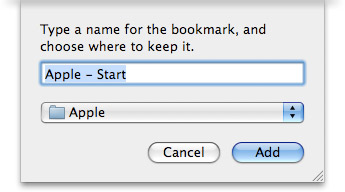
You Tube, the Onion, Apple Hot News, your bank, your local Craigs List, Wikipedia — if you visit the same websites on a regular basis, you can save yourself some time and keystrokes by creating bookmarks for those sites. Let’s say you keep up with environmental news with regular visits to grist.org. The easiest way to create a bookmark is to:
- Go to the site for which you’d like to create a bookmark.
- Click the + sign in the Safari toolbar.
- In the Sheet that drops down, type “grist” (or whatever name you’d like to use for the site), choose the folder — “News,” for example — where you’d like to keep it, and click the Add button.
And you’re done. Next time you want to catch up on environmental news, instead of typing the name of the site, simply click the News folder (found in the Bookmarks bar of most Macs), and choose grist from the menu that appears.
-
Open a Web Page from the Dock
Open a Web Page from the Dock
You can fill your Dock with applications, documents, folders, and stacks. In fact, you can even add bookmarks for web pages to your Dock. Let’s say you like to keep track of the latest news about Apple. If you add the Hot News site to your Dock, you can visit it whenever you’d like with a single click. Here’s how:
- Go to the Apple Hot News page.
- Drag the little Apple icon just to the left of the URL in the Address bar to your Dock.
Mac OS X creates a locator icon with the name of your website. To visit the site, just click the icon. Safari launches and takes you immediately to Hot News.
Want to add another? Since you like learning more about the Mac, let’s add the Find Out How page to your Dock, as well. To do so,
- Visit Find Out How.
- Drag the little Apple icon just to the left of the URL in the Address bar to your Dock.
Now, when you want to learn more about using your Mac, you can Find Out How right from the Dock.
Using iCal
-
Share an iCal Schedule
Share an iCal Schedule
With your busy schedule, you depend on iCal to make certain you know when the kids need to be at the dentist and when you’re supposed to be in Philadelphia for the sales conference. Since this information may be just as valuable to your spouse, it would be helpful to share your calendar, and iCal offers a simple way to do so.
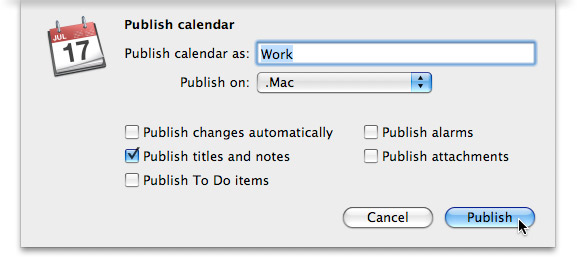
- Select the calendar you want to share.
- From the Calendar menu, choose Publish and fill out the form in the sheet that appears.
- Click Publish. iCal displays the URLs where you can view your schedule online and lets you either visit the page or send email to those with whom you’d like to share your calendar.
-
Subscribe to an iCal Calendar
Subscribe to an iCal Calendar
You can create calendars in iCal to keep track of all sorts of activities — all your meetings at work, your spouse’s meetings, after-school activities for the kids, family birthdays.
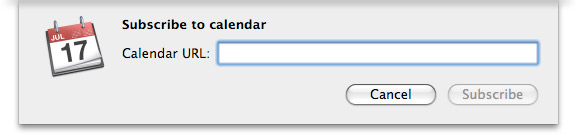
You can even use iCal to subscribe to calendars published on the Internet. Let’s say your kids’ soccer league publishes the practice and match schedules on the league’s .Mac site. To subscribe, simply
- In iCal, choose Calendar from the Subscribe menu.
- Type the URL for the .Mac website where the schedule is published.
- Check the “Refresh” checkbox to have iCal automatically update your copy of the calendar when the league publishes updates.
- Click the Subscribe button.
And you’re done. iCal adds the schedule to your Calendars list and places a curved arrow next to it. Double-click the name if you’d like to change it, but you can’t make any other changes to a calendar you’re subscribing to.
Using iChat
-
Add a Buddy to iChat
Add a Buddy to iChat
An extremely versatile application, iChat lets you participate in simple text chats, audio chats, or video chats with one or a group of people with Internet access and a MobileMe, AIM, Google Talk, or Jabber account. To get started, you first need to set up iChat on your system by clicking the icon for iChat in the Dock and responding to the questions in the dialogs that appear.
To add a buddy to your Buddy List in iChat:
- Choose Add Buddy from the Buddies menu (or click the + sign at the bottom of the Buddy List window).
- Type the name of your friend’s account name in the Account Name field and select the type of account from the pop-up menu.
- Choose the group to which you’d like to add your new buddy, type your buddy’s first and last names in the appropriate fields, and click the Add button.
That’s it. You’ve added your first buddy. If your bud’s online, you’ll see a status indicator next to his or her name, and you can start a chat with a quick doubleclick on your buddy’s name.
-
Create a Buddy Icon with Photo Booth
Create a Buddy Icon with Photo Booth
If you’re using a Mac with a built-in iSight camera, use the built-in iSight camera to take a single snapshot of yourself, a 4-up snapshot (that’s four quick shots in a row), or a movie clip.
- Open the Applications folder and double click on Photo Booth.
- Choose the type of snapshot you’d like to take by clicking the appropriate button on the left just below the live video window.
- Then pose nicely, smile, and click the Camera button.
Photo Booth places thumbnails in the drawer at the bottom of the window.
Ready to set your iChat buddy icon?
- In the thumbnail drawer at the bottom of the window, select the photo you’d like to use.
- Click the Buddy Picture icon.
Photo Booth copies the image, quickly opens iChat, and displays the photo in the Buddy Picture window. Use the slider to resize it if you’d like. Click Set, and you’re done.