Featured Tutorials
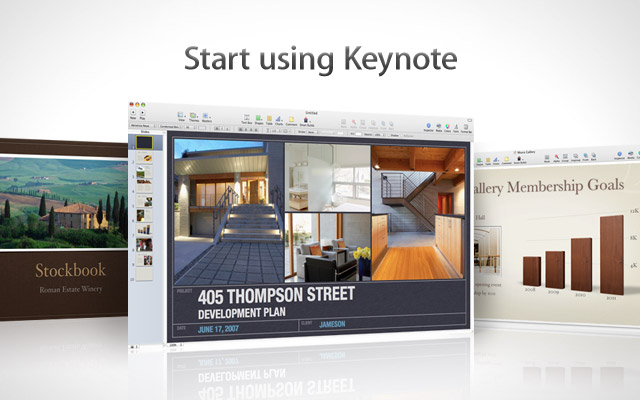
 Start Using Keynote Keynote ’08 2:04 Now Playing
 Formatting a Document Pages ’08 1:37 Now Playing
 Formatting Text Pages ’08 1:56 Now Playing
 Creating a Table of Contents Pages ’08 1:11 Now Playing
 Adding Photos, Movies and Audio Keynote ’08 2:01 Now Playing
 Starting a New Spreadsheet Numbers ’08 1:30 Now Playing
Feedback
Dear Customer:
Thank you for your feedback regarding Find Out How. We cannot respond to you personally, but please know that your message has been received and will be reviewed by the Find Out How Feedback Team. If we need to follow up with you on your ideas for improving Find Out How, we will contact you directly.
We appreciate your assistance in making Find Out How better.
Find Out How Team
Apple
Browse all video tutorials
Pages ’08
Creating Word Processing Documents
-
Working with Word Processing Documents
src="http://images.apple.com/findouthow/images/qt_endstate.jpg"
-
Formatting Text
src="http://images.apple.com/findouthow/images/qt_endstate.jpg"
-
Creating Section, Layout, and Page Breaks
src="http://images.apple.com/findouthow/images/qt_endstate.jpg"
-
Formatting a Document
src="http://images.apple.com/findouthow/images/qt_endstate.jpg"
Documents
Pages ’08 offers an intuitive way to create beautiful, media-rich documents using tools you’ll know how to use right away.
-
Creating a Table of Contents
src="http://images.apple.com/findouthow/images/qt_endstate.jpg"


Enhance Your Content
-
Tracking Changes in Your Document
src="http://images.apple.com/findouthow/images/qt_endstate.jpg"
-
Using Address Book Merge
src="http://images.apple.com/findouthow/images/qt_endstate.jpg"
Working with Graphics and Media
-
Adding Media
src="http://images.apple.com/findouthow/images/qt_endstate.jpg"
-
Adding Tables and Charts
src="http://images.apple.com/findouthow/images/qt_endstate.jpg"
Creating Page Layout Documents
-
Working with Page Layout
src="http://images.apple.com/findouthow/images/qt_endstate.jpg"
-
Controlling Text Flow
src="http://images.apple.com/findouthow/images/qt_endstate.jpg"
-
Wrapping Text Around Objects
src="http://images.apple.com/findouthow/images/qt_endstate.jpg"
Sharing Your Documents
Keynote ’08
Creating Presentations
-
Start using Keynote
src="http://images.apple.com/findouthow/images/qt_endstate.jpg"
Presentations
The new features in Keynote ’08 make it easier than ever to amaze your audience with cinema-quality presentations.
-
Organizing Your Slides
src="http://images.apple.com/findouthow/images/qt_endstate.jpg"
-
Adding Photos, Movies and Audio
src="http://images.apple.com/findouthow/images/qt_endstate.jpg"


Making Your Presentation Look Great
-
Creating Shapes and Masking Images
src="http://images.apple.com/findouthow/images/qt_endstate.jpg"
-
Removing Unwanted Backgrounds from Photos
src="http://images.apple.com/findouthow/images/qt_endstate.jpg"
-
Applying Image Effects
src="http://images.apple.com/findouthow/images/qt_endstate.jpg"
Adding Cinema-quality Animation
-
A to B Animations
src="http://images.apple.com/findouthow/images/qt_endstate.jpg"
-
Using Smart Builds
src="http://images.apple.com/findouthow/images/qt_endstate.jpg"
Delivering Your Presentation
-
Using Presenter Notes
src="http://images.apple.com/findouthow/images/qt_endstate.jpg"
-
Adding Voiceover to Record a Slideshow
src="http://images.apple.com/findouthow/images/qt_endstate.jpg"
-
Creating Interactive Slideshows
src="http://images.apple.com/findouthow/images/qt_endstate.jpg"
-
Printing Presentations
src="http://images.apple.com/findouthow/images/qt_endstate.jpg"
Numbers ’08
Creating Spreadsheets
-
Starting a New Spreadsheet
src="http://images.apple.com/findouthow/images/qt_endstate.jpg"
Spreadsheets
Innovative, powerful and intuitive, Numbers ’08 is the easiest way to make functional and great-looking spreadsheets.
-
Working with Cells
src="http://images.apple.com/findouthow/images/qt_endstate.jpg"
-
Using Formulas and Functions
src="http://images.apple.com/findouthow/images/qt_endstate.jpg"
-
Adding Charts
src="http://images.apple.com/findouthow/images/qt_endstate.jpg"


Organizing Your Spreadsheets into Tables
-
Adding Tables to Your Spreadsheet
src="http://images.apple.com/findouthow/images/qt_endstate.jpg"
-
Customizing Tables
src="http://images.apple.com/findouthow/images/qt_endstate.jpg"
-
Adding Address Book Contacts
src="http://images.apple.com/findouthow/images/qt_endstate.jpg"
Analyzing Your Data
-
Sorting Filtering Information
src="http://images.apple.com/findouthow/images/qt_endstate.jpg"
-
Using Checkboxes and Sliders
src="http://images.apple.com/findouthow/images/qt_endstate.jpg"
Making Your Spreadsheet Look Great
-
Adding Text and Shapes
src="http://images.apple.com/findouthow/images/qt_endstate.jpg"
-
Adding Images, Movies and Sound
src="http://images.apple.com/findouthow/images/qt_endstate.jpg"
-
Using Table Styles
src="http://images.apple.com/findouthow/images/qt_endstate.jpg"
Printing and Sharing Your Spreadsheets
-
Printing Spreadsheets
src="http://images.apple.com/findouthow/images/qt_endstate.jpg"
Browse all text tutorials
Pages ’08
-
Setting Margins
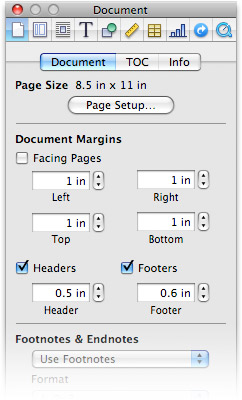
Setting Margins
Inspector windows provide almost complete control over the way your Pages ’08 documents look. This includes such basic formatting as the margins, which you can set or change at any time.
To set document margins:
- Click the Inspector button in the toolbar to display an Inspector window. (If you already have an Inspector window open, clicking the Inspector button will hide it.)
- Click the Document Inspector button in the upper-left corner of the Inspector window.
- In the Document Margins section of the Document Inspector, use the Left, Right, Top, and Bottom fields to set up or change the margins for all the pages in your document.
-
Accessing Document Statistics
Accessing Document Statistics
Pages ’08 provides detailed statistical information about the documents you’re writing.
To access document statistics:
- Click the Inspector button in the toolbar to display an Inspector window (if one isn’t already open).
- Click the Document Inspector button in the upper-left corner of the Inspector window.
- Click the Info button to reveal the Info pane.
In the middle section of the pane, Pages indicates the number of words, pages, lines, paragraphs, sections, graphics, and characters in your document.
Although earlier versions of the application provided statistics for the entire document only, Pages ’08 also lets you get statistics for sections of a document.
To obtain stastics for a section of your document:
- Select a range of text for which you’d like such statistical data as a word or character count.
- Click the Inspector button in the toolbar to display an Inspector window.
- Click the Info button in the Document Inspector. Pages ’08 displays statistics for the words, pages, lines, paragraphs, sections, graphics, and characters in the selected text.
-
Adding Comments to a Document
Adding Comments to a Document
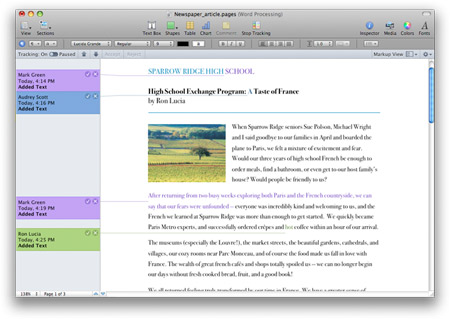
Comments offer an effective way to include margin notes, questions, opinions, and suggested changes or corrections. And they’re very easy to add in Pages ’08.
To add a comment:
- Click the paragraph (or select the text) to which you’d like to add a comment.
- Click Comment in the toolbar (or choose Comment from the Insert menu).
Pages opens the Comments pane and creates a new yellow comment bubble. To help you (and your collaborators) know who inserted the comment and when, Pages adds your name and includes date and time stamps. Pages also draws a line from the comment bubble to the text to which it refers, making it easier for reviewers to find associated copy.
- Add your comment in the yellow comment bubble, and you’re done.
-
Exporting Pages ’08 Documents in Microsoft Word Format
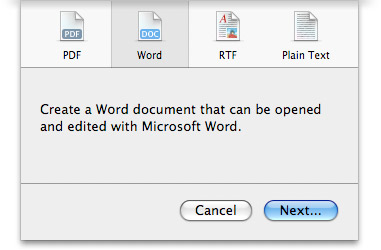
Exporting Pages ’08 Documents in Microsoft Word Format
It’s easy to export the documents you create in Pages, so that colleagues using Microsoft Word on a Mac or Windows can read, review, or edit them.
To export a Pages ’08 document as a Microsoft Word file:
- Choose Export from the File menu.
- Click the Word icon in the resulting dialog; then click Next.
- Name the Word document, indicate where you want it saved, and click Export.
And you’re done. Friends or colleagues can open your document using Microsoft Word on a Mac or PC, and Word will preserve virtually all of the formatting, tables, graphics, footnotes, and other elements you’ve included.
-
Adding Photos to a Document
Adding Photos to a Document
With Pages ’08, it’s easy to add photos to a document. In fact, many Pages templates already have placeholder images in them.
To add a photo to a template you’ve opened:
- Click the Media button in the toolbar to reveal the Media Browser. Then click the Photos button to display the contents of your iPhoto library.
- Click an album or event to display all the photos in that album or event.
- Drag the photo on top of a placeholder image.
Working on a Pages document that doesn’t have image placeholders? Not to worry, you can add photos to any Pages document just as easily.
To add a photo to a document without placeholder images:
- Click the Media button in the Toolbar to have Pages open the Media Browser.
- Click an album or event to display all the photos in that album or event.
- Drag the photo from the Media Browser to your document and release the mouse button.
If the photo you added is not perfectly positioned, you can grab it and drag it to the location you’d like it to appear. In fact, Pages displays x and y coordinates that allow you to place it precisely.
Numbers ’08
-
Adding a Footer Row to a Table
Adding a Footer Row to a Table
In Numbers, you can call attention to data you want to emphasize by adding a footer row to your table. In fact, Numbers offers numerous ways to do so.
To add a footer row:
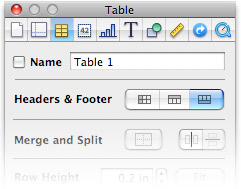
- Click the Footer button in the Format Bar. Or,
- Click the Inspector button. Then in the Inspector window, click the Footer button in the Headers & Footer section. Or,
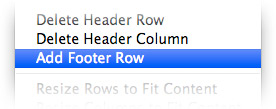
- Choose Add Footer Row from the Table menu.
-
Exporting a Numbers ’08 Document as a Microsoft Excel File
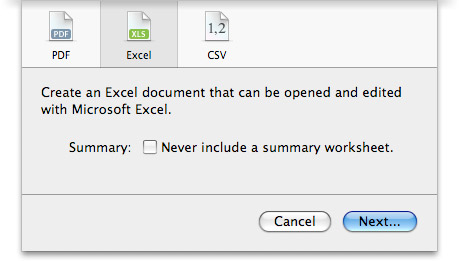
Exporting a Numbers ’08 Document as a Microsoft Excel File
It’s easy to share a document you create in Numbers with friends or colleagues using Microsoft Excel on a Mac or PC.
To export a Numbers ’08 document as a Microsoft Excel file:
- Choose Export from the File menu.
- Click the Excel icon in the resulting dialog; then click Next.
- Name the Excel document, indicate where you want it saved, and click Export.
Numbers converts each table into a separate worksheet in a single Excel spreadsheet and generates a summary worksheet outlining the worksheets into which each table was placed. It also alerts you — with a Document Warning dialog — of any potential conversion errors, but these are usually minor. You should check formulas, however, as some Excel formula calculations may differ from those in Numbers.
-
Using Autofill to Create Chronological or Numerical Series
Using Autofill to Create Chronological or Numerical Series
Instead of typing each month in successive cells, you can use Autofill to quickly add the months of the year to a Numbers table.
To add months using Autofill:
- Select a cell, type “January,” and press Enter.
- Select the cell again and change the formatting — font, font style, size, and alignment — using the controls in the toolbar.
- Now grab the Fill handle in the cell’s bottom-right corner and drag to the right (to fill adjacent cells in the same row) or down (to fill successive cells in the same column) with the months of the year.
Want to populate a table row or column with the days of the week? Just type “Sunday” into the cell and follow the same three steps.
Can Numbers do the same for numerical series? Absolutely.
To add a numerical series using Autofill:
- Enter “5” in one cell and “10” in the cell immediately below it.
- Select both cells, grab the Fill handle, and drag down.
Since you incremented the values in the selected cells by 5, Numbers also fills successive cells with increments of 5.
-
Performing Instant Calculations
Performing Instant Calculations
The bottom-left corner of every Numbers document includes buttons for sum, avg, min, max, and count functions. With no cells selected, no information is displayed next to the buttons. However, if you select two or more cells, Numbers instantly fills in, respectively, the:
- Sum of the values in the selected cells
- Average of the values in the selected cells
- Minimum value in the selected cells
- Maximum value in the selected cells, and a
- Count of the cells selected
These buttons not only provide a handy way to get quick calculations, but Numbers also lets you use them to quickly add a function to your table. Let’s say, for example, that you’d like to total the first column in a table.
To add the Sum function to a column:
- Select the cells in the column you’d like totaled.
- Drag the Sum button from the bottom-left corner of the Numbers table into the cell in which you’d like the total of the first column to appear.
Numbers adds the function to the cell and even picks up the formatting of the selected cells. You can add a Sum function to a row of cells just as easily.
To add a Sum function to a row of cells:
- Select a series of cells in a table row.
- Drag the Sum button into the vacant cell immediately to the right of the last selected cell.
Whether you add the function to your table or simply select a series of cells to perform calculations on the fly, this little trick can be very helpful.
-
Using Sliders
Using Sliders
You can use the novel slider input control options available in Numbers to test different what-if scenarios. Sliders let you make rapid changes to the contents of a cell.
To format a cell as a slider:
- Select a cell.
- Choose Slider from the More Cell Formats button in the Format Bar.
Numbers places an initial value in the cell and, next to that cell, displays a slider you can drag to the left or the right to quickly change the value. You can also change the characteristics of the values presented in the cell when you move the slider.
To modify cell content using sliders:
- Select a cell.
- Click the Inspector button in the toolbar to open an Inspector window.
- Click the Cell Inspector button.
You can specify the minimum and maximum values and set the increment by which the values will change as you move the slider left and right. You can also tell Numbers where to position the slider and how to format the value displayed in the cell.
-
Using Steppers
Using Steppers
Whereas sliders let you quickly make relatively large changes to the value in a cell, steppers are more suited to specific incremental changes.
To format a cell as a stepper:
- Select a cell.
- Choose Stepper from the More Cell Formats button in the Format Bar.
When a cell is formatted as a stepper, Numbers adds up and down arrows immediately to the right of the cell (when selected) that you use to increment the value in the cell. By default, Numbers sets the increment value to 1, but you can change it.
To change the increment value in a Stepper cell:
- Select a cell.
- Click the Cells Inspector button in the Inspector window and adjust the available parameters.
When formulas you’ve set up in your tables or charts depend on the values in cells formatted as sliders or steppers, you can immediately see the effects of the incremental changes made as part of your what-if scenarios.
Keynote ’08
-
Removing Photo Backgrounds
Removing Photo Backgrounds
In Keynote, you can eliminate a photo’s background, so that it doesn’t cover up the headlines, subheads, and other editorial and graphic elements already on a slide. Keynote’s Instant Alpha too alows you to convert the background of that photo into an alpha channel, a transparent layer that lets everyone see the elements on your slide right through the photo.
To create an Alpha Channel and remove a photo’s background:
- Select the image whose background you want to eliminate.
- Click the Alpha button in the toolbar (or choose Instant Alpha from the Format menu).
- Click the background color you want to make transparent, slowly drag the Alpha tool over it, then press Return.
As you drag, the Alpha tool also renders transparent contiguous areas with colors similar to the one you clicked originally. By clicking and dragging over additional areas of your photo, you’ll quickly eliminate, or “knock out,” the entire background from the photo, leaving only those elements you want to include on your slide.
-
Adding Audio
Adding Audio
In Keynote ’08, you can use a song from your iTunes library as a soundtrack that starts playing when your presentation starts.
To add audio:
- From any slide in your presentation, click the Inspector button in the Keynote toolbar.
- Click the Document Inspector button in the Inspector window.
- Click Audio to display the Audio pane.
- In the Audio pane, click the iTunes Library button. Keynote opens the Media browser and displays the contents of your music library.
- Drag the track or playlist you want to use from the Media browser into the Audio well in the Document Inspector.
Use the controls in the Document Inspector to set the volume level of the soundtrack. If you’d like the music to play throughout your presentation, choose Loop from the pop-up menu. The music will repeat until the presentation ends. You can also have it play once or turn it off completely.
-
Adding Video
Adding Video
To create a true multimedia experience for your audience, consider adding video to your Keynote ’08 presentation.
To add video, use any of the following methods:
- Drag a QuickTime movie file from a folder on your hard drive to the slide canvas or directly to a media placeholder on a Keynote slide.
- Click the Media button in the Keynote toolbar. Then click the Movies button. Drag the movie you want to add from the Media browser onto the slide canvas or directly into a media placeholder on the slide.
- Select Choose from the Insert menu, navigate to the folder to which you saved your movie, and select the video file you want to place in your presentation. Click Insert.
Do you want to include a Flash movie file in your Keynote presentation? You can insert a Flash movie using any of the aforementioned options, but if you’re using QuickTime 7.1.3 or later, you need to set a Flash preference.
To view a Flash movie using QuickTime:
- Choose System Preferences from the Apple menu.
- Click QuickTime in the Internet & Network row.
- In the Advanced tab, click the checkbox to enable Flash.
-
Adding Voiceovers
Adding Voiceovers
In Keynote ’08, you can take advantage of the new Narration feature to record a voiceover on every slide. Since Keynote saves your timing, the narration will pause as you move from one slide to the next.
- Connect an external microphone to your Mac or use the built-in microphone (if available).
- Go to the slide from which you want to begin recording. (When you create a recorded slideshow, playback begins with the slide from which you started recording.)
- Choose Record Slideshow from the File menu. Keynote plays your presentation full screen.
- Speak into the microphone to record your narration. The pulsing red light in the upper-left corner lets you know you’re recording.
- Click the mouse button or press the Right Arrow key to advance to the next slide or use the following options for controlling the recording of your narrative:
- Click W (white screen), F (freeze), or B (black screen) to pause recording. Press any key to resume.
- Click the red recording indicator to pause recording. Click it again to resume recording.
- Click Esc (Escape key) to stop playback and save the recording.
When you record a narration, Keynote automatically selects Recorded from the Presentation pop-up menu in the Document Inspector.
-
Adding Hyperlinks
Adding Hyperlinks
You can create a dynamic presentation by including hyperlinks that open web pages. It’s easy to do, and all you need is an Internet connection when you give your presentation.
To add a hyperlink to your presentation:
- Go to the page from which you’d like to open the web page and select the text or the object you’d like to use as your hyperlink.
- Open an Inspector window (by clicking the Inspector button in the Toolbar), click the Hyperlink Inspector button, and click the checkbox to “Enable as a hyperlink.”
- From the pop-up menu, choose Webpage.
- Type the web page address in the URL field and, if desired, use the Display field to change the text that will appear as a hyperlink in your presentation.
You’re done. Test the link to see if it takes you to the right page, and you’re ready to create a link to another page.