
Staden, developed by James Bonfield and colleagues at the MRC, UK, is a fully developed set of DNA sequence assembly(Gap4), editing and analysis(Spin) tools.
Main Programs:
Additional programs are described in the documentation.- Gap4 performs sequence assembly, contig ordering based on read pair data, contig joining based on sequence comparisons, assembly checking, repeat searching, experiment suggestion, read pair analysis and contig editing. It has graphical views of contigs, templates, readings and traces which all scroll in register. Contig editor searches and experiment suggestion routines use confidence values to calculate the confidence of the consensus sequence and hence identify only places requiring visual trace inspection or extra data. The result is extremely rapid finishing and a consensus of known accuracy.
- Pregap4 provides a graphical user interface to set up the processing required to prepare trace data for assembly or analysis. It also automates these processes. The possible processes which can be set up and automated include trace format conversion, quality analysis, vector clipping, contaminant screening, repeat searching and mutation detection.
- Trev is a rapid and flexible viewer and editor for ABI, ALF, SCF and ZTR trace files.
- Prefinish analyses partially completed sequence assemblies and suggests the most efficient set of experiments to help finish the project.
- Tracediff and hetscan automatically locate mutations by comparing trace data against reference traces. They annotate the mutations found ready for viewing in gap4.
- Spin analyses nucleotide sequences to find genes, restriction sites, motifs, etc. It can perform translations, find open reading frames, count codons, etc. Many results are presented graphically and a sliding sequence window is linked to the graphics cursor. Spin also compares pairs of sequences in many ways. It has very rapid dot matrix analysis, global and local alignment algorithms, plus a sliding sequence window linked to the graphical plots. It can compare nucleic acid against nucleic acid, protein against protein, and protein against nucleic acid.
Version
1.7.0
Sample Sessions
First login to helix. Replace 'user' in the following example with user's helix ID. Create a directory called, for example, /home/user/pregap_intro
% mkdir /home/user/pregap_intro
% cd /home/user/pregap_intro
Obtaining an initial set of ABI sequencer data:
Obtaining copies of the vector sequences for screening the reading:
For this exercise, the required cloning vector (lorist2) sequence file lorist2.vector is in the same directory as your ABI data. The sequencing vector is m13mp18 and is already held in the Staden Package installation directory. The cloning site used is SmaI.
Using pregap4 to prepare a set of ABI sequencer files for entry into a sequencing project database:
Make sure X-windows application is started. Make sure your current directory is /home/user/pregap_intro
A Pregap4 window pops up:

Click tab Files to Process, Add files, change to pregap4_intro directory, select Any as the file type. The browser should show all the files listed in this directory. We are to process all of the binary sample files which contain the raw trace data alone with sequence and other information.
Select all the Sample XXX files by holding down the control key and clicking on the five files, XXX is a three digit number. Press OK
- Click Configure Modules tab
- Select General Configuration on left; on the right, get entry names from trace files select yes
- Estimate Base Accuracies [x]
- Trace Format Conversation [x]
- Initialise Experiment Files [x]
- Quality Clip [x]
- Sequencing Vector Clip [x]; Use vector-primer file Yes; Click on the Select vector-primer file subset; select m13mp18/SmaI; click OK
- Screen For Unclipped Vector [x]
- Cloning Vector Clip, enter lorist2.vector in the Vector file name box
- Interactive Clipping [x]

Trev is a grphical tool that allows you to:
- Edit the sequence of your reads
- Adjust the left and right quality clip points, determined by qclip
- Adjust the left and right vector clip points, determined by vector_clip
When trev is run as a pregap4 module, only the second two functions should be considered. By default, sequence editing is disabled in this context. For more info, see section 1.7 of the documentation.
Click File, save. A bunch of new files will be created by pregap4.
Customizing the modules of Pregap4
Select Modules, Add/Remove Modules, user can change modules freely. After finish, click File, Save module list. A new file called pregap4.config will be created.
Select file, exit to quit pregap4
Copy sample files from /usr/local/staden/course/data/phred_data/ into a new directory. In the following example, a couple of hundred ZTR files and a lorist6.vector file were copied into /home/user/exercise.
% pregap4
In the pregap4 window, Add files, ZTR, select all files by clicking any file then Ctrl-A, then press OK
Click Configure Modules tab
Disable Estimate Base Accuracies
Disable Trace Format Conversion
Enable Initialise Experiment Files
Enable Augment Experiment Files, click Experiment File Line Types, do this:

Click OK and save
Enable Quality Clip
Enable Sequencing Vector Clip
Enable Screen for Unclipped Vector
Enable Cloning Vector Clip, specify lorist6.vector as the vector file name
Enable Gap4 shotgun assembly, type in testdb as Gap4 database name, tick Create new database option. click on any other module name. This will change edit to ok next to the Gap4 shotgun assembly module.
Disable everything else.
Under File, Load Naming Scheme, click Browse, select sanger_names_old.p4t, ok, ok.
Click File, Save All Parameters (in all modules)
Quit pregap4
Type pregap4 -nowin *.ztr on unix window.
When finished, a gap4 database is created. These are files named testdb.0*
GAP4
Following example above, under /home/user/exercise, type /usr/local/staden/bin/gap4
Open database by File, Open, testdb.0.aux, ok
Contig Selector window will open
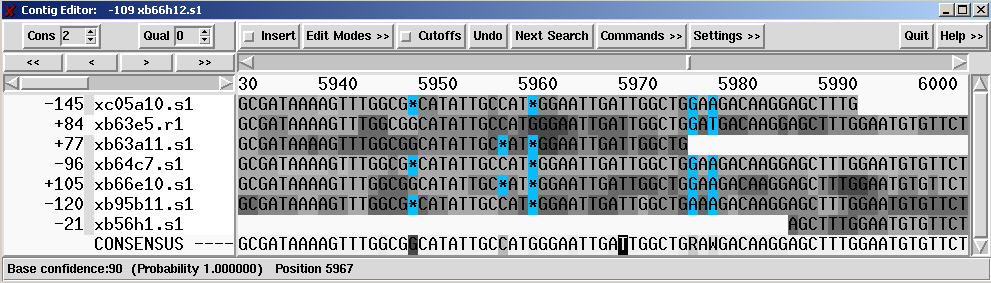
Select Edit, Contig Editor, OK, following window show:

Editing the consensus sequence
There are two types of editing action available, replace and insert. When you start the contig editor it will be in replace mode. You can toggle between modes by clicking (left mouse button) on the box that is labelled Insert. The contig editor will allow you to edit anything in any way. See section 2.6.4 in the documentation.
Finding problems and editing them
The places in your contig that will most probably require editing are where the consensus sequence is undetermined. Click Next Search, problem, forward, click search button. You will find * characters with very occasional -.
By altering the value in the box labelled Qual in the contig editor, user control a simple display showing the quality of bases, although there are better ways of showing this as you will see later. Increasing the Qual value will gradually turn base red (when they have a confidence value lower than the Qual value).
Checking the trace data
You can get gap4 to automatically display the traces which would best be used for verifying and solving problems. Click settings, trace display, auto-display traces. From now on the Search button will display up to three traces when searching for problems:

For more info, see documentation
Editing with confidence
Setup gap4 for use with confidence values. In GAP4 main window, options, consensus algorithm, ok:

Now to see what the phred case-calls look like, edit, edit contig, ok,setting, show reading quality and show consensus quality and highlight desagreement and by background color:
To list the error rates:
In contig editor, commands, List Confidence, accept default and click Apply. the editor information line (at the bottom of the window) now contains something like the following:
Expected no. of errors between 1 and 9569 is 3.87. Error rate = 1/2471
The main gap4 output window should show:

