HOT TOPICS >> New survey • Spring will come • Raw milk • Global warming? • Plant potatoes
    Blogs Home > Hands-on and How-to

Hits and misses of DIY projects.

New Biochar Stoves at the 2009 ETHOS Conference

January 23 through 25, 2009, about 100 “stovers” gathered in Kirkland, Wash., for the annual ETHOS (Engineers in Technical and Humanitarian Opportunities of Service) conference devoted to meeting household energy needs in the developing world. Improved stove technology was only part of a program that included discussion of standards and testing, distribution and manufacturing, and the intricacies of carbon credit financing. The highlight of the conference occurred at the ceremonial “lighting of the stoves” on the concrete steps outside the conference hall under a light flurry of snow late on Sunday afternoon.

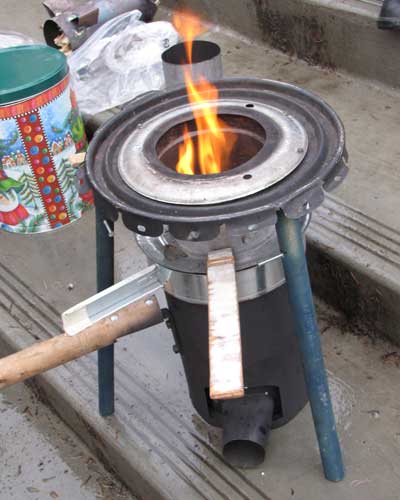
A variety of innovative designs were on display, but only two of the stoves were able to operate in a pyrolysis mode to produce charcoal. Paul Anderson, an independent stover who works with the Biomass Energy Foundation, demonstrated a TLUD (top-lit updraft gasifier) stove using natural draft that leaves a charcoal residue after cooking. The char can be saved by dumping it into a covered bucket or pot to stop combustion. Anderson has two versions, what he calls the “refugee” stove made of tin cans, and the “artisan” version that will be manufactured in India. Plans for constructing the stoves will be freely available soon on the bioenergy listserve.
biochar stove
  PHOTO BY KELPIE WILSON/INTERNATIONAL
  BIOCHAR INITIATIVE
  Paul Anderson's "artisan" top-lit updraft (TLUD) gasifer stove
  produces charcoal at the end of a cooking session that can be
  saved in a covered metal bucket or ceramic pot.

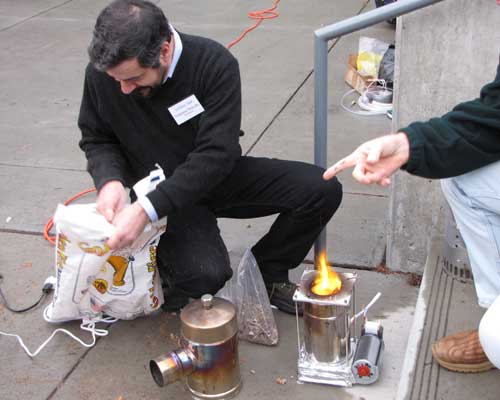
Biochar advocates at the conference were very intrigued with the Lucia stove invented by entrepreneur Nat Mulcahy of WorldStove. Mulcahy is an industrial designer who has thrown himself into the project of bringing a sophisticated, high performance biomass stove to mass markets worldwide. Contrary to the approach of many stove designers who search for designs that can be easily manufactured in poor countries, Mulcahy wondered what could be accomplished using advanced manufacturing technology. He found that metal injection molding allowed him to make a burner with a swirl pattern resulting in highly efficient combustion and heat transfer. When used with a fan, the stove can be operated in a pyrolysis mode that produces charcoal. You can see his pyrolysis demonstration at the WorldStove YouTube channel.
biochar stove - lucia
  PHOTO BY KELPIE WILSON/INTERNATIONAL BIOCHAR INITIATIVE
  Nat Mulcahy prepares to add fuel to his Lucia stove. The copper pot can be set on
  top of the stove to function as a space heater.

Mulcahy’s burner is made out of 28 recycled aluminum cans. An aluminum inlet plate and a cast-iron forge plate complete the list of special parts; the rest of the stove can be put together from sheet metal, common fasteners and fans recycled from computers. The parts can be shipped flat and assembled locally. WorldStove plans to start production at a factory in northern Italy in March. The stove has been certified in Europe as producing less than 66 ppm carbon monoxide, and WorldStove is pursuing licenses to manufacture a model that will work as a fireplace insert, along with another model that Mulcahy says will triple the heat output and halve the emissions of a standard pellet stove. He also announced that Finland wants to subsidize 1.5 million of his stoves for saunas with the objective of producing biochar.

The new Biolite stove by industrial designers Jonathan Cedar and Alec Drummond does not make char, but is interesting nonetheless. A lightweight backpacking stove, its key innovation is to incorporate a bismuth-telluride thermoelectric generator (TEG) to operate a forced-air draft fan for this gasifier stove. The TEG is a nice innovation that could be applied to biochar producing stoves that use fans, eliminating the need for any external power supply.

biolite stove
  PHOTO BY KELPIE WILSON/INTERNATIONAL BIOCHAR INITIATIVE
  Prototypes of the Biolite backpacking stove designed by Jonathan Cedar and
  Alec Drummond. The fan is powered by an integrated thermoelectric generator.

Aside from exciting new technology, the Ethos conference offered many sessions concerned with the problems of stove dissemination. More than 1.5 billion people still cook over open fires. Impacts to health, safety, forests, air and climate could be mitigated with better stoves, but lack of funding for stove programs is a huge barrier. Carbon credit financing can help.

Two groups shared information on ways to obtain carbon credit financing. Stuart Conway of Trees, Water and People explained the process his group went through to offer a direct voluntary offset for its programs. The Center for Entrepreneurship in International Health and Development (CEIHD) is available to help groups set up projects for carbon credits. Adding biochar production to a stove program can potentially increase the amount of carbon offset achievable, and internationally there is a growing interest in biochar-producing stoves.

In December 2008, at the climate meeting in Poland, The International Biochar Initiative (IBI) held a side event on stoves that was very well attended. See the description of this event on IBI’s Poznan page.

Standards and testing are topics that are also of concern to biochar producers. Aprovecho Research Center had a large presence at the conference and stove designers will want to take a look at all the resources they offer. Laboratory manager Nordica MacCarty had Aprovecho’s mobile emissions testing unit on display. The unit packs up into one large suitcase that can be taken into the field. MacCarty has done testing in India and is off to Africa next. Aprovecho also does emissions testing at their lab in Cottage Grove, Ore.

Many interesting discussions took place in the hallways and at meals. A small group of biochar enthusiasts discussed ideas for helping less fortunate people generate income by producing biochar. Other discussions heard at the Ethos Conference repeated this theme of providing income-generating solutions. The practical aspects of integrating appropriate technology into people’s lives emerged as perhaps the greatest challenge, whether in the developing or already developed worlds.

0 Comment(s) >>

Building a Chicken Coop

Thinking about starting or expanding your chicken-raising efforts? Maybe the neighbors like your free-range eggs so much that a small market for your eggs is developing.

There are lots of simple, inexpensive coops you can make, such as the Portable Chicken Mini-coop. But if you're looking for housing for a few more chickens or something a bit more durable, take a look at BuildingAChickenCoop.com. The plans are very detailed, and there are options for small (4-foot-by-12-foot, including run), mid-size (3-foot-by-8-foot, plus nest box) and large (7-foot-by-8-foot, roughly). In addition to the step-by-step diagrams included with the plans, the package of e-books includes information on positioning coops, building nest boxes and tips for materials.

0 Comment(s) >>

Make a Table in an Afternoon

You can build a table quickly and easily. The table in the photo is small, of course, but it could be used for nightstand, a lamp table or (in this case) a table to hold a toy keyboard for my 3-year-old granddaughter. I built this table in less than a day, and that includes time to make a special jig (or sled) for my table saw so that I could taper the legs. I used 1-inch-thick pine boards for the entire table.

small table - pine
    PHOTO BY TROY GRIEPENTROG
   This table is about 30 inches wide, 11 inches deep and 18 inches tall.

How to Make a Table in Eight Steps

1. Determine how tall you want the table to be and cut four legs. If you decide to taper the legs, cut the tapers before cutting the legs the right length.

2. Clamp all the legs together and cut them to length.

3. Cut four boards for the apron (the part that holds the top to the legs). The width isn't too important, but about 2 inches minimum for strength and enough material to work with.

4. Join the legs to the apron boards using pocket screws. I use the simplest, cheapest Kreg pocket screw kit for this. (I balked at paying $20 for this several years ago, but it's a great investment.)

pocket screws
   PHOTO BY TROY GRIEPENTROG
  Use pocket screws for quick, strong joints between pieces of wood.

5. Cut the top of the table.

6. When you build a table this small, you don't need to use fancy methods to attach the top. Just drill through the apron boards and use screws. (On larger tables, the expansion and contraction of the wood calls for special measures.) I drilled larger holes to hide the screw heads; this is called countersinking the screws.

table top
   PHOTO BY TROY GRIEPENTROG
  Attach the top of the table to the apron with screws placed about every 8 inches.

7. For an added touch, I used a router to round the edges of the table and legs. You could bevel the edges with a rasp instead.

8. Sand the table. Paint, stain, varnish or oil it if you'd like.

For more complete details on how to make a table, read Build Your Own Tables.

0 Comment(s) >>

Pegboard Tool Cart

Ever have trouble finding a tool you know you have somewhere? Maybe it's time to get organized. Pegboard tool carts help sort out your tools while keeping them easily accessible. If you want a beginning welding project, check out Build a Peg Board Tool Cart (then brag about it) on the instructables website. But even if you're not into metal, a similar cart could be made of wood.

0 Comment(s) >>

$25 DIY Greenhouse

Instructables is a great Web site for do it yourselfers. I just ran across instructions for building a small greenhouse for $25. It's a fun, practical project to help you extend the gardening season.

Instead of using PVC, which isn't very eco-friendly, you might consider other plastic pipe options — or even using saplings.

1 Comment(s) >>

An Easy and Affordable Poultry Pen

This exercise pen is simple and practical. It’s inexpensive and easy to build, even without power tools. Although I call it an exercise pen, it could have all sorts of uses with minor modifications. I built this pen to keep ducklings on the lawn during the day, but put the ducks in a building at night.

duck pen
  TROY GRIEPENTROG

I used all 2-by-4 untreated pine. The premise is simple: make the pen 8-feet-by-4-feet so a minimal number of cuts will be necessary. It’s 2-feet high so cutting the chicken wire is also easy (assuming you buy or have a 2-foot roll of wire).

Materials List

  • 10 8-foot 2-by-4s
  • 40’ of 24-inch chicken wire
  • 2 hinges (not absolutely necessary)
  • Staples for attaching the chicken wire
  • 2.5” or 2.75” #8 or #10 screws

Some variation in materials is acceptable. Remember, this is a practical and quick project, so use what you have or use what you like. 2-by-3 lumber would work. Bigger screws are a little stronger, but this pen isn’t necessarily predator proof.

Putting It Together

Start by cutting six 2-by-4s in half. If you want to account for the width of the saw blade, it’s a good idea, but not critical. Take two of the 4-foot sections and cut them in half again. You should now have four 8-foot pieces, 10 four-foot pieces and four 2-foot pieces.

Make a rectangle out of two 4-foot pieces and two 8-foot pieces, but be sure to put the 4-foot pieces between the 8-foot pieces; that is, you’ll drill holes all the way through the 8-foot pieces where you’re going to attach them and the screws will anchor in the ends of the 4-foot pieces. After you’ve secured the corners with at least two screws each, make another rectangle the same way.

Next, attach the 2-foot corner “posts.” It’s a good idea to put screws through both the 8-foot pieces and 4-foot pieces that you’re attaching to the posts. It will make the entire structure stronger. You should now have the basic frame for the pen. If you don’t want to mess with putting a top on the pen, simply staple chicken wire all the way around it and you’re done. But if you want to keep cats or wild birds from getting in the top, read on.

duck run top
  TROY GRIEPENTROG

Topping it Off

Attach three of the 4-foot pieces of lumber to the top rectangle. Place them 2-feet apart on center so that the chicken wire will reach across the span without much overlap.

I added a “door” to the top of the pen. Of the four sections created in the top by the separating 2-by-4s, I put mine in the second section. Putting the door in an end section would probably be better because the birds always run to one end when you’re trying to catch them. But if you put the door in an end section, you have to account for the corner posts, which complicates the project.

To build the door, make another rectangle, this time using the 4-foot sections for the long sides. You should have a 4’ piece of lumber left over at this point. Cut two 20.25-inch pieces from that to make the door. You’ll want it to fit somewhat loosely so that you can open and close it. Attach it with hinges. I made rough handles with the left over ends of the 2-by-4s.

Cover the door and the top with chicken wire and you’re done. The pen isn’t terribly heavy, so it’s easy to tip it up to get the birds out.

If you want better predator protection, heavier wire attached more securely should improve your chances of success. You might also want to add something to the top to provide some shade for your birds.

duck run ducks
  TROY GRIEPENTROG
  Ducklings enjoy spending time on the lawn on a sunny spring day.
4 Comment(s) >>

Build a Kitchen Recycling Center

Sorting and storing recycling until it goes to the curb or recycling center can be convenient and clean. To help you plan the best solutions for your home, regardless of the size the kitchen, read Designing a Recycling Center. Helpful diagrams are included with the article.

For a quick, easy recycling center you can make to hang on a door, click here. This is a great idea for those who live in an apartment or have very limited space.

0 Comment(s) >>


Subscribe Today - Pay Now & Save 66% Off the Cover Price

First Name: *
Last Name: *
Address: *
City: *
State/Province: *
Zip/Postal Code:*
Country:
Email:*
(* indicates a required item)
Canadian subs: 1 year, (includes postage & GST). Foreign subs: 1 year, . U.S. funds.
Canadian Subscribers - Click Here
Non US and Canadian Subscribers - Click Here

Lighten the Strain on the Earth and Your Budget

Mother Earth News is the guide to living — as one reader stated — “with little money and abundant happiness.” Every issue is an invaluable guide to leading a more sustainable life, covering ideas from fighting rising energy costs and protecting the environment to avoiding unnecessary spending on processed food. You’ll find tips for slashing heating bills; growing fresh, natural produce at home; and more. Mother Earth News helps you cut costs without sacrificing modern luxuries.

At Mother Earth News, we are dedicated to conserving our planet’s natural resources while helping you conserve your financial resources. That’s why we want you to save money and trees by subscribing through our Earth-Friendly automatic renewal savings plan. By paying with a credit card, you save an additional $4.95 and get 6 issus of Mother Earth News for only $10.00 (USA only).

You may also use the Bill Me option and pay $14.95 for 6 issues.