|
Add, Edit and Re-order Your QuickLinks!
Create your own QuickLinks. It's easy.
In our ongoing effort to make the NCI-Frederick site easier to navigate, we have added a new feature that will allow NCI-Frederick staff to personalize the QuickLinks list.
It's easy to do, and works much like "Favorites" in Internet Explorer.
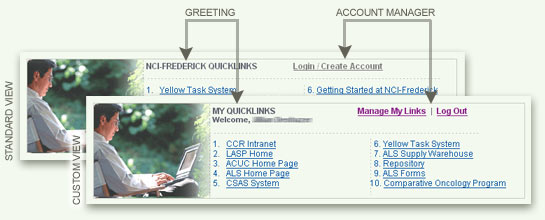
Figure 1: QuickLinks on the Home Page. You will know you are logged in when you see your username displayed in the greeting area. Your account manager links will also be visible.
The QuickLinks section is available on all NCI-Frederick pages and allows individuals to create custom navigation based on what areas of the site they use on a regular basis. Users who are not logged in will see a standard list of 10 links. Users who have created an account and logged in will see their personal list of links.
QuickLinks can be composed of internal pages, external websites and links directly to documents or forms. The first step in using this features is to Create an Account, then you may do any of the following:
Create Your Account
 |
Figure 2: Login Screen
|
Step 1a: From any page in the NCI-Frederick site, click on the Login/Create Account link (this is located on the bottom section of the home page, and in the left navigation bar on the content pages). This action will take you to the main login page.
Step 1b: Once you are on the login screen (Figure 2), click on the Create Account button.
Step 1c: A disclaimer page will open that indicates only NCI-Frederick staff have the ability to create custom accounts and login. Read the instructions, then click on the Step 2 button.
Step 2: In the fields provided, enter your full first name, last name and email address. Click on the Step 3 button.
 |
Figure 3a: Select From Existing Account
|
 |
Figure 3b: Create New Account
|
Step 3a: If a user account already exists for you, a screen with all matches for the first and last name entered will open (Figure 3a). Review the list that appears and either:
- select the correct account using the radio button beside the correct username and profile, or
- select "Create New Login Profile" if there are no correct matches on the list provided
When your selection has been made, click on the Step 4 button. If you selected to create a new profile, you will be taken to Step 4.
If you selected an existing account, you will skip directly to Step 5.
Step 3b: If a user does not exist for the name and email address entered, a message will appear indicating that you will need to create a new account (Figure 3b). Review the list that appears and select the correct account. Click on the Step 4 button.
Step 4:
Enter your first name, last name, email address, and building number in the fields provided. When entering your username, pick something that you commonly use or that you will remember. When enterting your password, make sure it contains at least one numeric or special character. Click on the Step 5 button.
 |
Figure 4: Page Selection Screen
|
Step 5: Once your account creation is complete, you will be taken to the page selection screen (Figure 4). Click on the Return to Previous Page button to return to the page that you started the account creation process from. To begin adding new links to your QuickLinks account, click on the Proceed to My Account button.
Learn how to add, edit, re-order your QuickLinks.
|
