

|
About:
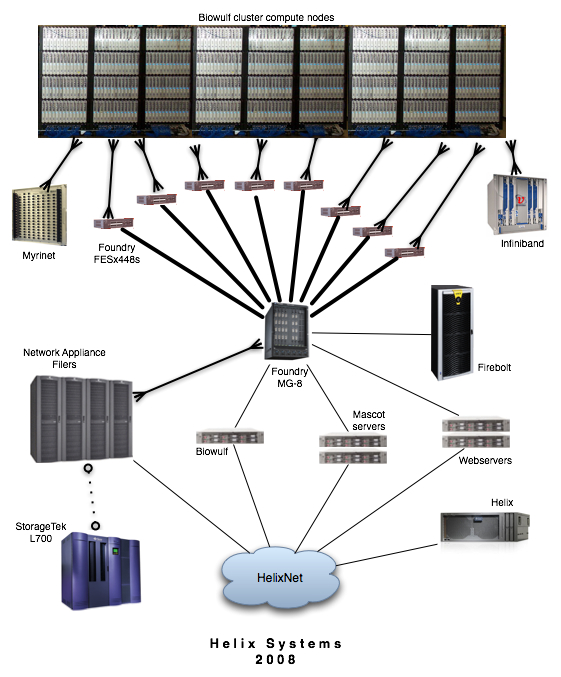
 The NIH Biowulf cluster is a GNU/Linux parallel processing system designed and built at the National Institutes of Health and managed by the Helix Systems Staff. Biowulf consists of a main login node and 2200 compute nodes with a combined processor count of over 6300. The computational nodes are connected to high-speed networks and have access to high-performance fileservers. |
The continued growth and support of NIH's Biowulf cluster is dependent upon its demonstrable value to the intramural program. In the past we have been successful in obtaining support by citing published work which involved the use of our systems.
- When publishing data resulting from calculations done on the NIH Biowulf
cluster, please use the following citation in the article:
This study utilized the high-performance computational capabilities of the Biowulf Linux cluster at the National Institutes of Health, Bethesda, Md. (http://biowulf.nih.gov).
- Please report the publication of articles which made use of the cluster to the Helix Systems Staff by citing the reference in email to staff@biowulf.nih.gov.
Biowulf accounts require a pre-existing Helix account. A Biowulf account can be obtained by registering on the web here. Biowulf accounts not accessed within a six-month period are automatically locked as a security precaution. A user may request to have his account unlocked by sending email to staff@biowulf.nih.gov.
The Biowulf system is accessed from the NIH network via ssh to biowulf.nih.gov. We recommend the PuTTY SSH client for Windows users as it is free, feature-rich, and widely used. Mac and Unix/Linux users can use the ssh client available from the command line in a terminal window.
Xwindows connection software is also recommended for GUI/visualization applications that are run on the login or computational nodes (e.g. x-povray or interactive SAS) display on your desktop workstation. We provide free Xwindows software for Macs and PCs to Helix Systems users.
An initial password is assigned to each user upon creation of an account. Your initial password is the same as your password on Helix at the time the Biowulf account was created. To change your Biowulf password, use the UNIX command 'passwd', which will prompt you for your old password and then a new password. It is required that you select a password that consists of at least eight characters with at least three of the four character classes: upper-case characters, under-case characters, numbers and special characters (any other printable characters). None of your previous twenty-four passwords can be used. Your username and password are uniform across all nodes of the Biowulf system.
Note: Passwords on helix and biowulf are not synchronized at this time.
NIH password policy requires that users change their password every 60 days. Whenever you reset your password, the 60 day expiration is also reset. For 2 weeks before your password expires, you will be warned when you log in to Biowulf.
The Bourne-Again SHell (bash) is the default shell on most Linux systems including Biowulf. Other available shells, including csh and tcsh, are listed in /etc/shells. To change your default shell, use the command:
chsh -s shell_name
where shell_name is the full pathname of the desired shell (e.g., /bin/csh).
Biowulf home directories are in a shared NFS (Network File System) filespace, therefore the access to files in your home directory is identical from any node in Biowulf. Note that your Biowulf home directory is the same directory as your Helix home directory.
E-mail can be sent from any node on Biowulf. However, all mail sent out from Biowulf will have a return address of helix.nih.gov (rather than the address of the node). In addition, mail sent to a user on a Biowulf node will be automatically forwarded to that user on helix.nih.gov. In other words, you can send, but not receive mail on Biowulf.
If you do not read mail on helix, be sure to set up a .forward file in your helix home directory.
You can communicate with the Biowulf/Helix staff by sending email to: staff@biowulf.nih.gov
| # of nodes | processors per node | memory | network |
| 224 |
8 x 2.8 GHz Intel EMT64 (E5462)
12 MB secondary cache
|
8 GB
|
1 Gb/s Ethernet
16 Gbs/s Infiniband
|
| 232 |
4 x 2.8 GHz AMD Opteron 290
1 MB secondary cache
|
8 GB | 1 Gb/s Ethernet |
| 471 |
2 x 2.8 GHz AMD Opteron 254
1 MB secondary cache
|
40 x 8 GB
226 x 4 GB
91 x 2 GB
|
1 Gb/s Ethernet
160 x 8 Gb/s Infinipath
|
| 289 |
4 x 2.6 GHz AMD Opteron 285
1 MB secondary cache
|
8 GB | 1 Gb/s Ethernet |
| 389 |
2 x 2.2 GHz AMD Opteron 248
1 MB secondary cache
|
129 x 2 GB
66 x 4 GB
|
1 Gb/s ethernet
80 x 2 Gb/s Myrinet
|
| 91 |
2 x 2.0 GHz AMD Opteron 246
1 MB secondary cache
|
48 x 1 GB
43 x 2 GB
|
1 Gb/s Ethernet
48 x 2 Gb/s Myrinet
|
| 390 |
2 x 2.8 GHz Xeon
512 kB secondary cache
|
119 x 1 GB
207 x 2 GB
64 x 4 GB
|
100 Mb/s Ethernet
64 x 2 Gb/s Myrinet
|
| 1 | 32 x 1.4 GHz Itanium 2 | 96 GB | 1 Gb/s ethernet |
All nodes are connected to a 1 Gb/s switched Ethernet network while sub-sets of nodes are on high-performance Myrinet2000, Infinipath or Infiniband networks. The hostnames for these interfaces are p2 through p2180. The hostname for biowulf's internal interface is biowulf-e0 (i.e., nodes wishing to communicate with the login machine, should use the name biowulf-e0 rather than biowulf).
The ethernet switches are Foundry FESx 448, FastIron 1500, 800, II+ and II switches. The backbone switch is a Foundry BigIron MG-8 using 10 Gb/s fiber links to the FESx 448s and trunked Gigabit ethernet links to the FastIrons.
For those applications that can benefit from increased bandwidth and lower latency than Ethernet, there are three high performance switched networks available:
- 224 8-core nodes are on a DDR Infiniband network connected to a Voltaire ISR 2012 infiniband switch. DDR Infiniband provides 20 Gb/s bandwidth at very low latencies.
- 184 dual-processor nodes are connected to and Infiniband network via QLogic InfiniPath adapters. This network is similar to the above mentioned Infiniband network but with two major differences: it is slightly lower latency but runs at a lower bandwidth as well (~10Gb/s max).
- 165 dual-processor nodes have a connection to a Myrinet2000 network. This high performance network has a bandwidth of 2 Gb/s with a latency of around 10uS. The nodes are interconnected by two 128-port Myricom Clos-128 switches.
The login node (biowulf.nih.gov) is an Sun X4200 (quad-processor 2.4 GHz Opteron 2216) with 4 GB RAM. It is a minimal system designed for log-in, light-weight tasks, 32-bit compiling/development and the submission of jobs to the batch system for runs on the cluster. No compute intensive jobs are permitted on the login node.
|
There are several options for disk storage on Biowulf; please review this section carefully to decide where to place your data. Contact the Biowulf systems staff if you have any questions. Except where noted, there are no quotas, time limits or other restrictions placed on the use of space on the Biowulf system, but please use the space responsibly; even hundreds of gigabytes won't last forever if files are never deleted. Disk space on the Biowulf system should never be used as archival storage. |
| Location | Creation | Backups | Speed | Space | Available from | |
| /home | network (NFS) | with Helix account | yes | high | 1 GB default quota | B,C,H |
| /scratch (nodes) | local | created by user | no | medium (***) | 30 - 130 GB dedicated while node is allocated | C |
| /scratch (biowulf) | network (NFS) | created by user | no | low | 120 GB shared | B,H |
| /data | network (NFS) | with Biowulf account | yes | high | 48 GB default quota | B,C,H |
(***) On fast Ethernet (100Mb) nodes, this disk space will be faster than any network (NFS) connected filesystem.
Each Biowulf node has a directly attached disk containing a /scratch filesystem. Note that scratch space is not backed up to tape, and thus, users should store any programs and data of importance in their home directories. Use of /scratch on the batch nodes should be for the duration of your job only. It is your job's responsibility to check for sufficient disk space. Your job may delete any and all files from /scratch to make space available (use the clearscratch command). Please use /scratch instead of /tmp for storage of temporary files.
/scratch on the login node (biowulf.nih.gov) is actually a shared (NFS) filesystem, accessible from both the login node and Helix. Files on this filesystem which have not been accessed for 14 days are automatically deleted by the system.
This is a RAID-4 filesystem mounted over NFS from four Network Appliance FAS960 and two FAS3050 Filers configured for high availability. This system offers high performance NFS access, and is exported to Biowulf over a dedicated high-speed network. /data is accessible from all computational nodes as well as Biowulf and Helix, and will be the filesystem of choice for most users to store their large datasets. Biowulf users are assigned an initial quota on /data; please contact the Biowulf staff if you need to increase your quota.
Note: your /data directory is actually physically located on on filesystems named /data1 through /data6. The /data directory consists of links to one of those filesystems. Please refer to your data directory through the /data links as opposed to the physical location because the physical location is subject to change. In other words, use /data/yourname rather than (for example) /data6/b/yourname in your scripts.
Files which are greater than 4 megabytes in size, and have not been accessed in 12 months will be subject to migration to on-line secondary storage, also known as "near-line" storage.
You will still be able to access migrated files exactly as you did before they were migrated. This is due to the fact that a symbolic link is created in place of the original file. As with files on /data, migrated files will be accessible from all Helix Systems, including the computational nodes of the Biowulf Cluster.
For example, before migration:
% ls -l
-rw-r----- 1 joeu joeu 5715508 Dec 13 1999 jobout.dat
After migration:
% ls -l
lrwxrwxrwx 1 root root 34 Feb 12 16:13 jobout.dat -> /dest2/data4/joeu/jobout.datat
or, using the "-L" switch (which "follows" the link)
% ls -lL
-rw-r----- 1 joeu joeu 5715508 Dec 13 1999 jobout.dat
One consequence of using symbolic links as "place holders" for the original file is that if you wish to delete a file that has been migrated, you should first delete the migrated copy, and then the link that points to it. Continuing the example above:
% rm /dest2/data4/joeu/jobout.dat
% rm jobout.dat
Differences between primary and near-line storage:
- The disk technology implementing secondary storage is slower than that of primary storage.
- The technology implementing secondary storage is not configured as high availability storage. That is, if the fileserver fails, the storage will not be accessible until the fileserver returns to service. Note that data will not be affected, only access to it until the fileserver returns to service.
Use the checkquota command to determine how much disk space you are using:
$ checkquota

Mount      Used       Quota      Percent    Files
/data7:      5.95 GB   48.00 GB   12.40%    5007
/home:     359.39 MB  500.00 MB   71.88%    3510
|
The Biowulf Cluster is highly heterogeneous with respect to processor speed, memory size and networks. Nodes can contain either 2, 4 or 8 processors with memory sizes from 2G to 8G, on message-passing networks that range from very fast (16 Gb/s) to relatively slow (100 Mb/s). This can initially create confusion on the part of users in deciding on what nodes the need to run their work. However, once the cluster hardware is understood it should be quite easy for users to ascertain what nodes are suitable for their purpose without over-using resources or denying resources to others. |
Here are some common errors that beginners make when using the Biowulf cluster:
- Running fewer processes on nodes than there are processors. Please make sure you understand that the cluster nodes each have 2,4 or 8 processors, and that you need to be using all of them to maximize your productivity. There is one exception: when you need more memory per process than is possible to allocate without leaving processors idle (e.g. you need 8G of RAM per process to do your job - you can allocate dual-processor 8G nodes, leaving one processor idle.)
- Not monitoring your jobs. If your MPI job is running poorly because it doesn't scale well to the requested number of processors, then you're wasting resources and denying them to others. This applies to single-process jobs as well. If you're not sufficiently loading the system(s) you're running on, then you need to know about it to correct the problem(s).
- Consuming resources with minimal gain. Please keep jobs running efficiently: doubling the number of processors in a parallel job to take 3% off of your total wall-time is not efficient computing. Cluster space/time is valuable and it is the goal of this staff to maximize work done on the cluster by all users.
- Not understanding the batch system. Please read the documentation on this page so that you understand how to request relevant resources for a job while avoiding the irrelevant ones (e.g. requesting Infinband nodes when not using the Infiniband network or large-memory nodes when running small-memory tasks).
- Not asking for help. When in doubt, drop us an email or give us a call, it's what we're here for.
Clarification of terms used in this guide.
- Node: A node is a computer containing one or more processors. Sometimes simply called a "machine" or "box".
- Processor: A processor is a cpu, each able to run a single application process at any given time. Also referred to as a "core".
- process: The execution instance of an application. An MPI program will typically consist of 2 or more processes. Some program processes can have more than one thread of execution.
Node categories on the Biowulf cluster:
- Login nodes: These are nodes used for program development, compiling, debugging and submission of jobs to the batch system. There is currently one login node (biowulf.nih.gov). Please do not run compute-intensive code on login nodes.
- Batch nodes: the vast majority of nodes in the cluster are used for production jobs run under the control of the batch queueing system. These nodes are dedicated to your job.
- Interactive nodes: these are shared nodes reserved for jobs which request interactive nodes using the "-I" switch to qsub.
Batch (or queueing) systems allow the user to submit jobs to the cluster without regard for what resources (cpu, memory, networks) are available. When those resources become available the batch system will start the job. There are many batch systems available; the one used on the Biowulf cluster is Altair's PBS Pro.
In order to run a job under batch you must submit a script which contains the commands to be executed. The command to do this is qsub. The qsub command on Biowulf is heavily customized and this documentation should be used in lieu of that provided by Altair. The batch script (or batch command file) is simply a Linux shell script with optional commands to PBS (called directives).
A very minimal batch script example:
#!/bin/bash
#
# this file is myjob.sh
#
#PBS -N MyJob
#PBS -m be
#PBS -k oe
#
cd $PBS_O_WORKDIR
myprog < /data/me/mydata
One could simply run this as a shell script on the command line, however when executed by the batch system, the lines beginning with #PBS have special meaning. These directives are as follows:
-N: name of the batch job.
-m: send mail when the job begins ("b") and when it ends ("e").
-k: keep the STDOUT ("o") and STDERR ("e") files.
Other directives can be found on the qsub man page.
The environment variable $PBS_O_WORKDIR is the directory which was the current directory when the qsub command was issued.
Note that if the "myprog" program above ordinarily sends its output (STDOUT) to the terminal, that output will appear in a file called MyJob.o<jobnumber>. Any errors (STDOUT) will appear as MyJob.e<jobnumber>.
The simplest form of the qsub command is:
% qsub -l nodes=1 myjob.bat
The resource list (-l) here consists of the number of nodes (1). You must specify a number of nodes, even if it is one.
The batch system allocation is done by nodes (not processors). When you are allocated a node by the batch system, your job is the only job running on the node. Since a node may contain 2, 4 or 8 processors, you should ensure that you utilize the node fully (see the swarm program below).
Parallel jobs running on more than 2 cpus will need to specify more than 1 node. Additionally, since you will want a parallel job running on nodes of identical clock speed, you will probably want to specify a node type as well:
qsub -l nodes=8:o2800 myparalleljob
Node types currently supported are (from fastest to slowest):
o2800   2.8 GHz Opteron
o2200   2.2 GHz Opteron
o2000   2.0 GHz Opteron
p2800   2.8 GHz Xeon
Nodes can also be selected based on memory size:
m2048   2 GB (1 GB/processor)
m4096   4 GB (2 GB/processor)
m8192   8 GB (4 GB/processor)
(Note: All nodes have at least 1 GB. Also, the above memory properties are normalized for dual-processor nodes, ie, 4 GB 2p nodes and 8 GB 4p nodes both have m4096 properties).
Nodes can also be selected based on network:
gige    gigabit ethernet
ib      infiniband
myr2k   myrinet
(Note: some p2800 nodes are not gige connected).
Other properties:
dc      dual-core node (4p)
qc      quad-core node (8p)
x86-64  64-bit node
Note: Don't make additional specifications unless you need to! In most cases, the less you specify the better. The more flexibility the scheduler has in allocating nodes for you job, the less likely your job will wind up having to wait for specific resources.
- At this time, any node the system allocates to you will be a 2 processor node. You have to explicitly request a 4-processor node with the "dc" property. The exception to this is when nodes are allocated by the swarm command, which ensures that the correct number of processes are started on each type of node.
- Your job may not run properly if your startup file (.bashrc, .cshrc, etc)
contains commands which attempt to set terminal characteristics or do output to
STDOUT. Such commands can be skipped by testing the environment variable
PBS_ENVIRONMENT:
#csh
if ( ! $?PBS_ENVIRONMENT ) then
   do terminal stuff here
endif
- If your default shell is csh or tcsh, your job.o###### files will contain
the warning:
Warning: no access to tty (Bad file descriptor).
Thus no job control in this shell.
This warning can be ignored. Alternatively, you can change your shell to bash (with the chsh command) or tell qsub to use a different shell with:qsub -l nodes=1 -S /bin/sh myscript
-r y|n       this switch controls whether your job is restartable.  If
             one of the nodes that your job is running on should hang,
             the operations staff will often restart the job.  If you
             do not want your job to be restarted, use "-r n" with qsub.

-v varlist   this switch allows you to pass one or more variables from
             the qsub command line to your batch script.  For instance,
             with "qsub -v np=4 myjob", the myjob script can use the $np
             variable with a value of 4.  You can also list an environment
             variable without a value, and that envvar will be exported
             with its current value.

-I           for interactive jobs, see below.

-V           export all environment variables to the batch script.  Useful
             when running X11 clients on interactive nodes, see below.
See the qsub man page for additional options.
Using the batch system for interactive use may sound like an oxymoron, but htis allows you to run compute-intensive processes without overloading the Biowulf login node.
The following example shows how to allocate 4 nodes:
biobos$ qsub -I -V -l nodes=4
qsub: waiting for job 2011.biobos to start
qsub: job 2011.biobos ready
p139$ cat $PBS_NODEFILE
p139
p138
p137
p136
p139$ exit
logout
qsub: job 2011.biobos completed
biobos$
Note the following:
- The qsub command, used with the -I switch, automatically logs you in to the first allocated node.
- A walltime limit of 24 hours is set if a node specification is made in the qsub command (e.g., "-l nodes=1:o2800").
- The -V switch exports all current environment variables to the batch session. This is required in order to run an X11 client on the interactive node.
- As in batch, the $PBS_NODEFILE variable is the name of a file which contains the allocated nodes.
- The nodes are unallocated when the interactive session is ended using the exit command. Please remember to exit your interactive sessions so that node resources are freed up.
See the man pages for details on the following PBS commands:
qstat -u [username]            list jobs belonging to username
qdel [jobid]                   delete job jobid
qdel -Wforce [jobid]           delete a job on a hung node
qselect -u [user] -s [state]   select jobs based on criteria
For example, to delete all of your current jobs:
qdel `qselect -u myname`
To delete only your queued jobs:
qdel `qselect -u myname -s Q`
There are no time limits for jobs running in the batch queue. However, while debugging a program, or if there is otherwise a possibility that your job could "runaway" due to a programming error, please use the walltime switch to limit the time your job can run before it is terminated by the batch system. For example, to limit your job to 72 hours use "-l walltime=72:00:00" as an argument to the qsub command.
Scheduling on Biowulf is done using a Fair Share algorithm. This means that, when more jobs are waiting to run than can be started, the next job to run will be the one belonging to the user with the least amount of system usage during the previous 7 days. This should allow users to submit as many jobs to the queue as they would like without concern that they will take an unfair amount of processing time.
The batch system enforces a maximum number of cpus (or cores) allocated to each user. This number can vary depending on system load and other factors. To see the current limits, use the batchlim command:
$ batchlim
             Max CPUs    Max CPUs
             Per User   Available
            ---------- -----------
ib          48         n/a
norm        160        n/a
nist1       32         172
norm3       32         100
nist2       16         48
Most user jobs run in the norm queue, so in the example above, the maximum per user allocation is 160 cores (which could be 80 x 2p nodes or 40 x 4p nodes).
Note: You should never specify a queue when submitting a job.
Because each Biowulf node has two or four processors, but the PBS batch system allocates nodes rather than processors, submitting multiple single process jobs to the system results in a poor utilization of processors (i.e., only one processor per node).
In the case of simply running two processes on a single dual-processor node, the following example uses the wait command to prevent the batch command script from exiting before the application processes have finished:
#!/bin/bash
#
# this file is myjob.sh
#
#PBS -N MyJob
#PBS -m be
#PBS -k oe
#
myprog -arg arg1 < infile1 > outfile1 &
myprog -arg arg2 < infile2 > outfile2 &
wait
Note how this script runs 2 instances of a program by putting them in the background (using the ampersand "&"), and then using the shell wait command to make the script wait for each background process before exiting.
When running many single-threaded jobs, setting up many batch command files can be cumbersome. The swarm command can be used to automatically generate batch command files and submit them to the batch system.
The swarm Command
swarm allows you to submit an arbitrary number of serial jobs to the batch system by simply creating a command file with one command per line. swarm automatically creates batch command files and submits them to the batch system. Two commands are submitted for each node, making optimal use of the processors.
Here is an example command file:
myprog -param a < infile-a > outfile-a
myprog -param b < infile-b > outfile-b
myprog -param c < infile-c > outfile-c
myprog -param d < infile-d > outfile-d
myprog -param e < infile-e > outfile-e
myprog -param f < infile-f > outfile-f
myprog -param g < infile-g > outfile-g
The command file is submitted using the following command:
swarm -f cmdfile
The result is 4 jobs submitted to the batch system, 3 jobs with 2 processes each, and the last with a single process.
When submitting a very large swarm (1000s of processes), the bundle option to swarm should be used:
swarm -f cmdfile -b 40
If cmdfile contains 2500 commands, approximately 63 bundles of 40 commands each will be created and submitted as 32 batch jobs (2 bundles per job, one for each processor on a node).
Note: swarm will correctly allocate the correct number of processes to 2-, 4-, or 8-processor nodes.
See the swarm documentation for more details.
The multirun command
If you wish to submit more than 2 single-threaded jobs but want them under control of a single job, then an mpi "shell" can be used (note: In many cases this will not be an optimal use of resources. Unless all processes exit at roughly the same time, idle nodes will not be freed by the batch system until the last process has exited).
The basic procedure is as follows (generation of these scripts can be done automatically by writing a higher order script):
1. Create an executable shell script which will run multiple instances of your program. Which will run depends on the "mpi task id" of the instance.
#!/bin/tcsh
#
# this file is run6.sh
#
switch ($MP_CHILD)
 case 0:
 your_prog with args0
breaksw
case 1:
your_prog with args1
breaksw
case 2:
your_prog with args2
breaksw
case 3:
your_prog with args3
breaksw
case 4:
your_prog with args4
breaksw
case 5:
your_prog with args5
breaksw
endsw
2. Use mpirun in your batch command file to run the mpi shell program (multirun):
#!/bin/tcsh
#
# this file is myjob.sh
#
#PBS -N MyJob
#PBS -m be
#PBS -k oe
#
set path=(/usr/local/mpich/bin $path)
mpirun -machinefile $PBS_NODEFILE -np 6 \
 /usr/local/bin/multirun -m /home/me/run6.sh
3. Submit the job to the batch system:
qsub -l nodes=3 myjob.sh
This job will run 6 instances of the program on 3 nodes.
Once a batch job has been submitted it can be monitored using both command line and web-based tools.
Using either the jobload command or the user job monitor (see below), you can determine the overall behavior of your job based on the load of each node. Perfectly behaving jobs will have loads of near 100% on all nodes. If the nodes in a parallel job are running at loads below 75% (or are green), the job probably isn't scaling well, and you should rerun the job with fewer nodes. Loads of less than 75% for non-parallel jobs may mean that not all processors are being used, or that the job is i/o bound. Contact the Biowulf staff for help in deciding whether your job is making best use of its resources.
The sections below provide information about various ways of monitoring your jobs.
qstat
The qstat command reports the status of jobs submitted to the batch system. 'qstat -a' shows the status of all batch jobs; 'qstat -n' shows, in addition, the nodes assigned to each job. Qstat with the "-f" switch gives detailed information about a specific job, including the assigned nodes and resources used. See the man page for 'qstat' for more details.
freen
The freen command can be used to determine the currently available nodes (free/total):
% freen

        m1024   m2048   m4096   Total
------------- GeneralPool -------------
o2800   /       17/91   1/241   18/332
o2200   /       84/223  27/44   111/267
o2000   /       6/40    /       6/40
p2800   31/80   125/204 63/63   219/347
p1800   31/33   4/4     /       35/37
-------------   Myrinet   -------------
o2200   /       11/67   /       11/67
o2000   16/48   /       /       16/48
p2800   22/38   /       /       22/38
------------- Infiniband  -------------
o2800   /       /       4/60    4/60
-------------  Reserved   -------------
o2800   /       /       14/15   14/15
o2600   /       /       0/39    0/39
o2200   /       /       4/14    4/14
jobload
The jobload command is used to report the load on nodes for a job or for a user:
$ jobload juser
Jobs for  juser     Node    Load
455157.biobos       p488    100%
455260.biobos       p331    100%
455261.biobos       p405    100%
455262.biobos       p451     99%
455263.biobos       p452    100%
455265.biobos       p1425   100%
561609.biobos       p506     99%
699962.biobos       p416     50%
812953.biobos       p744     50%

User Average:       88%
All but 2 nodes allocated to this user are running to capacity.
$ jobload 869186
869186.biobos       Node    Load
                    p554    100%
                    p555    100%
                    p557    100%
                    p564    100%
                    p565    100%
                    p566    101%
                    p567    100%
                    p568    100%
            Job Average:    100%
This shows a well-behaved parallel job.
# jobload 763334
763334.biobos       Node    Load
                    p1495    25%
                    p1497     0%
                    p1498     0%
                    p1500     0%
                    p1501     0%
                    p1503     0%
                    p1504     0%
                    p1507     0%
            Job Average:      3%
This last example shows a improperly running parallel job.
cluster monitor (web-based)
The web page at http://biowulf.nih.gov/sysmon lists several ways of monitoring the Biowulf cluster. The "matrix" view of the system shows the load of each node in discrete blocks of 100. For instance, block 17, row 3, column 4 (node p1734) shows a green dot, indicating that the system is 50% loaded (in this case a load of 2, where a load of 4 would be ideal). A healthy job would show yellow dots, an over-loaded job shows red and unused or severely under-loaded systems are indicated with a blue dot.
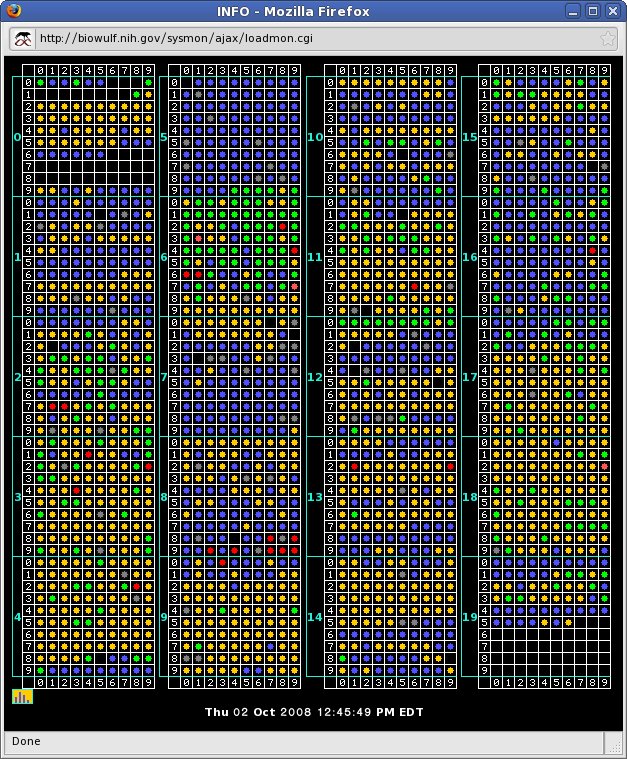
The color of the dot indicates the load percentage:
- white - the node is down
- blue - idle (load <10%)
- green - load >10% <60%
- yellow - load >60% <110%
- red - load >110%
Rolling over a dot will expose the node name and the system load (2-processor systems are at 100% load when the system load is 2, 4 processor systems are at 100% at 4, 8-processors systems at 8, etc).
Clicking on the dot corresponding to a node will result in a display of the process, cpu, disk and memory status for that node (output from the top and df commands).
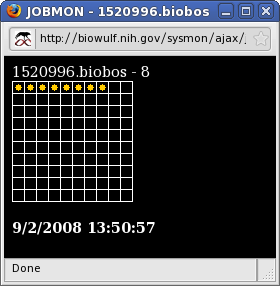
| The status of specific batch jobs can be monitored by first clicking on List Status of Batch Jobs which gives output similar to qstat, and then clicking on the Job ID of the job of interest. This results in the display of a matrix which contains dots only for the nodes allocated to the job. The loads of those nodes can be monitored in same way as for the system as a whole. |
 |
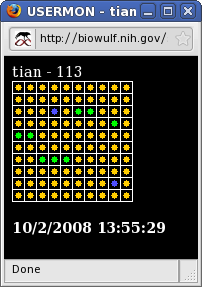 |
Finally, the sum total of nodes allocated across all jobs to a user can be monitored by clicking on Username. Again, for both JobID and Username monitoring, clicking on a dot corresponding to a node results in a display of information about the node. |
|
On clusters like Biowlf, nodes are physically separated from one another with the exception of a high-level network link (Ethernet, Myrinet, Infiniband etc). Since it is impossible to "share" memory between processes on separate nodes, processes must explicitly pass memory, or "messages" between themselves over the network link via a common protocol. In most cases, the protocol used is MPI (Message Passing Interface) - there are others but parallel programmers primarily use some implementation of the MPI standard. |
On Biowulf there are three possible network links (see node configurations chart above for numbers and types of nodes) that our parallel applications are built for:
- Ethernet - most common, available on all nodes but is the least scalable. Most nodes run at 1 Gb/s.
- Myrinet2000 - Available on a small subset of nodes, 2 Gb/s, much lower latency than Ethernet.
- Infinipath - Available on a small subset of nodes, 4 Gb/s very low-latency.
For more information on MPI on Biowulf, see the Libraries and Development page. This page pertains mostly to developers but is also useful to users that want to know a little more about the compilers, MPI implementations and libraries available on Biowulf.
MPI over Ethernet on the Biowulf cluster is primarily provided by MPICH2, a popular implementation developed at Argonne National Laboratories. Biowulf has recently switched from MPICH1 to MPICH2 for new development. Programs built with MPICH1 will need to refer to the MPICH1 page for information on launching those jobs. The information on this page pertains to starting programs built with MPICH2.
Setting the MPD password fileIf this is the first time you've used MPICH2 you'll need to create a file in your home directory (~/.mpd.conf) that consists of a single line. This command should do the trick:
[janeuser@biowulf ~]$ echo 'password=[password]' > ~/.mpd.confThis password is used internally by the process controllers and does not have to be remembered. Indeed, you'll quickly forget that it exists. Once it's created you'll need to set the permissions so that only you can read it:
[janeuser@biowulf ~]$ chmod 600 ~/.mpd.conf
Running the MPI processesOur MPICH2 installations use the MPD process manager to launch and control MPI processes. This requires three discrete steps to run a job: First, start the mpd managers on each node in your job with the "mpdboot" command. Then launch your job with "mpiexe." The last step is to tear-down your mpd managers with "mpdallexit."
Note: you will need to set your PATH to include the MPI installation used to build the application (the applications page entry for the program you're trying to run will tell you this if you did not build the program yourself). While users familiar with MPI will note that this is not strictly true, it is the only sure way to know you're getting the correct versions of the process managers and mpiexe scripts.
A minimal qsub script will look something like this:
#!/bin/bash
#PBS -N test_job
#PBS -k oe
export PATH=/usr/local/mpich2-intel64/bin:$PATH
mpdboot -f $PBS_NODEFILE -n `cat $PBS_NODEFILE | wc -l`
mpiexec -n $np /full/path/to/executable
mpdallexitThe qsub submission will look something like this:
[janeuser@biowulf ~]$ qsub -v np=8 -l nodes=4:gigeRefer to the Using the Biowulf Cluster for complete information on using the batch system.
Here is an example of a minimal batch command file for running a job over Myrinet/GM (Myrinet runs under MPICH1).
You will need to set your PATH to include the MPI installation used to build the application (the applications page entry for the program you're trying to run will tell you this if you did not build the program yourself).
#!/bin/csh
#PBS -N MyJob
#PBS -k oe
PATH=/usr/local/mpich-gm2k-pg/bin:$PATH:.
cd $PBS_O_WORKDIR
mpirun -machinefile $PBS_NODEFILE -np $np MyProg < MyProg.in >& MyProg.outThe batch job is submitted with the qsub command:
% qsub -v np=8 -l nodes=4:myr2k myjob.batNote the node specifier "4:myr2k", which results in a request for 4 nodes with the "myr2k" property (i.e., connected to Myrinet 2000).
Refer to the Using the Biowulf Cluster for complete information on using the batch system.
A note on Infiniband vs. Infinipath: The Biowulf cluster has two different high-speed networks on two subsets of cluster nodes that are based on the Infiniband standard: Infinipath and Infiniband (often refered to as IPath and IB respectively). While the hardware that drives the two distinct networks is very similar, the underling software is not. Programs compiled for one will not work on the other (see the Development page under "MPI" for information on building for these target networks).
The Infinipath network was designed specifically as a message-passing network: the manufacturer implemented only those portions of the Infiniband standard necessary to create a network for parallel applications. The result is an ultra low-latency network with relatively high bandwidth (~8 Gb/s) that they chose to call "Infinipath" (Pathscale being the company that designed the product).
The Infiniband network is the more recent addition to the Biowulf cluster and it implements the full Infiniband standard. This network is also very low-latency (though theoretically not as low as the Infinipath network) with very high bandwidth (~16 Gb/s). The real-word performance difference between these two networks will often (perhaps usually) be negligible.
Note that the default MPI on the Infiniband nodes is MVAPICH2, which is a full MPI1 and MPI2 implimentation that uses mpd daemons to manage processes by default. This is for improved start-up performance and more sensible error reporting should problems arise. In order to use mpd on the Infiniband cluster you'll need to create an ~/.mpd.conf file with a secret word in it. You only need to do this once and it's not at all necessary to worry about maintaining it:% echo 'password=password' > ~/.mpd.conf % chmod 400 ~/.mpd.confA minimal batch command file for an Infiniband MPI job might look like this:
#!/bin/bash
#PBS -N MyJob
#PBS -k oe

cd $PBS_O_WORKDIR

mpdboot -f $PBS_NODEFILE -n `cat $PBS_NODEFILE | wc -l`
mpiexec -n $np MyProg < MyProg.in >& MyProg.out
mpdallexit
The batch job is submitted with a qsub command that might look something like this. Note that the "ib" property is used to request an Infiniband node and that the IB nodes have 8 cores each.
% qsub -v np=64 -l nodes=8:ib myjob.batA minimal batch command file for an Infinipath MPI job might look like this. Note that the default MPI implimentation on the Infinipath nodes uses "mpirun" alone rather that the 3-step mpdboot/mpiexe/mpdallexit process:
#!/bin/bash
#PBS -N MyJob
#PBS -k oe

cd $PBS_O_WORKDIR

mpirun -machinefile $PBS_NODEFILE -np $np MyProg < MyProg.in >& MyProg.out
A request for Infinipath nodes may look like this:
% qsub -v np=64 -l nodes=32:ipath myjob.batRefer to the Using the Biowulf Cluster for complete information on using the batch system.
See the Programming Tools and Libraries page.
Particularly with parallel programs, it's important that you benchmark your job to make sure subsequent runs perform with an acceptable degree of efficiency. Specific benchmarking information can be found, if applicable, on the applications page, if the program is maintained by us.
Biowulf nodes are heterogeneous with respect to architecture (x86_64, i686), processor speed, memory size, and networks. The batch system will not distinguish between nodes of differing cpu clock speeds, memory sizes or networks. This will have no consequences for most production codes (other than varying runtimes), however, if you are running benchmarks, you will want to specify processor speed and memory size:
qsub -l nodes=4:p2800:m2048 myjob.bat   # run on 2.8 GHz Xeon/2 GB nodes

qsub -l nodes=4:o2800:m4096 myjob.bat   # run on 2.8 GHz Opteron/4 GB nodes
