 |


|
|
Level I Glider
Grades 4-6
Description
This is a Balsa wood glider 11 1/2 inches (29 cm.) long. It has one major
problem with its design. What can you do to make it fly better - that
is - to make it fly farther, or to make it have longer time aloft. These
are the materials you can work with and your teacher will guide you through
research that will teach you about flight. Try the scientific method,
just like the Wright brothers, and experiment and test a few designs to
see what will make this glider fly better. Good luck and have fun!
Materials
- Template-Print at
100%
- manila folder
- scissors
- glue stick
- wood glue
- Scotch tape
- sandpaper (fine)
- Balsa 1/16 "
- Spruce 1/8" (optional - see Teacher Tips)
- clamps
- clay
Procedures
- Glue template page to manila folder with glue stick.
Allow 15-20 minutes to dry.
- Cut out pattern carefully. By being glued to the
folder, the pattern is easier to handle.
- Lay pattern on Balsa and trace around it with pencil.
- Cut out parts.
- Sand rough edges - very lightly - holding sand
paper at an angle.
- Beginning at midpoint of fuselage, sand fuselage
- very lightly - to taper down from 1/8" at midpoint to 1/16"
at tail.
- Assemble by matching letters - A on wing matches
A on fuselage, etc.
- Glue it with wood glue and set up light pressure
(clamps or substitute) to keep glued edges in place. Allow 24 hours
for glue to dry completely.
- Test Flight.
Let the redesign and testing begin!
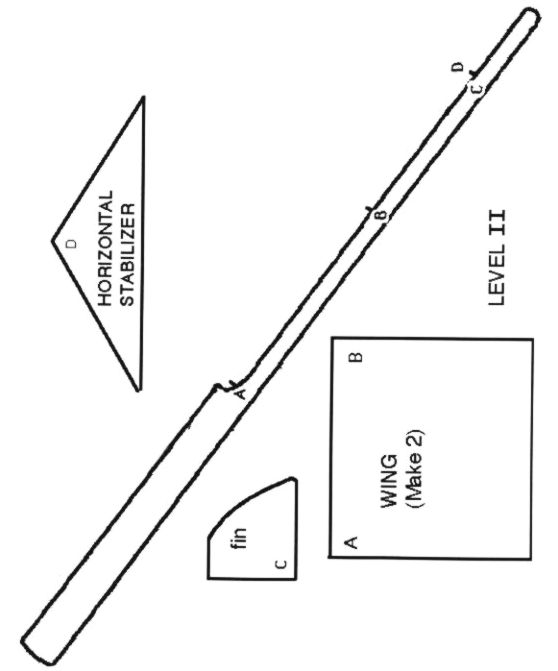
Level II Glider
Grades 6-8
Description
This is a Balsa wood glider 11 1/2 inches (29 cm.) long. It has a few
major problems with its design. What can you do to make it fly better
- that is to make it fly farther, or to make it have longer time aloft.
These are the materials you can work with and your teacher will guide
you through research that will teach you about flight. Try the scientific
method, just like the Wright brothers, and experiment and test a few designs
to see what will make this glider fly better. Good luck and have fun!
Materials
- Template-Print at 100%
- manila folder
- scissors
- glue stick
- wood glue
- Scotch tape
- sandpaper (fine)
- Balsa 1/16 "
- Spruce 1/8" (optional - see Teacher Tips)
- clamps
- clay
Procedures
- Glue template page to manila folder with glue stick.
Allow 15-20 minutes to dry.
- Cut out pattern carefully. By being glued to the
folder, the pattern is easier to handle.
- Lay pattern on Balsa and trace around it with pencil.
- Cut out parts.
- Sand rough edges - very lightly - holding sand
paper at an angle.
- Beginning at midpoint of fuselage, sand fuselage
- very lightly -to taper down from 1/8" at midpoint to 1/16"
at tail.
- Assemble by matching letters - A on wing matches
A on fuselage, etc.
- Glue it with wood glue and set up light pressure
(clamps or substitute) to keep glued edges in place. Allow 24 hours
for glue to dry completely.
- Test Flight.
Let the redesign and testing begin!
Teacher Tips
Class Handouts
There is a balsa wood glider that has won competitions and stayed aloft
over twenty minutes before they quit timing it officially. It's over 15
years old now and has a lot of nicks in it, but it's still a great flier.
Another one just like it found a thermal outside, and it just flew off
over the horizon. No kidding - they never found it. There are secrets
to this. We can tell you a few and the rest you have to discover. (If
this is irresistible, look at template "The
Greatest".)
Most importantly, these gliders (Level I and Level II) will be made by
hand (not in a hurry), sanded gently, and when it is time for gluing,
the glued edges must have some light pressure on them and set for 24 hours.
Materials
- Template, manila folder, scissors, glue stick,
Scotch tape, sandpaper, clamps and clay are all ordinary, common materials.
- Wood glue can be Elmer's Glue-All multi-purpose
or more expensive, like Weldbond Universal Space Age Adhesive. Both
are excellent and non-toxic.
- Balsa wood 1/16" - a sheet 8" X 10"
for each model. Allow at least two sheets or equivalent for each student
to allow for ample margin of error and experimentation, maybe even more.
- Spruce wood may be used for fuselage. It is slightly
denser, therefore the model is stronger and easier to work with. If
Spruce is used, then have it precut in sticks 11 1/2" (29 cm.)
long. If Balsa wood is used, have the fuselage pieces precut also, for
keeping that part standard.
Construction Procedures
- Remind students that this is like most any art
- you work carefully and with a light touch to get the best results.
- The wings, rudder, and horizontal stabilizer are
sanded so that both the leading edges and trailing edges are almost
knife like.
- For best results, the wings should be on top of
the fuselage. Same with tail assembly.
- The edges that meet for gluing should be lightly
sanded. Glue should be adequate amount, but not globs. Pressure can
be from clamps, clothespins, weight of a book - whatever will hold it
firmly for 24 hours. It might be appropriate to have this as a weekend
homework project.
- Clear off some bookshelves and assign each student
their "hangar".
Level I Aeronautical Explanations
- Being that this project allows only one part of
the glider to be changed, hopefully it has become obvious to the students
that it is the wing. Tell the students first of all, the wings have
to support the airplane. Ask them if they think these wings can do that.
Do the best flying birds like eagles and hawks have small or large wings?
- Besides size, you must consider shape. Look at
pictures of gliders. What is the shape of that wing? Introduce "wing aspect ratio". After finding a desirable
ratio range, then notice further differences such as straight, rounded,
and tapered. See Helpful Hints. Stay away from
sweptback, as they are used in high performance jets generally. You
might consider dihedral.
- Next consider Center
of Gravity (CG). Every change made to the glider, such as moving
the wings fore or aft, changing the size or shape, will automatically
affect the CG. If the CG is too far forward, the glider nose will pitch
down. If the CG is too far aft, the glider nose will pitch up. So to
fine tune the balance, (CG), try moving the wings very slightly fore
or aft first. Also use a bit of clay (about one M & M size) all
gently pinched on the nose to fine tune the CG. If Balsa wood fuselage
is used, you may need to add a very small pinch of clay to compensate
for less density - equal amounts both fore and aft of CG.
Level II Aeronautical Explanations
- Go through the same explanations for wings as Level
I.
- Because you are not allowed to alter the fuselage,
and we have just looked at the wing, what is left? Right, the tail assembly,
also known as the empennage. This includes the horizontal stabilizer,
vertical stabilizer (fin), and the rudder. (Although this glider model
will not have a moveable rudder.)
- Here again, you consider the size, shape, and placement
of individual parts. If you have CG problems, consider first of all
the weight and therefore the size of the empennage.
- Look at other airplanes. See Helpful
Hints to see if the tail shape somewhat matches the wing shape.
If you decide to try elliptical (rounded) edges, usually if they are
the leading edge, they are more streamlined (less drag).
Launching Tips for Both Levels
- "Trim" (balance) your glider so that
it flies straight and level, before you go for distance or time aloft.
You can add a really tiny bit of clay pinched onto a wing if it has
the tendency to turn either right or left.
- To launch for distance, hold your hand under the
fuselage partially under the wing and throw it straight ahead. You'll
have to test it several times to learn the right amount of force to
use. Sometimes maximum force throws it out of control. Practice, Practice,
Practice - another good homework assignment.
- If your distance glider wants to glide right on
out of your test facility (classroom), you undoubtedly have a pretty
good time aloft glider also. So try that inside a huge place with a
high ceiling, like the gym, or outside. If outside, look for a thermal
like warm air rising off blacktop or cement. To launch this one, hold
it as before except with your forefinger right at wing root and throw
it almost straight up like a baseball as hard as you can. If you have
trimmed this model to circle (add a very tiny pinch of clay to one wingtip)
and you find a thermal, it will circle around and around for quite some
time.
- Your final "Flight Tests" would make
a great Air Show for the rest of the school to enjoy. You could start
an annual event with trophies and photos to display from year to year.
You could design certificates of award. And most definitely have some
documentation for the serious aeronautical career bound student to start
his or her portfolio.
Happy Flying!!!
Definition of Terms
| Aerodynamic design - |
designed to produce as much lift with as
little drag as possible. |
| Center of Gravity (CG)
- |
the theoretical point where the entire
weight of the airplane is considered to be concentrated. |
| Chord line - |
an imaginary straight line drawn the wing
from leading edge to trailing edge. |
| Denser - |
greater mass to its volume. |
| Dihedral - |
the upward angle of an airplane's wings
with respect to the horizontal. Dihedral contributes to the lateral
stability of an airplane. |
| Fuselage - |
the body of the plane and attachment point
for other major airplane components. |
| Horizontal stabilizer - |
part of tail which is parallel to fuselage. |
| Leading edge - |
the front part. |
| Taper- |
a gradual decrease in width and thickness. |
| Thermal - |
rising column of warm air. |
| Trailing edge - |
the back part. |
| Trim - |
to balance an aircraft. |
| Wing aspect ratio -
|
span of the wing, wingtip to wingtip, divided
by its average chord. In general, the higher the aspect ratio, the
higher the lifting efficiency of the wing. |
|
|


