FDA Home Page |
Search FDA Site |
FDA A-Z Index |
Contact FDA
Prior Notice of Imported Foods
July 2005
FDA Industry Systems
Prior Notice Systems Interface (PNSI)
Prior Notice for Food Articles
Step-by-Step Web System Instructions
for PNSI "Wizards"
New Features in the Prior Notice System Interface (PNSI)
This document may be printed directly from your browser.
To aid in reading a printed copy it is recommended that it be printed in "landscape" mode. (Help)
Screens, descriptions, and examples are subject to change as
enhancements are made to the system.
They are not intended to take the place of the written regulations found
at:
http://www.cfsan.fda.gov/~pn/pnfr.html
Table of Contents
"Wizard" is a term often used to describe an optional help utility that walks the user through the steps of common tasks in an application. Several wizards are provided in FDA's Prior Notice System Interface (PNSI).
For complete instructions on how to submit a Prior Notice through PNSI see Prior Notice for Food Articles Step-by-Step Web System Instructions for PNSI
Using the Carrier Code Wizard
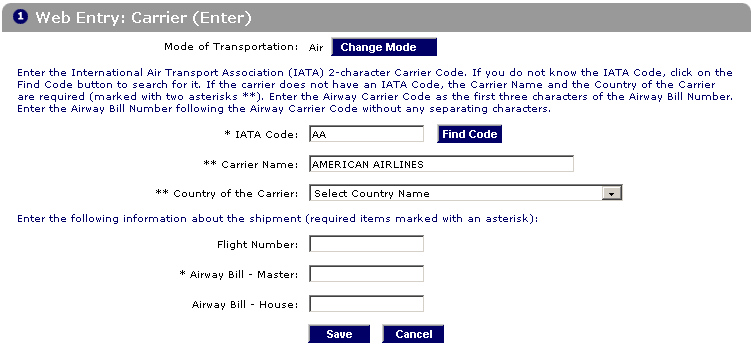
- Choose the Find Code button on the Web Entry:
Carrier (Enter) page (Figure 12) to display the Find Carrier
Code page (Figure 13).
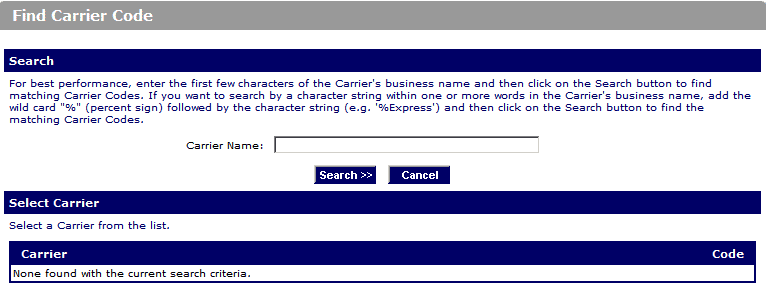
- Enter at least three characters of the carrier's business name in the
Carrier Name box and Choose the Search button. A list of Carriers will display in the Carrier section.
Figure 13:
- Choose the appropriate carrier in the Carrier column (Figure
14). The Web Entry: Carrier (Enter) (Figure 14b) page will display
with the Carrier Code and Carrier Name populated.
- Continue entering Carrier Information.
Figure 14:
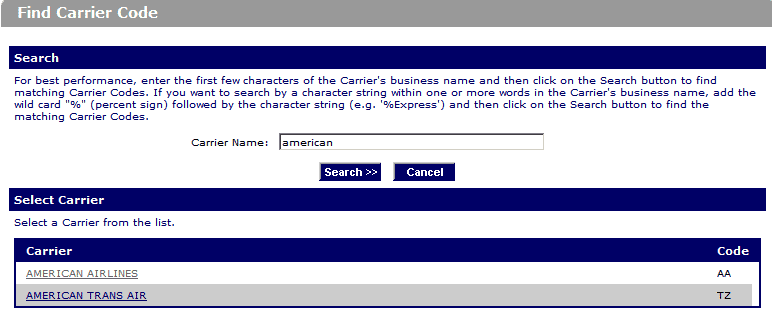
Figure 14b:
Using the Product Code Wizard
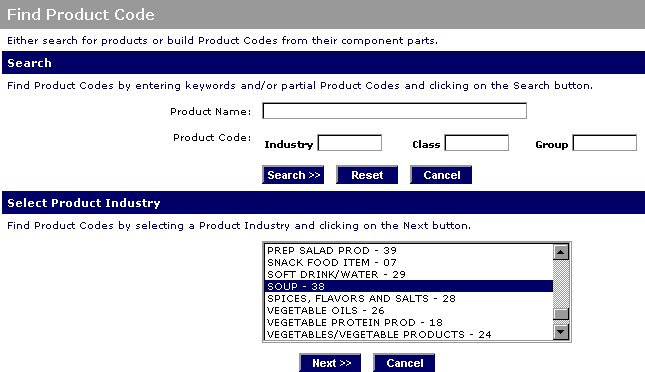
- Choose the Search button in the Product Information section (Figure 18) to display the Find Product Code page (Figure 22).
- On the Find Product Code page search for a particular Product Code by either:
- Entering keywords in the Product Name box and/or portions of the Product Code, or
- Building the Product Code by selecting its component parts: Industry,
Class, and Group. In this example we will build the Product Code for canned bean
and mushroom soup by selecting the component parts of the Product Code.
Scroll through the list and Select Product Industry (e.g., SOUP - 38) and then choose the Next button.
Figure 22:
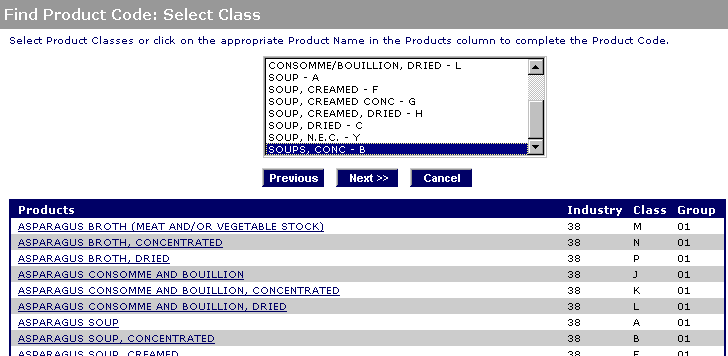
- The Find Product Code: Select Class page displays (Figure 23), listing all products within the selected Product Industry. Select a Product Class (e.g., SOUPS, CONC - B) and then choose the Next button.
Note: On the Find Product Code: Select Class page, you may also scroll through the list and choose the desired product.
Figure 23:
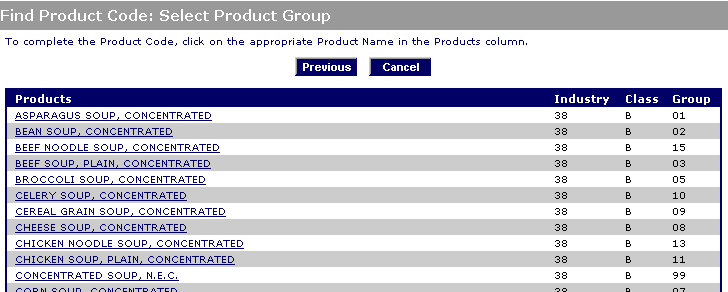
- The Find Product Code: Select Product Group page displays all Product Groups
within the Product Class (Figure 24). Select a Product Group by choosing a Product
in the Products column (e.g., MIXED VEGETABLE SOUP, CONCENTRATED).
Figure 24:
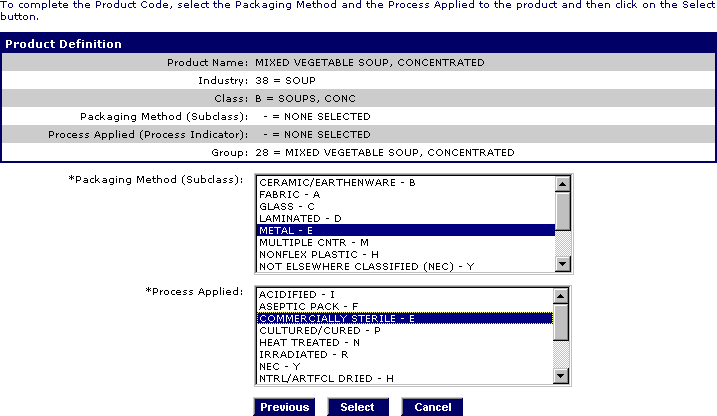
- The Find Product: Complete Product Definition page displays (Figure 25), prompting
you to indicate the appropriate Packaging Method (e.g., METAL - E) and Process
Applied (e.g., COMMERCIALLY STERILE - E). This completes the Product Code Definition.
- Choose the Select button to select the Product Code for your article.
The Prior Notice: Article (Create) page will display, including the complete Product Code (e.g., 38BEE28) and definition (e.g., MIXED VEGETABLE SOUP, CONCENTRATED, METAL, COMMERCIALLY STERILE ).
- Continue entering Product Information.
Figure 25:
Using the Packaging Wizard
- Choose the Wizard button from the Quantity and Packaging section. (Figure 20)
- Quantity and Packaging - Step 1: (Figure 44) Select if the article
is Packaged or Bulk shipped, then choose the Next button.
For this example we will be shipping 1 box containing 8 cartons of 24 cans each. The cans have a base unit of 16 oz.
Figure 44:

- Quantity and Packaging - Step 2: (Figure 45) Enter the Base
Unit,
the weight or volume (measure) of the smallest package you
are shipping, then choose the Next button.
For this example, the smallest unit is a can. These cans weigh 16 oz. each, so for the Quantity enter 16 and for the Measure enter ounces, weight (avdp).
Figure 45:

- Quantity and Packaging - Step 3: (Figure 46) Enter the Quantity
and Package Type of the next level of packaging, then choose
the Next button.
For this example, the smallest unit of packaging is a can. These cans get shipped in groups of 24.
For Quantity enter 24; for Package Type enter Can, Cylindrical.
Figure 46:

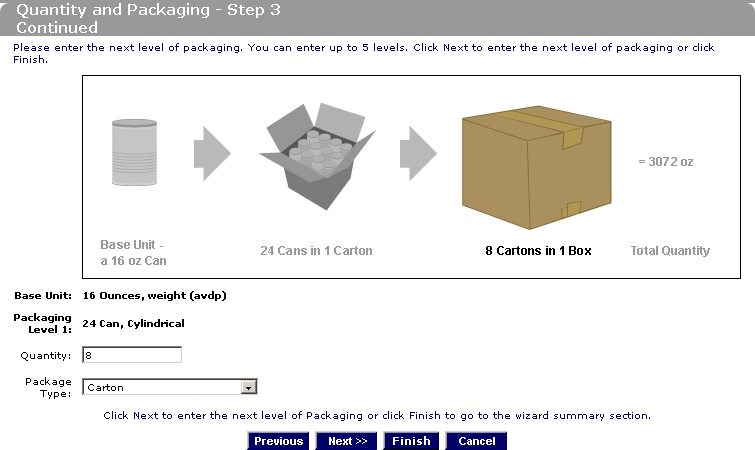
- Quantity and Packaging - Step 3 Continued: (Figure 47) Continue
entering Quantity and Package Type of the next levels of packaging.
Choose the Next button
to add up to 5 levels.
In this example, the cans are packed in cartons, so the next level of packaging is cartons. The cartons are shipped in groups of 8. For Quantity enter 8; for Package Type enter Carton.
Figure 47:
- Quantity and Packaging - Step 3 Continued: (Figure 48) Enter
the Quantity and Package Type of the last level of packaging,
then choose the Finish button.
In this example, the cartons are packed in boxes. There is only 1 box in this shipment.
For Quantity enter 1; for Package Type enter Box.
Figure 48:

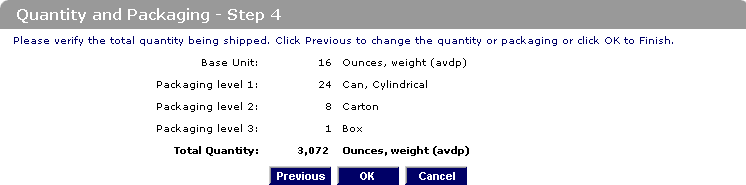
- Quantity and Packaging - Step 4: (Figure 49) Review the information
you have entered. If it is correct, choose the OK button. If it
is incorrect, choose the
Previous button to go back and correct the packaging information.
Figure 49:
- The system will return to the Prior Notice: Article (Create) page with the Quantity and Packaging information you have entered using the Wizard in the appropriate places. (Figure 20)
- Choose the Save button. (Figure 20) The
system validates the information entered, determines from the product code
whether the product entered is manufactured or grown and goes directly
to the Prior Notice: Related Facilities (View) page. Begin Adding Related Facility information.
For more information see:
See also Create New Account Quick Start Guide