FDA Home Page |
Search FDA Site |
FDA A-Z Index |
Contact FDA
Prior Notice of Imported Foods
December 2004; Updated August 2005
FDA Industry Systems
Prior Notice Systems Interface (PNSI)
Prior Notice for Food Articles
Step-by-Step Web System Instructions
for PNSI Version 1.9
New Features in the Prior Notice System Interface (PNSI)
This document may be printed directly from your browser.
To aid in reading a printed copy it is recommended that it be printed in "landscape" mode. (Help)
Screens, descriptions, and examples are subject to change as
enhancements are made to the system.
They are not intended to take the place of the written regulations found
at:
http://www.cfsan.fda.gov/~pn/pnfr.html
Table of Contents
The Prior Notice Concept: Terms
- Prior Notice
- Notification to the US Food and Drug Administration (FDA) of imported
shipments of articles of food prior to their arrival in the United States.
- Includes information about the product, quantity, and packaging,
and related facilities, such as the manufacturer, shipper, owner, and ultimate consignee.
Information required varies by entry type.
- Anyone who has knowledge of the required information about an imported
shipment may submit prior notice through the FDA Prior Notice System Interface.
- Brokers and filers who currently submit Entries for admissibility
processing through the Automated Broker Interface (ABI) to the Bureau of Customs and Border Protection
(CBP) Automated Commercial System (ACS) can submit Prior Notices through that system.
- Article
- "Article" is a food subject to prior notice.
- Web Entry
- The information that applies to one or more Articles
subject to prior notice requirements in one shipment.
- Includes information such as the anticipated arrival port, date, and
time, the submitter, importer, and the carrier. Information required varies by entry type.
- Tutorials may cover additional terms you need to understand in their context.
Accessing the Prior Notice System Interface
- Navigate to the FDA Industry Access page (www.access.fda.gov).
- On the FDA Industry Access page, choose the Login button.
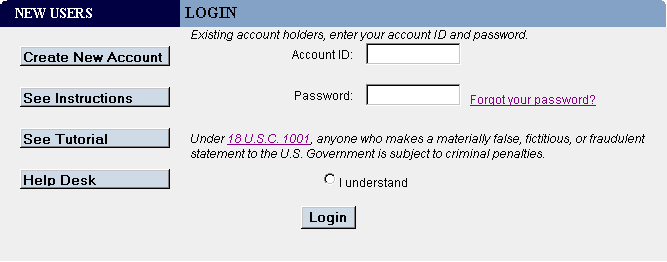
- On the Login page (Figure 1), enter your FDA Industry Systems Account ID and Password.
- If you do not have a user account, create a user account by choosing "Create
New Account" under the New Users section. (See the FURLS
documentation for information on creating a user account.)
- Confirm that you understand the consequences of 18 U.S.C. 1001 by choosing I understand.
- Choose the Login button.
Figure 1:
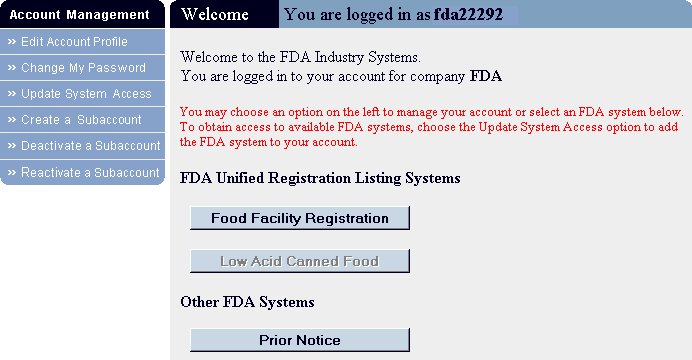
- The FURLS Welcome page displays (Figure 2), listing the menu
of systems to which you have access.
- Choose the Prior Notice button.
Figure 2:
- The Welcome to the Prior Notice System Interface page displays (Figure 3), listing the options to which you have access on the left side.
-
Get Started opens a Help module that explains how to submit a Prior Notice.
- Learn New Features opens a Help module describing New Features available
in this Version of the Prior Notice System Interface.
- Create New Web Entry guides you to the first step in creating a Prior Notice.
- Find Existing Web Entry allows you to find a Web Entry that you or your company has already created.
- Find Existing Prior Notice allows you to find a Prior Notice that you or your company has already created.
- New in version 1.5: View/Submit Holding Facility allows you to submit Holding Facility information for a Prior Notice that has already been submitted, even if the Prior Notice has been transmitted through the U.S. Customs and Border Protection's (CBP) Automated Commercial System (ACS) or by another PNSI user.
- Choose the Create New Web Entry button to display
the
Web Entry (Create) page (Figure
4).
Figure 3:

Creating a New Web Entry
Creating a Web Entry
- For this example, select Consumption from the Entry Type drop-down
list (Figure 4b). Consumption is one of many entry types subject to prior
notice. All parts of this tutorial refer to the Consumption entry type. Other
entry
types, such as Transportation and Exportation or Mail, require slightly different
information.
- Choose the Next button. (Choosing Cancel would return you
to the Welcome to the Prior Notice System Interface page.)
Figure 4:

Figure 4b:

-
Input Entry information (Figure 5):
-
Entry Identifier. If you have one for the shipment, enter the
CBP Entry Number in the Entry Identifier box. If you do not have a CBP assigned
Entry Number, check the Not Known checkbox to have the system generate an Entry Number.
- How Many...? Enter the number of Prior Notices your company intends to submit for this Web Entry, i.e. the number of articles of food in the shipment subject to the prior notice requirement. This number
is an estimate that you can increase or decrease prior to submission.
Figure 5:

- Enter the Port of Arrival information (Figure 6):
- Port of Arrival. Enter the Port Code, if you know it. Otherwise, select the State where the Port of Arrival is located, and choose the Find Port Code button to find the Port Code.
- Anticipated Border Crossing. Enter the name of the specific crossing
point, such as the bridge name, if the Port of Arrival has multiple crossing points.
- Anticipated Arrival Date. Enter the date you expect the
shipment to arrive at the Port of Arrival in US date format: MM/DD/YYYY or choose the calendar icon to find a date.
- Anticipated Arrival Time. Enter the anticipated time of arrival in the time zone of the Port of Arrival. Using a 24 hour clock format: HH:MM, select the time using the dropdown lists.
Figure 6:

Creating a Submitter
Enter the Submitter information (Figure 7): The Submitter of a Web Entry is the individual in the Submitting Firm
with knowledge of the required prior notice information submitted to
FDA. As the individual logged into this system, you are the "Transmitter" of the data, and may or may not be the Submitter.
- If you are the Submitter of this Web Entry, select Yes in the dropdown list.
- If you are not the Submitter, do the following:
- a) Select the Country containing the Submitter's business location.
- b) Choose the Enter Submitter button.
Figure 7:

- c) In the Web Entry: Submitter (Enter) page
(Figure 8), if you have the Submitter's Food Facility Registration Number
(issued when the facility was registered
with FDA's Food Facility Registration System), enter it, the Submitting
Individual's Name, Business Name, City, and Country. If you
do not have a Food Facility Registration Number enter all
required information, denoted by asterisks, and the phone, fax, or e-mail
contact information for the Submitter if they exist.
- d) Choose the Save button. You may be asked to confirm the address (Figure 8b). The Web Entry page
will display with the Submitter information in
static text (Figure 8c).
Figure 8:

Figure 8b:

Figure 8c:

Creating an Importer
- If the Importer and Submitter are the same, select Yes in the dropdown
list (Figure 9).
- If not, do the following:
- a) Select the Country where the Importer's business is located.
- b) Choose the Enter Importer button. The Web
Entry: Importer (Enter) page displays (Figure 10).
Figure 9:

- c) In the Web Entry: Importer (Enter) page
(Figure 10), if you have the Importer's Food Facility Registration Number,
enter it, and the Importer's Business Name and City. If you do not have the Importer's Food Facility Registration Number,
enter all required information, denoted by asterisks.
- d) Choose the Save button. The Web Entry page
will display with the Importer information in static text.
Figure 10:

Creating a Carrier
-
Enter Carrier Information (Figure 11):
-
a) In the Web Entry (Create) page, select
the Mode of Transportation from the dropdown list (Figure 11b), then choose
the Enter Carrier button. Note: Options may vary depending on your Entry Type. (e.g. New in version 1.5: Modes of Transportation "Express Courier - Air" and "Express Courier - Land" will only appear when the Entry Type "Consumption, Express Courier" has been chosen.)
Figure 11:

Figure 11b:

- b)
Using the Mode of Transportation "Air" in this example,
describe the carrier by entering the International Air Transport Association (IATA)
code (Figure 12). If you do not know the code, choose the Find Code button
to display the Find Carrier Code page and use the Carrier Code Wizard. (See the additional section for further
detail on Using the Carrier Code Wizard)
If there is no Carrier Code, then enter the Carrier Name, and Country of the Carrier.
Note: Required information may vary by mode of transportation.
- c) To describe the shipment, enter the Flight Number and the Airway Bill Numbers. The valid format for the Bill of Lading Number is a minimum 5 characters and a maximum 16 characters that are either letters or numbers. The valid format for Airway Bill Number is AAANNNNNNNN, where A is a letter or a number and N is a number.
- d) Choose the Save button. The Web Entry page
will display with the Carrier information in static text.
Figure 12:

(For Figures 13 - 14b see Using the Carrier Code Wizard)
Editing and Saving a Web Entry
- Review all of the Web Entry information to make sure that it is accurate (Figure 15). To
modify Web Entry information, choose the Edit button in any section header.
- Choose Save to save the Web Entry. You will see the Web Entry
(View) page with the Web Entry information in static text (Figure 15b) You
will also now have the option to choose Create Prior Notice.
Note: You
may continue to modify your Web Entry information until you or your company
has submitted the first prior notice for this Web Entry.
Figure 15:

Figure 15b:

Creating and Submitting a Prior Notice
Creating a Prior Notice
-
To create a new prior notice for this Web Entry, choose the
Create Prior Notice button at the top or bottom
of the Web Entry (View) page (Figure 16).
Figure 16:

- The Prior Notice: Article (Create) page displays
with the Entry Identifier of your Web Entry.
- Enter the Article Information (Figure 17).
- a) Select the Country from which the Article is Shipped.
Note that this country does not have to be the same as the business location of the Shipper.
- b) Enter the Harmonized Tariff Schedule (HTS) Code, a
numeric code assigned to various commodities listed in the Harmonized Tariff Schedule of the United States Annotated. For
prior notice, only the first 6-digits of
the HTS Code are required but the system will accept 6, 8, or 10 digit codes. (For more information see the list of Harmonized Tariff Schedule Codes
Flagged with Prior Notice Indicators)***
Figure 17:

- Enter the Product Information (Figure 18).
- a) Enter the FDA Product Code. (If you do not know the Product Code, choose the Search button to display the Find Product Code page and use the Product Code Wizard. See the additional section for further detail on Using the Product Code Wizard.)
- b) Enter the Common or Usual Name/Market Name of the product.
Figure 18:

- Enter the Production Identifiers (production lot codes
or production batch identifiers), if the product is required to bear such numbers by the FD&C Act or by FDA regulations (Figure 19). Examples of products
requiring Production Identifiers include low acid canned foods, acidified
foods, and low acid canned infant formula.
- a) Choose the Add button in the Production Identifiers section header
to go to the Prior Notice: Production Identifiers (Add) page
(not shown) and enter the information.
- b) When you are finished adding Production Identifiers, select the Save button and the Production Identifier section of the Prior Notice: Article
(Create) page changes to display them (Figure
20).
- c) Check the box in front of an identifier and choose the Delete button in the Production Identifiers section header to delete any incorrect Production Identifiers.
Figure 19:

- Enter the Quantity and Packaging (Figure 20).
- a) Enter the base unit: the weight or volume of the smallest
unit, or the weight or volume of the bulk shipment. You must create a separate Prior Notice for each article of food with a different base unit.
- b) Indicate whether the product is bulk-shipped using the checkbox.
- c) If the product is not bulk-shipped, provide the estimated quantity of food that will be shipped, described from the largest container to the smallest package size (up to five packaging levels may be provided.) For example, 100 Cases, 40 Cans per Case with a base
unit of 16oz per Can.
- d) Choose the Calculate button to calculate the Total
Quantity. If the calculated total quantity is not correct,
correct the base unit or numbers of containers to arrive
at the correct Total Quantity.
- e) New in version 1.5: You may also use a Packaging Wizard to help you enter this information by choosing the Wizard button. The Wizard assists users in entering the Quantity
and Packaging information in a step-by-step process.
Figure 20:

- Choose the Save button. (Figure 20) The system validates the information
entered, determines from the product code whether the product entered
is manufactured or grown and goes directly to the Prior Notice: Related Facilities (View) page. Begin Adding Related Facility information.
- When Copying a Prior Notice, choosing the Save button displays the Prior Notice: Article (View) page (Figure 21). Choose the Related Facilities tab to begin
Adding Related Facilities to your prior notice. Use this tab to get to the Prior Notice: Related Facilities (View) page at any time.
Figure 21:

(For Figures 22 - 25 see Using the Product Code Wizard)
Adding Related Facilities
- In this example, the product you have entered is no longer
in its natural state. The system determines this from the Product Code selected earlier and
provides the interface for entering information about the Manufacturer of the
Article. (See Step 1a of this section if the product you have entered is in its natural state) Select the FDA Country of Production from the dropdown box in the Manufacturer section of the
Prior Notice: Related Facilities (View) page and choose the
Enter Manufacturer button (Figure 26). The Prior Notice: Manufacturer (Enter) page will display,
the Country of Production you selected displaying as the Country (Figure 27).
Figure 26:

- a)
For most Entry Types, you must have the Food Facility
Registration Number of the Manufacturer of the product
in order to submit
the Prior Notice. This number was issued when the manufacturer registered with
the FDA using FDA's Food Facility Registration System. Enter the Food Facility
Registration Number, Business
Name, and City. If the registration number provided does not match the manufacturer name, city and country, transmitters will receive a message prompting them to provide the street address for the manufacturer.
- b) If the Manufacturer is not required to register according to the Registration Rule or the Manufacturer identity is not known, select the checkbox indicating this, select the reason the manufacturer is not required to register or is not known from the dropdown box, and provide Name and all address information available.
- c) For some Entry Types if you do not have the Food Facility Registration Number, simply provide the Name and complete address information of the Manufacturer.
- d) Choose the Save button.
Figure 27:

-
1a. Alternately, if the product you have entered is in its natural
state, the Prior Notice: Related Facilities (View) page
will display a section for information on the Grower/Consolidator of
the product. Select the FDA Country of Production from the dropdown box in
the Grower/Consolidator section of the Prior Notice: Related
Facilities
(View) page and choose the Enter Grower/Consolidator button (Figure
26a). The Prior Notice: Grower/Consolidator (Enter) page
will display, the Country of Production you selected displaying as the Country
(Figure 27a).
Figure 26a:

- a) If you do not have the Grower/Consolidator information, mark the checkbox to indicate that the Grower/Consolidator is Unknown and choose the Save button.
- b) If you do have information on the Grower/Consolidator, first use the Facility Type dropdown box to indicate whether the Facility is a Grower or a Consolidator.
- c) If you have the Facility's Food Facility Registration Number, enter it. Also enter the Name and complete growing location address information of the Grower/Consolidator.
- d) Choose the Save button.
Figure 27a:

- Prior Notice returns to the Prior Notice: Related Facilities (View) page
(Figure 28). Here you may edit the Manufacturer or Grower/Consolidator information by choosing
the Edit button for that section. You may also enter the information
for the other Related Facilities: Shipper, Owner, Ultimate Consignee, and
Holding Facility here.
Note: Not all entry types require every facility.
Figure 28:

- To Enter the Shipper
- a) Select the Country where the shipper is located (Figure 28).
- b) Choose the Enter Shipper button.
- c) In the Prior Notice: Shipper (Enter) page
(Figure 29), enter the Shipper's Food Facility Registration Number, Business
Name and City, or enter all required data denoted by asterisks. If the Shipper is the same Facility as another that you have already entered for this Prior
Notice, select the Facility and choose the Save button.
Note: If you indicate that the Shipper is the same as another facility (e.g. the Manufacturer or Grower/Consolidator) the system will ignore any other data you enter for the Shipper.
- d) Choose the Save button. The View Prior Notice: Related Facilities (View) will display with the Shipper information in static text
Figure 29:

- Enter the Owner of the article of food at the time of Prior
Notice submission.
- a) Select the Country where the Owner's business is
located from the dropdown box (Figure 28).
- b) Choose the Enter Owner button. The Prior Notice: Owner (Enter) page displays (Figure 30).
- c) If the Owner is the same Facility as another that you have already entered for this Prior Notice, select the Facility and choose the Save button.
Note: If you do this, the system will ignore any other data you enter for the Owner.
- d) Enter the Owner's Food Facility Registration Number, Business Name,
and City, or all required address information denoted by asterisks.
- e) Choose the Save button. The Prior Notice:
Related Facilities (View) will
display with the Owner information in static text.
Figure 30:

- Enter the Ultimate Consignee by choosing the Enter Ultimate Consignee button
(Figure 28). The Prior Notice: Ultimate Consignee (Enter) page
is displayed. The Ultimate Consignee must be located in the United States.
The process is the same as for Owner.
-
If CBP has already directed your food article to a Holding Facility, enter the Holding Facility of the article of food at the time of Prior Notice submission.
New in Version 1.5: If you did not transmit the Prior Notice through PNSI you may still Submit Holding Information after any Prior Notice Submission.
- a) If you need to enter information about a holding facility Choose the Enter Holding Facility button. The Prior Notice: Holding Facility (Enter) page will display (Figure 31).
- b) Enter the Specific Holding Location (within the Holding Facility), Contact Name, Phone, and Date Available at Location.
- c) Select an appropriate Holding Location Type (Port/Import Lot, Secure Facility at Port, or Secure Facility outside of Port) from the Holding Location Type drop-down list.
- d) If you want this Holding Facility to be the default when you indicate that Articles for the Web Entry are held, select Yes from the drop-down list in response to the question "Should this Holding Facility be the default for Articles you later indicate are held for this Web Entry?"
- c) Enter the Holding Facility's Food Facility Registration Number, Business Name,
and City, or all required address information denoted by asterisks.
- e) Choose the Save button. The Prior Notice: Related Facilities (View) will display with the Holding Facility information in static text.
- f)
Figure 31:


Submitting the Prior Notice
-
The Prior Notice: Related Facilities (View) page
displays with all facility information in static text (Figure 32). Review
this information and make corrections using any Edit button.
- After you have verified that your Prior Notice is complete and accurate,
choose the Submit Prior Notice button.
Figure 32:

- The Submit Prior Notice? page (Figure 33) will display all the Web Entry and Prior Notice information for review and verification.
After you submit your first Prior Notice, you may no longer edit information in that Prior Notice or the associated Web Entry.
- Please verify that the information contained within your Web Entry and Prior Notice is correct to the best of your knowledge.
At the bottom of the page (Figure 33b) you may choose Yes to submit or No to continue editing the Prior Notice.
- The Complete Web Entry? page (Figure 35) will display and ask if you wish to complete this Web Entry if the number of Prior Notices that have been
submitted for this Web Entry is within 2 or 90% of the number entered previously on the Web Entry (Create) screen.
Figure 33:

Figure 33b:

-
The system will issue a Confirmation Number. The Prior Notice: Submitted page displays with your Confirmation Number and all submitted data (Figure 34).
- You may choose the Print/Save button to
convert the Prior Notice: Submitted page to PDF*.
You may print the PDF file or save it to your computer's hard drive.
Figure 34:

Completing a Web Entry
Completing Web Entries is required after submitting all Prior Notices for the Web Entry. Completing the Web Entry alerts FDA to expect no further Prior Notices for the Web Entry and cancels any remaining Prior Notices in Draft status. When a Web Entry is "Completed", the system accepts no additional Prior Notices, but allows you to cancel the Web Entry or associated Prior Notices.
- When you have submitted all Prior Notices you intend to submit for a Web Entry, complete the Web Entry by choosing the Complete Web Entry button located at the top right of the Prior Notice: Submitted page (Figure 34).
- You may also complete a web entry at any time by using the Find Web Entries page to accessing the Web Entry (View) page (Figure 15b), and choosing the Complete Web Entry button located at the top right. This button will not appear until at least one Prior Notice has been submitted.
- The system will display the Complete Web Entry? page to remind users that once a Web Entry has been completed the Web Entry and associated prior notices may no longer be modified and ask for confirmation that the Web Entry should be completed (Figure 35). Select the Yes button to complete the Web Entry, or No to return.
Figure 35:

-
The Web Entry (View): Completed page displays (Figure 36). Choose the Print Summary button to create the Web Entry Summary Confirmation page as a PDF*. You may print the PDF file or save it to your computer's hard drive.
Make sure the Carrier receives a copy to present to United States Customs and Border Protection or the Food and Drug Administration at the Port of Arrival. The Prior Notice Confirmation Number must accompany food carried by or otherwise accompanying an individual.
Figure 36:

Note: If you do not Complete your Web Entry before the end of the timely submission period based upon the mode of transportation (2 hours before arrival for Land, 4 hours before arrival for Air or Rail, or 8 hours before arrival for Water), the system completes it automatically. If the system automatically completes your Web Entry and you need to submit additional Prior Notices for it, copy the Web Entry and continue creating and submitting Prior Notices.
*PDF (Portable Document Format) Readers are available for free from the
Adobe Acrobat website.
For more information see:
See also Create New Account Quick Start Guide