Featured Movie Tutorials
Feedback
Dear Customer:
Thank you for your feedback regarding Find Out How. We cannot respond to you personally, but please know that your message has been received and will be reviewed by the Find Out How Feedback Team. If we need to follow up with you on your ideas for improving Find Out How, we will contact you directly.
We appreciate your assistance in making Find Out How better.
Find Out How Team
Apple
Browse all video tutorials
One Place for All Your Video
-
Importing from a Camcorder
src="http://images.apple.com/findouthow/images/qt_endstate.jpg"
-
Import from iMovie HD
src="http://images.apple.com/findouthow/images/qt_endstate.jpg"
-
Other Ways to Import Video
src="http://images.apple.com/findouthow/images/qt_endstate.jpg"
-
Introduction to the Video Library
src="http://images.apple.com/findouthow/images/qt_endstate.jpg"
-
Reorganizing Your Video Library
src="http://images.apple.com/findouthow/images/qt_endstate.jpg"
Enjoy and Rediscover Your Video
-
Skimming Video
src="http://images.apple.com/findouthow/images/qt_endstate.jpg"
-
Trimming Video
src="http://images.apple.com/findouthow/images/qt_endstate.jpg"
-
Rating Video
src="http://images.apple.com/findouthow/images/qt_endstate.jpg"
Making Movies
-
Creating a Movie
src="http://images.apple.com/findouthow/images/qt_endstate.jpg"
Movies
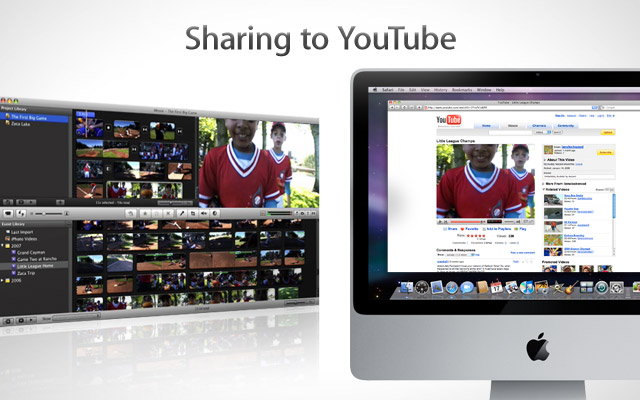
iMovie ’08 makes viewing and working with video as intuitive as enjoying your photos. And now sharing your movies is easier than ever.
-
Adding Music
src="http://images.apple.com/findouthow/images/qt_endstate.jpg"
-
Adding Sound Effects
src="http://images.apple.com/findouthow/images/qt_endstate.jpg"
-
Adding Voiceover
src="http://images.apple.com/findouthow/images/qt_endstate.jpg"
-
Adjusting Color
src="http://images.apple.com/findouthow/images/qt_endstate.jpg"
-
Adding Titles
src="http://images.apple.com/findouthow/images/qt_endstate.jpg"
-
Cropping and Rotating Images
src="http://images.apple.com/findouthow/images/qt_endstate.jpg"
Sharing Your Movies
-
Sharing to iPod, iPhone, and Apple TV
src="http://images.apple.com/findouthow/images/qt_endstate.jpg"
-
Sharing to MobileMe Gallery
src="http://images.apple.com/findouthow/images/qt_endstate.jpg"
-
Sharing to YouTube™
src="http://images.apple.com/findouthow/images/qt_endstate.jpg"
Advanced Techniques
-
Working with Audio Clips
src="http://images.apple.com/findouthow/images/qt_endstate.jpg"
-
Working with Background Audio
src="http://images.apple.com/findouthow/images/qt_endstate.jpg"
-
Advanced Color Techniques
src="http://images.apple.com/findouthow/images/qt_endstate.jpg"
-
Advanced Editing Techniques
src="http://images.apple.com/findouthow/images/qt_endstate.jpg"
-
Using the Edit Tool in Advanced Mode
src="http://images.apple.com/findouthow/images/qt_endstate.jpg"
-
Marking Video in Advanced Mode
src="http://images.apple.com/findouthow/images/qt_endstate.jpg"
-
Tagging and Filtering with Keywords
src="http://images.apple.com/findouthow/images/qt_endstate.jpg"
Creating a DVD from Your Videos, Photos, and Music
-
Creating DVDs with Magic DVD
src="http://images.apple.com/findouthow/images/qt_endstate.jpg"
DVDs
Quickly create a Hollywood-style DVD using an Apple-designed theme that gives your home movie a professional look.
-
Making an iDVD Project
src="http://images.apple.com/findouthow/images/qt_endstate.jpg"
-
Creating Slideshows
src="http://images.apple.com/findouthow/images/qt_endstate.jpg"
-
Burning Your DVD
src="http://images.apple.com/findouthow/images/qt_endstate.jpg"
-
Working with the iDVD Map View
src="http://images.apple.com/findouthow/images/qt_endstate.jpg"
Browse all text tutorials
Assembling a Simple Movie
-
Adding Clip Transitions
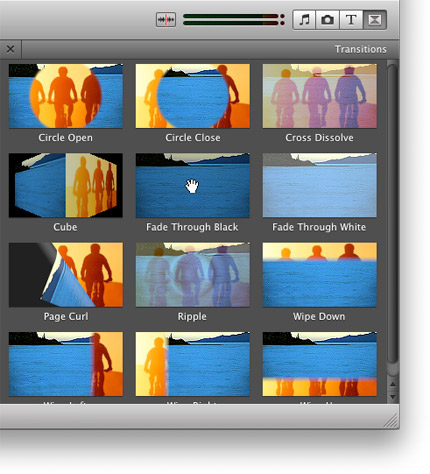
Adding Clip Transitions
Sometimes the shift from one clip to another can be a little too quick. Rather than jarring viewers with a sudden change, transitions let you move the viewer smoothly by blending the end of one clip with the beginning of another.
To apply a transition:
- Click the Transitions button to open the Transitions browser. Hold your cursor over each transition to preview it.
- Select a transition from the Transitions browser and drag it between two clips in your project. Be sure the vertical green line appears before you release the mouse button.
- Click the “Play Project from beginning” button to see the transition effect.
- Click the square transition icon preceding the first clip to select the transition; then choose Edit > Set Duration. When the Duration dialog appears, set the duration for the transition and decide whether the duration time should apply only to the selected transition or to all transitions in your project.
-
Inserting Title Cards
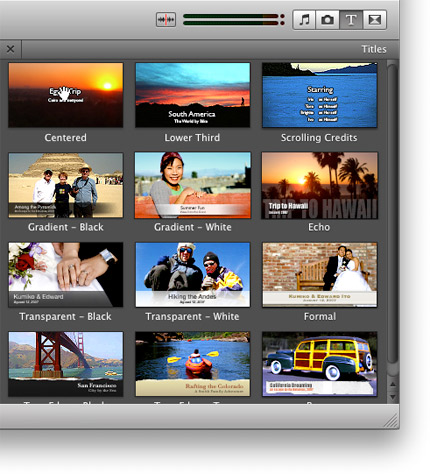
Inserting Title Cards
There’s a quick and easy way to add a title card with a black background before or after a clip.
To insert a title card:
- Click the Titles button to open the Titles browser.
- Drag a title from the Titles browser to a space before or after a clip. iMovie inserts a black background with the title on it.
- Click Done.
Use title cards at the beginning of your project to introduce the creators of the movie or at the end of your movie for movie credits.
Sharing a Movie
-
Emailing a Movie
Emailing a Movie
You can easily share your movies by publishing them on your MobileMe Gallery or YouTube. Or you may simply want to email a short 30-second movie to friends or family. But, be careful: If you email a gigantic movie file, it could take up all the space in your friend’s email inbox. Try to keep any movie file you email under 2MB.
To email a movie file:
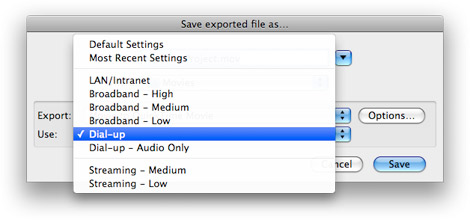
- Click Share > Export using QuickTime. A settings dialog appears.
- Give your movie a name and choose where to save it. You might want to save it to your desktop.
- Choose “Movie to QuickTime Movie” from the Export pop-up menu.
- Choose a compression preference from the Use popu-up menu. This selection determines how QuickTime will adjust settings to compress your movie and minimize its file size.
- Click Save. iMovie renders your QuickTime movie and saves it to the location selected in Step 2.
-
Organizing Your Movies in iTunes
Organizing Your Movies in iTunes
It’s easy to organize your own home movies using iTunes. Once you move them to iTunes, you can view them on your iPod or iPhone, or you can watch them on the flat-screen TV using Apple TV.
To organize your movies in iTunes:
- Open iTunes.
- Click the Finder icon in the Dock.
- Find the QuickTime movie you’d like to add to your iTunes Library and drag it onto the Movies icon in the iTunes library. The QuickTime movie is now in your iTunes Library.
- To view the movie in iTunes, click Movies in your iTunes library and double-click the movie title.
Shooting and Recording Sound
-
Setting Up the Establishing Shot
Setting Up the Establishing Shot
You’ll always need at least one “establishing shot” that indicates where your movie takes place. This is often a wide shot that introduces your main characters and shows where they’re situated. Sometimes this is the first shot in your movie.
Establishing shots can be very creative. Think about shooting from up high, over your head, or through a window. You can even begin by shooting a sign that shows where your movie takes place.
-
Framing Your Shots
Framing Your Shots
Pay attention to how tightly you frame your subject. Consider, for example, how large a person or object appears in the picture frame. Wide shots, such as shots of an entire football field or an expansive landscape, help to establish a scene. Close-up shots bring you closer to the characters and usually occur after a wide shot has identified where your movie takes place.
-
Incorporating Medium Shots
Incorporating Medium Shots
When working with a handheld video camera, it’s common to shoot everything as a close-up. The LCD screen on your video camera is often so small that it makes your subject look boring unless you get in really tight.
Fight this urge and trust that when you see the video on your television or Mac, filling the entire screen with just a face will make your audience a little uncomfortable. The medium shot, showing two or more characters onscreen or one character from the waist up, is the kind of image viewers are used to seeing in TV shows and movies.
-
Recording Sound
Recording Sound
As you start making movies, you’ll quickly discover that it’s more enjoyable to watch poor-quality video with great sound quality than high-quality video with terrible sound. You’ll also discover that most handheld video cameras use omnidirectional microphones. They record sounds from beside, behind, and in front of the camera, resulting in ambient noise that can be very distracting.
To create movies with better sound:
- When shooting landscapes and establishing shots, you may not need to record the audio associated with the video you’re capturing. In such cases, mute the audio track and replace it with music, sound effects, or dialog recorded separately.
- When videotaping someone speaking or when shooting a conversation between two or more people, zoom out completely so you can move the camera as close to your subjects as possible while still maintaining a medium shot — not a close-up.
- Consider getting either an external microphone you can have your subjects speak into or a unidirectional shotgun microphone you can attach to your video camera.
Editing Your Movie
-
Selecting Favorites
Selecting Favorites
As you review your footage, you can mark favorites, reject footage you know you’ll never use, and organize clips with keywords.
To mark favorites:
- Select a clip that you intend to use in your movie.
- Click the star button to mark it as a favorite.
When you mark a clip as a favorite, iMovie places a green line at the top of the clip.
-
Using Keywords
Using Keywords
Keywords help you quickly identify clips that share a common attribute.
To assign keywords:
- Choose Preferences from the iMovie menu. At the bottom of the Preferences window, select the Show Advanced Tools checkbox.
- Click the Keyword button in the iMovie toolbar or press K on your keyboard.
- When the Keywords window appears, click the Inspector button at the top.
- In the Event browser, select all the clips to which you’d like to assign a keyword.
- In the Keywords window, click the keyword that you’d like to assign to the clips. iMovie tags all the selected clips with the keyword and puts a blue line at the top of the clip.
To find video tagged with keywords:
- Choose Window > Keyword Filter or click the Keyword Filter button to open the “Filter by Keywords” pane.
- In the “Filter by Keywords” pane, select the keywords you want to use to “filter” the video and find the frames you want.
- At the bottom of the pane, click one of the filtering buttons to show or hide the video tagged with the selected keywords.
Any finds all the video tagged with one or more of the keywords you’ve selected.
All finds only the video tagged with the combination of keywords you’ve selected.
Include shows the video tagged with the selected keywords.
Exclude hides the video tagged with the selected keywords.
-
Extending Audio over Cutaways
Extending Audio over Cutaways
It’s common to cut from one clip to another and have the audio from the first clip continue to play after the second video clip begins.
To extend audio across multiple clips:
- In the Project area, select the clip that contains the audio you’d like to extend into a second clip. Select the last few seconds of the first clip that contain the audio you want.
- To split the first clip, choose Edit > Split Clip.
- Control-click the selected clip and choose “Reveal in Event Browser.”
- In the Event browser, Command-Shift-drag the clip to extract the audio and place it at the start of the next clip.
- Delete the video portion of the clip you split in step 2.
Because you’ve extracted the audio from exactly the part of the clip you split, the audio seamlessly plays across the next shot.
-
Normalizing Sound Levels
Normalizing Sound Levels
Normalizing audio brings a clip’s audio volume to the same level as all the other clips, keeping volume at a consistent level throughout your movie.
To normalize audio in your movie project:
- Select a clip.
- Click the Adjust Audio button or press A to open the Audio Adjustments window.
- Click the Normalize Clip Volume button.
-
Adding Credits
Adding Credits
It’s easy to add dramatic scrolling credits to the end of your movie.
To add scrolling credits:
- Open the Titles browser by clicking the Titles button in the iMovie toolbar.
- Drag Scrolling Credits to the end of your project timeline.
- Select the Scrolling Credits thumbnail in your project timeline. The Scrolling Credits tile appears in the Preview pane.
- Double-click the placeholder text in the Scrolling Credits tile, enter your own text, and click Done.
- To set the duration of the Scrolling Credits tile, click the small clock icon in the Scrolling Credits tile and enter the duration in the duration dialog that appears.
Making a DVD
-
Adding Audio to Your Main Menu
Adding Audio to Your Main Menu
After selecting a theme for your DVD, you can add an audio track to play while your audience views the main menu.
To add audio to the main menu:
- In the bottom-right corner of the iDVD window, click the Media button. When the Media browser appears above, click Audio to reveal a list of your iTunes and GarageBand collections.
- Drag the audio file you want to use from the Media browser to an unoccupied part of the main menu.
-
Previewing a DVD
Previewing a DVD
Before burning your DVD, be sure to preview it.
To preview a DVD:
- In the bottom of the iDVD window, click the Play button. This turns the iDVD window into a preview window and displays the iDVD remote control window.
- Click the Down Arrow button on the remote control. This action highlights the “Choose a scene” menu button.
- On the remote control, click Enter.
- Use the remote control to choose a scene to preview.
- When you’re finished previewing, click the Exit button on the remote control.
-
Modifying Menu Buttons
Modifying Menu Buttons
It’s easy to change the appearance of menu buttons on the main menu page.
To change the style of a button:
- In the main menu, select a menu button.
- In the bottom-right corner of the iDVD window, click Buttons to open the Buttons pane.
- Select a button style.
To change the size of a button:
- Select a button to modify and choose View > Show Inspector. The Inspector window opens.
- Drag the Size slider to the left to decrease or to the right to increase the size of the button.