Featured Music Tutorials
Feedback
Dear Customer:
Thank you for your feedback regarding Find Out How. We cannot respond to you personally, but please know that your message has been received and will be reviewed by the Find Out How Feedback Team. If we need to follow up with you on your ideas for improving Find Out How, we will contact you directly.
We appreciate your assistance in making Find Out How better.
Find Out How Team
Apple
iTunes
GarageBand
Browse all video tutorials
Jukebox
-
Download and Install iTunes
src="http://images.apple.com/findouthow/images/qt_endstate.jpg"
-
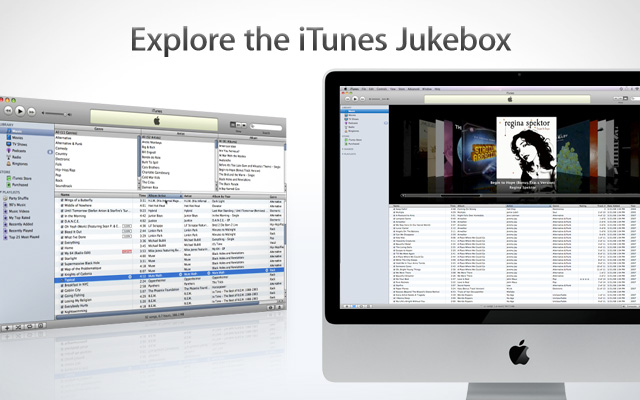
Explore the iTunes Jukebox
src="http://images.apple.com/findouthow/images/qt_endstate.jpg"
-
Import Music from CDs
src="http://images.apple.com/findouthow/images/qt_endstate.jpg"
-
Create Playlists
src="http://images.apple.com/findouthow/images/qt_endstate.jpg"
Store
-
Get New Music and Video
src="http://images.apple.com/findouthow/images/qt_endstate.jpg"
-
Get Free Podcasts
src="http://images.apple.com/findouthow/images/qt_endstate.jpg"
-
Buy Movies and TV Shows
src="http://images.apple.com/findouthow/images/qt_endstate.jpg"
-
Learn with iTunes U
src="http://images.apple.com/findouthow/images/qt_endstate.jpg"
Syncing
-
Sync to Your iPod
src="http://images.apple.com/findouthow/images/qt_endstate.jpg"
Browse all text tutorials
Navigate the Jukebox
-
Right-Click Shortcuts
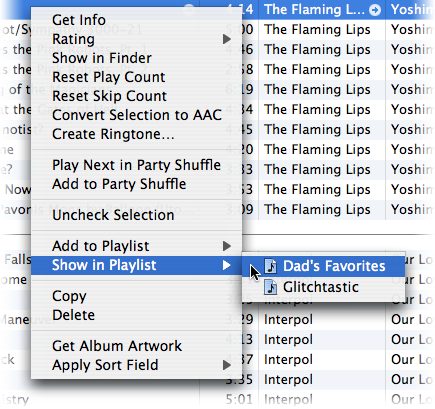
Right-Click Shortcuts
You can right-click songs, playlists, column headings, and many other items in iTunes to do certain tasks more easily. For example, to see all the playlists that include a particular song, right-click the song, then scroll down to Show in Playlist.
-
Quick Links
Quick Links

To quickly find more music on the iTunes Store from an artist in your library or perhaps a cover of the same song by a different artist, click the arrow next to the artist or song title in your library.
To do so, open iTunes > Preferences (Windows — Edit > Preferences) and make sure you check "Show links to the iTunes Store."
-
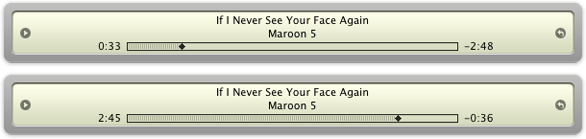
Scrubbing Tracks
Scrubbing Tracks
To scan forward or back when a song is playing, drag the diamond in the progress bar.
To switch between total, elapsed, and remaining time, click the time display at the top of the iTunes window. (You might need to double-click a song to see the time display.) Click the song title to switch between artist, title, and album name.
-
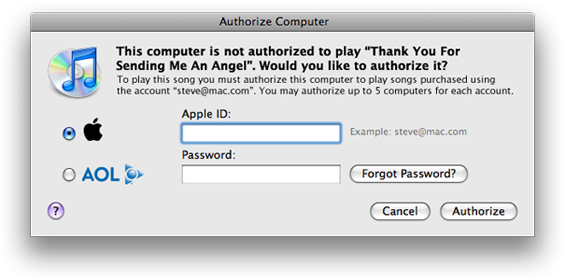
Playing Authorized Tracks
Playing Authorized Tracks
If you’re listening to the songs in a shared library or playlist and your computer is not authorized to play the purchased songs in the list, iTunes skips the purchased music. To listen to purchased music in a shared library or playlist, you need to double-click the song and authorize your computer to play it.
Importing music
-
Adding Songs from CDs
Adding Songs from CDs

To quickly add a song from a CD to an existing playlist, insert the CD, then drag the song from the list of CD tracks to the playlist. The song is imported into your library and added to the playlist. To add a song from a CD to a new playlist, drag the song from the CD to the white area below the items in the Source List. The song is imported into your library and added to a new playlist.
-
CD Track Info
CD Track Info
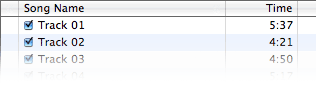
If you insert a new CD in your computer and the song names appear in iTunes as “Track 1,” “Track 2,” “Track 3,” and so on, you’ll want to add the real album information before you import the CD. There are two ways to do so.
First, if you’re connected to the Internet you can go to Advanced in the menu bar and select Get CD Track Names. But perhaps your CD is rare and the album information is not in the database online. In that case, you can click the song name twice and then type the title manually. The same applies for the artist and album names.
-
Converting WMA Files
Converting WMA Files
In iTunes for Windows, you can convert your unprotected WMA files to AAC files (or whatever file format is chosen in the Importing pane of iTunes Preferences) without changing the original WMA file. Simply drag the WMA files into your library in iTunes and iTunes does the grunt work, converting them for you. Windows Media Player 9 or later must be installed to convert unprotected WMA files. Protected WMA files cannot be converted.
-
Editing CD Information
Editing CD Information
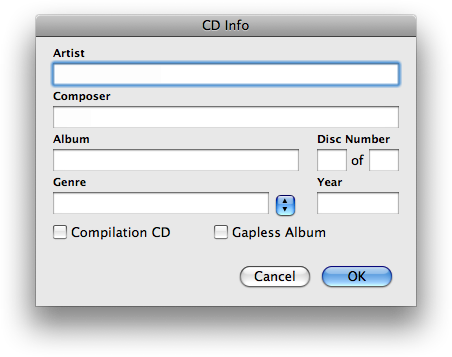
To quickly enter CD information for all the songs on a CD, select the CD in the Source List and choose File > Get Info. You can enter basic CD information once for all the songs on the CD.
Burning music CDs
-
CDs from Albums
CDs from Albums
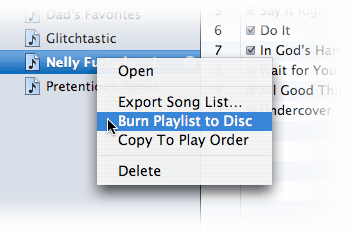
To make your own CD from an album in your library, click Library and choose View > Show Browser (if you see only Hide Browser, then the Browser is already visible). Drag an album from the Album list in the top-right section of the library to the white area below the items in your Source List. Click the album's playlist icon to select it, then choose File > Burn Playlist to Disc.
To avoid the message that appears when you insert a blank CD, click the Burn button before inserting the blank CD.
-
Print CD Inserts
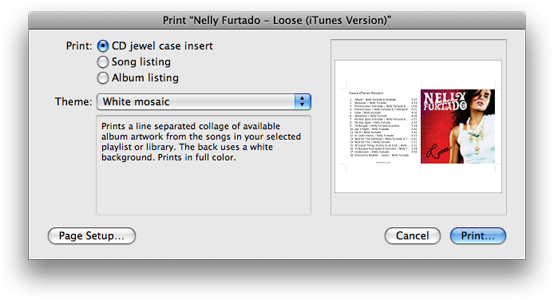
Print CD Inserts
You can print a list of the songs in your library or a selected playlist to use as a CD jewel case insert, or simply to have a song or album list. Select your library or a playlist and choose File > Print. Choose whether you want to print a CD jewel case insert or song or album list. Select a printing theme from the Theme pop-up menu. Themes allow you to change how the information is printed. When you're done, click Print.
Making, and sharing Playlists
-
Playlist Windows
Playlist Windows
To open a playlist in a new window, double-click the playlist icon in the Source List. To copy a song from one playlist to another, drag the song to a playlist in the Source List.
-
Playlists from Albums
Playlists from Albums
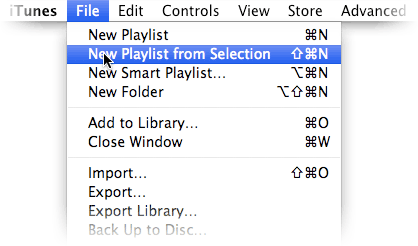
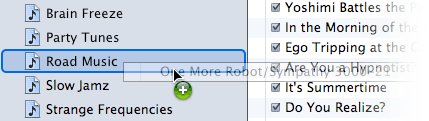
To quickly create a playlist from selected songs, select the songs in your library and then choose File > New Playlist from Selection.
-
Smart Playlists
Smart Playlists
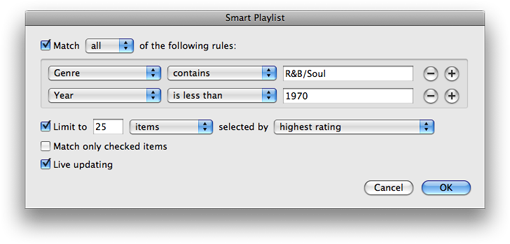
An easy way to keep track of your music by genre or artist is to create Smart Playlists. A Smart Playlist continuously searches your music library for new tracks meeting the criteria you set. iTunes gives you conditions to set as criteria for Smart Playlists, including Artist, Album, Year, Song Name, (Date) Last Played, Date Added, Genre, Composer, My Rating, Play Count, and more. For example, you may want to have all your R&B/Soul music in one playlist. If you set up a Smart Playlist, it will gather every R&B/Soul song in your library and continuously add to the playlist new R&B/Soul songs imported into your library in the future.
-
Party Shuffle
Party Shuffle

Let’s get the party started. And just as important — let’s keep it going. iTunes Party Shuffle takes over as DJ, so you can relax and enjoy your party. Open iTunes > Preferences (Windows — Edit > Preferences), click Show Party Shuffle, and then click OK. Select Party Shuffle from the Source List and iTunes creates a random playlist from music in your library. If you like you can change the source (at the bottom of Party Shuffle playlist) from Library to a select playlist.

More Party Shuffle options let you choose to see the last 5-100 songs played or none at all, as well as the next 5-100 songs that will play. Another nifty option lets you direct Party Shuffle to play higher-rated songs more often. Using these options, you can add, remove, and rearrange songs in the random playlist on the fly, leaving you with an awesome playlist and more time to party.
-
Share Your Playlists
Share Your Playlists
You can share your musical tastes with other people by publishing your playlists on the iTunes Store. Shared playlists include 30-second previews of any songs in your playlist that are also available on the iTunes Store. If a song in your playlist is not available on the iTunes Store, the song isn’t listed in the shared playlist.
To share a playlist, select the one you want to share. Click the Publish arrow to the right of the playlist in the Source List. If you don’t see the Publish arrow, make sure the “Show links to the iTunes Store” checkbox is selected in iTunes > Preferences (Windows — Edit > Preferences).
Changes you make to your playlist after it’s published are not updated automatically on the iTunes Store. You need to click the Publish arrow each time you make a change that you want to share.
Tips and Tricks
-
View Options
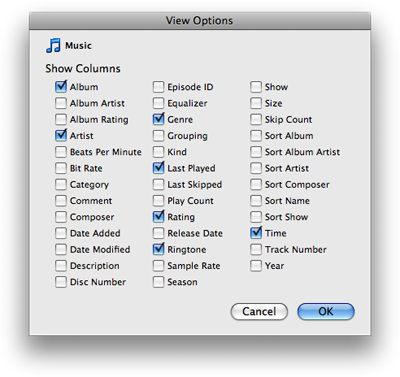
View Options
In iTunes you can customize your view of library and playlist columns however you like. What track information is most important to you — Song Name, Time, Album, Artist, Genre, My Rating, Last Played (date), Date Added, Year, Play Count? In View > View Options, you can show or hide columns in your jukebox. You can even move the columns around by clicking and dragging the column headings. It’s your jukebox. You can lay it out any way you choose.
-
Buffer Sizes
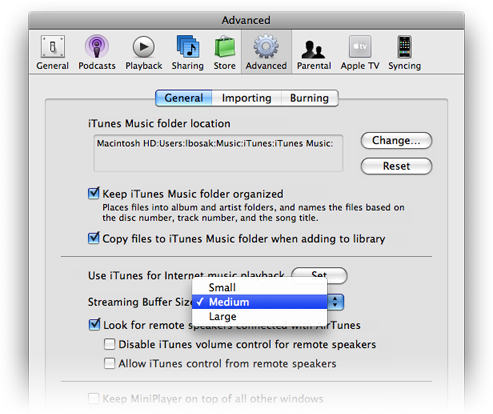
Buffer Sizes
If you have a fast Internet connection (DSL or cable modem), you can have the music that’s streamed to your computer (previews, radio stations, shared music libraries) begin playing more quickly by choosing the Small streaming buffer size in the Advanced pane of iTunes > Preferences (Windows — Edit > Preferences). If you have a slower Internet connection (dial-up), you can choose the Large buffer size for smoother streaming playback.
-
Total Times
Total Times
To switch between the approximate time and precise time for all the songs in the selected playlist or the library, click the time displayed at the bottom of the iTunes window.

-
Compilation Albums

Compilation Albums
To see all the songs on a compilation CD grouped together in your library, make sure "Group compilations when browsing" is selected in iTunes > Preferences (Windows — Edit > Preferences). In Mac OS X, you can open Preferences from the iTunes menu, or in Windows, choose Preferences from the Edit menu. If this checkbox is deselected, artists from compilation CDs appear individually in the Artist list in Browse view.
Browse all video tutorials
Turning Your Mac into a Recording Studio
-
Record any Instrument into Your Mac
src="http://images.apple.com/findouthow/images/qt_endstate.jpg"
-
Using Software Instruments
src="http://images.apple.com/findouthow/images/qt_endstate.jpg"
-
Multitake Recording
src="http://images.apple.com/findouthow/images/qt_endstate.jpg"
Kick Start Your Song with Magic GarageBand
-
Create Songs with a Virtual Onstage Band
src="http://images.apple.com/findouthow/images/qt_endstate.jpg"
Virtual Onstage Band
Don’t know how to play an instrument? Magic GarageBand offers a Virtual Onstage Band to do the playing for you.
Compose a Great Song
-
Arranging Your Song
src="http://images.apple.com/findouthow/images/qt_endstate.jpg"
Arranging Songs
With GarageBand, anybody can make a song, even if you’ve never played an instrument.
-
Mixing Your Song
src="http://images.apple.com/findouthow/images/qt_endstate.jpg"
-
Working with Key & Tempo
src="http://images.apple.com/findouthow/images/qt_endstate.jpg"
-
Automating Effects
src="http://images.apple.com/findouthow/images/qt_endstate.jpg"
-
Creating Your Own Loops
src="http://images.apple.com/findouthow/images/qt_endstate.jpg"
-
Recording, Editing and Printing Music Notation
src="http://images.apple.com/findouthow/images/qt_endstate.jpg"
Share Your Song
-
Exporting Your Songs to iTunes
src="http://images.apple.com/findouthow/images/qt_endstate.jpg"
-
Creating a Podcast
src="http://images.apple.com/findouthow/images/qt_endstate.jpg"
Browse all text tutorials
Creating Music
-
Setting Preferences for iTunes
Setting Preferences for iTunes

To prepare a song to export to iTunes, the first step is to set your song and playlist information in the Export pane of the GarageBand preferences.
- Choose GarageBand > Preferences to open the Preferences window.
- Click the My Info button to open the My Info Preferences pane. Name your iTunes Playlist, composer, and album.
-
Setting Output Volume
Setting Output Volume for iTunes
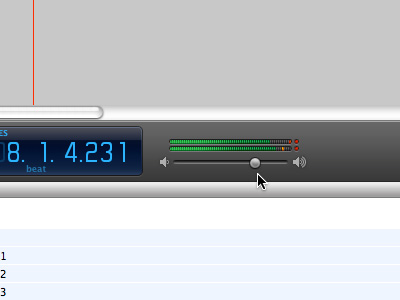
To make your songs sound great, you’ll want to adjust the Output Volume correctly.
- Press the spacebar to begin playing your song. As the song plays, watch the Master Output Volume meters, located at the bottom of the viewing pane, for signs of clipping (red bars).
- If you see any clipping, stop playback.
- To lower output volume, drag the Master Output Volume slider to to the left.
- Play the song again from the beginning and check the new levels. Ideally, your levels should peak between the highest green and yellow portions of the meter.
- Choose Track > Fade Out. The master track appears and an Automation Curve is added to the track with a gentle fade. You can modify this curve as needed to control the fade out on your song.
- Save your project.
Recording a Podcast
-
Adding Episode Info
Adding Episode Info
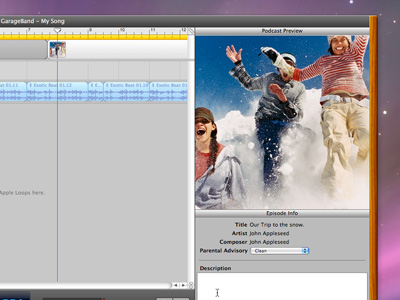
The last step needed to complete your podcast episode is to add the episode information, which includes the title, artist information, a description of the episode, and a parental advisory. The episode information is available when you work on the podcast in iWeb and when you view the podcast in iTunes.
- Select the Podcast Track in the Timeline.
- Show the Track Info pane, if it’s not already showing.
- Click the Description area and type in your podcast description. The description can be more in-depth if you’d like. You might include the names of the band members, list the songs included in the podcast, and provide other information.
- From the Parental Advisory menu, choose Clean.
- Customize the Artist name.
- Customize the Title field.
- Save your project.
Scoring an iMovie
-
Preparing to Score an iMovie
Preparing to Score an iMovie
GarageBand makes it easy to add your own original audio score to your iMovie projects. You can add songs, Apple Loops, and voiceover audio tracks while watching your iMovie from within GarageBand.
- Open GarageBand and create a new Music Project.
- Save the project to your GarageBand projects. Use the default options for tempo, signature, and key.
- Click Create. The GarageBand project opens, but it needs to be customized to show the elements necessary to create a musical score.
- Choose Control > Show Loop Browser. You’ll use Apple Loops as the primary building block for your score. Apple Loops, prerecorded music files, can be used to add drum beats, rhythm elements, and other repeating patterns to a project.
- Open the iLife Media Browser, choose Control > Show Media Browser. The Media Browser contains buttons for audio, photos, and movies. It’s an easy way to find the media files you want to use.
- Choose Track > Show Movie Track to add the track that will let you see the movie you’re scoring.
-
Importing a Video File into GarageBand
Importing a Video File into GarageBand
You can import any iMovie project or QuickTime-compatible video file from the Media Browser and add it to a track in your GarageBand project. This allows you to view the movie while your GarageBand project plays.
To import a video file using the Media Browser:
- In the Media Browser, click the Movies button.
- Select the movie you’d like to score.
- If available, double-click the movie file thumbnail image to preview the movie in the Media Browser.
- To stop the movie preview, press the spacebar.
- Drag the thumbnail image into the Movie Track in your GarageBand project. GarageBand generates thumbnails for the track to represent the video clips. It also adds a track called Movie Sound, and creates a new AIFF file that contains the soundtrack of the movie. The original movie file remains unchanged.
- Select the Movie Track to see its info in the Track Info pane. Then select the Movie Sound track to see its information.
-
Using a Software Instrument Loop
Using a Software Instrument Loop
You can use Apple Loops to create an original song as a score for your movie. This process will take some experimentation to get right, but it allows you to set the exact tone and mood you want.
- With your GarageBand project open and Video Preview viewable, press Command-L to open the Loop Browser. When the Loop Browser opens, the Track Info pane automatically closes.
- To narrow the number of Apple Loops available, try typing “Guitars” into the search field.
- Click some of the items in the results list in the right column.
- Try selecting the loop “Acoustic Picking 06” and drag it to an empty area of the Timeline. Be sure to drag it all the way to the left so the loop starts at the beginning of the video. The loop is added to the Timeline and lasts for 8 seconds.
- To make the “Acoustic Picking 06” loop longer or shorter, movie your cursor over the upper-right of the loop region. Your cursor becomes a loop pointer, a curved arrow, and now you can drag the upper-left corner of the loop and extend or shorten it.
It may take time for you to find to find the Apple Loops you want to use in your movie and to determine the right length for those loops. Play around. Have fun. You’ll get the hang of it.