
Revised October 2005
![]() Download a free PDF of this guide.
Download a free PDF of this guide.
Contents
Related pages
Use our feedback form for questions or comments about G6620.
Publication search
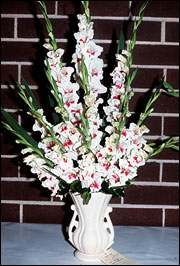
Figure 1
Gladioli come in a wide array of colors and are excellent for floral arrangements.
The gladiolus was once known as sword lily. Improved types were first developed from crosses of several species native to the Mediterranean area of Europe. Later discovery of African species led to crosses, which produced the forerunners of the attractive large-flowered types we know today.
Although "glads," as they are commonly called, are used to a limited extent for landscape effect, their chief value is for cut flowers (Figure 1). Their wide range of colors, sizes and flower types makes them particularly useful for flower arrangements They are spectacular flowers for exhibition in flower shows and are a specialty of many amateur growers.
Large-flowered
These varieties with their large, showy flowers are the most popular of all gladioli. They are excellent for exhibition and are much used by florists as cut flowers. Petals may be frilled, ruffled, semiruffled or plain. Almost all colors, tints and shades are available in them.
Miniature
The miniature glads should not be confused with varieties of species such as Primulinus. They are not plain-petaled and small but are essentially replicates of the ruffled and frilled large-flowered types. The small flowers on short spikes often make them more suitable for small arrangements.
The middle and third numbers of the code signify color (Table 2). An even number for the third digit means no conspicuous markings. An odd-numbered third digit means that the flower contains conspicuous markings.
The number 454, for example, indicates a large-flowered medium-red glad without prominent markings, while 262 indicates a small-flowered glad with a light rose color.
Table 1
Gladiolus size classes
| Code | Flower diameter |
|---|---|
| 500 (Giant) | over 5-1/2 inches |
| 400 (Large) | 4-1/2 to 5-1/2 inches |
| 300 (Medium) | 3-1/2 to 4-1/2 inches |
| 200 (Small) | 2-1/2 to 3-1/2 inches |
| 100 (Miniature) | under 2-1/2 inches |
Table 2
Gladiolus color indicators
| Color | Pale | Light | Medium | Deep | Other |
|---|---|---|---|---|---|
| White | 00 | ||||
| Green | 02 | 04 | |||
| Yellow | 10*(1) | 12 | 14 | 16 | |
| Orange | 20*(2) | 22 | 24 | 26 | |
| Salmon | 30 | 32 | 34 | 36*(3) | |
| Pink | 40 | 42 | 44 | 46 | |
| Red | 52*(4) | 54 | 56 | 58 Black red | |
| Rose | 60 | 62 | 64 | 66 | 68 Black rose |
| Lavender | 70 | 72 | 74 | 76 | 78 Purple |
| Violet (Blue) | 80 | 82 | 84 | 86 | |
| Smokies | 92 | 94 | 96 | ||
| Tan | 90 | 98 Brown |

Figure 2
Development of gladiolus corm
The corm is a swollen underground stem. Each year a new corm is formed atop the old one, which shrivels and dies. On the upper surface of the new corm, buds develop from which the new plant grows the following year. The bases of old leaves are papery and cover the corm. These are called husks. The husks overlap each other and meet to form a point at the top.
While the new corm is forming atop the old one, small new corms called cormels or cormlets are produced from the base (Figure 2). Cormels are a chief means of propagating a certain variety of gladiolus.
The size of the plant and spike produced is directly related to the size of the corm that is planted. Corms are graded into sizes as follows:
Sizes Jumbo, 1, 2 and 3 can all be expected to flower (sometimes two or more spikes each) under good growing conditions. Occasionally under ideal growing conditions, a flower will be produced by sizes 4 and 5.
Corms are most productive during their first six years. Often as they become older they may decline in vigor. For this reason it is desirable to save cormels to develop a constant supply of young, vigorous corms.
Heavy soils with poor internal drainage can be lightened by adding organic materials such as compost, peatmoss or sawdust. If sawdust is used, nitrogen in the soil will be tied up. For this reason, it will be necessary to mix about 3/4 cup of ammonium nitrate with each bushel of sawdust.
In areas where drainage is poor, glads should not be grown, or raised beds should be built to improve drainage.
To maintain the fertility in the bed, apply 2 pounds of a 5-10-5 fertilizer or one with a similar analysis to each 100 square feet of planting space. Scatter the fertilizer evenly over the soil surface before digging, and dig to a depth of 6 to 8 inches. Rotted cow manure is excellent for glads but must be mixed well into the soil so it does not touch bulbs or foliage, or it will encourage rots.
Planting
Select a spot in full sun with good drainage. Glads do not do well in competition with woody shrubs or trees and therefore should not be planted close to them.
Glads may be planted as early as a month before the average last frost date and at two-week intervals thereafter for a succession of bloom. The last planting should be no later than early July if the corms are to have enough time to develop and mature before frost. The time from planting until bloom varies from 70 to 90 or more days, depending on weather conditions and variety. Plant large bulbs 4 to 6 inches deep, medium-sized bulbs 3 to 4 inches deep and small bulbs 2 to 3 inches deep. Cover only 2 inches in the beginning and pull soil to the plants with each cultivation. Glads are often planted by digging out a trench and planting corms in either a single or double, staggered row. Corms may be spaced only 2 to 3 inches apart in the row, but if they are being grown for show, they should be spaced at least 6 inches apart. Rows should be spaced from 20 to 36 inches apart.
Cultivation
Cultivation of glads should be only enough to keep down competing grasses and weeds. It should be shallow so that roots are not damaged. Mulches help to keep down weeds and conserve soil moisture. Straw, wood shavings and sawdust are all suitable. A 2- to 4-inch depth is required for good weed control. A light application of nitrogen should be made after a heavy mulch is applied. Preemergence herbicides can be used successfully for the control of most annual weeds and grasses to reduce cultivation.
Watering
Glads need ample water throughout the growing season. During dry weather, water the plants weekly to supply the equivalent of 1 inch of rainfall per week. Watering should soak the ground thoroughly. Avoid daily light waterings.
Staking
To ensure tall, straight flower spikes, staking is necessary. In beds or borders, individual plants will need to be staked. This can be accomplished using 1 x 1-inch stakes made from any suitable lumber. The spikes should be tied to the stakes at about 10-inch intervals with soft twine or cloth strips. In the cutting garden (as the row in the vegetable garden) 2 x 2-inch stakes can be inserted at about 10-foot intervals along the row. Wire or heavy twine is then stretched between the stakes at a spacing of 10 and 20 inches above the soil line. Individual plants can then be tied to the supporting wire or twine. Hilling up soil on both sides of the row likewise gives good support.
Fertilizer side-dressing
A side-dressing of fertilizer after the plants are well established will increase vigor. Apply a 5-10-5 fertilizer to each row. This can be applied in a band on one side of the row, keeping 4 to 6 inches away from the stems. It will be most effective if applied in a small trench several inches deep but may also be placed on the soil surface and scratched in lightly. The first application should be timed when growth is about 6 to 10 inches tall. A second application is placed on the opposite side of the row as the flower spikes start showing through the leaf sheaths. Apply about 1 pound of the fertilizer to each 100 feet of row at each application. Too heavy applications of nitrogen early in the growing season result in excessive foliage growth and poor quality flowers.
Cutting flowers
Glads do not look well in the garden unless old flowers are kept picked. Since they are used primarily for cutting, spikes should be picked in their prime for maximum life indoors. Cut the spike when the first floret is showing color. To cut the spike, insert a sharp knife above the second to fourth leaf and make a slanting cut up the stem. Immerse in water immediately to prevent wilting of the petals. Be sure to leave at least two, and preferably four, leaves on the plant after cutting spikes to help corms mature properly. Gladiolus spikes are very geotropic and should be stored in a vertical position until they are used.
Digging corms
Corms are ready to dig in four to six weeks after blooms are finished or when the tops die off. They can be dug anytime before a hard freeze. Healthy plants should be left in the soil as long as possible so there is ample time for maximum development of the corms.
Curing and cleaning
After digging, wash off soil that adheres to the corm and roots. Cut the tops to within one-half inch of the corm. Corms can be left outdoors in the sun for a day or two if the temperatures are mild, and then spread out in a light, airy place to cure. They are cured to get the surplus moisture out of the husks and corms as quickly as possible to prevent storage rots. After two to three weeks of drying, remove the old corm from the base. Sort the corms and cormels according to size. The small cormels can be saved and planted the following year, but remember it will take two to three years to produce a blooming-size corm from them.
Storing
Corms should be stored during the winter at a temperature of 35 to 45 degrees Fahrenheit in a well-ventilated area. Airy containers such as loose-weave baskets, mesh bags or old nylon stockings make good containers that may be hung out of the way (Figure 3). Dust corms before storage with an all-purpose garden fungicide to ensure against insect and disease damage while in storage.
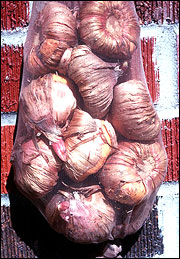
Figure 3
Store corms in a well-ventilated area in a loose-weave basket,
mesh bag or old nylon stocking.
Gladioli are relatively free of insect pests. The most troublesome pest is the gladiolus thrips. This insect is very small and seldom seen as it feeds in hidden places. It does considerable damage, especially to the flowers. It works on the buds before they emerge from the sheaths and causes malformed and spotted flowers. Thrips may overwinter on the corms. Aphids, grasshoppers and cucumber beetles are other insect pests that may cause damage to flowers or foliage.
There are many different disease organisms that attack the corms and stems of the gladiolus. Collectively, they might best be called corm and stem rots. Most are active during storage and develop with improper curing and storage. Before corms are planted in the spring, they should be carefully inspected. Pull back some of the husk to examine the inner surface and eliminate all corms that are infected. Although infected bulbs may grow if planted, growth is generally weak and stem rots often develop later to cause death. One of the best control measures against these rots is immediate removal and destruction of bulbs or plants that show disease.
Participating in flower shows is a good way to learn more about gladiolus and to meet people with similar interests. Additionally, exhibiting the result of one's gardening efforts can be very gratifing. Member societies of the North American Gladiolus Council hold shows during the summer; additionally, gladiolus classes are included in the floriculture shows of most county and state fairs.
Spikes destined for exhibition should have florets with petals that are fully hydrated and show no sign of aging or insect damage. Choose spikes that have the bottom one-third or their florets in full bloom, the middle one-third showing color and the upper one-third in bud. Florets should be evenly spaced and all facing in the same direction. The stem should be straight and the tip of the spike should not be bent. Cut the spike so that the stem portion is about one-third its total length. It is best to cut spikes for exhibition the night before the show, place them in water and allow them to remain overnight in a cool location for florets to gain maximum hydration.
G6620, revised October 2005