1.1
Introduction
WISQARS Fatal provides mortality
data for 1981-1998 and for 1999 in three report formats: mortality
(fatal injury) reports, leading causes of death
reports, and years of potential life lost (YPLL)
reports. A mortality report
gives you a statistical table about a
particular injury cause and intent of injury, along with other details
you specify (such as age range and sex). A leading cause
of death report gives you a chart of the most common causes of
death for a particular population or range of years, with
injury-related causes highlighted in colors (red, blue, and
green). A YPLL report provides a measure of premature
mortality (early death) for a specific population and a
particular year or range of years
You can access a fatal report
using three basic steps:
- Choose a report
type.
- Select report
options.
- Select advanced report
options.
Back
to Tutorial Menu
1.2
Choose a Report Type
The first step for using WISQARS Fatal is to choose
a report type. Your options are fatal
injury reports, leading causes of death reports,
and years of potential life lost (YPLL) reports. Choose a report type based on your
information needs. If you need detailed statistics about a particular
fatal injury cause or intent for a
particular population--such as homicide for Hispanic residents
of the Southwest--then you need a mortality report. If you need information about the most common
causes of death for a specific population, then you
need a leading causes of death report. If you need
statistics that help show whether a cause(s) of death
contributes to early death for a specific population, then you
need a YPLL report.
To choose a report type, perform the following steps:
- Open the WISQARS home page in your Internet
browser. (The URL is http://www.cdc.gov/ncipc/wisqars/).
- Move your cursor to the middle
of the page, underneath the heading "Fatal
Injuries." Select the green "Go"
button beside the type of report you want:
mortality (fatal injury) report, leading causes of death
report, or YPLL report.
Another menu page displaying choice
of year(s) will appear.
- Select the year(s) in which you
are interested--1998 and earlier or 1999.
Note:
The
coding of mortality data changed significantly in 1999 from ICD-9 to ICD-10,
so you may not be able to compare number of deaths and death
rates from 1998 and before with
data from 1999. Some comparability ratios are
available. More Information >>
The appropriate report
options page will appear.
Back
to Tutorial Menu
1.3
Select Report Options
The next step in obtaining a
report from WISQARS is to select your report options.
The three types of reports offer different report options.
A. Mortality (Fatal Injury) Report
Options
Mortality reports feature the following options:
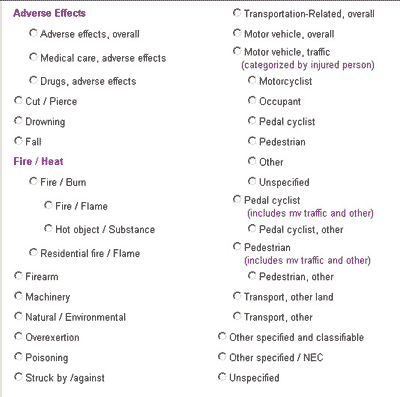
- Cause or mechanism of injury (for example, falls, motor vehicle, fire/burn, cut/pierce,
poisonings)
- Intent of
injury (for example, unintentional, homicide, legal
intervention)
- Census region / state of residence (for example,
Northeast, Colorado, Southwest)
- Race/ ethnicity (for example, black, American
Indian)
- Hispanic origin
- Sex
- Year of report
For thorough
definitions of each option's terminology, see help file section
5.0.)
To select mortality report options, take the
following steps:
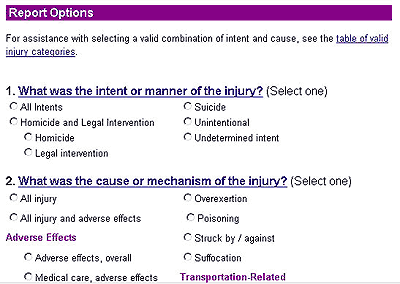
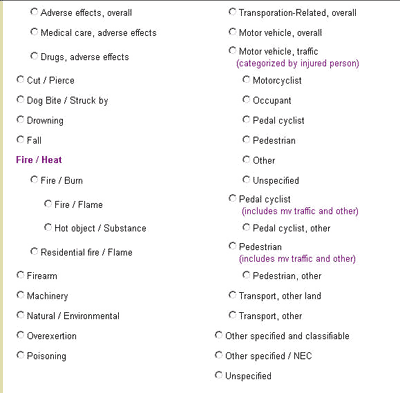
- For items 1 and 2, select the button beside the intent
of injury and cause of injury you desire (see Figure
1.1).
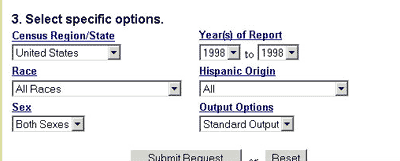
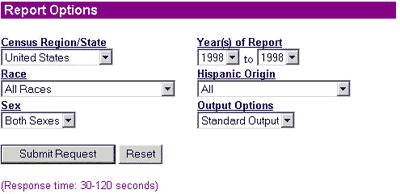
- For item 3, specify the census region or state of
residence, race, Hispanic origin, and sex
of the deceased as well as the year of data you want (see Figure 1.2); select the
item you want from each option's pull-down menu.
Note:
If you want more information
about a report option, click on the category name (e.g.,
intent, year(s) of report). A full definition of the
category and its specific options will appear.
- At this point, you can submit your report request or
select advanced report options (see section
1.4). To submit your report request, click on
the "submit" button below item 3 (see Figure
1.2). WISQARS will quickly display a
table containing the requested information.
Figure 1.1:
Mortality Report Option Items 1, 2
B. Leading Causes of Death Report Options
Leading causes of death reports allow you
to request a customized report featuring the following options:
- Census Region / state
of
Residence
- Year(s) of report
- Race
- Hispanic origin
- Sex
- Output (display) options
For thorough
definitions of each option's terminology, see help file section
5.0.
To request a leading causes of death report, select report
options through the following steps:
- Specify the census region / state of residence, race,
Hispanic origin, and sex of the deceased as
well as year of data (see Figure 1.4) by selecting the
item you want from each option's pull-down menu.
- Select how you want the report to display through the
display pull-down menu. The
standard view contains hyperlinks and color, the printer friendly view
has color but no hyperlinks, and the text-only view
features hyperlinks but no color.
Note:
As you make your selections, if you want more information
about a report option, click on the category name (e.g.,
sex, year(s) of report). A full definition of the
category and its specific options will appear.
- At this point, you can submit your report request or
select advanced report options (see section
1.4). To submit your report request, click on
the "submit" button at the end of the
"Report Options" section (see Figure
1.4). WISQARS will quickly display a
chart containing the requested information.
|
Figure
1.4: Leading Causes of Death Report Option Items |
|
 |
|
Back
to Tutorial Menu |
|
C. Years of Potential Life Lost (YPLL)
Report Options
YPLL reports feature the following options:
- Census region / state of residence
- Race
- Hispanic origin
- Sex
- Year
- Calculate YPLL from age.
For thorough
definitions of each option's terminology, see help file section
5.0.
To request a YPLL report, select report
options through the following steps:
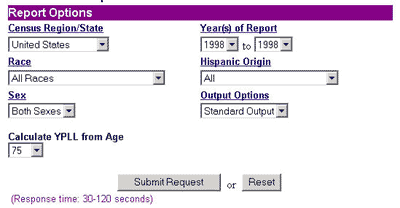
- Specify the census region / state of residence, race,
Hispanic origin, and sex of the deceased as
well as year of data (see Figure
1.5) by selecting the
item you want from each option's pull-down menu.
- Specify the age from which you want WISQARS to calculate
YPLLs by selecting the age from the pull-down
menu.
Note:
If you want more information
about a report option, click on the category name (e.g.,
sex, year(s) of report). A full definition of the
category and its specific options will appear.
- At this point, you can submit your report request or
select advanced report options (see section
1.4). To submit your report request, click on
the "submit" button at the end of the
"Report Options" section (see Figure
1.5). WISQARS will quickly display a
chart containing the requested information.
|
Figure 1.5:
YPLL Report Option Items |
 |
1.4 Select
Advanced Report Options
All three reports offer advanced report options.
While these options are
not required for submitting a report request, they allow
you to customize information further.
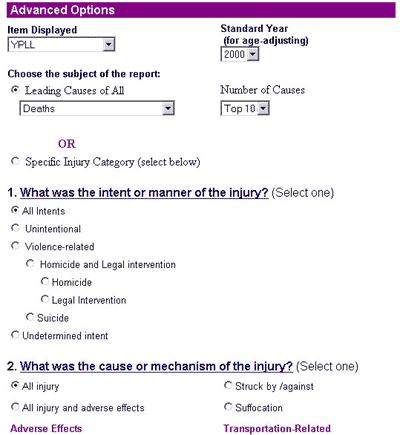
A. Mortality Report Advanced Options
Nonfatal injury reports offer the following advanced
options:
- Age groups
- Age adjusting
- Sorting by category: age,
age group, race, sex, state year.
For
thorough definitions of terminology used in the advanced
report options, see help file section
5.0.
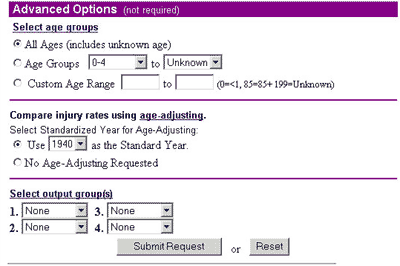
To select advanced report options,
- Decide which option(s) you want to
use.
- Select the item
you desire from the pull-down menu(s) (see Figure
1.6).
- Click on the "Submit"
button at the bottom of the "Advanced Options"
section. Within 30-120 seconds, WISQARS will display a
table containing the requested information.
| Figure
1.6: Advanced Mortality Report Options |
|
 |
|
B. Leading Causes of
Death Report
Advanced Options
Leading causes reports offer three advanced options:
- Number of causes
- Categories of death
- Age-group formatting
For
a thorough definition of these advanced options, see help file
section
5.0.
To select advanced report options,
- Decide which option(s) you want to
use.
- Select the item
you desire from the pull-down menu(s). For age-group
formatting, select the button beside a preset option, or
create a custom age range using the pull-down menus (see Figure
1.7).
- Click on the "Submit"
button at the bottom of the "Advanced Options"
section. Within 30-120 seconds, WISQARS will display a
chart containing the requested information.
Back
to Tutorial Menu
|
1.5
Downloading Data / Images Report Options
Section: 1.5.1 Downloading Data
Each report allows you to download the data in a
comma-separated value (csv) format:
- Select the link at the bottom of the report that says
"Download Results in a Spreadsheet (CSV) File."
- In Internet Explorer, a window will appear asking whether to open the file or
save it.
- In Netscape, a window may appear offering "More
Info," "Pick App," "Save File,"
or "Cancel." Then you will be given the
option whether to open the file or save it.
-
Select "Save this file to disk" and click on "OK."
- Browse for and select the location (folder, drive, etc.)
where you want to save the data. Click on
"Save".
Importing the data into desktop software
When importing the data into a software package such as
Excel, be sure to identify the file as type TEXT (*.prn,
*.txt, *.csv). This type likely will not be the
default.
Section: 1.5.2
Capturing graphic images from Leading Causes of Death
Reports
Method of Capturing the Leading Causes of
Death chart
- Press Print Screen key on your
keyboard.
- Save Picture as a GIF file.
- Open Power Point and a new blank
slide.
- Insert Picture - From file; and then
navigate to
saved GIF file.
Method of capturing a bar chart in Power
Point
- Select "Printer-Friendly Version" link,
located below the chart to remove hyperlinks, CDC
banners, etc.
- From anywhere on the image, right
click mouse.
- Select "Save Picture As"; then assign a
file name and location.
- Save picture as a GIF file.
- Open Power Point and a new blank
slide.
- From "Insert" pull-down menu, select
"New slide."
- Insert picture from file
- Navigate to the previously
saved file
- Click on "Insert."
Back
to Tutorial Menu
|