
eForms
Form 1 - Electric Utility Annual Report
Note: This also applies to Fom 3-Q - Comprehensive Quarterly Financial and Operating Report
Electronic Submission Software - Installation Manual
The FERC Form 1 Submission Software (FOSS) is downloaded from the FERC Forms
Server via the Internet. The downloaded file is an installation file. It is
used to install
the application on your workstation. Once the software is installed at your site,
the installation file is no longer needed and can be deleted.
Once the software is installed it will appear in your workstation "Start
Menu" under a Program Group called "FERC Applications". You
would start the software by clicking on "Start/FERC Applications/Form
1 Submission Software".
Once installed, the FOSS software will check with the FERC Forms Server via
Internet to determine if there are any updates to the software. This check
happens every time you start the software. If updates are available, they will
be downloaded
to your workstation and installed automatically. This keeps everyone's
copy of the software in synchronization – and repairs problems you may
find and report to the FERC.
Downloading and Installing the Form 1 Submission Software
Click the Form 1 Submission Software link [EXE] to obtain the software installation
file. The following screen will appear. You may choose "Run this program from
its current location" and installation will begin.
If you choose "Save this program to disk", the downloaded installation
file can be used to make multiple installations. In this instance, remember
where you tell the software to save the file. After download, locate the file
with Windows Explorer, place your cursor on the file name, and double-click.
This will start the installation process.

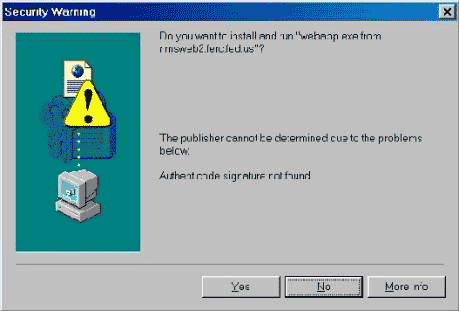
When Installation begins, you will get the following screen. Just click "Yes".
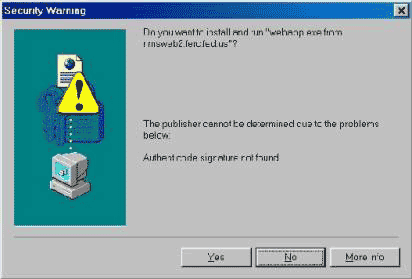
The next screen is a normal part of Microsoft Software installation. There is
no need to worry about the licensing agreement - we are authorized to distribute
this software free-of-charge.
The setup program will want to place the application in the F1SS folder on your
C: drive. If the folder does not exist, it will ask if you want to create it.
Please do not change the folder name or location. It is easier for us to help
you if you have a standard installation. Just click "OK".

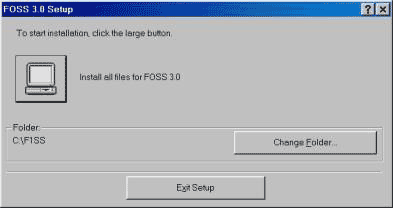
When the following screen appears, click on the big button shaped like a computer
screen to begin the actual installation. And, leaving the folder name as the
default would be helpful when you call for support.
The installation process will create a program group called FERC Applications
(see below). You can select a different group name, however, as mentioned earlier,
it will be much easier for us to provide support if you allow a standard installation.

Eventually, the installation will finish and you will get the following notification:
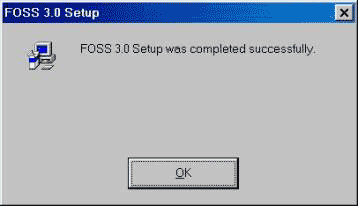
The installation will instruct you to restart your computer. This is necessary
for proper registration of certain components of the software.
Initial Operation and Setup of the Form 1 Software
At this point, installation is complete. You now need to set your communications
options (if any) and obtain the initial download of your Form 1 database information.
However, if you have a Form 1 Database from previous years saved on your network
drive, you should use that database. When you first start the software (click
on the Start Menu, locate Program Group "FERC Applications", then click on "Form
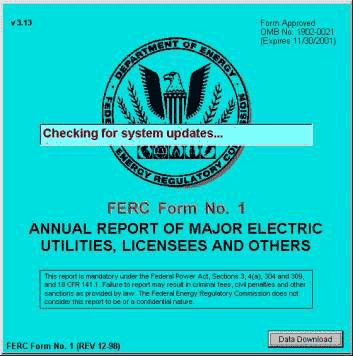
1 Submission Software"), you will get the following "Splash Screen". Notice
that the Version Number of the software is in the upper left-hand corner of the
screen. This number changes every time updates and changes are downloaded to
your workstation.
Downloading Your Initial Form 1 Database
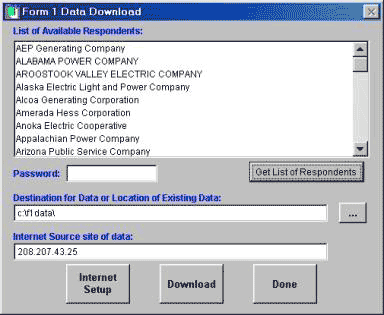
If you are running the software for the first time, the data download screen
will appear (see below). This function allows you to download a database of the
company or companies for which you file Form 1 information. If you filed Form
1 in the previous year using this software, you should have a copy of your Form
1 Database on your network. This version should be used instead of attempting
to download a new database. If you have an existing database, you can skip down
to the heading: "Using a Database from a Previous Year.
Before you proceed, you should click on the "Internet Setup Options" button and
set any of the options that apply to your Internet connection. These options,
if any, can be obtained from your Network/IT Support Personnel. These options
may also be set within the data entry software by clicking on the "Options" pull-down
menu at the top of the screen, and clicking on "Internet Communications Setup".
The next step is to determine a location for your database. The box titled "Destination
for Data or Location of Existing Data" shows a proposed default location for
your Form 1 Database. It is highly recommended that you choose a directory on
your Network for the Form 1 Database. First of all, storing the database on your
network permits multiple users of the Software to work at the same time. (If
you desire having multiple users inputting data, the database must be on a shared
network drive accessible by all users). Secondly, you will be protected from
losing your work should your workstation have a malfunction. Most network data
is backed up every evening. If you chose not to use a network drive for your
database, and ensure that it is backed up frequently, you are at risk of losing
all your work should something happen to the database because of hardware malfunction.
Please consider the ramifications of this happening, and take appropriate action
to protect your data.
Once the Database location has been chosen, you click on the "Retrieve Company
Listing" button. The software will obtain a list of companies available for
download from the FERC Forms Server. If you cannot get the list, refer to Troubleshooting.
You will need to contact FERC for a password to download a company database.
This is to prevent users from accidentally downloading a new database copy instead
of using the database from 1998.
Select your company name in the "List of Available Companies" box by clicking
on it once. Then, Click on the "Begin Download" button. The software will notify
you when the download is complete. If you file for more than one company, you
may now select a different company for download, and click the "Begin Download
Button" again. Continue in this manner until all companies you file for are
downloaded. Once database download is complete, you may click on "Finished".
Using a Database from a Previous Year
Normally, the software will "remember" where your database was located in prior
years. If you are doing a "fresh" software install, you may see the "Form 1 Data
Download" screen. If you do, delete the data in "Destination for Data or Location
of Existing Data:" and insert the path to your database on your network. Then,
hit the tab key to exit the field, and click on "Done". You can click on the
button to the right with the three dots and you can navigate to the database
location.
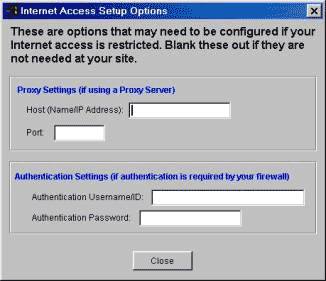
Here is a picture of the screen that will appear if you click on the "Internet
Setup Options" button. Unless you are sure of what to place in these boxes,
just leave them blank. If the software cannot communicate with the FERC Forms
Server for updates, you might contact your network support personnel to determine
what values belong in these boxes, if any.
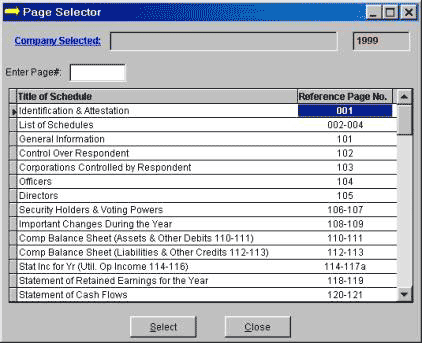
Here is a picture of the Page Selector Screen on the Data Entry page of FOSS.
To select your company, click on "Company Selected". You will see a new window
that contains the companies or company (if you just file for one) and a pull-down
menu for the particular year you wish to work with. Once you have selected the
company, you can double-click on any "Reference Page No:" to open that schedule.
Although it clutters the screen, you can have more that one schedule page open
at one time.
Here is an example of the screen you will see when you click on "Company Selected" (see
above). In this example, there are three "real" companies and two "Ficticious" companies
(Fla P&L and The Fla Power & Light. "Ficticious Companies" can be created
from the "Real" company and printed for submission to State agencies. They cannot
be filed with the FERC. Notice the "pull-down" menu for the Year. You can go
back and review or correct prior year data and even resubmit a prior-year Form
1 if you make corrections.

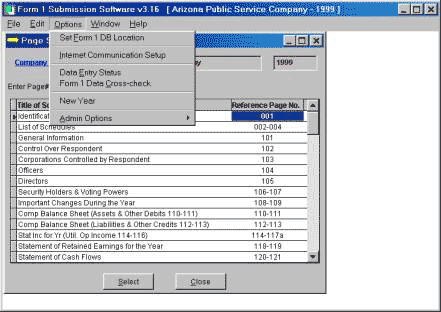
Here is an example of the "Options" pull-down menu. Following paragraphs will
describe the elements in this menu.
Set Form 1 DB Location
This is used to specify a new location for the database. An example would
be, you have installed the database on your C:f1data folder and you want to move
the database to a network drive. First, you would create the network folder.
Then, you would select all the contents of the C:\F1data folder (go to the folder,
use cntrl/A to select all). Copy the entire contents to the new network folder.
Then, you would start the FOSS, select "Options/Set Form 1 DB Location" and select
the new drive and folder on the network. Once that is done, you can erase the
C:\F1data folder on your workstation.
New Year
This element sets up the database for a new year of reporting activity - for
example, starting 1999 when the last year you entered was 1998. First, make sure
that your company name and the year 1998 appear in your "Company Selected" box.
Then, click on "Options/New Year" and follow the directions to set up 1999.
Next, click on "Company Selected" and select 1999 from the drop-down list for
year. If you have multiple companies in your database, you will have to do this
process for each one of them. This must only be done once. All workstations using
the software will now be able to access 1999.
Internet Communications Setup
This element allows you to enter the Internet Communications Options screen.
This is the same screen you can call up in the Form 1 Data Download screen. You
should ask your network support personnel if any of these options apply to your
network.
Data Entry Status
This element produces a report that you can view on screen, or
print. It indicates which schedules have had data entered and which ones are
still blank. In situations where the Form 1 is being filled out by many different
people,
you can determine which schedules have been worked on - and which schedules are
still blank.
Form 1 Data Cross-check
This element edits the database for consistency and produces a report on
screen for review or printing. This is an edit report an attempts to determine
consistency errors between schedules and other obvious errors. Some of the warnings
it produces are not errors, but rather areas that you should review to ensure
that the data is correct.
Form 1 Operations Manual and Help Facility
The Form 1 software contains extensive documentation that explains its operation.
You can either view this help on the screen, or print it out to read when you
have the time or inclination. You invoke the Help by pressing the F1 key, or
clicking on the Help Menu at the top of the screen.
The results should look like the picture below. Notice that you have
to click on the "purple" book icons to expand them and view their contents.

The following is a list of all the files that comprise the Form 1 database.
There are 205 of them. Essentially, there is a table in the database for each
Form 1 schedule page. This is the directory/folder that should be placed on your
network for data security purposes. You should ask your network support personnel
to assist you in setting up a security scheme so that only members of your work
group can access these files. Otherwise, someone might think it is fun to delete
some of the files and see what happens. This can cause you a lot of wasted time
and extra work.
Also, be sure that this folder is backed up by Network Operations every evening.
If something happens to the database, you will lose all your work that was done
since the last backup. If it has never been backed up, then, you start all over.
Not a pleasant thought.
Once you are finished with Form 1 for a particular reporting year, you should
either leave the database on the network, or ask that it be backed up with the
assurance that you can get it back for the next year. The database contains all
Form 1 filing information for 1994 through 1998 - and, once you do 1999, it will
be there also, and 2000 and so on. So, to put it another way, please do not delete
or lose the database.

If You Have Problems, Please Read Carefully
You may experience problems downloading your initial database or obtaining the
automatic updates mention at the beginning of this document. Either of these
problems can usually be traced to your Firewall which protects your network from
outside interference. The software will work OK at most companies. However, if
you have a problem with these two issues, your only recourse is to plead with
your IT folks to loosen things up a little or make some accommodation.
If you have errors in the software where it quits, gives you some kind of system
error, or otherwise acts in an abnormal manner, you can report these problems
to FERC and we will try to resolve them. (See below for reporting procedures)
If there are bugs in the software, we will fix them, and distribute updates to
your software automatically. If you can't receive automatic updates (see #1 above),
you will probably have to download and install the software each time there is
an update. The software has version numbers which change as we apply corrections
or improvements. Also, we send out a cumulative list of improvements and fixes
(called Release Notes) to everyone on the email distribution list indicating
which version fixed what. This is how you can tell an update has occurred even
if the auto update feature doesn't work for you.
Below is an example of the F1SS Folder where the software is installed on a typical
workstation:
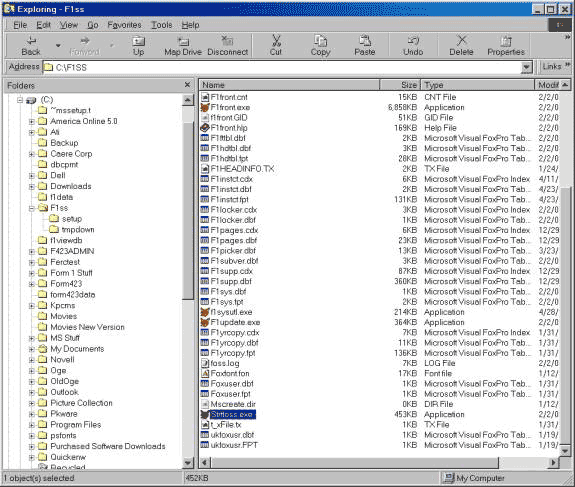
Notice the file named foss.log. When you send us an email regarding any errors
or problems, we must have the foss.log attached to the email. Also, be sure to
put the word Form1 in the Subject of the email. If you forget to attach the foss
log file, we will send you a reply mail asking for it. So, it just saves time
to send it along in the first place. Of course, your IT people are welcome to
review the log file and help diagnose any problems you might have.
Send emails with software problems, Internet problems, or suggestions for improvements
to the application to FERC
Online Support. Be sure to attach the foss.log to your email if you are
reporting an error.
If you feel you have a serious problem, call the FERC Online toll-free number
at 1-866-208-3676.
|
 |

 |
 |
 |
| |
Downloads & Links
Electronic Submission Software
Viewer
Form Communications Test Application
Database Utility
|
|
 |
 |
 |
|


