Adobe Acrobat 8.0 uses menus, tool bars, icons and other controls to format PDFs. It also uses special features, and creates additional accessibility functions.
You are now ready to prepare the converted document for posting on the Web.
- Document Properties
- Remove Hidden Content and Comments
- Bookmarks
- Hyperlinks
- Accessibility Tags
- Accessibility Report
- Review Table Tags
- Reduce File Size
B. Document Properties:
PDF Document properties are very similar to Word Document properties. Word document properties will transfer to the PDF document properties.
If you receive a PDF and are not sure if the source was formatted correctly, then check the properties by following the instructions below.
PDF Document properties may be displayed by clicking on “File”, then “Properties”.

The following tabbed menu will be displayed:

Description Tab:
File: Displays the name of the file.
Title: The title of the document.
Author: Your Office, Division, or OpDiv.
Subject: Brief identification of the subject of the document
Keywords: The keywords are associated with the document during a search and will effectively rank the document for relevance. The closer the search words match your keywords, the higher the document will be rated in the search. When using multiple keywords, separate them with a comma. Be sure to choose words that are relevant to the content.
Language: To add language click on the “Advanced” Tab. The following window will be displayed. Under “Reading Options” use the Language dropdown menu to select the appropriate language. The following window will be displayed. Under “Reading Options” use the Language dropdown menu to select the appropriate language.

C. Remove Hidden Content and Comments:
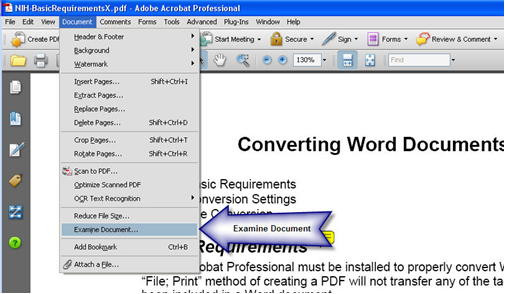
During the review process hidden content and comments are sometimes added to PDF documents. These items must be removed prior to posting the PDF to the web. To remove these items:
- Click on “Document” found in the “Menu” bar
- Select “Examine Document”

A window displaying all hidden data and comments in the document will be displayed.
- Uncheck Metadata and Bookmarks
- Click Remove All Items

D. Bookmarks:
Bookmarks are a collection of direct links to content within the document.They provide users with a means of navigating the document. Any PDF document over 9 pages must have bookmarks included.
Bookmarks may be displayed by clicking on the bookmark icon.

Separate guidance for Bookmarks is available at http://www.hhs.gov/web/508/pdfbookmarks.html.
E. Hyperlinks in PDF Documents
Active hyperlinks set in Word will transfer as active links in the PDF. Hyperlinks must be tested to ensure the link is not broken and that the link is going to the intended web page.
If hyperlinks are not active or need to be changed, follow the instructions below.
To insert a hyperlink into a PDF document:
- Select the “Link Tool” found in the “Advanced Editing” tool bar.

- A set of “cross hairs”, which resembles a “+” sign, will be displayed in the window. Use these cross hairs as your cursor to highlight the text to be linked.
The Create Link Dialog box will be displayed.

- Select “Open a web page” in the “Link Action” section of the dialog box.
- Click the “Next” button.
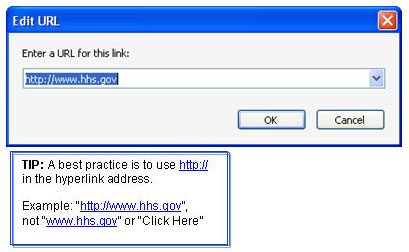
- Another dialog box will be displayed requesting the link.
- Enter the link. (It is strongly suggested that you copy and paste the hyperlink directly from the Internet page to avoid making mistakes when typing the URL manually.
- Click “OK”.

F. All documents must have accessibility tags
Accessibility tags are critical for assistive technology to “read” a document.
Many times these tags convert over from the Microsoft document into PDF. However, do not assume that they will automatically do so.
To check for accessibility tags, view the document properties:
- Click on File, then Properties.

If the document has accessibility tags they will be displayed under the Description Tab. Tagged PDF: Yes

If “Yes” is displayed, click “OK” to close Document Properties.
If the Tagged PDF indicator is set to No, you must insert accessibility tags:
- Select Advanced from the Main Toolbar;
- Select “Accessibility”;
- Then select “Add Tags to Document”

A wizard will add the needed accessibility tags to the document. Once a document has been tagged it must be checked with the accessibility reporting tool in Adobe Acrobat Professional.
G. Run Accessibility Report
The accessibility report will provide information on most tagging problems.
To run an accessibility report:
- Click on “Advanced” located in the Main Toolbar;
- Then click on “Accessibility”;
- Then “Full Check”

The following default window will appear:

Make sure the report is saved to the correct folder on your computer.
- Click on “Choose” to select the location (C drive, My Documents, etc.)
- Make sure all the boxes are checked in “Checking Options”.
- Click on “Start Checking” which will run the report.
A window with the report summary will appear;
- Click “OK” to view the report.
- The report will be displayed in a split screen.
- The report will be on the left side of the screen; the PDF will be on the right side.
- The issues identified in the Detailed Report Section link to the object(s) in your PDF document that need(s) to be corrected.
- There are also Links in the Detailed Report Section which will guide you on how to repair any errors.

H. Review Table Tags
Tables converted from Microsoft Word will need to have the associated Tags edited.
Tables are designated as “Table” in the Tags panel. The detail of the table tag may be displayed by clicking on the “+” to expand the lower level objects of the table.
Column/Row headers must be tagged to associate the data cells with the corresponding column/row heading cells. This will provide column/row heading information for screen readers.
The table should also be ordered so it can be interpreted from left to right, top to bottom order.

Separate guidance for table tagging is available at http://www.hhs.gov/web/508/tabletags.html and http://www.hhs.gov/web/policies/pdfaccessibility/editpdftabletags.pdf.
Adobe has both on-line information and a downloadable documentation on the tagging of PDF documents.
I. Reduce File Size
Reducing the size of a PDF file will make it download faster.
If the file size has already been reduced it will be indicated in the “Document Properties” window. In the lower right corner of the window “Fast Web Viewing” will show as “Yes”.

To reduce the file size:
- Close Document Properties window.
- Select “Document” from the Main Toolbar in the Acrobat window;
- Then select “Reduce File Size”.
- In the drop down list, select “Acrobat 8.0 and later”.

A dialog window for “Reduce File Size” will be displayed.
- Click on “OK”.
- You will then be asked to save the file.
- Save your file.

You are now done! Your PDF is 508 compliant and ready to post.
<< Previous