Mineral Resources On-Line Spatial Data
Using the Map Browsers
System and Software Requirements
-
- The Map Browser Internet application works on virtually all computers, however,
a monitor screen size of 800x600 or better is recommended. The Map Browser is optimized
for a screen size of 1024x768 and has been tested with screen size up to 1600x1200. The application is written
entirely in HTML, XHTML, CSS, and JavaScript 1.3. Therefore, scripting must be enabled in your browser settings for the
application to work. We recommend using the most recent version of Mozilla Firefox or Microsoft
Internet Explorer, although any recent, Javascript-enabled browser should be compatible. All development on the
system is done using Firefox as the test client.
When you initially start the application, a series of Javascript files will be downloaded to your system.
Depending on the speed of your system and network connection, the initial download may take a couple of minutes.
Page Options
- The Mineral Resources On-Line Spatial Data Home Page presents the user
with the following options:
- (1) Browsing Data from a Map View. The user can start the Map Browser application by
clicking on the North American icon, or the World icon. In addition to starting at a different map scale,
the North American browser and the World browser present slightly different data layers. Whereas the
World browser primarily presents data layers which contain global data, the North American browser
presents more detailed data layers that are focused more on the United States and North America.
The two browsers can also be started by clicking on the links below the icons or by clicking on the
links on the Navigation Pane on each page.
- (2) Download Data. Clicking on any of the 'Download Data' links on the home page or in
the Navigation Pane takes the user to a page where each of our data files is described both in text and by
formal metadata. Selecting a data layer from that page takes the user to a location where the user can
download data if the data is provided by the Minerals Program or link to a source page for data that is not
provided by us. For data that is provided by the Minerals Program, the user can choose to download the
entire data set, or a portion of the data set based on geography and/or theme, in a variety of formats.
See the data download help page for more information on using the data selection application.
- (3) Web Services. In addition to the map browser described above, our data are also available
as Web Services. This page describes the types of Web Services that we support, provides the
necessary URLs to make use of the Web Services, and lists the individual Web Services that are
currently available.
The Navigation Pane at the left of each page offers the following additional choices:
- (1) Metadata. This link takes the user to the same page described above, under 'Download
Data'. Selecting a data set on that page gives the user access to metadata documents that describe the
details of data set construction, technology utilized, structure, schema, and definitions as well as contacts
for further information.
- (2) System Requirements. This page gives more information on requirements to run the map
browsers, including a list of browsers which have been tested with the application.
- (3) Help. A link to this page.
- (4) Data Availability. This page presents the Mineral Resources Program's policy statement
on data use as it pertains to this web site. In particular, it spells out our policy toward the use of public
data vs. the permitted uses of proprietary data.
- (5) About our Data. A page listing, with brief descriptions, the data sets that are available from
this web site.
- (6) About this site. A summary of the project, personnel, and technology behind this web site.
- (7) Feedback. An opportunity to give us your comments and suggestions.
Finally, at the top and bottom of each page are links to the U. S. Department of Interior, other parts of the
U. S. Geological Survey, other mineral resource related sites, and Privacy and other Policy Statements.
Return to top
Map Browser Tools
Once the Map Browser Javascript files have been downloaded to your system and the initial map has been
retrieved from the server, you will see an initial display with a background map which depends on whether the
North American or the World browser has been selected. Other than the initial map and the set of data layers
that are available, the browsers are identical. All displays and tools function in the same way in both browsers.
The display consists of four parts: the main map window in the center, a
tool bar in the banner at the top of the page, a combination
table of contents/legend window to the right of the main map, and a
text window at the bottom.
Each part of the map browser will be discussed separately, below.

North America Map Browser initial view
The main map window
The main map window displays the combination of data layers that are selected by the user, on a map which can be
panned or zoomed to cover any geographic region of the Earth. Data in the main window can also be queried in several
different ways. The map is presented in a Mercator projection and always includes a north arrow. Note that the dividers
to the right and on the bottom of the map window can be moved by the user (click and drag), thus allowing the user to
control how much of the display is used for the map.
The toolbar

The toolbar contains icons of tools that are used to manipulate the main map window (zoom, pan, etc.), query the data
layers, print the map, and control the display of either a data layer list or a map legend in the Table of Contents
window. Note in the image above that the first icon (Zoom In) has a red box superimposed. The red box indicates the
current mode of the toolbar. In this case, clicking or dragging in the map window will invoke the Zoom In tool. The
function of each of the tools in the toolbar is discussed in the following paragraphs.
 Zoom In Pressing this button
allows you to zoom in to a smaller area on the map by clicking on a location or
by holding down the left mouse button and dragging a window. If you click on a
location, the new map will zoom in by a fixed amount and be centered on that location.
If you drag a box, the new map will contain the new box plus enough area to fill the
current shape of the map window. A red square in the tool icon indicates the tool is active.
Zoom In Pressing this button
allows you to zoom in to a smaller area on the map by clicking on a location or
by holding down the left mouse button and dragging a window. If you click on a
location, the new map will zoom in by a fixed amount and be centered on that location.
If you drag a box, the new map will contain the new box plus enough area to fill the
current shape of the map window. A red square in the tool icon indicates the tool is active.
 Zoom Out Pressing this button
allows you to zoom out to a larger area on the map by clicking at a location or
by holding down the left mouse button and dragging a window. If you click on a
location, the new map will zoom out by a fixed amount and be centered on that location.
If you drag a box, the new map will contain a larger area in inverse proportion to the size
of the box that you drag plus enough area to fill the current shape of the map window. Smaller drag box = larger
area covered by resulting map; larger box = smaller additional area included. A red square in the tool icon
indicates the tool is active.
Zoom Out Pressing this button
allows you to zoom out to a larger area on the map by clicking at a location or
by holding down the left mouse button and dragging a window. If you click on a
location, the new map will zoom out by a fixed amount and be centered on that location.
If you drag a box, the new map will contain a larger area in inverse proportion to the size
of the box that you drag plus enough area to fill the current shape of the map window. Smaller drag box = larger
area covered by resulting map; larger box = smaller additional area included. A red square in the tool icon
indicates the tool is active.
 Initial Map Extent Pressing this button returns the display
to the initial map extent you saw when you first accessed the map. This is the maximum map extent for all
data layers.
Initial Map Extent Pressing this button returns the display
to the initial map extent you saw when you first accessed the map. This is the maximum map extent for all
data layers.
 Layer Maximum Extent Pressing this button changes the map display
to the maximum extent for the data layer that is selected as the 'active' layer in the table of contents
layer list display. For more information on active layers, see the description of the
table of contents, below.
Layer Maximum Extent Pressing this button changes the map display
to the maximum extent for the data layer that is selected as the 'active' layer in the table of contents
layer list display. For more information on active layers, see the description of the
table of contents, below.
 Previous Map Extent Pressing this button returns the display
to the map extent of the previous map you were viewing. This tool is particularly useful if you inadvertantly
zoom the map in or out, or pan away from the area of interest. Press this button to returnm to your
original map extent.
Previous Map Extent Pressing this button returns the display
to the map extent of the previous map you were viewing. This tool is particularly useful if you inadvertantly
zoom the map in or out, or pan away from the area of interest. Press this button to returnm to your
original map extent.
 Pan Pressing this button allows you to manually navigate across the map, at the
same zoom level, by clicking at a location or by holding down the left mouse button, dragging the map
with the cursor to a new location, and releasing the left mouse button. If you click at a location, the map will be
redrawn with the point at which you clicked at the center of the map. If you drag the map, the map will be redrawn
when you release the mouse button. If you pan beyond the edge of the current map display, a new map will
be requested from the server. A red square in the tool icon indicates the tool is active.
Pan Pressing this button allows you to manually navigate across the map, at the
same zoom level, by clicking at a location or by holding down the left mouse button, dragging the map
with the cursor to a new location, and releasing the left mouse button. If you click at a location, the map will be
redrawn with the point at which you clicked at the center of the map. If you drag the map, the map will be redrawn
when you release the mouse button. If you pan beyond the edge of the current map display, a new map will
be requested from the server. A red square in the tool icon indicates the tool is active.


 Fixed Pan Pressing any of these buttons pans the map by a fixed amount in the
direction indicated (north, south, west, east, respectively). These buttons do not rely on user
interaction in the map window; the map is redrawn as soon as the button is clicked.
Fixed Pan Pressing any of these buttons pans the map by a fixed amount in the
direction indicated (north, south, west, east, respectively). These buttons do not rely on user
interaction in the map window; the map is redrawn as soon as the button is clicked.
 Identify Pressing this button returns attribute information about a map feature
on which you click. A map layer must be 'active' in the table of contents
before using this tool. For more information on active layers, see the description of the
table of contents, below. Attribute information for the selected feature on the active
data layer will be displayed in tabular form in the text window, below the map. For more information
on tables in the text window, see the description of the text window, below.
A red square in the tool icon indicates the tool is active.
Identify Pressing this button returns attribute information about a map feature
on which you click. A map layer must be 'active' in the table of contents
before using this tool. For more information on active layers, see the description of the
table of contents, below. Attribute information for the selected feature on the active
data layer will be displayed in tabular form in the text window, below the map. For more information
on tables in the text window, see the description of the text window, below.
A red square in the tool icon indicates the tool is active.
 Query Pressing this button brings up a dialog box in the text window where you can
enter search criteria for locating and describing specific map features contained in the 'active' layer. For
more information on the text window, see the description of the text window, below.
For more information on active layers, see the description of the table of contents, below.
Look under Map Browser Tips for additional information on utilizing the query dialog.
Query Pressing this button brings up a dialog box in the text window where you can
enter search criteria for locating and describing specific map features contained in the 'active' layer. For
more information on the text window, see the description of the text window, below.
For more information on active layers, see the description of the table of contents, below.
Look under Map Browser Tips for additional information on utilizing the query dialog.
 Erase Using the query tool to make a selection from the currently 'active' data layer
creates a table of records which match the query criteria in the text window. The map is also re-drawn
with selected features highlighted in yellow. Pressing the Erase tool causes the selection set to be
dropped and the map to be re-drawn without the highlighting.
Erase Using the query tool to make a selection from the currently 'active' data layer
creates a table of records which match the query criteria in the text window. The map is also re-drawn
with selected features highlighted in yellow. Pressing the Erase tool causes the selection set to be
dropped and the map to be re-drawn without the highlighting.
 Print Pressing this button creates a graphic image (map layout) of the current map
display along with its legend that the user can then print. A popup window will appear allowing the user
to enter a map title. The map layout will then be downloaded in a new browser window. The layout
can be printed, using the browser's print function, as an 8.5" x 11" page. If the popup map title
window does not appear, check to see that your browser is not preventing popup windows from appearing.
In most modern browsers, you can set your popup blocker to allow popups from specific servers if you
do not want to allow all popups. This is a simple map printing tool which is confined to letter-sized maps.
Because of the limited legend space on the page, it works best with maps with small numbers of
data layers with small numbers of different symbols. If you are interested in a more complex map printing
function, please use the Feedback page to let us know what kind of maps
you are interested in creating for printing.
Print Pressing this button creates a graphic image (map layout) of the current map
display along with its legend that the user can then print. A popup window will appear allowing the user
to enter a map title. The map layout will then be downloaded in a new browser window. The layout
can be printed, using the browser's print function, as an 8.5" x 11" page. If the popup map title
window does not appear, check to see that your browser is not preventing popup windows from appearing.
In most modern browsers, you can set your popup blocker to allow popups from specific servers if you
do not want to allow all popups. This is a simple map printing tool which is confined to letter-sized maps.
Because of the limited legend space on the page, it works best with maps with small numbers of
data layers with small numbers of different symbols. If you are interested in a more complex map printing
function, please use the Feedback page to let us know what kind of maps
you are interested in creating for printing.
 Toggle Table of Contents The Table of Contents window, to the right of the main map window,
serves two functions. As the application is started, the window shows the data layers that are available for
display at the current map scale and which layers are currently selected for display. Pressing this
button replaces the data layer list with a map legend. The map legend shows the symbols that
are used for each data layer that is currently being displayed along with a brief label. Pressing the
button a second time restores the list of data layers.
Toggle Table of Contents The Table of Contents window, to the right of the main map window,
serves two functions. As the application is started, the window shows the data layers that are available for
display at the current map scale and which layers are currently selected for display. Pressing this
button replaces the data layer list with a map legend. The map legend shows the symbols that
are used for each data layer that is currently being displayed along with a brief label. Pressing the
button a second time restores the list of data layers.
Return to top
The table of contents
The Table of Contents window, to the right of the main map window, serves two functions.
As the application is started, the window shows the data layers that are available for display at the current
map scale and which layers are currently selected for display, as shown at right. Pressing the 'Toggle Table
of Contents' button on the toolbar replaces the data layer list with a map legend. Pressing the
button a second time restores the list of data layers.
The data layer display contains a button, at the top of the window, which refreshes the map display.
The main map display does not update as changes are made to the list of displayed layers. When the
user is finished selecting the desired data layers for display, the 'Refresh Map' button must be clicked
to request a new map from the server.
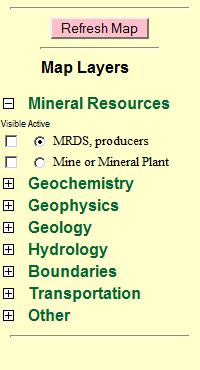
Below the 'Refresh Map' button, the data layers that are available for display are arranged in a
hierarchical list. The list is divided into major categories of data layers with headings in large, green type.
Each category can be opened by clicking on the  symbol to the left of the category name. The category can then be
closed again by clicking on the
symbol to the left of the category name. The category can then be
closed again by clicking on the  symbol that appears before the name.
When the individual data layer names are visible, data layers can be added to the main map display
by clicking in the square checkbox under the column labeled 'Visible'. As many data layers as desired
can be added to the map. However, server response time is slowed by requesting numerous data layers
and by data layers with large numbers of display symbols. Note that the scale at which some data layers
may be displayed is limited. At the small scale end, data layers with many locations to symbolize are
limited to prevent excessive server processing time; at the large scale end, location resolution prevents
accurate map depiction. Data layers that cannot be displayed at the current map scale do not appear
on the layer list. The user may have to zoom in or out on the main map to see all available data layers.
Each data layer also has a round 'radio button' to the left of the layer name under a column labeled
'Active'. Clicking on this button makes the layer selected the current active layer. Only one data layer
may be active at any time. The active layer is the layer that is used for all Query and Identify activities,
and as the layer used by the Zoom layer extent tool.
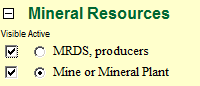
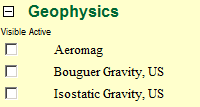
At this time, there is no facility for querying image data layers, such as geophysical layers, so the 'Active'
button does not appear for those layers. In the upper figure to the right, one can see that both of the Mineral
Resources data layers have been made visible, while clicking on the 'Mine or Mineral Plant' active button
has cleared the 'MRDS Producers' active button. The lower figure shows the absence of active buttons
for geophysical image layers.
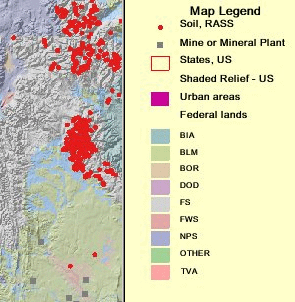
The map legend
Pressing the 'Toggle Table
of Contents' button on the toolbar replaces the data layer list with a map legend. Pressing the
button a second time restores the list of data layers. The map legend (shown at right with a portion
of the main map window) shows the symbols that are used for each data layer that is currently being
displayed along with a brief label. Pressing the button a second time restores the list of data layers.
The example shows a map with 6 data layers selected. Some of the data layers have no symbology
displayed because they consist of images, rather than discrete symbols (Shaded Relief). Some data
layers are displayed with a single symbol (States and Urban Areas), while others are displayed with
multiple symbols for different classes within the layer (Federal Lands, with type of land ownership
specified). The order of the data layers in the legend is the same as the display order on the map.
Data layers shown higher up on the legend list are plotted on top of those shown lower down.
Return to top
The text window
Return to top
Map Browser Tips
This Help page is under construction. More to come shortly . . .

