"Infection Control for
Viral Haemorrhagic Fevers
In the African Health Care Setting"
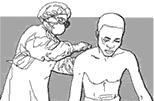
Section 4: Wear
Protective Clothing
This
section describes how to:
- Prepare a supply
of protective clothing for use with VHF Isolation Precautions.
- Make adaptations
from locally available materials when an item is not available, or if
the supply is limited.
- Put on and take
off protective clothing in the changing room.
|
4.1 Specify Who Should Wear Protective Clothing |
 |
- All doctors, nurses,
and health care workers who provide direct patient care to suspected
VHF patients.
- All support staff
who clean the isolation room, handle contaminated supplies and equipment,
launder reusable supplies, and collect and dispose of infectious waste
from VHF patients.
- All laboratory
staff who handle patient specimens and body fluids from suspected VHF
cases.
- Laboratory support
staff who clean and disinfect laboratory equipment used to test VHF
specimens.
- Burial teams who
remove bodies of deceased VHF patients and prepare them for burial.
- Family members
who care for VHF patients.
When
a VHF case is suspected in the health facility, the following protective
clothing should be worn in the isolation area:
- A scrub suit or
inner layer of clothing (an old shirt and trousers brought from home)
- Rubber boots or
overshoes (only if the floor is soiled)
- A gown or outer
layer of clothing (surgical or disposable gown with long sleeves and
cuffs)
- A plastic apron
worn over both layers of clothes
- A second pair
of thin or thick gloves. Wearing a second pair of gloves provides an
added measure of safety during patient care and when handling contaminated
supplies
- A HEPA-filter
(high-efficiency particulate air respirator) or other biosafety mask
(or surgical mask if HEPA-filter or other biosafety mask is not available)
- Clear eyeglasses
or non-fogging goggles.
Note: When protective
clothing is not available or is in short supply, adaptations must be made
and used.
| 4.2
Gather a Supply of Protective Clothing |
|
| |
|
 |
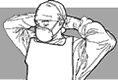
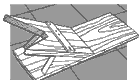
| Fig.
13. Inner layer of clothing |
Obtain
and store the following items outside the changing room or in a storage
cabinet inside the changing room.
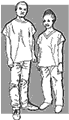
Scrub
suit or inner layer: Wear a scrub suit or a set of old clothes brought
from home (such as a loose-fitting shirt and trousers). Avoid wearing
long skirts to prevent contact between clothing and spills of infectious
waste on the floor.
 |
| Fig.
14. Thin gloves |
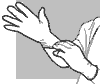
Thin
gloves: These permit fine-motor function when examining or caring
for patients. They can be latex, vinyl, or surgical gloves; they do not
need to be sterile. The gloves must reach well above the wrist, preferably
10 cm to 15 cm long (4 inches to 6 inches), measuring from the wrist up
along the arm.
Boots:
Boots or overboots must be worn over street shoes when infectious waste
is on the floor. Common rubber boots are recommended. The sides of the
boots should be at least 30 cm (12 inches) high and have textured soles.
If
boots are not available, wear two layers of plastic bags.
 |
| Fig. 15. Using
plastic bags as boots |
Assign
those staff who are entering the isolation area their own pairs of boots.
Staff members will be responsible for storing their boots in a covered
shelf or in a plastic sack between each use.
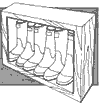 |
| Fig. 16. Storing
boots |
Gown
or Outer Layer: Wear a disposable surgical gown or a cotton gown over
the first layer of clothes.
Disposable
surgical gowns can be reused by the same staff member if they are not
contaminated and are not obviously dirty and torn.
When
the supply of disposable gowns is limited, wear a cotton surgical gown
that can be washed and reused.
The
gown should:
- Open at the back
and close with ties at the neck and waist.
- Be knee-length
with collar wraps around the neck and elastic bands to close the gown
around the wrist. If elastic bands are not used, sew on cotton loops.
They can be hooked around the thumb to hold the sleeve in place.
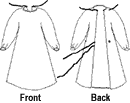 |
Fig. 17. Illustration
of gown
with ties front back |
If the
supply of cotton surgical gowns is limited, make additional gowns from
local cotton fabric. Instructions for making cotton gowns are listed in
Annex 5. Specifications for ordering gowns
and other pieces of recommended clothing are listed in
Annex 6.
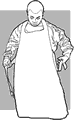 |
Fig. 18. Wearing
a plastic apron |
Plastic
Aprons: Wear a plastic apron over the outer gown. The apron prevents
contact with infectious body fluids that may soak through protective clothing
when the patient
bleeds, coughs or vomits. Plastic aprons should be worn by anyone who
has direct contact with a suspected VHF case or infectious body fluids.
These aprons are strongly recommended for:
- Nurses
- Laboratory staff
- Cleaning staff
- Staff who perform
autopsies or prepare bodies for burial.
When a supply of
commercial plastic aprons is not available, make aprons from plastic sheeting,
rubber, or plastic cloth normally used to cover kitchen tables.
The apron should:
- Have hooks or
ties that fasten around the neck.
- Have ties at the
waist that reach around and tie at the back.
- Be long enough
to cover the top of the boots and provide additional protection from
spills running inside the boots.
 |
| Fig.
19. Thick gloves |
Thick gloves:
These are worn over an inner pair of thin or latex gloves. They are worn
to clean spills, launder reusable protective clothing and patient bedding,
handle disposable waste, and conduct autopsies and burial preparations.
The gloves can be
made of neoprene or thick rubber. They should reach well above the wrist,
about 30 cm (12 inches) up the arm. When thick rubber gloves are not available,
use normal kitchen gloves as the outer layer of gloves.
If the supply of
gloves is limited, wear one pair of gloves. Disinfect them after each
contact with the VHF patient or with infectious body fluids and contaminated
material. How to disinfect and clean gloves during patient care and for
reuse is described in Sections 5.3 and 5.4.
 |
Fig. 20. Using
plastic
bags as gloves |
If gloves are not
available, use plastic bags to cover the hands.
If nothing is available
to serve as a glove or hand covering, make sure health facility staff
wash their hands with soap and water immediately:
- After every contact
with the VHF patient
- Before leaving
the patient's room
- After any contact
with infectious body fluids
- After contact
with any contaminated material.
How to set up handwashing
stations is described in Section 1.3.
Mask: Masks protect the health care worker's face from contact
with blood or droplets of infectious body fluids. Use masks that cover
the mouth and nose. Use a HEPA-filter or other biosafety mask, a surgical
mask, or a cotton mask made locally.
 |
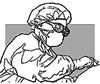
Fig. 21. HEPA-
filter mask |
HEPA-filter
or biosafety mask:A
HEPA-filter mask filters the air to prevent breathing in small particles
and harmful microorganisms. It provides protection from airborne transmission
of microorganisms.
A HEPA-filter or
biosafety mask is lightweight and easy to use. It can be reused by the
same health care worker as long as it continues to fit comfortably and
the mask does not become contaminated, crushed, or splattered with body
fluids.
Do not touch the
mask after it has been put on. The mask may become contaminated once
it is touched. To avoid the necessity for touching the mask, make sure
it fits comfortably before entering the patient's room.
When handling a
reused mask, hold it by the strings. Be careful that the outside surface
does not touch the health care worker's face.
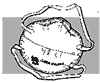 |
Fig. 22. Surgical
mask |
Surgical mask:
If HEPA-filter or
other biosafety masks are not available, use surgical masks. Surgical
masks will not filter out small particles, but they will protect the
health care worker from droplets or splashing of body fluids.
A surgical mask
can be reused by the same health care worker as long as it is not contaminated
and not obviously dirty and torn.
Cotton mask:
If surgical masks are not available, use cotton masks made from four
or five layers of cotton cloth sewn together.
 |
| Fig.
23. Cotton mask |
Use a different
colour
for each side of the mask. This will help health
care workers quickly identify which side should be worn inside.
The mask should
have ties that are long enough to reach behind the head.
Cotton masks will
not provide protection from breathing in particles, but they will provide
protection against splashes and other droplet contact with infectious
body fluids. A cotton mask can be reused by the same health care worker
as long as it is not contaminated and not obviously dirty and torn.
Head covering:
A head covering or cap protects the hair and head against splashes from
the patient's vomit, blood, or other body fluids.
Use
disposable or cotton caps.
If disposable
caps are not available, make cotton caps from locally available cotton
fabric. Include ties so the cap does not fall off when the health care
worker bends over a patient.
 |
| Fig. 24.
Head covering |
If cotton caps are
not available:
- Use a scarf, bandanna,
or large piece of cloth.
- Fold the scarf,
bandanna, or cloth and wrap it around the head.
Eyewear: Wear
clear eyeglasses or non-fogging goggles to protect the eyes from splashes
or spills of infectious body fluids.
 |
|
Fig. 25. Wearing
clear eyeglasses
or goggles
|
Obtain
clear eyeglasses from a local eyeglass shop or in the market. Place ties
on the ear holders. Tie the eyeglasses around the back of the head so
they will not fall off when a health care worker bends over a patient.
If available, wear commercial non-fogging goggles instead of eyeglasses.
| 4.3
Put on Protective Clothing |
|
Make
sure the changing room (and the changing area for cleaning and other staff)
contains a supply of protective clothing. Section
3.4 describes how to set up a changing room.
|
Fig.
26. Scrub
suit: the first
layer of clothing |
1. Before
entering the changing room, remove
jewelry,
wallets and other valuables. Store them safely outside the changing room.
2. Remove
street clothes and hang them on a hook. Put on the scrub suit or
set of old clothes.
3. Enter
the changing room.
 |
| Fig. 27. Putting
on boots |
4.
Put on rubber boots. Put on each boot and tuck the trouser leg inside
the boot. If overboots are used, tape the top of the boot to the leg with
plastic tape. This will help prevent spills from running
inside the boots.
 |
Fig. 28. Putting
on| the first pair
of gloves |
5.
Put on the first pair of gloves.
- Look at your hands
for cut or broken skin. If the skin is cut or broken, refrain from direct
patient contact.
- Put on one glove
at a time. If the scrub suit or set of old clothes has long sleeves,
place the edge of each glove under the cuff.
- When only one
pair of gloves is worn, place the edge of the glove over the cuff or
gown.
If gloves are not
available, use plastic bags. Put on one layer now. Attach and close the
first layer with tape or elastic bands.
 |
Fig. 29. Putting
on
the outer gown |
6. Put on the
outer gown.
- Pick up the gown
from the inside. This is especially important if the gown is being
reused.
- Place arms through
the armholes. Tie the gown in back. Or, ask another
health care worker to tie the gown.
|
Fig. 30. Putting
on a plastic apron |
7. Put on
the plastic or rubber apron.
8. Put on the
second pair of gloves.
- Place the edge
of the second pair of gloves over the cuff of the gown.
-
 |
| Fig. 31.
Proper way to put on the second pair of gloves |
If using plastic
bags, place the second layer of plastic bags over the first. Close ends
of the bags with plastic tape or elastic bands.
- Health facility
staff who do cleaning, laundering, disinfecting, waste disposal or handling
the body should wear thick gloves as the second pair of gloves.
 |
Fig. 32. Putting
on
mask |
9. Put on the
mask.
Tie it
at the back of the neck and towards the top of the head.
|
Fig. 33. Putting
on
head cover |
10. Put on a head
cover.
 |
Fig. 34. Putting
on
eyewear |
11. Put on the
protective eyewear. Attach the eyeglasses or goggles behind the head
with string or cord to prevent the eyewear from falling off when working
with patients in the isolation ward.
Remember! Make sure
the mask, head cover and eyewear fit comfortably. Once gloved hands have
touched a patient, do not touch the mask, headcover and eyewear.
Plan ahead to bring
everything into the isolation area for examining the patient. Once protective
clothing has been put on, do not reenter the general health facility.
In an emergency, ask the guard or a health assistant to go and obtain
any needed items from other parts of the health facility.
| 4.4
Take Off Protective Clothing |
|
The
steps for removing protective clothing include disinfection with bleach
solutions and washing hands with soap and water.
How to set
up supplies for disinfection is described in Section
3.3.
How to prepare the bleach solutions is described in Section
5.1.
Outer gloves and boots are likely to have the most contact with infectious
body fluids during patient care.
Before
leaving the patient's room:
1. Disinfect the outer pair of gloves.
- Wash the gloved
hands in soap and water.
- Dip the gloved
hands in 1:100 bleach solution for 1 minute.
2. Disinfect the apron. Spray or wipe it with 1:100 bleach
solution.
 |
Fig.
35. Disinfecting
the boots |
3. Disinfect the
boots.
Note: The soles of rubber boots are difficult to clean because they are
textured. Disinfect them carefully and make sure to reach all surfaces
of the textured soles.
- Use a sprayer
containing 1:100 bleach solution to spray boots
OR
- Hold the foot
over a pan or basin and ask another health worker to pour 1:100 bleach
solution over the boots
OR
- Step into a shallow
pan containing 1:100 bleach
solution and wipe boots on a bleach-drenched cloth.
4. Remove the
outer pair of gloves.
If two pairs of gloves are worn:
- Pull the edge
of the glove back over the gloved hand so that the glove turns inside
out as it is being pulled back.
- If gloves will
be reused, place the glove in a bucket containing soapy water.
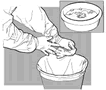
|
|
Fig.
36. Disinfecting
used gloves in
soapy water for
reuse or disposing
of them in waste bucket |
- If gloves will
not be reused, discard them in a bucket for disposal of contaminated
waste.
- Remove the other
glove in the same way.
If only one pair
of gloves is worn:
- Do not remove
the gloves now.
- Rinse the gloved
hands in 1:100 bleach solution for 1 minute before leaving the patient's
room.
After disinfecting the boots and removing the outer gloves, go into the
changing room.
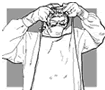 |
Fig.
37. Removing
the apron |
5.Remove
the apron and outer gown.
- Put the apron
in a laundry container or hang it for reuse (if it will be reused).
 |
Fig. 38.
Removing
the gown |
- Remove the outer
gown. Hang it on a hook for reuse. Make sure it is hung inside out.
If the gown needs laundering, place it in the laundry container.
 |
Fig.
39. Washing
the gloved hands |
6. Disinfect the
gloved hands after contact with apron and outer gown.
- Rinse the gloved
hands in 1:100 bleach solution. Then wash them in soap and water.
- Dry the gloved
hands with a one-use towel.
- If bleach is not
available, wash the gloved hands with soap and water.
 |
Fig
40. Removing
the eyewear |
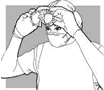
7. Remove the
eyewear, head cover and mask.
- If eyewear is
heavily soiled, wash the eyeglasses in soapy water and wipe them clean.
Store them in a drawer or shelf with the clean supply of eyeglasses.
- Remove the head
cover and, if unsoiled, store it with the cleaned eyewear.
If it is soiled, place it in the laundry container or discard it
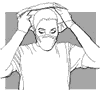 |
Fig.
41. Removing
the headcover |
in the bucket for
disposal of contaminated waste.
- Remove the mask
and hang it on a hook or store it for reuse.
- A HEPA-filter
or other biosafety mask can be reused by the same health care worker
as long as it is not soiled.
If the HEPA-filter
or other biosafety mask is soiled, discard it in a bucket for disposal
of
 |
Fig.
42. Removing
the mask |
contaminated
waste.
- A locally made
cotton mask can be reused as long as it is not obviously dirty and torn.
If it is soiled, place it in the laundry container.
 |
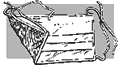
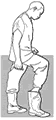
| Fig. 43. A boot
remover |
8. Remove the boots.
- Place a towel that has been soaked in 1:100 bleach
solution on the floor for health facility staff to stand
on when removing boots.
- Use a boot remover to take off the rubber boots.
Avoid touching the boots with bare or gloved hands.
- Store boots safely until next use. For example, store
them in a plastic sack or on a covered shelf.
9. Remove the
inner pair of gloves.
If gloves will be discarded:
-
 |
Fig. 44.
Remove the
inner gloves |
Remove the first
glove with the other gloved hand. Pull the edge of the first glove back
over the gloved hand so that the glove turns inside out as it is being
pulled back.
- Place the inside-out
glove in the palm of the gloved hand.
- Reach inside the
glove to a clean area. Pull the glove back over the hand so that only
the inside of the glove is exposed and covers the glove held in the
palm. Discard the gloves in a bucket for disposal of contaminated waste.
- Wash ungloved
hands with soap and water.
If gloves will be
reused:
- Reach inside the
first glove to a clean area. Pull the glove back over the hand so the
glove turns inside out as it is pulled back. Place the glove in a bucket
of soapy water.
- Remove the second
glove in the same way.
- Place the second
glove in soapy water.
- Immediately wash
ungloved hands with soap and water.
10. Remove inner layer of clothes and dress in street clothes.
- If the inner layer
is not soiled, store the clothing for reuse.
- If soiled, place
the clothing in the laundry container.
- If personal shower
facilities are available, shower before dressing in street clothes.
- If skin has contact
with soiled material, follow guidelines for accidental exposure in Section
5.13.
- Put on street
clothes.
11. Wash hands
with soap and clean water before leaving the changing room.
|
Note:
When gloves are in limited supply, use one pair of gloves only.
Modify the order for removing protective clothing as follows:
1. Rinse gloved hands in 1:100 bleach solution upon
leaving the patient isolation room.
2. Remove apron and outer gown as described in Section
4.4.
3. Remove the gloves.
4. Wash ungloved hands in soap and water.
5. Remove the inner gown or scrub suit, mask, head cover and eyewear.
6. Wash hands again.
|
|