General Information
Mapping News
Mapping Website FAQ
User Guide
Data Downloads
Purchase Hardcopy Maps
Zoning Designations
FEMA Flood Zone Definitions

Map Views
Street Map
Council Districts
School Locations
Bike Paths
Bus Stops
Community Planning Areas
Map Searches/Queries
Addresses
City Parks
Recreation Facilities
City Facilities
Landmarks
Zip Codes
Neighborhoods
Public Safety Sites
Schools
Case Tracking
Geodetic Control
Citywide GPS Network ARTGN
Environmental Issues
Zone Atlas Pages
Latitude/Longitude Finder
Contact
GIS Web Team
Information Systems Division
Email: gis@cabq.gov
User Guide
Layers List
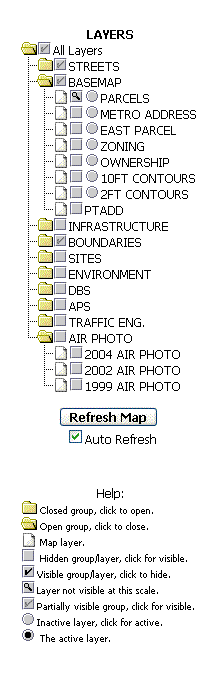
Associated with the layer lists, there are 2 important controls.
The Visibility Check Box
 This controls a layer's visibility - unchecked the layer is OFF.
 When checked, the visibility of the specified layer is ON .
There is no need to hit the 'Refresh' button when you change the visibility status of a layer. The map will re-fresh automatically.
The Active Layer Buttons
 Directly next to the Visibility Control is this small button, which handles a
layer's Active status.
Directly next to the Visibility Control is this small button, which handles a
layer's Active status.
 This illustrates the active layer, which is important for tools such as Identify,
which is discussed in the Tool section below.
This illustrates the active layer, which is important for tools such as Identify,
which is discussed in the Tool section below.
Example
The image below shows the OWNERSHIP layer both Visible and Active

Tool Bar
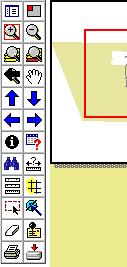
To the left is the Toolbar, which is found on the left side of the Map Frame.
Basic Tools
 This icon represents the Zoom In action. You can click and drag a rectangle around
your area of interest, and the map will zoom to that area.
This icon represents the Zoom In action. You can click and drag a rectangle around
your area of interest, and the map will zoom to that area.
 This is the Zoom
Out icon. A single click on the map area will produce the zoom out
action.
This is the Zoom
Out icon. A single click on the map area will produce the zoom out
action.
 This 'push pin' icon is for
Address Matching. Click this will open up the AddressMatch
Dialog below the Map Frame.
This 'push pin' icon is for
Address Matching. Click this will open up the AddressMatch
Dialog below the Map Frame.
 Clicking the Set
Units icon changes the units of measument between Feet, Miles, Meters
and Kilometers. Dependeing on the scale of your measurments, you
Clicking the Set
Units icon changes the units of measument between Feet, Miles, Meters
and Kilometers. Dependeing on the scale of your measurments, you
 This tool allows the user
to take general Measurements. It tracks individual segments
and a running total of all segments. The measure totals can be cleared with
the 'Eraser' tool. Experiment
This tool allows the user
to take general Measurements. It tracks individual segments
and a running total of all segments. The measure totals can be cleared with
the 'Eraser' tool. Experiment
 This is the
Eraser icon, it will clear a selected area, clear addressmatch results,
clear measurement totals... what ever needs clearing, this tool will accomplish
the task.
This is the
Eraser icon, it will clear a selected area, clear addressmatch results,
clear measurement totals... what ever needs clearing, this tool will accomplish
the task.
 The FIND Control
is base on your ACTIVE layer and can be used to locate a feature
with the value you enter into the textbox. Very helpful for locating a Lot or Subdivison
in the Parcel layer, or a Street Name in the Street Network layer, a Park Name in the Parks layer. This tool is case sensitive, and most of our data is entered in ALL CAPS!
The FIND Control
is base on your ACTIVE layer and can be used to locate a feature
with the value you enter into the textbox. Very helpful for locating a Lot or Subdivison
in the Parcel layer, or a Street Name in the Street Network layer, a Park Name in the Parks layer. This tool is case sensitive, and most of our data is entered in ALL CAPS!
 To Query any
Layer, this is the Control. A query will be established based on your ACTIVE layer.
This is similar to the Find tool, but allows the user to build a complex query.
To Query any
Layer, this is the Control. A query will be established based on your ACTIVE layer.
This is similar to the Find tool, but allows the user to build a complex query.
 This is the Overview
Map icon, which toggles the Overview map on the screen. If the Overview
map is obscuring the map image, it can be turned off by clicking this tool.
A second click will turn it on again.
This is the Overview
Map icon, which toggles the Overview map on the screen. If the Overview
map is obscuring the map image, it can be turned off by clicking this tool.
A second click will turn it on again.
 The Layer List
toggles to a Map Legend with this control. The default is always
the Layer List, but after you have composed the Map, this tool will allow you
to see the complete Map.
The Layer List
toggles to a Map Legend with this control. The default is always
the Layer List, but after you have composed the Map, this tool will allow you
to see the complete Map.
 Identify
tool is to retrieve attributes from an Active layer. For example, you need to
know the owner of a specific property that you have already located. Under the
LAYER LIST, make the Ownership layer ACTIVE by clicking on the circle
next to the layer name (you will be notified of the active layer in the dialog
area underneath the map frame). After the proper layer is made active, click
on the Identify Tool and click on the feature (in this case a parcel). The information
is returned in the dialog area beneath the Map Frame.
Identify
tool is to retrieve attributes from an Active layer. For example, you need to
know the owner of a specific property that you have already located. Under the
LAYER LIST, make the Ownership layer ACTIVE by clicking on the circle
next to the layer name (you will be notified of the active layer in the dialog
area underneath the map frame). After the proper layer is made active, click
on the Identify Tool and click on the feature (in this case a parcel). The information
is returned in the dialog area beneath the Map Frame.
The image below shows the result of using the Identify tool on the OWNERSHIP layer.

 and
and  The Select tools allow a user to gather attributes (much like identify)
from more than on feature at a time. One tool selects based on a user defined
'rectangle' the other allows for selecting based on odd shaped polygons. One
reason to use this tool over the Identify tool is that it actually highlights
the selected features.
The Select tools allow a user to gather attributes (much like identify)
from more than on feature at a time. One tool selects based on a user defined
'rectangle' the other allows for selecting based on odd shaped polygons. One
reason to use this tool over the Identify tool is that it actually highlights
the selected features.
![]() The Hotlink tool
will display an image file associated with a particular feature in the Active layer.
Currently, the only layer with image data is the Survey Ground Control. Make
sure the proper layer is active (for example, Geodetic Control), click the
Hotlink tool , and click a control point. A pop-up window will open displaying
the image data (a Geodetic Map Sheet in this case). This tool is will not function
properly if you have Pop-Up blocking Activated! In all cases of images being
subverted by pop-up-blockers I have seen, the map view resets back to
the overall city view every time one tries to print. Adjusting your
settings to allow our server (currently oneview.cabq.gov) to send pop-ups should take care of the problem.
The Hotlink tool
will display an image file associated with a particular feature in the Active layer.
Currently, the only layer with image data is the Survey Ground Control. Make
sure the proper layer is active (for example, Geodetic Control), click the
Hotlink tool , and click a control point. A pop-up window will open displaying
the image data (a Geodetic Map Sheet in this case). This tool is will not function
properly if you have Pop-Up blocking Activated! In all cases of images being
subverted by pop-up-blockers I have seen, the map view resets back to
the overall city view every time one tries to print. Adjusting your
settings to allow our server (currently oneview.cabq.gov) to send pop-ups should take care of the problem.
Printing a Map
 Printing is accomplished with this icon. This brings up a form in the dialog portion
of the screen that allows the user to choose a pagesize and print resolution.
The user can also specifiy their own title for the print page.
Printing is accomplished with this icon. This brings up a form in the dialog portion
of the screen that allows the user to choose a pagesize and print resolution.
The user can also specifiy their own title for the print page.
Screen shot illustrating the printer dialog:

After clicking the "Create Print Page" button, the software composes a page which includes the map image, an overview map and a legend. When this page has been created, it can be submitted to a printer via your browsers 'Print' button.
One of the most common problems that users have printing
is the Pop-up blocker killing off
the print page that is created. In Internet Explorer the blocker defaults
to "ON", as well as many other
software toolbar interfaces (google & yahoo).
In all cases of printing being subverted by pop-up-blockers I have seen, the
map view resets back to
the overall city view every time one tries to print. Adjusting your
settings to allow our server (currently
vistagrande.cabq.gov) to send pop-ups should take care of the problem.
Saving a Map Image to Your Computer
If you dont not want to actually print a hardcopy of your map image, rather would like to save the image as a jpg or png, you still need to follow the "Create Print Page" process but instead of submitting to a printer, simply 'right click' the map image and 'save as' to your computer. The image can then be opened in common graphic editors or word processing documents.