 Screen printing
with its ability to lay down a heavier ink deposit is a process where an
industrial woven fabric or "screen" is manually stretched to a predetermined
tension, and affixed to a wood or aluminum frame using a suitable adhesive or
mechanical means. The woven structure of the screen contains mesh openings which
allow the ink to pass onto the substrate
in the areas that are not blocked by the stencil material. Screen printing
with its ability to lay down a heavier ink deposit is a process where an
industrial woven fabric or "screen" is manually stretched to a predetermined
tension, and affixed to a wood or aluminum frame using a suitable adhesive or
mechanical means. The woven structure of the screen contains mesh openings which
allow the ink to pass onto the substrate
in the areas that are not blocked by the stencil material.
Employees then spread and push ink through the
screen using a sweeping motion with a squeegee.
Following the ink transfer, the screen pulls away from the substrate leaving behind the printed image.
The following identifies
potential hazards and possible solutions to reduce the ergonomic hazards within
the screen printing process:
Pre-press
|
|
In the modern printing business most pre-press work is
done via computer. Images are delivered, checked and edited. The hazards
associated with this type of activity are similar to those found in an office
environment.
Potential Hazards
Screen printers spend more time on development than other
printing crafts since much of their work may require intricate "artistic"
applications. Workstations that are not properly designed for computer work may
cause stressful postures or motions.
- Prolonged periods of awkward body postures (i.e., neck bending, torso
bending or twisting, raised shoulders) (Figure 1).
- Repetitive motions (i.e., frequent reaching to a mouse, clicking or
dragging) (Figure 1).
- Contact stress to the legs from chair front and to the arm from desk
surfaces.
- Glare or monitor washout from poor placement of monitor in
relation to windows and other bright light sources (Figure 2).
|

Figure 1. Poor workstation setup.
This person must reach up and away from his desk to operate the mouse.

Figure 2. Bright light source in field of view
creates difficulty in viewing monitor. |
|
Possible Solutions
- Establish a training program so that employees can learn how to set up and
periodically adjust their workstations (Figure 3).
- Ensure keyboard and mouse are at proper height and position.
- Provide appropriate computer-related components and furniture.
|
Figure 3. Proper workstation setup and posture. Rollover text in the image above to
highlight specific areas.
|
|
|
|
Large frames are
placed on work tables and a mesh material is attached to the frames. Mesh must be
pulled taut so there are no wrinkles or loose areas.
Stretching is
accomplished by holding the fabric in a mechanical or manual clamping system
which pulls the fabric
to the desired tension level. The fabric is then attached to the frame using a
suitable adhesive or mechanical fasteners. Screen tensioning can also be produced with self-tensioning
frames, where the fabric is clamped into the frame itself and elements in the
frame sides are expanded or rolled to create the stretching force needed.
Potential Hazards
- Depending on the process, technology or tools used to stretch mesh, the activity
may require awkward postures and exertion of excessive force.
- The large size of the screens or related equipment may
cause awkward postures
when reaching and bending to position the frame, position the mesh over the
frame and in clamps, cut the mesh, and remove the frame
from the table.
- Heavy manual lifting and lowering of larger screens on and off the table.
- Use of tools may require exertion of significant hand force
while hand, wrist and shoulder may be in awkward postures (Figure 4).
|

Figure 4. While using small wrench, the wrist is
turned down in awkward position and neck is bent forward. |
|
Possible Solutions
- Provide adjustable tables (Figure 5) so employees may adjust work height to
minimize torso bending. Generally, table height should be below elbow
height for tasks that require exertion of significant force and at about elbow
height for fine manipulative tasks.
- Consider corner cutouts or segmented tables. This allows the table size to
be contracted or expanded to accommodate the size of frame. Minimizing the size of
the table will reduce forward reaching and torso bending.
- Use 2-person teams to lift larger, heavier frames.
- Educate employees about proper body
mechanics. Back, neck, and wrists should be straight. Elbows in close to the body
while supporting a load.
|

Figure 5.
Table level at proper height for this employee to exert force on
clamps without stressful bending.
|
- Consider
job rotation to tasks with different ergonomic stressors.
Employees should rotate whenever possible
to a variety of tasks to avoid prolonged periods of repetitive motions
or maintaining the same postures. To facilitate rotation, efforts should be made
to cross-train employees in several operations such as ink mixing, reclaiming,
inventory control, and office work.
- Explore feasibility of using automated equipment or purchasing pre-stretched
screens.
|
|
|
|
Screens must be thoroughly degreased prior to applying a
stencil (emulsion). The screen is cleaned with a brush using water and
a degreaser. These steps prepare the surface so that the stencil adheres well.
Reclaiming the screen also requires use of a brush
and cleaner and involves removal of the tape, stencil material, stains, or
ghost images from the screen once the printing process is completed. Reclaimed
screens are then degreased in the same process as new screens and reused.
Potential Hazards
- Awkward postures including bending forward at the waist, wrist bending, and
extended reaching to apply degreaser, abrasive and tape to the screen (Figure
6), position frames in the spray booth or other surface to scrub mesh with a
brush (Figure
7).
- Forceful or prolonged gripping
to hold and activate power washer hose and trigger, and brushes when
cleaning and rinsing mesh.
- Repetitive or prolonged forceful exertions when
using brushes and spray guns, especially on high-volume jobs.
- Repetitive motions and finger force performed on high-volume jobs.
- Frequent manual lifting and handling of screens, related equipment or tools.
|

Figure 6. Awkward wrist and back position.
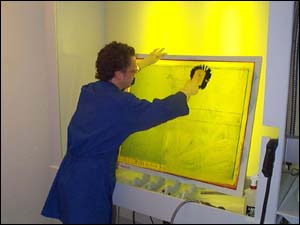
Figure 7.
Over-reaching. |
|
Possible Solutions
- Adjust workstation surface height and angle to minimize forward bending and
reaching (Figure 8). Suggested modifications include:
- Provide height and tilt adjustable workstations.
- If workstation is too short, add blocks under the table legs to raise
the work surface, so that employees do
not need to bend torso.
- Where a workstation must be shared between multiple employees
and there is insufficient
adjustability, adjust
height to accommodate the tallest user and provide shorter users with
platforms.
- Provide height-adjustable seating.
- Modify workstation to provide the option for employees to sit, stand or
lean.
- Encourage employees to work while standing up straight with the
elbows in close to the body.
- If employees must work in awkward body
posture for a prolonged period of time, allow frequent micro (one-minute) breaks
to change body posture.
- Position screens between hip and shoulder height to reduce bending and reaching. This may be accomplished by incorporating a ledge in the wall of the spray booth or installing a rack or an easel frame to hold the screens.
- Locate all tools and products within easy reach of the employees to prevent
bending forward and reaching to retrieve items (Figure 9).
- Use tools that minimize force and awkward postures. For
example, a long-handled brush for cleaning tasks would reduce forward reaches
(Figure 9).
- Use a brush with an appropriately
designed handle to reduce grip force. Generally, the handle should be well
rounded and constructed of a material which is non-porous, non-slip (rubber
or plastic coated) and have a diameter of about 1.5 inches. The handle should be
bent in an appropriate manner to minimize wrist deviation, either to the side or
up and down (Figure 9).
|

Figure 8. Workstation is at proper
height for employee; elbows are held close to body and employee is standing
straight.

Figure 9.
Tools are within easy reach.
Spray gun has large grip and trigger.

Figure 10. Use a pistol grip handle on hose to keep wrist straight. |
- Use pistol grip handle on hose to keep wrist straight (Figure 10).
- Consider placing power washer and
hose on a counter-balance to reduce the force required to hold and maneuver the
gun and hose when spraying.
- Consider
job rotations to tasks with different ergonomic stressors.
Employees should rotate whenever possible
to a variety of tasks to avoid prolonged periods of repetitive motions
or maintaining the same postures. To facilitate rotation, efforts should be made
to cross-train employees in several operations such as ink mixing, reclaiming,
inventory control, and office work.
- Transport heavier screens using a wheeled cart or mobile easel stand to reduce manual lifting and carrying.
|
|
|
|
After a screen is stretched over a wood or aluminum frame, it is coated with an
emulsion for further processing. Areas of the screen are blocked off with a
non-permeable material (i.e., a stencil) which is a negative of the image to be
printed and is exposed to UV light. The negative hardens and the softer image is
washed off leaving a stencil with the image as open spaces where the ink will be
pressed through to coat the substrate.
Potential Hazards
- Bending forward at the waist, wrist bending, and reaching to apply block out
products and tape (Figure 11 and 12).
- Repetitive use of forceful finger exertions with wrist bending for high volume jobs.
- Manually lifting heavy screens or related equipment.
|
 while exerting finger force.")
Figure 11.
Awkward position of the wrist as screen is coated with emulsion
(stencil) while exerting finger
force.

Figure 12. Application requires prolonged wrist bending. |
|
Possible Solutions
- Adjust workstation surface height and angle to minimize forward bending and
reaching (Figure 13). Suggested modifications include:
- Provide height and tilt adjustable workstations.
- If workstation is too short, add blocks under the table legs to raise
the work surface so that employees do not need to bend torso.
- Where a workstation must be shared between multiple employees
and there is insufficient
adjustability, adjust
height to accommodate the tallest user and provide shorter users with
platforms.
- Provide height-adjustable seating.
- Modify workstation to provide the option for employees to sit, stand or
lean.
- Encourage employees to work while standing up straight with the
elbows in close to the body.
- If employees must work in awkward body
posture for a prolonged period of time, allow frequent micro (one-minute) breaks
to change body posture.
|

Figure 13. Adjustable work surface to reduce reaching and bending. |
- Locate all tools and products within easy reach of the employee to prevent
bending forward and reaching to retrieve items.
- Investigate a modified for coating
trough handle that is padded, conforms to the shape of the hand,
minimizes wrist bending and widens the grip diameter. For example, see those
solutions created for squeegee handles.
- Consider use of a mounted tape dispenser.
- Consider
job rotation to tasks with different ergonomic stressors.
Employees should rotate whenever possible
to a variety of tasks to avoid prolonged periods of repetitive motions
or maintaining the same postures. To facilitate rotation, efforts should be made
to cross-train employees in several operations such as ink mixing, reclaiming,
inventory control, and office work.
|
|
|
|
Ink must be
properly prepared based on the specific printing job. This involves retrieving
correct containers from storage areas, mixing colors, adding thinners when
necessary, and attaining the correct amount of ink for the specific printing job.
Potential Hazards
- Awkward body postures including torso bending, reaching above shoulder level, or extended reaches to retrieve ink
containers stored on shelves.
- Significant force used to lift heavy ink containers and move drums.
- Repetitive pinch gripping of ink containers when filling inkwells (Figure
14).
|

Figure 14. Forceful pinch grip required to hold container and apply ink to an
off-set press. |
|
Possible Solutions
- Use an adjustable workbench for mixing ink
so that pouring and mixing are performed at or slightly below waist height to
promote neutral posture
(back straight with elbows in close to the body).
- Store most frequently used containers between shoulder and waist height to
minimize bending and reaching.
- Order supplies in smaller volumes such as gallon bottles rather than
5-gallon pails, to reduce heavy manual lifting (Figure 15).
- Use a pushcart to retrieve and transport multiple containers from storage
to the workbench.
- Use mechanical assistance such as a drum truck to move heavy drum barrels.
- Mix ink at the workbench instead of holding and mixing over the inkwell to
help reduce strain, especially when containers are heavy.
|

Figure 15. Containers of ink are in a
manageable size, stored at an appropriate height, and equipped with handles
for easy carrying.
|
|
Press
|
|
Commercial and industrial screen printing is done on
single and/or multicolor presses with varying degrees of automation.
Each color is applied separately from
its own screen as the substrate automatically moves to the next step in the
process. The employee only loads the substrate to be printed (textiles,
paper, etc.) on the print bed or print table, making sure that it is firmly secured in
place and unloads the finished product at the end of the process.
Potential Hazards
- Prolonged sitting or standing to feed or remove material from equipment and conveyors.
- Repetitive bending, reaching, and exertion of finger force to feed materials into the press (Figure 16).
- Repetitive bending and twisting to obtain
substrate from supply areas, and remove finished product from presses or
dryers for shipping.
- Manual lifting and carrying heavy or bulky substrate or
finished product from supply areas to packing areas.
|

Figure 16.
Automated screen printing operation.
Woman leaning forward to pull and
stretch a t-shirt for printing. |
|
Possible Solutions
- Alternate postures between sitting and standing to reduce fatigue.
- Use sit/stand stools for rest and better access.
- Provide employees with shoe insoles or anti-fatigue floor mats when standing for extended periods.
- Adjust the chair or machine feed
area so that employees may keep their arms close to their body and minimize
bending during the feeding process (Figure 17).
- Arrange substrate and materials within easy reach to reduce twisting. Where possible, place material at no more than a
45 degree angle from in front of worker. This material should be accessible
while keeping elbows in close to the torso.
|

Figure 17.
Loading paper for automated screen printing.
Waist height loading table. |
- Use carts to move material from storage to work area, then
to packing areas.
- Consider
job rotation to tasks with different ergonomic stressors.
Employees should rotate whenever possible
to a variety of tasks to avoid prolonged periods of repetitive motions
or maintaining the same postures. To facilitate rotation, efforts should be made
to cross-train employees in several operations such as ink mixing, reclaiming,
inventory control, and office work.
|
|
|
|
Ink is placed onto
a screen and is spread by a printer who manually pushes or pulls the hand-held
squeegee across the surface of the screen. The printer
will usually hold the squeegee at a 60-85 degree
angle from the screen surface in the direction of the pull and apply enough
force to push the ink through the screen to the substrate below.
Potential Hazards
- Awkward postures including torso bending, reaching,
and bending the wrists to apply the ink (Figure 18).
- Forceful pinching of the squeegee and pressure on
shoulder and the palm of the hand to apply downward force (Figure 18).
- Highly repetitive motions and
postures when performing high-volume jobs (Figure 18).
- Manual lifting of heavy screens or related equipment
to set up job.
|

Figure 18.
Awkward bending position and whole
body motion for manual printing.
|
|
Possible Solutions
- Adjust workstations surface height and angle to minimize unnecessary forward bending and
excessive reaching. Suggested modifications include:
- Provide height and tilt adjustable workstations.
- If workstation is too short
and adjustment is not possible, add blocks under the table legs to raise
the work surface so that employees do not need to bend torso.
- Where a workstation must be shared between multiple employees
and there is insufficient adjustability, adjust
height to accommodate the tallest user and provide shorter users with
platforms.
- Modify workstation to provide the option for employees to sit, stand or
lean.
- Encourage employees to work while standing up straight with the
elbows in close to the body.
- If employees must work in awkward body
posture for a prolonged period of time, allow frequent micro (one-minute) breaks
to change body posture.
|

Figure 19.
Bending forward so body weight can
assist the task. |
- Use a padded squeegee handle that conforms to the shape of the hand, and widens the grip diameter.
- Lean forward somewhat to allow body
weight to assist with exertion of downward force on squeegee (Figure 19).
- Partial or full automation of this process step may eliminate ergonomic concerns and promote a faster,
possibly more accurate application process.
- Consider
job rotation to tasks with different ergonomic stressors.
Employees should rotate whenever possible
to a variety of tasks to avoid prolonged periods of repetitive motions
or maintaining the same postures. To facilitate rotation, efforts should be made
to cross-train employees in several operations such as ink mixing, reclaiming,
inventory control, and office work.
|
|
Post Press
|
|
Garments or
textiles are generally folded after they have been printed and cured.
Potential Hazards
- Prolonged standing.
- Awkward and prolonged postures of the torso and neck
maintained for long periods of time when working at a low
work surface (Figure 20).
- Repetitive reaching when dealing with large garments.
- Elevated elbow postures when working on work surfaces that are too
tall.
|

Figure 20. Stationary height worktable
is somewhat low, causing
individual to bend the neck and reach slightly down. Concrete floors are
uncomfortable to stand on. |
|
Possible Solutions
- For smaller items try to alternate postures between sitting and standing to reduce fatigue from lack
of movement.
- Use an adjustable chair when sitting.
- Provide employees with shoe insoles or anti-fatigue floor mats (Figure 21) when standing for
prolonged periods of time.
- Consider
job rotation to tasks with different ergonomic stressors.
Employees should rotate whenever possible
to a variety of tasks to avoid prolonged periods of repetitive motions
or maintaining the same postures. To facilitate rotation, efforts should be made
to cross-train employees in several operations such as ink mixing, reclaiming,
inventory control, and office work.
|

Figure 21. Use of floor mats may relieve
back pressure.
|
- Consider an automatic folding machine.
- Provide an adjustable height and tilt workstation so that most work may be done
slightly below elbow height. Suggested modifications include:
- Provide height and tilt adjustable workstations.
- If workstation is too short
and adjustment is not possible, add blocks under the table legs to raise
the work surface so that employees do not need to bend torso.
- Where a workstation must be shared between multiple employees
and there is insufficient adjustability, adjust
height to accommodate tallest user and provide shorter users with
platforms.
|
|
Materials Handling
|
|
Printed textiles
must be packed into boxes or other packaging and palletized for
shipping.
Potential Hazards
- Repetitive reaching and twisting to
place items into boxes (Figure 23).
- Elevated arms when reaching up and over the
top of shipping boxes placed on packing tables (Figure 22).
- Deep torso bending or squatting to
place garments in shipping boxes placed on the floor (Figure 24).
- Forceful manual lifting and carrying of product and filled boxes for palletizing and
shipping.
|

Figure 22. Employee must reach up
and over sides of box to pack product. |

Figure 23. Awkward posture due to
incorrect
table height for packaging box. |

Figure 24. Employee has to squat to place
shirts in box. |
|
|
Possible Solutions
- Place product and/or boxes at about waist height to eliminate extended
reaching, torso and neck bending and to keep arms close to the
body (Figure 25).
- Place boxes adjacent to the work surface in order to slide product into
boxes and eliminate or reduce lifting of product or stooping to place product
into boxes (Figure 26). This may be accomplished by placing boxes on carts, stands or
tilt
tables.
- Place an object or wedged-shaped device under the far side of the box. This
tips the box towards the employee to improve the angle and access for loading.
- Use automated taping machine to reduce force exertion and improve body
posture when taping boxes (Figure 27).
- Provide a height and tilt adjustable packing stands so that packing height can be
adjusted and the opening can tilt towards the employee.
|

Figure 25. Use a packing stand to reduce wrist
and torso bending.

Figure 26. Use a conveyor system to move product to
the palletizing position.

Figure 27. The taping process can be automated using a taping machine.
|
|
|
|
Depending on customer specifications, printed product may need to be packed
and palletized before it is shipped to the customer.
Bundled product may be heavy and loading
height may vary from almost
ground level to above head height. After a load has been prepared on a pallet,
it is often wrapped with
plastic to maintain its stability during transit.
Potential Hazards
- Forward bending and reaching to grab bundles
or boxes from the conveyor or
accumulation tables.
- Repetitive reaching, twisting,
and bending to stack and position finished material on pallets (Figure 28).
- Forceful, repetitive gripping to retrieve printed materials from presses,
and load on pallets.
This is especially true when boxes without hand cutouts or handles are used.
- Bundles may be too heavy or bulky for an individual to lift safely.
- Torso bending and twisting as well as reaching out and away from the body to place items on pallets. The height of material on the
bottom of the pallet is typically only a few inches above the floor (Figure
29).
- Forceful gripping and pulling of plastic wrap rolls when wrapping pallets.
- Employees must bend at the waist to
manually wrap the bottom of the pallets while supporting
the plastic wrap dispenser.
- Manual wrapping of product on pallets causes
stress on the lower back, shoulders and arms (Figure 30).
- Physical stress associated with positioning large plastic wrap rolls into
automatic wrapping machines.
- Repetitive lifting of wooden pallets weigh between 40 and 70 pounds causes
stress to the lower back, shoulders and arms.
|

Figure 28. This employee is working at
an awkward angle and at different heights that cause him to bend and twist uncomfortably
even when loading at upper levels of pallet.

Figure 29. Pallet with material
close to the floor.

Figure 30. Manually wrapping a pallet can require
torso bending. |
|
Possible Solutions
- Optimize bundle size and weight for one-person lifting. Generally, a
single bundle should not weigh in excess of 40 pounds and should be shoulder width
(about 24 inches).
- Provide boxes with hand holds or
cutouts.
- Adjust the height of the conveyor or provide a platform for the employee
to stand on so that the bundles are slightly below waist height and close to the
employee's body.
This will provide optimal leverage for the employee to lift and stage bundles
without bending or reaching.
- Use a slide or roller conveyor so
employees can pull or slide product closer to the body before it is lifted.
- Minimize twisting of torso when loading between conveyor and pallet. Move
the feet to face the load instead of twisting.
- Design the workstation to minimize the amount of turning
and carrying necessary. Place
box or pallet close to conveyor.
- Provide anti-fatigue mats around machines to reduce the stress of standing
for prolonged periods of time (Figure 31).
- Consider
job rotation to tasks with different ergonomic stressors.
Employees should rotate whenever possible
to a variety of tasks to avoid prolonged periods of repetitive motions
or maintaining the same postures. To facilitate rotation, efforts should be made
to cross-train employees in several operations such as ink mixing, reclaiming,
inventory control, and office work.
- Use height-adjustable lift devices to keep the load close to waist level.
This enables the employee to position
the load close to the body by turning the pallet (Figure 32).
- Consider using take-away conveyors (roller or powered) (Figure 33) to move finished
materials to the next processing station or to an area where the employee
palletizes loads in a more ergonomic manner.
- Use forklift to position pallets off the floor and
at a matching height adjacent to the conveyor.
- Consider use of automatic pallet wrapper and automatic strapping machine
(Figure 34 and 35).
- If manual wrapping must be performed, use rolls that weigh as little as
possible to minimize the lifting hazard
and use a roll holder with a handle to
improve hand postures.
- Whenever possible, elevate the pallets used for receiving processed
materials to minimize bending. This may be achieved by placing pallets
on a platform that positions the load close to waist level. The loaded pallet
is then placed on several empty pallets (Figure 36) to raise the height of the raw
materials. This will minimize bending of the torso. Secure the pallets to
reduce the risk of falling materials.
- Use lighter, plastic pallets (Figure 37). Plastic pallets can weigh half of
what a
wood pallet weighs. The employees of both the company
and customer will benefit from the reduction in weight.
- Train employees on proper lifting techniques.
- Keep back straight.
- Keep elbows in and close to torso.
- Keep load close to and in front of body.
- Avoid twisting.
- Get firm grip, lift smoothly, and avoid jerking motions.
|

Figure 31. Anti-fatigue mat can be
placed around machines
to reduce the stress of standing
for prolonged periods of time.

Figure 32. Pallet lift that automatically
adjusts to the correct height
based on pallet weight.

Figure 33. Use a conveyor system to
minimize carrying packages.

Figure 34. This machine applies the tape to the box tops, which reduces the
likelihood of repetitive motion injuries to employees.

Figure 35. A semi-automatic pallet wrapper which can run independently of an
operator once it has been setup.

Figure 36. Elevating pallets reduces awkward postures when used for manual
wrapping. Ensure pallets are secured and stacks are not above shoulder
height.

Figure 37. Plastic pallets weigh between 20 and 30 pounds. |
|
|


