
If you are using
Navigator 4.x
or
Internet Explorer 4.x
or
Omni Web 4.x
, this site will not render
correctly!
Vis > GFDL Scientific Visualization Guide > Converting Analog and Digital (DV) Video
Converting Analog and
Digital (DV) Video at GFDL
See also How to Make a DVD at GFDL
1. Overview
Tools are available to transfer Super-VHS quality analog video to the popular
DV digital format and vice-versa. Super-VHS offers 400 lines of
resolution and VHS offers
~240 lines, whereas DV provides 480+ lines.
DV operates at a fixed data rate of 25 Mbps, so you can expect a
DV quality movie to consume 13 GB for every hour of footage.
Once a video is in DV though, you can export it as
a movie for the internet at a higher compression rate,
such as a Quicktime movie, or create a DVD for archiving and distribution.
2. Converting Analog (VHS) to Digital (DV)
-
Turn on the VCR and A/D Converter in room 104 at GFDL (see
Figures
below).
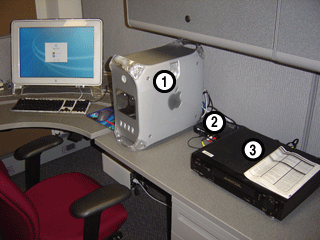

Figure 1 (1) Computer with Video Editing Software & DVD Writer, (2) A/D Converter and (3) VCR Figure 2 Detail of A/D Converter showing Super-VHS and Audio Input Connections

Figure 3 Rear power button on A/D Converter
- Log onto the computer as guest.
- Ensure that the A/D Converter is set to Digital Mode as indicated by a blue light (see
Figure 4 below).
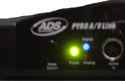
Figure 4 Digital Mode indicated by blue light on A/D Converter
-
Start the Video Editing Software (iMovie) from the Desktop toolbar.

Figure 5 Startup icon for iMovie on computer desktop
-
Create a new video project in iMovie.

Figure 6 New Project menu item
-
In iMovie, enable the video capture mode by clicking next to the little camera icon.
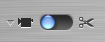
Figure 7 iMovie import mode
- Insert your VHS tape and position it by watching the preview window as the tape rewinds or fast-forwards.
-
When ready, press the Import button in iMovie and press Play on the VCR.

Figure 8 Video capture started in iMovie by Import button
- When recording is complete, your digital video may be edited, saved as a Quicktime movie, or exported to DVD or a DV camera.
3. Converting Digital (DV) to Analog (VHS)
-
In iMovie, open an existing project or create a new project and
import your digital video clips.

Figure 9 Import videos previously digitized or
open an existing project.
-
Switch iMovie to Edit mode.

Figure 10 Edit mode for exporting.
-
Drag your clips to the timeline at the bottom.

Figure 11 The timeline will be exported as shown.
-
Select from the menubar, File | Share.
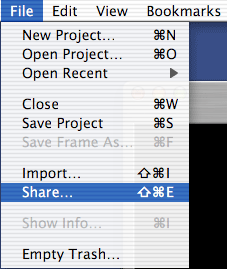
Figure 12 Export menu item.
-
Select Video-Camera from the options and nothing else.

Figure 13 Export mode for the A/D Converter.
- Ensure that the S-VHS and RCA audio cables are connected on the rear of the A/D Converter and VCR.
- Turn on the A/D Converter and VCR. See Figure 3 on how to do this.
-
Ensure that the VCR is set to the AUX Channel, as shown below.
If not use the +/- buttons.


Figure 14 Channel selectors on VCR (left) and display (right) - Press the Pause and Record buttons simultaneously on the VCR.
- Press the Share button on the computer (Figure 13).
- Press Play on the VCR.
- Press Stop on the VCR when recording should finish.
4. References