General Instructions for Submission
Allowable Actions
Basically, in a CIS request,
you can do one – and only one – of the following:
1.
Add a service
2.
Delete a service
3.
Add a site
4.
Delete a site
5.
Relocate a site
All allowable CIS actions
fall under one of the above. The table below
shows how CIS actions map to the five headings.
| Service |
Add |
·
Start paying for a required or additional
service
·
Start providing a missing required service
·
Propose an additional service |
| Delete |
·
Stop paying for a required or additional
service
·
Stop providing an existing additional
service |
| Site |
Add |
·
Add a service site where
o
It is a completely new site or
o
It is converted from an existing admin-only
site |
| Delete |
·
Terminate a service site where
o
Grantee shuts down the site or
o
Grantee converts the site to admin-only |
| Relocate |
·
Relocate one approved site to a new
location.
·
Relocate one existing site to more than
one new location.
·
Relocate more than one existing site
into only one new location |
Figure
4
: Allowable CIS Actions
Cover Page
On the CIS Cover Page, you
must choose the type of request you are submitting.
The choices map to the allowable actions in
3.1.1 above. The choice
you make determines the screens you will see
when you leave this one.
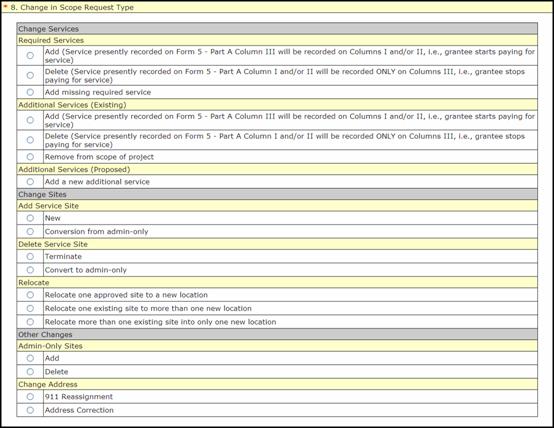
Figure
5
: Change in Scope Request Type (CIS Cover Page)
Click the Save and Continue
button when you are done working with the
CIS Cover Page.
Change Services
Based on the selection you
made on the cover page, you will be taken
to screens where you will be able to (1) request
changes to an existing required or additional
service, (2) request termination of an existing
additional service, or (3) propose a new additional
service.
The following tables are
intended to clarify what is deemed as “adding”
and “deleting” required and existing additional
services. In each table, the three columns
under “From” represent how the boxes in columns
1-3 of Form 5a might be checked originally.
The columns under “To” represent how the boxes
would be checked as a result of your CIS request.
The difference between the two determines
whether your CIS request is an “addition”
or a “deletion” of a service. (Basically,
any time you begin paying for a service is
an add; any time you stop paying for a service
is a delete.)
Updates
to Mode of Service Provision
Deemed Addition of Required
service:
Rows 5 thru 11 represent
missing required services
| ADD |
From |
|
To |
| 1 |
— |
— |
X |
|
— |
X |
— |
| 2 |
— |
— |
X |
|
X |
— |
— |
| 3 |
— |
— |
X |
|
X |
X |
— |
| 4 |
— |
— |
X |
|
X |
X |
X |
| 5 |
— |
— |
— |
|
— |
— |
X |
| 6 |
— |
— |
— |
|
— |
X |
— |
| 7 |
— |
— |
— |
|
X |
— |
— |
| 8 |
— |
— |
— |
|
X |
X |
— |
| 9 |
— |
— |
— |
|
— |
X |
X |
| 10 |
— |
— |
— |
|
X |
— |
X |
| 11 |
— |
— |
— |
|
X |
X |
X |
Deemed Addition of Existing
Additional Service:
| ADD |
From |
|
To |
| 12 |
— |
— |
X |
|
— |
X |
— |
| 13 |
— |
— |
X |
|
X |
— |
— |
| 14 |
— |
— |
X |
|
X |
X |
— |
| 15 |
— |
— |
X |
|
X |
X |
X |
Deemed Deletion of Required
Services and Deemed Deletion of Existing Additional
Services:
| DELETE |
From |
|
To |
| 16 |
X |
— |
— |
|
— |
— |
X |
| 17 |
— |
X |
— |
|
— |
— |
X |
| 18 |
X |
X |
— |
|
— |
— |
X |
| 19 |
X |
— |
X |
|
— |
— |
X |
| 20 |
— |
X |
X |
|
— |
— |
X |
| 21 |
X |
X |
X |
|
— |
— |
X |
Requesting Changes
to Existing Services
To request changes to existing
required or additional services, or to request
termination of existing additional services,
you must first choose the service. The Change
Details page appears when you leave the CIS
Cover Page. Click the Pick From List button
to choose a required or additional service.

Figure
6
: Choosing a Service
You may work with only one service per CIS request. If
you choose the wrong service, or decide
that you want to work with a different service,
you must first remove the service you originally
chose.
Different screens will appear
depending on whether you have chosen to work
with a required or an additional service.
In either case, the steps you take will be
more or less the same. Figure
7
shows the update page for a required service.
Check/uncheck the boxes as appropriate to
indicate changes to the way you provide the
service.
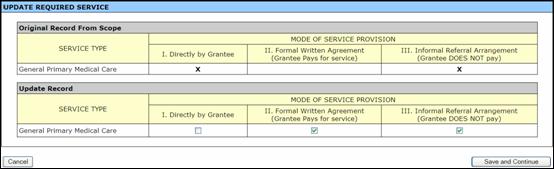
Figure
7
: Updating a Required Service
Click the Save and Continue
button when done.
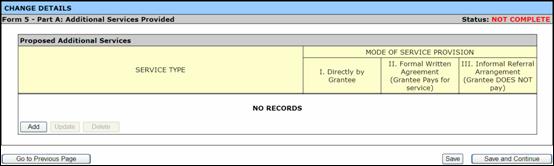
Proposing Additional
Services
The Change Details page appears
when you leave the CIS Cover Page after indicating
that you want to propose adding a new additional
service to your scope. Click the Add New Service
button.

Figure
8
: Adding a Service
Click the Add button to add
a service.
Figure
9
: Adding a Service (Continued)
Choose the service to add
from the list, and then check the boxes to
indicate the way you propose to provide the
service.
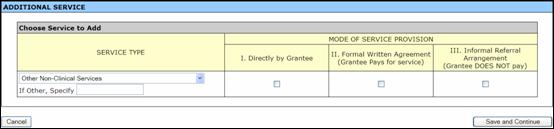
Figure
10
: Choosing a Service to Add
Click the Save and Continue
button when done.
Change Sites
Based on the selection you
made on the cover page, you will be taken
to screens where you will be able to (1) add,
(2) delete, or (3) relocate sites.
You may work with only one site per CIS request, unless
splitting or consolidating service sites.
If you choose the wrong site, or decide
that you want to work with a different one,
you must first remove the site you originally
chose.
Adding a Site
The following actions constitute
adding a site:
1.
Adding a new admin/service delivery or pure
service site;
2.
Converting an existing admin-only site into
an admin/service delivery or pure service
site.
Adding a new admin/service delivery or pure
service site
The Add Site page appears
when you leave the CIS Cover Page after indicating
you want to propose adding a site. Click the
Add New Site button.

Figure
11
: Choosing a Site
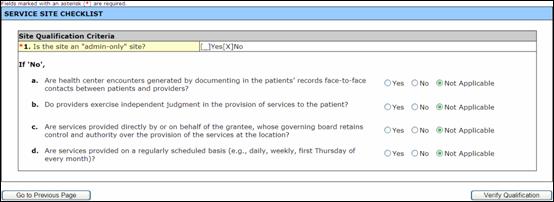
Complete the questionnaire
to verify that the site qualifies under the
new PIN. Click the Verify Qualification button.
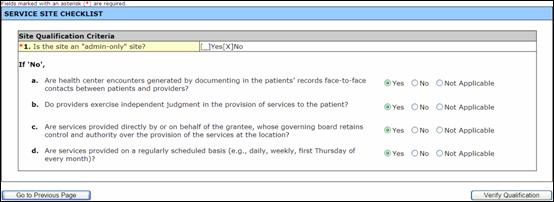
Figure
12
: Site Qualification Criteria Page
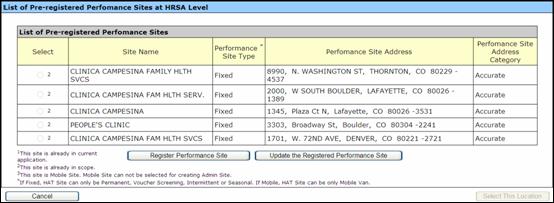
The site you wish to add
should already be registered with HRSA. Choose the site from the list. Click the Select
This Location button.
§
If the site does not appear in the list, click
the Register Performance Site button to register
it. When you return to this screen, select
the site and click the Select This Location
button.
§
If the site appears in the list and you want
to change its name, select it and click the
Update the Registered Performance Site button.
When you return to this screen, select the
site and click the Select This Location button.
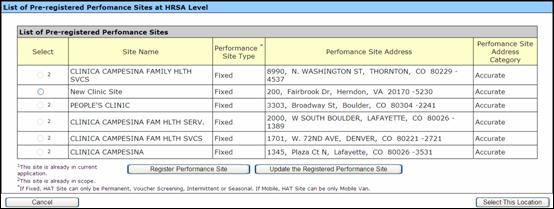
Figure
13
: Pre-Registered Performance Sites Page
Enter the information for
the site.

Figure
14
: Update Service Site Information Page
Click the Save and Continue
button when done.
Converting an existing admin-only site into
an admin/service delivery or pure service
site
To propose adding a site,
where that site is an existing admin-only
site that you are converting into an admin/service
delivery site or a pure service delivery site,
you must first choose the existing admin-only
site from the list of sites in your scope.
The Add Site page appears when you leave the
CIS Cover Page. Click the Pick From List button
to choose the site.

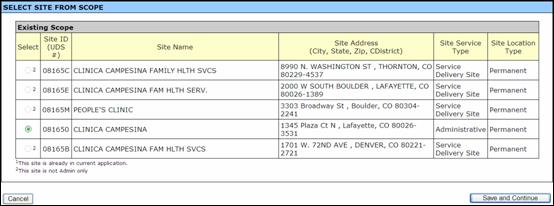
Figure
15
: Choosing a Site
Choose the site from the
list (only eligible sites are selectable,
and you can only choose one), and then click
the Save and continue button.

Figure
16
: Select Site Page
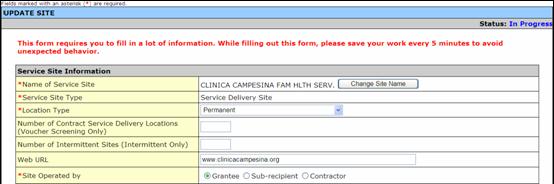
Click the Update Site link
to update the information for the site.
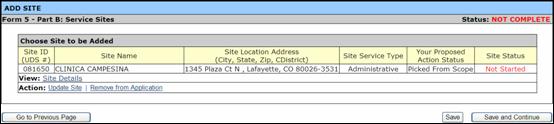
Figure
17
: Update Site Page
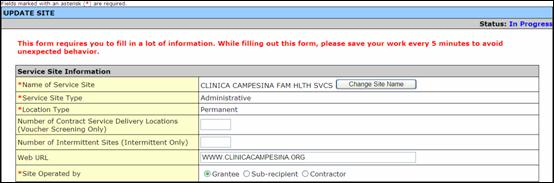
Enter the information for
the site.
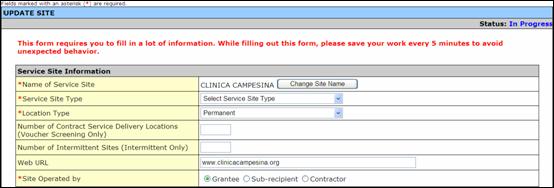
Figure
18
: Changing Service Site Type to Administrative/Service
Delivery
You will not be able to change the site’s physical address
Click the Save and Continue
button when done.
Delete a Site
The following actions constitute
deleting a site:
1.
Terminating (shutting down) an admin/service
delivery or pure service site;
2.
Moving the services portion out of an admin/service
delivery site, making it an admin-only site.
Terminating a Site
To terminate a site, you
must first choose the site. The Delete Site
page appears when you leave the CIS Cover
Page. Click the Pick From Existing Sites button
to choose the site.

Figure
19
: Choosing a Site to Terminate
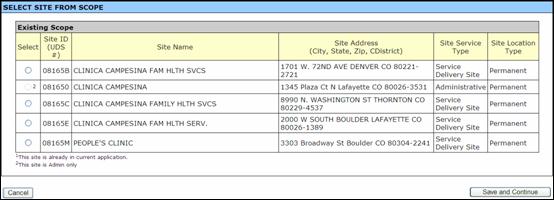
Choose a site from the list
(only eligible sites are selectable, and you
can only choose one), and then click the Save
and Continue button.
Figure
20
: Select Site Page
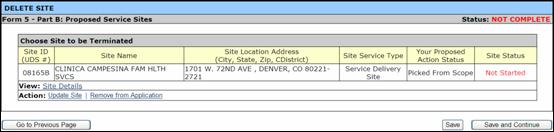
Click the Terminate Site
link and then confirm the action on the next
screen.

Figure
21
: Terminating a Site
Click the Save and Continue
button on the confirmation screen when you
are done.
To convert an admin/service
delivery or pure service site into an admin-only
site, you must first choose the site. The
Delete Site page appears when you leave the
CIS Cover Page. Click the Pick From Existing
Sites button to choose the site.
Figure
22
: Choosing a Site to Convert
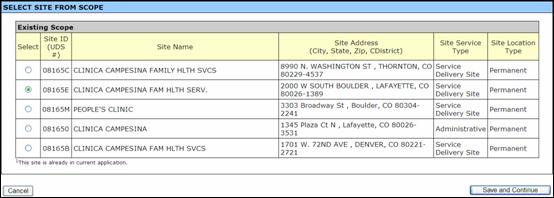
Choose a site from the list
(only eligible sites are selectable, and you
can only choose one), and then click the Save
and continue button.

Figure
23
: Select Site Page
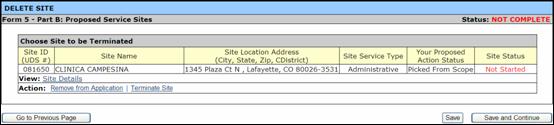
Click the Update Site link.
Figure
24
: Terminate Site
Review the site information.
Note that the service site type is changed
to Administrative.
Figure
25
: Changing Service Site Type to Administrative
Click the Save and Continue
button when done.
Relocating Sites
The following actions constitute
relocating sites:
1.
Moving a single existing site to a new location;
2.
Splitting a single existing site into multiple
ones;
3.
Consolidating multiple sites into a single
one.
A key concept to bear in
mind is that site relocation is a two-part
operation – terminating a site at its original
location and adding it at its new one. This
is true of all three scenarios above.
Moving a Single Site
to a New Location
To move a site, you must
first choose the site and terminate it. Then
you must add it at its new location.
The Relocate Site page appears
when you leave the CIS Cover Page. Under Site
to be Relocated (“From” Site), click the Pick
From Existing Sites button to choose the site.

Figure
26
: Choosing a Site to Move
Choose a site from the list
(only eligible sites are selectable, and you
can only choose one), and then click the Save
and continue button.
Figure
27
: Select Site Page
Click the Terminate Site
link. Confirm the action on the next screen.

Figure
28
: Change Site Details Page
The next step is to add the
site at its new location. There are two possible
scenarios:
1.
You are moving services to an existing admin-only
site, creating an admin-service delivery site.
If this is the case, click on the Pick From
Existing Sites button under Site to be Relocated
(“To” Site) to choose the admin-only site.
2.
You are moving services to a new site. In
this case, click on the Add New Site button
under Site to be Relocated (“To” Site) to
add the site.
Figure
29
: Update Service Site Information Page
Our example assumes that
you want to move to a new site. Complete the
questionnaire to verify that the site qualifies
under the new PIN. Click the Verify Qualification
button.
Figure
30
: Site Qualification Criteria Page
The site you wish to add
should already be registered with HRSA. Choose the site from the list. Click the Select
This Location button.
§
If the site does not appear in the list, click
the Register Performance Site button to register
it. When you return to this screen, select
the site and click the Select This Location
button.
§
If the site appears in the list and you want
to change its name, select it and click the
Update the Registered Performance Site button.
When you return to this screen, select the
site and click the Select This Location button.
Figure
31
: Pre-Registered Performance Sites Page
Enter the information for
the site.
Figure
32
: Update Service Site Information Page
Click the Save and Continue
button when done.
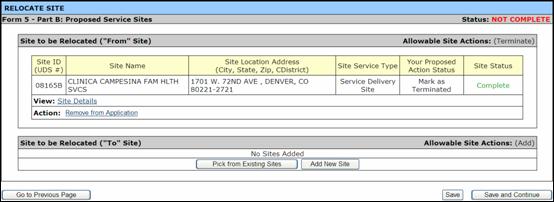
The Relocate Site page should
show that the “Terminate” and “Add” site actions
are complete. For any action that is not complete,
click the Update Site link for that site.
When all actions are complete, the section
status (top right-hand corner) will be complete.
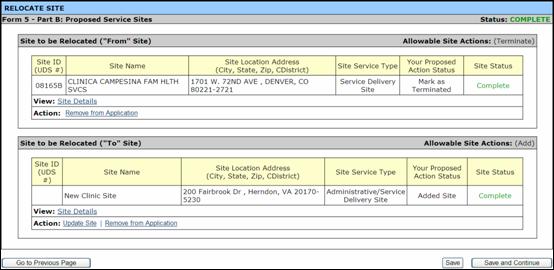
Figure
33
: Relocate Site Page
%
If you proposed adding a new site at a given address
but never actually opened it at that address
because of lease issues, you can use the
Relocate option to “move” the site to its
correct address.
When splitting a single existing
service site into multiple ones, the resulting
sites might be existing ones to which services
have been moved, new sites created as part
of the relocation, or a combination of the
two.
The process of splitting
a site is basically the same as that of relocating
one. First, choose the site and terminate
it. Then add it at its new location. The difference
is that you add more than one “To” site.
The Relocate Site page appears
when you leave the CIS Cover Page. First choose
the site being split (the “From” site), and
then choose or add the sites created as a
result of the split (the “To” sites). See
section 3.1.4.3.1 for details
of how to do this.
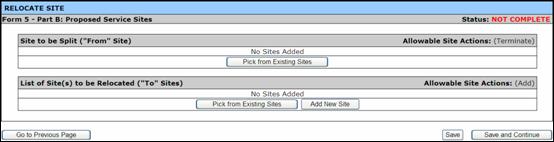
Figure
34
: Splitting a Service Site
Click the Save and Continue
button when done.
When consolidating multiple
existing service sites into a single one,
the resulting site may be either (a) an existing
non-service site that is being converted to
a service site as a result of this consolidation
or (b) a site that is being created as part
of the consolidation.
The process of consolidating
sites is basically the same as that of relocating
a single one. First, choose the sites to be
consolidated and terminate them. Then add
the new site.
The Relocate Site page appears
when you leave the CIS Cover Page. First choose
the sites to be consolidated (the “From” sites),
and then choose or add the single site into
which they will be consolidated (the “To”
site). See section 3.1.4.3.1
for details of how to do this.
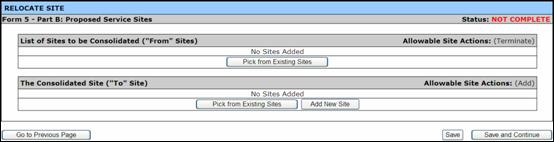
Figure
35
: Consolidating Service Sites
Click the Save and Continue
button when done.
Other Changes
It is possible to add or
delete an admin-only site. It is also possible
to change the address of a site, either because
of 911 reassignment or because it is necessary
to correct a site’s address.
The Add Site page appears
when you leave the CIS Cover Page after indicating
you want to propose adding an admin-only site.
Click the Add New Site button.
Figure
36
: Choosing a Site
The site you wish to add
should already be registered with HRSA. Choose the site from the list. Click the Select
This Location button.
§
If the site does not appear in the list, click
the Register Performance Site button to register
it. When you return to this screen, select
the site and click the Select This Location
button.
§
If the site appears in the list and you want
to change its name, select it and click the
Update the Registered Performance Site button.
When you return to this screen, select the
site and click the Select This Location button.
Figure
37
: Pre-Registered Performance Sites Page
Enter the information for
the site.
Figure
38
: Update Service Site Information Page
Click the Save and Continue
button when done.
To delete an admin-only site,
you must first choose the site. The Delete
Site page appears when you leave the CIS Cover
Page. Click the Pick From Existing Sites button
to choose the site.
Figure
39
: Choosing a Site to Terminate
Choose the site from the
list (only eligible sites are selectable,
and you can only choose one), and then click
the Save and Continue button.
Figure
40
: Select Site Page
Click the Terminate Site
link and then confirm the action on the next
screen.
Figure
41
: Terminating a Site
Click the Save and Continue
button on the confirmation screen when you
are done.
It is possible to change
the address of a site, either because of 911
reassignment or simply because it is necessary
to correct a site’s address. In either case,
the procedure is the same.
The Relocate Site page appears
when you leave the CIS Cover Page after indicating
that you want to change a site address. Click
the Pick From Existing Sites button to choose
the site.

Figure
42
: Choosing a Site for Address Correction
Choose the site from the
list (you can only choose one), and then click
the Save and continue button.
Figure
43
: Select Site Page
Click the Change Location
link to update the information for the site.

Figure
44
: Change Location Page
On the Update Site page,
click the Change Location button and update
the information.

Figure
45
: Change Location Button on Update Site Page
Assurances
After indicating the type
of CIS request and entering the details, you
must complete the assurances questionnaire
and the appropriate checklist.
Allowable Attachment
or Document Types
The following attachment
types are supported in HRSA EHBs:
.DOC - Microsoft
Word
.RTF - Rich Text Format
.TXT - Text
.WPD - Word Perfect Document
.PDF
- Adobe Portable Document Format
.XLS
- Microsoft Excel
While submitting the narratives
for the CIS request, use the templates where
provided. Where you are uploading supporting
documents, you must attach the documents in
one of the formats specified above.
CIS Request Templates
Some sections in the CIS
request have templates that must be downloaded,
completed and then uploaded to your CIS request.
The templates are in Microsoft Word format.
When they are downloaded, they will be pre-populated
with the grant and CIS request identification
information. Save the template to your computer and then enter
the required information.
Once you have completed the
template you must upload it to your CIS request
through HRSA
EHBs.
In some cases, you may have
to download the template multiple times or
copy the template before you make modification.
For example if your CIS request relates to
multiple sites, you can either download the
template multiple times or download it once
and make necessary copies.
When you save the template it must be in Microsoft Word
format. Please
ensure that the appropriate file type is
selected in the “Save as Type” dropdown
box when you save.
It is recommended that you save your CIS attachments
using a convenient and easy to remember
file naming convention and folder structure
on your computer.
 |

